jonomisfit
Club Retro Rides Member
Posts: 1,790
Club RR Member Number: 49
|
|
Oct 17, 2020 18:09:16 GMT
|
|
|
| |
|
|
|
|
jonomisfit
Club Retro Rides Member
Posts: 1,790
Club RR Member Number: 49
|
|
Oct 17, 2020 18:16:40 GMT
|
then that was everything from the top for the moment, so need to get back underneath. bumpers off  P1040332 P1040332 by jono_misfit, on Flickr  P1040333 P1040333 by jono_misfit, on Flickr spit going back in  P1040334 P1040334 by jono_misfit, on Flickr raising it up  P1040335 P1040335 by jono_misfit, on Flickr Turn over slightly to ease access to remove some suspension  P1040336 P1040336 by jono_misfit, on Flickr and upside down so I can get to the rear sump guard mount points.  P1040337 P1040337 by jono_misfit, on Flickr drilled out the end of the chassis rails,  P1040338 P1040338 by jono_misfit, on Flickr 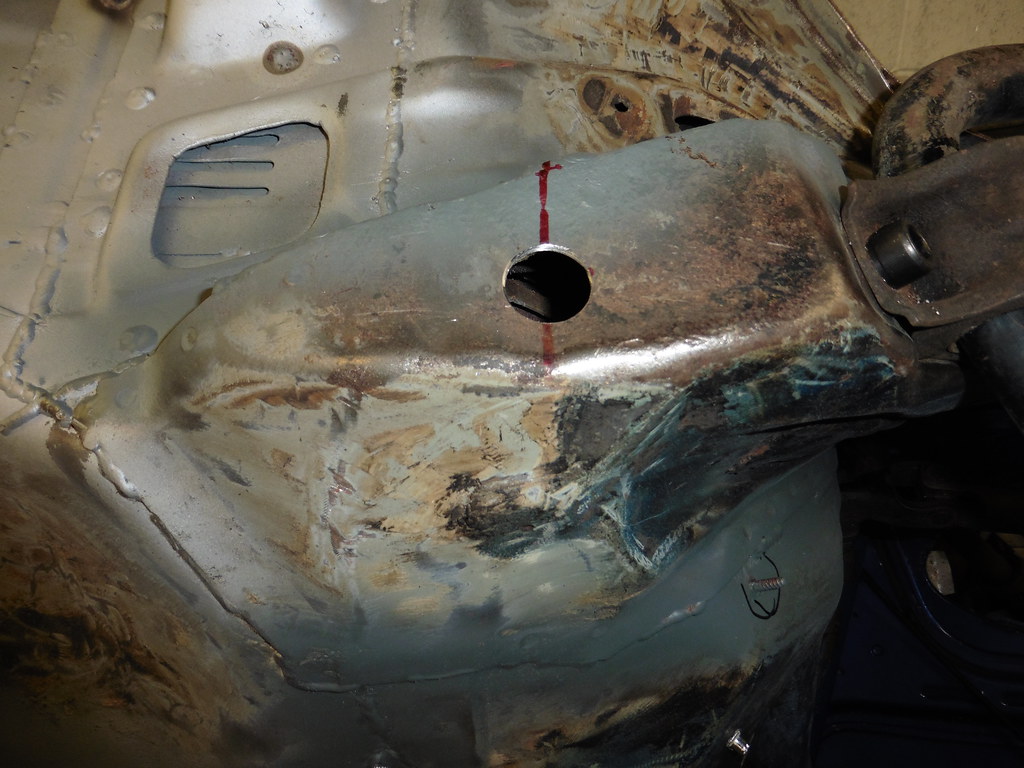 P1040339 P1040339 by jono_misfit, on Flickr cut out some steel and welded on some nuts  P1040340 P1040340 by jono_misfit, on Flickr go here like so  P1040341 P1040341 by jono_misfit, on Flickr  P1040342 P1040342 by jono_misfit, on Flickr should get them welded in next session, then some other tidying up to do. |
| |
|
|
jonomisfit
Club Retro Rides Member
Posts: 1,790
Club RR Member Number: 49
|
|
Oct 18, 2020 19:40:57 GMT
|
Before welding in I wanted to make sure the pads were lined up. Some angle bar to bolt through.  P1040343 P1040343 by jono_misfit, on Flickr start welding  P1040344 P1040344 by jono_misfit, on Flickr finish welding. Full seam at the front to prevent it scooping up any crud, stitched at the side and back to allow any water to flow out.  P1040345 P1040345 by jono_misfit, on Flickr and the other  P1040346 P1040346 by jono_misfit, on Flickr a quick flat back and zinc primed 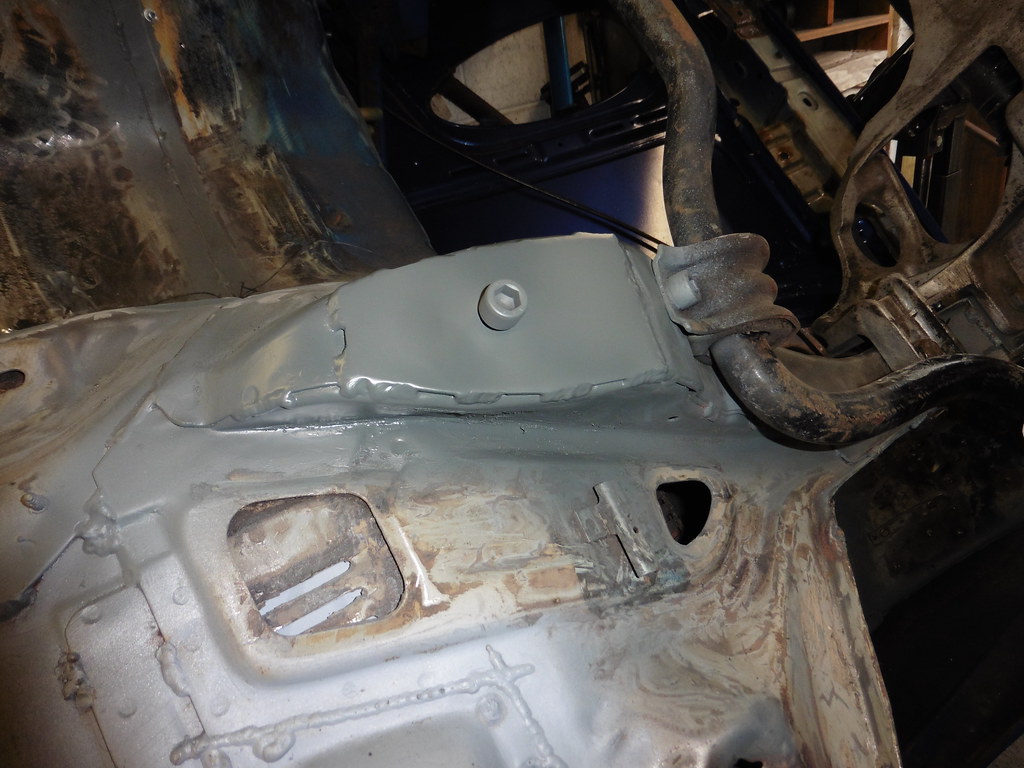 P1040347 P1040347 by jono_misfit, on Flickr  P1040348 P1040348 by jono_misfit, on Flickr then spent 10 mins with the twist knot wheel int he grinder to buff back the floor to see how well it lifted any rememnts of underseal and E-coat. I gave it a very light DA as well. This is only an experiment to see what prep I need to do.  P1040349 P1040349 by jono_misfit, on Flickr then gave anything that looked like it might even remotely have a touch of orange to it a dose of hycrate 80  P1040350 P1040350 by jono_misfit, on Flickr  P1040351 P1040351 by jono_misfit, on Flickr  P1040352 P1040352 by jono_misfit, on Flickr  P1040353 P1040353 by jono_misfit, on Flickr then hit a few bits with some primer  P1040354 P1040354 by jono_misfit, on Flickr which looks good. until you look into it closer  P1040355 P1040355 by jono_misfit, on Flickr  P1040356 P1040356 by jono_misfit, on Flickr what looked like nicely feathered out E-coat wasnt. The floor is a mess anyway so it'll never be perfect. But i'd like it better than that. So i'll need to try flatting back with a finer pad in the DA. I can see my weekends having a fair amount of tedious underside paint prep for a while. I'm not intending to undercoat the car, at least not at this stage. There are other floor based mods to do once the car is on the road and I don't want to be stripping undearseal back off again. |
| |
Last Edit: Oct 18, 2020 19:44:12 GMT by jonomisfit
|
|
jonomisfit
Club Retro Rides Member
Posts: 1,790
Club RR Member Number: 49
|
|
Oct 24, 2020 17:59:58 GMT
|
flipped the car over and started cleaning back the other side of the floor, then started with some Hydrate 80  P1040357 P1040357 by jono_misfit, on Flickr  P1040358 P1040358 by jono_misfit, on Flickr  P1040359 P1040359 by jono_misfit, on Flickr  P1040360 P1040360 by jono_misfit, on Flickr and then once cured  P1040361 P1040361 by jono_misfit, on Flickr stripped out the front suspension and sump guard mount  P1040362 P1040362 by jono_misfit, on Flickr flipped it back upright and started the inside strip down  P1040363 P1040363 by jono_misfit, on Flickr one empty shell  P1040364 P1040364 by jono_misfit, on Flickr 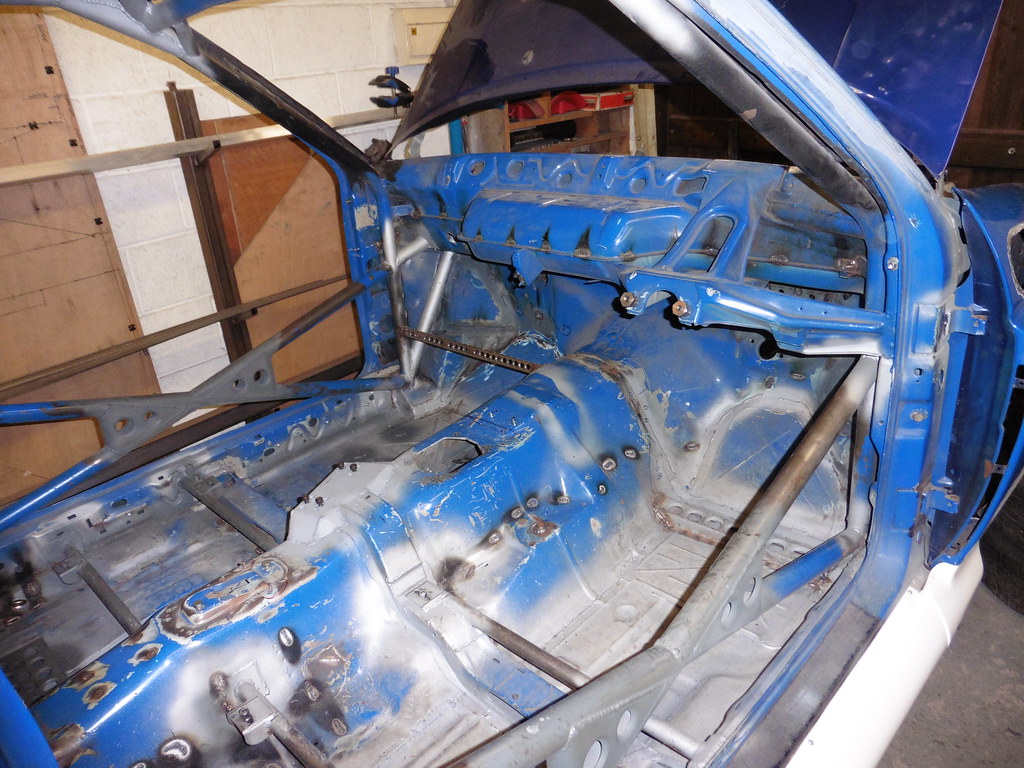 P1040365 P1040365 by jono_misfit, on Flickr engine bay emptied  P1040366 P1040366 by jono_misfit, on Flickr then started making cut outs for the sill stands. The rear is good and the tube is about 5-10mm behind the skirt.  P1040367 P1040367 by jono_misfit, on Flickr  P1040370 P1040370 by jono_misfit, on Flickr the front mount is about 45mm behind the skirt. This is due tot he skirt design rather than the stick out I've set for the tubes.  P1040368 P1040368 by jono_misfit, on Flickr  P1040369 P1040369 by jono_misfit, on Flickr Whilst i'm sure they will work like this, i'd prefer the mount to be mainly in shear on the pin rather than bending. weld on an extension. Which as expected tightened up where i added the rib, so had to use the die grinder to give some clearance again.  P1040371 P1040371 by jono_misfit, on Flickr site like so  P1040372 P1040372 by jono_misfit, on Flickr the holes will have a small flap over them to prevent them filling with crud and the other side  P1040373 P1040373 by jono_misfit, on Flickr  P1040376 P1040376 by jono_misfit, on Flickr then started with the clean back on the drivers inner arch  P1040374 P1040374 by jono_misfit, on Flickr  P1040377 P1040377 by jono_misfit, on Flickr and the rear turret  P1040375 P1040375 by jono_misfit, on Flickr I really dislike the black tar stuff that was sprayed on to hide the rust. Its hard work gettig it off and it gums up everything when getting it off. Bits like this are particularly difficult to get cleaned up  P1040378 P1040378 by jono_misfit, on Flickr I've got an array of grinder and drill mounted rottary wire brushes but need some smaller ones as some of the bits are tricky to get into. Further updates are likely to be a bit sparse as it'll mainly be me cleaning back paint / underseal so I can epoxy prime the underside / engine bay / inner wheel arches. One thing I discovered is one of the diff mount plates has slipped from its cage and is no longer captive. This means its floating in the channel betwen the strut towers. I think i'll cut an access hatch into the channel from the inside, then make a cover plate for it. this way I can get into fix them, and if there are issues again they will be accessible by removing the plate. |
| |
Last Edit: Oct 24, 2020 18:04:16 GMT by jonomisfit
|
|
|
|
|
Oct 24, 2020 18:15:13 GMT
|
|
I find the tarry stuff is really difficult because it tends to melt and you just end up moving it around, I tend to soak it in celly thinners, scrape and wipe until it's gone.
|
| |
|
|
jonomisfit
Club Retro Rides Member
Posts: 1,790
Club RR Member Number: 49
|
|
Oct 24, 2020 18:25:23 GMT
|
|
Thanks. I hadn't thought of celly thinners.
I've got some kicking about so will give it a go.
|
| |
|
|
e30ben
Part of things
 
Posts: 71
|
|
Oct 24, 2020 19:02:27 GMT
|
|
Old petrol works well on removing bitumin type under seal If you have any knocking about....
|
| |
|
|
jonomisfit
Club Retro Rides Member
Posts: 1,790
Club RR Member Number: 49
|
|
Oct 31, 2020 19:38:40 GMT
|
I continued on cleaning out the turret, turn out there was a fair amount of rubbish in it still  P1040380 P1040380 by jono_misfit, on Flickr I went round any of the metal that looked like it would have has some rust.  P1040381 P1040381 by jono_misfit, on Flickr then did the same on the passenger side turret  P1040382 P1040382 by jono_misfit, on Flickr cleaned back and did the same to some other parts  P1040383 P1040383 by jono_misfit, on Flickr then thought i'd best tackle the missing nut plate  P1040384 P1040384 by jono_misfit, on Flickr opened  P1040385 P1040385 by jono_misfit, on Flickr It looks manky, but is just cavity wax and metal is all clean. Where the plate is missing from  P1040386 P1040386 by jono_misfit, on Flickr missing plate located and back in position  P1040387 P1040387 by jono_misfit, on Flickr a quick clean back, a de-wax / grease and prime  P1040388 P1040388 by jono_misfit, on Flickr |
| |
|
|
jonomisfit
Club Retro Rides Member
Posts: 1,790
Club RR Member Number: 49
|
|
Oct 31, 2020 19:47:47 GMT
|
I could just weld the plate back in and be done, however what happens once can happen again, and that top skin isnt doing much due to the strengthener plate under it, so make a removable cover. Cut some ali  P1040389 P1040389 by jono_misfit, on Flickr markout and start trimming  P1040391 P1040391 by jono_misfit, on Flickr drill some holes and mark some more  P1040392 P1040392 by jono_misfit, on Flickr a run round with the bead roller  P1040393 P1040393 by jono_misfit, on Flickr and fold up the returns  P1040394 P1040394 by jono_misfit, on Flickr add rivnuts to the chassis and bolts in like so  P1040395 P1040395 by jono_misfit, on Flickr  P1040396 P1040396 by jono_misfit, on Flickr added some earth points  P1040397 P1040397 by jono_misfit, on Flickr  P1040398 P1040398 by jono_misfit, on Flickr cleaned back and re-tapped other earth points (formerly known as rear seat mounts...) then started looking at the screen bar.  P1040399 P1040399 by jono_misfit, on Flickr needs .... something.... some steel  P1040400 P1040400 by jono_misfit, on Flickr trimmed and bent  P1040401 P1040401 by jono_misfit, on Flickr hmmmm.. too dull. needs.... something Marked up  P1040402 P1040402 by jono_misfit, on Flickr swaged holes, aaaaaah feels much better. I've missed you my swagey tools  P1040403 P1040403 by jono_misfit, on Flickr goes in like so  P1040404 P1040404 by jono_misfit, on Flickr  P1040405 P1040405 by jono_misfit, on Flickr welded in  P1040406 P1040406 by jono_misfit, on Flickr  P1040407 P1040407 by jono_misfit, on Flickr on the drivers side there is a tab conecting the cage to the shell at the top of the roof. on the passengers side there isnt. Sorted  P1040408 P1040408 by jono_misfit, on Flickr I welded up a few bits here and there whilst I was at it, and where gaps were close cage to shell I put a few extra stitches in. |
| |
|
|
jonomisfit
Club Retro Rides Member
Posts: 1,790
Club RR Member Number: 49
|
|
Oct 31, 2020 19:55:13 GMT
|
Welded up some more odds and sods / holes  P1040411 P1040411 by jono_misfit, on Flickr I then started cleaning back some of the engine bay. It been painted with a tough but very textured paint. I really don't like it, and its clearly done to try and hide some of the panel waves, but i'd rather it was flat paint and honest. I used what looks like a stiff scotchbrite pad in the grinder. It wizzes the paint off and doesnt tought the metal.  P1040409 P1040409 by jono_misfit, on Flickr  P1040410 P1040410 by jono_misfit, on Flickr They don't last very long and make a massive amount of dust. painted any areas the looked like they could harbour rust with killer / encapsulator  P1040413 P1040413 by jono_misfit, on Flickr Which when I took my mask off and looked around the workshop, it was getting in a very dusty state. This is only going to get worse when into full paint prep mode. Started moving round, tidying up, and sweeping up (with mask on)  P1040412 P1040412 by jono_misfit, on Flickr You can see the dust levels from the pic. I opened the door after this. shuffled things round more and continues hoovering up  P1040414 P1040414 by jono_misfit, on Flickr then started on a dexter kill room to hold the dust / paint spray in a contained area.  P1040415 P1040415 by jono_misfit, on Flickr It was the end of the day and I'd not enought roll to do more drops, so have come in and ordered some. |
| |
|
|
|
|
|
|
|
|
Brilliant wright ups, You are well motivated.
Keep at it
|
| |
|
|
jonomisfit
Club Retro Rides Member
Posts: 1,790
Club RR Member Number: 49
|
|
|
|
the kill room continues  P1040416 P1040416 by jono_misfit, on Flickr I bought a portable extractor.  P1040417 P1040417 by jono_misfit, on Flickr which goes at the door  P1040418 P1040418 by jono_misfit, on Flickr and feeds a tube bag that goes here  P1040419 P1040419 by jono_misfit, on Flickr and comes out here  P1040420 P1040420 by jono_misfit, on Flickr this provides a feed of downdraft air and on a temporary basis (until i pluck up the nerve to cut a 300mm diam hole in the side of the garage) goes the main extractor  P1040421 P1040421 by jono_misfit, on Flickr screw onto the frame and wire up to check it out  P1040422 P1040422 by jono_misfit, on Flickr infill the rest with plastic sheeting  P1040423 P1040423 by jono_misfit, on Flickr and knock up a filter. Made of paint shop extractor filer roll, inside chicken wire, which is then folded over the lips of the fan to give a seal. Very shonky but works  P1040424 P1040424 by jono_misfit, on Flickr having been playing with the extractors on and off over the day, what a difference they make! environment is much nicer to work in, and no matter what I did (including blowing down all the surfaces including the roof in the kill room to get the dust off) the extractors kept the air fresh. then i started masking up to spray the underside of the escort.  P1040425 P1040425 by jono_misfit, on Flickr masked off all the through holes on the inside.  P1040426 P1040426 by jono_misfit, on Flickr  P1040427 P1040427 by jono_misfit, on Flickr Next weekend should hopefully see me on to exoxy priming the underside. |
| |
|
|
|
|
|
|
|
|
Have you considered stone chipping the underside? I've just done the bottom of my MK2 jag (see my Econojag thread) and then painted it in body colour and it looks great.
I used gravitex and it has a reasonable build to it so hides quite a bit.
|
| |
|
|
jonomisfit
Club Retro Rides Member
Posts: 1,790
Club RR Member Number: 49
|
|
|
|
|
Thanks.
I'll keep it in mind
|
| |
|
|
|
|
jonomisfit
Club Retro Rides Member
Posts: 1,790
Club RR Member Number: 49
|
|
|
|
|
I was suffering withdrawal and had a relapse
|
| |
|
|
jonomisfit
Club Retro Rides Member
Posts: 1,790
Club RR Member Number: 49
|
|
Nov 13, 2020 21:25:10 GMT
|
I did some more cleaning back and rust treatment anwhere there could be orange.  P1040429 P1040429 by jono_misfit, on Flickr I've been on a quest to get rid of the effing textured paint.  P1040430 P1040430 by jono_misfit, on Flickr and still have some way to go. some masking off was done so I can at least get coats of epoxy on the underside to protect it.  P1040428 P1040428 by jono_misfit, on Flickr I spent a while cleaning up to make some space on the bench. then started getting out supplies  P1040431 P1040431 by jono_misfit, on Flickr I've then realised I was missing a couple of connections for spray guns!  P1040432 P1040432 by jono_misfit, on Flickr But it turns out Screwfix had 1 of all the bits I need in stock. Which i was quite suprised about. I'll pick them up first thing, then it'll be a light sand under the car, and full clean down, and a spray with some epoxy. |
| |
|
|
v8
Part of things
 
Posts: 312
|
|
Nov 13, 2020 21:32:43 GMT
|
|
I feel your pain doing the underside!
Are the inner wings modified from standard EsCos? Those swaged lines caught my eye...
|
| |
|
|
jonomisfit
Club Retro Rides Member
Posts: 1,790
Club RR Member Number: 49
|
|
Nov 13, 2020 22:21:42 GMT
|
|
The spit makes it a lot less painful than it could have been. Still it is a fair pain in the backside to try and clean up.
Yes they are. They've been double skinned at some point, and the beading is on the additional skin.
|
| |
|
|
jonomisfit
Club Retro Rides Member
Posts: 1,790
Club RR Member Number: 49
|
|
Nov 14, 2020 17:23:23 GMT
|
Started the day with getting the odds and sods I needed. Screwfix didnt quite have the bits I wanted, so I've had to reverse some of the connections. I'll sort that when I get some of the right fittings.  P1040433 P1040433 by jono_misfit, on Flickr  P1040434 P1040434 by jono_misfit, on Flickr I spent the morning flatting down and then panel wiped all the underside and inner wings  P1040435 P1040435 by jono_misfit, on Flickr then this afternoon was onto paint. Epoxy is 2 part Paint and catalyst so has a limited pot life. I got everything ready, misxed in the right quantitites and then was good to go. I filled the pot on the paint gun and got prepped to go paint. I then spotted a pool of paint, hmm I must have spilled something... no...  P1040442 P1040442 by jono_misfit, on Flickr Disaster, the pot had suddenly split. It was fine before I put the paint in as i'd checked everything, So had to swap to the backup gun, which is only a touch up gun (and it also didnt have the right size of tip). backup gun, which looks ok  P1040448 P1040448 by jono_misfit, on Flickr except 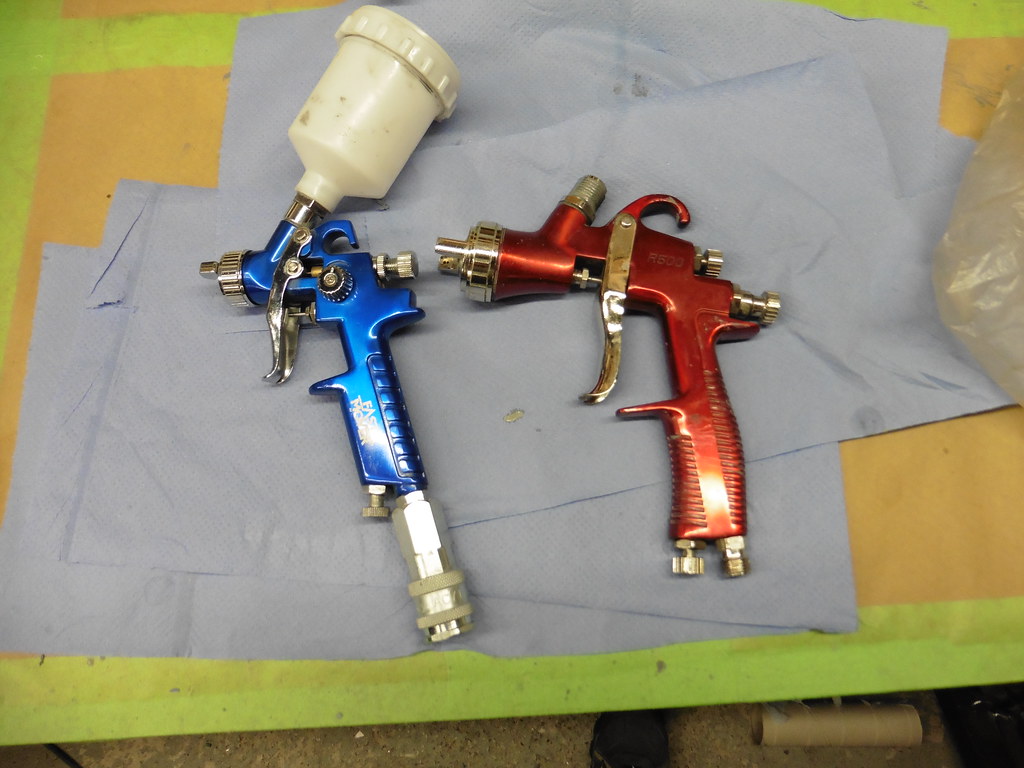 P1040449 P1040449 by jono_misfit, on Flickr hmm thats a bit smaller, thats a LOT smaller.  P1040450 P1040450 by jono_misfit, on Flickr Big pot takes ~ 600ml small pot take ~120ml I had the choice of stop and waste the paint I'd mixed or just crack on with the little gun. I did the later, it took ages, and took lots and lots of fills of the little pot. It really slowed the process down as the pot is so small, and the spray spot is also a lot smaller. Anyway, i did it. First coat litterally after the last spray 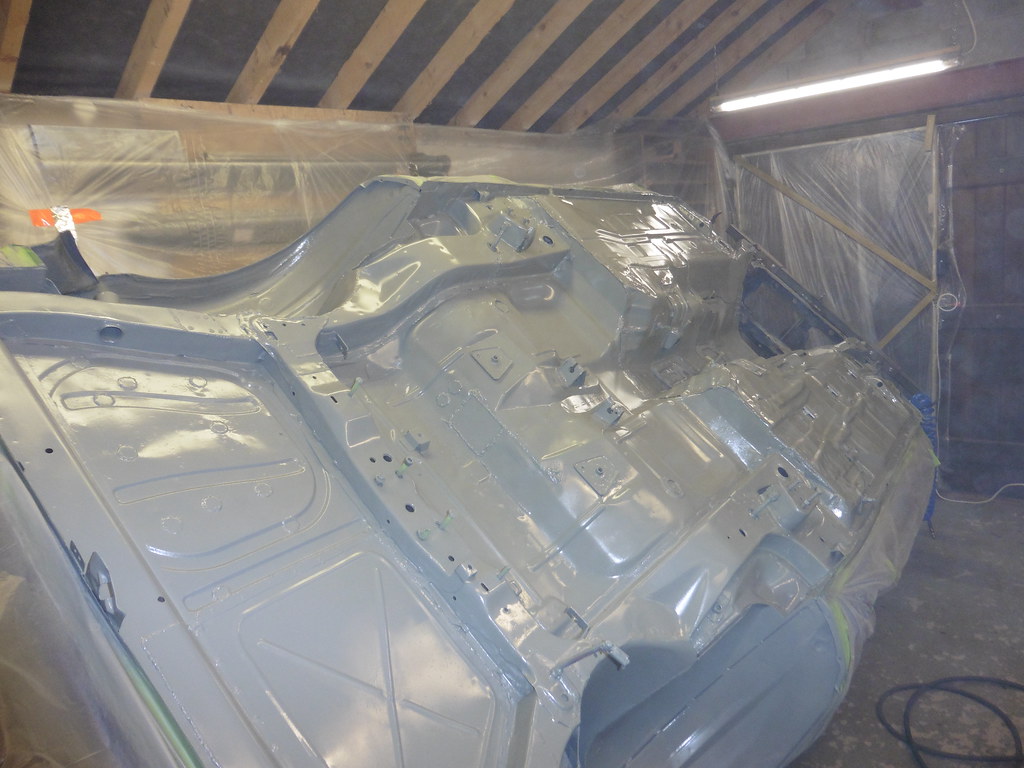 P1040436 P1040436 by jono_misfit, on Flickr  P1040437 P1040437 by jono_misfit, on Flickr  P1040438 P1040438 by jono_misfit, on Flickr  P1040439 P1040439 by jono_misfit, on Flickr  P1040440 P1040440 by jono_misfit, on Flickr  P1040441 P1040441 by jono_misfit, on Flickr gave it 15 mins, then started on the second coat (the epoxy is sprayed wet on wet)  P1040443 P1040443 by jono_misfit, on Flickr  P1040444 P1040444 by jono_misfit, on Flickr  P1040445 P1040445 by jono_misfit, on Flickr  P1040446 P1040446 by jono_misfit, on Flickr  P1040447 P1040447 by jono_misfit, on Flickr Its nice to see the underside in a single colour again. Epoxy sprays great. It doesnt sag like celly does, seems really forgiving, starts setting quite quickly irrespective of the temperature. What you cant see from the pictures is the paint really shows up just how battered the floor is in places. Still, its a rally car so thats pretty irrelivant. It also showed up where my prep has been less than stellar. Still, its the underside. The extraction system worked well. Outside the "spray booth" remained free of paint spray / dust, and in the booth way much better than previously for visibility / spray levels. You could visibly see the spray migrating down the both. My filter did its job. I can now remove this, put in the bin and replace with a new piece ready for the next use.  P1040451 P1040451 by jono_misfit, on Flickr Outside there was a second filter / old bed sheet to catch anything that got through which had nothing on it. I need to get a new spray pot for the gun before painting the engine bay, but I also need to finish prepping the engine bay first as well. |
| |
|
|
 P1040326 by jono_misfit, on Flickr
 P1040327 by jono_misfit, on Flickr
 P1040328 by jono_misfit, on Flickr
 P1040329 by jono_misfit, on Flickr
 P1040330 by jono_misfit, on Flickr
 P1040331 by jono_misfit, on Flickr
 P1040326 by jono_misfit, on Flickr
 P1040327 by jono_misfit, on Flickr
 P1040328 by jono_misfit, on Flickr
 P1040329 by jono_misfit, on Flickr
 P1040330 by jono_misfit, on Flickr
 P1040331 by jono_misfit, on Flickr


