|
|
|
May 26, 2024 21:31:47 GMT
|
Time to do a trial fit of the door gubbins then. I decided to start with the passenger door as this was the one that was on the workmate. the first issue I encountered was with the plate that holds the winder mechanism and the interior door handle. For those of you that haven't been with me since day one, I should explain that each of these steel plates had rotted excessively at the bottom. I had cut the rotten bits off and replaced them with new steel. Unfortunately I'd used one side as a template for the other. I know that the driver's side fits. However, the passenger side was WAY out. So much so, that I flattened it out, and cut a strip off the bottom, before re-bending it to fit correctly. Once I knew that it fitted properly, I drilled holes in the bottom flange to match where the holes on the door shells are. Originally these were riveted on. I shall probably re-rivet them as I am not keen on using screws, but for the sake of this mock-up, I did chuck some screws in. Next on the list was the window winder mechanism. I ended up wasting a significant amount of time with this. Why? Bolts. The Ford Fiesta winder bolts to the Midas-specific plates with short M6 bolts. I have saved these somewhere. That somewhere, like many archaeological missions, has been lost to time, and 2 garages, as well as a house move. They're doubtless stored safely in a small box or bag in a safe place. Which is nowhere I can remember. I also don't have many M6 bolts. I have found about 5, just one of which was the right length, so I spent some time shortening 3 of them in order to bolt everything together properly. By the time I had done this, it was pretty straightforward to line everything up and attach the cradle which holds the glass. This included the interior door release handle, which clips in the slot on the door plate. I say it clips in - it's a struggle to get it in there... 2 final things that I did. Firstly I draped the door card over the top, which looked good. I will have to find some spacers for the winder handle (or maybe make some?) but everything seems to go together nicely. I also had a look at the door frame. It was painfully obvious to me from this point that the frame MUST go in first - with the glass installed - everything else will then fit around it. It's a bit of a pain, and likely to need those 12 hands I mentioned previously, but it has to be done a specific way. At least this was a trial run - I would have been super-annoyed drilling out 20 -odd rivets! Additionally, I only had one of the surrounds for the door release handle, and that was broken. Luckily, it had a part number on the back of it. Turns out it's Mk2 Escort. I had a look on Ebay - yup, Ford tax. So I've ordered a couple as I can't get them anywhere else. Ah well... Door plate finally in place after some surgery. It has since been repainted.  I chopped this bit off the bottom then re-bent everything to make it fit properly.  Winder mechanism in place.  Much modified bolts in place - these caused me issues thanks to my poor memory. New ones are on order.  Door release handle finally in place. This is a proper backside to fit.  Cradle to hold the glass.  Door card draped in place. Liking the look of this.  Door frame - needs to go in first. Hmmm. Still, at least this is only a mock-up.  And finally, the broken surround for the release handle (no clips). This is an old Ford part, so it's expensive to replace. It's also Mk2 Escort. So it's now more money. I dislike Ford tax.  |
| |
|
|
|
|
|
|
|
May 31, 2024 13:12:09 GMT
|
Don't you just love it when you order something and the wrong item turns up in its place? Apparently, this is a pair of Mk2 Ford Escort interior door handle surrounds. Nope. I'm pretty sure it isn't... 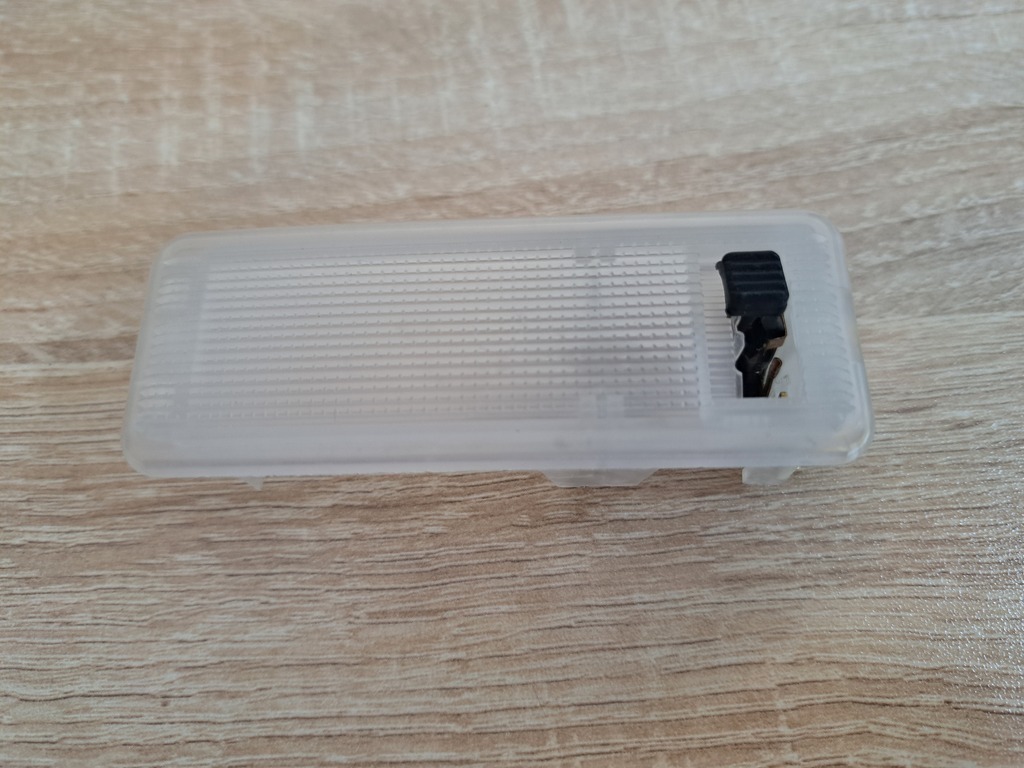 I've contacted the seller and they were very apologetic and confirmed they're re-sending the correct items. Still irritating though. |
| |
|
|
|
|
|
|
|
The garage was in an absolute state, so I have spent some considerable time cleaning it up. Once clean, I then proceeded to make some more mess. I have no spacers for the window winders. Being Mk1 Fiesta items, there will be Ford tax. I had a look around the garage to see if there was anything I could use. I have cut two rings from a pipe I had lying around (a bit of RC40, possibly), which I may modify. It's also possible I may just use them as a template to make a fibreglass buck. I am undecided at present, but as always, I'll figure something out. The replacement bolts for the winder mechanism turned up - some lovely short stainless M6 Bolts. They're all fitted. Murphy's Law dictated I immediately found the old ones, in a pot marked "winder bolts". On the shelf where I was convinced I had already looked. Ah well. The stainless ones look nice. And will be in a place where they cannot be seen. Awesome. I also gave the door lock knobs a quick rub down and a coat of black as they were dirty and covered in overspray. They now look rather swish. Potential winder spacers. Or the start of potential winder spacers, anyway.  Shiny new bolts!  Old bolts located, just after the new ones arrived. Now, what was I thinking about? Oh yeah, that's right. Yeehaw.  Swish knobs.  |
| |
|
|
|
|
|
Jun 13, 2024 16:32:47 GMT
|
More door stuff, then. I had an idea in my head of the order which everything needs to be done in when putting these doors back together, but thanks to my brain telling me not to rush things, there were a couple of bits I remembered that needed to be done first. Which, for some reason, took WAY longer than necessary... Number 1? The waist seal. Luckily, I did have new ones in my big bag full of new seals, and, as per the original one, these were to be riveted on. I did consider using sealant, but the seal had been left wound up so keeping it in place would have been awkward. Plus I got to use my new riveter. Due to using the original holes in the door, and the seal constantly moving due to its natural curve, this took significantly longer than expected to line up. Still, I eventually sorted all the holes. Out came the rivet gun and it all fitted together. And yes, I did remember to check that the edge hadn't curled under. I had to follow this up with the door hinges, as trying to fit these with all the door mechanisms in place would be more than awkward. It turns out that trying to fit them without said mechanisms in place is also awkward. It was really difficult to get my fingers in there to get a nut and washer on the back of each bolt. It was a REAL struggle. Still, it's now done, and I don't really want to do it again... I have drawn a blank for finding some spacers for the window winders. So I may as well make something - but from what? I had those two rings I'd cut from pipe, but I knew these weren't right. However, cutting them and expanding them slightly made them the perfect size for a mold. So I got some parcel tape, and some card, and made 2 little non-stick "pools" for resin. Of course they weren't quite liquid proof, but because I made a "hot mix", it only leaked a little bit before settling. Finally, the door handles turned up. These were 3D printed by the look of things, but were generally pretty good. I gave them a quick sand and gave them a coat of textured paint. Lovely. I might try putting a door together soon... Waist seal. Of course it wouldn't stay in place...  It does when it's riveted!  Taping a nut to the spanner in an attempt to get it on the hinge bolt - this failed...  EVENTUALLY got the hinges on...  Molds ready to receive resin...  ...and full up (with some small leaks).  And lastly, new door handle surrounds, which have been painted. Excellent!  |
| |
|
|
|
|
|
Jun 14, 2024 18:17:33 GMT
|
|
Great work buddy she’s coming on nicely
|
| |
Fraud owners club member
2003 W211 Mercedes E class
1989 Sierra sapphire
1998 ex bt fiesta van
|
|
|
|
|
Jun 15, 2024 21:19:39 GMT
|
Great work buddy she’s coming on nicely Thanks Dan - as usual, it's a struggle, but I am getting there! Before I did a "dry" fit of the door and its associated hardware, I took a cutting disc to the sides of the molds I'd made for the homemade winder spacers. They cracked open beautifully and I am pretty pleased with what I have created. They're slightly different sizes, one being slightly thicker than the other, but that is nothing that a bit of sanding can't cure. I'll get back to these later. So back to the doors: I wanted to do a dry fit to make sure everything lines up and also to make that mental note of the order they have to be reassembled. I needed to reattach the cable to the latch mechanism, but i could not properly do this until the pull handle was carefully slid home into the door plate. And when I did manage to get the cable in its hole, it pushed the grommet out and broke it, probably because it was 45 years old and as brittle as a 1970s Christmas decoration. Luckily I have a box of more recent grommets, so I sorted a replacement for both this door and the other, as that one would almost certainly be as bad. It was. Having got the rod in place, I gave the mechanism a shot of white grease, before sliding the door frame into place. I needed to amend the edges of the waist seal as they both fouled. Not a huge undertaking, but still something that needed attending to. Having attached the frame with some screws, I then realised that there was a step I 'd missed: I cannot attach the mirrors with the door cards in place, so these need to go on first. Luckily, these actually were in the box marked "Mirrors". They still need putting together, but this was an easy formality. I just need to sort the bolts to permanently attach them, which have to be screwed in from the inside of the door. Note to self: don't break the mirrors, as finding a replacement from a Renault 14 is somewhat difficult. I got my passenger one as a lucky find from Ebay in France about 12 years ago. Finding one today is as likely as me going for drinks with Gemma Arterton, and Hayley Atwell. At the same time. It isn't an impossibility, but it is rather improbable. Damn. I then disassembled the door as I will need some sealant to put under the bottoms of the quarterlights and under the front of the door frames. I don't have any, so I will need to get some. More shopping I guess... Molds "popped"  Cable not quite in place...  ...as it needs to be fitted to the door plate.  A 45-year old grommet self destructed. Well that's a surprise...  Grease is the word...  Adjustment needed here...  ...and here.  Frame temporarily in place. And looking pretty good.  Mirrors located, and put together. They reflect, which is a good thing!  Aaaaannnd everything is in bits again. I need to go shopping. Again.  |
| |
|
|
|
|
|
Jun 16, 2024 14:49:58 GMT
|
Just a very quick little update, and it's something I have been meaning to do for AGES. That little some was to sort an earthing point on the front subframe. So in I went with a drill and made a hole for an appropriate bolt. The more difficult thing was to get an tool in place to clean off the paint surrounding the hole. Sounds easy in practice, but when there's 1293cc of BL's finest and a Midas bodyshell in the way, it makes it a bit awkward. Eventually I managed to get in there by removing the coil and its bracket plus taking the entire filter system off the Powerfile. I ended up with about 3mm clearance, but this was enough room to attack the paint with 8 grit belt. Paint removed, I used a couple of star washers and nipped it up. Now any earth leads can terminate here and be secured with a nut. Excellent.  |
| |
Last Edit: Jun 16, 2024 14:51:11 GMT by mrbounce
|
|
glenanderson
Club Retro Rides Member
Posts: 4,352
Club RR Member Number: 64
|
|
Jun 16, 2024 15:44:20 GMT
|
|
I got a good tip recently for earth connections. It’s a bit “bodgy”, but if you can get in with a drill to drill the hole, then just go all the way in and use the jaws of the chuck to neatly take the paint off in a circle around the hole.
|
| |
My worst worry about dying is my wife selling my stuff for what I told her it cost...
|
|
|
|
|
Jun 17, 2024 11:45:07 GMT
|
I got a good tip recently for earth connections. It’s a bit “bodgy”, but if you can get in with a drill to drill the hole, then just go all the way in and use the jaws of the chuck to neatly take the paint off in a circle around the hole. Believe it or not Glen, I could not get the drill down that far 😆 But still, good to know for the future. |
| |
|
|
|
|
|
Jul 12, 2024 21:55:18 GMT
|
It looks like I have done nothing for the best part of a month - not so. I have been doing little bits here and there and have been saving up the photos for a bit of a decent sized update, so here we go. I decided to try the glass in the window channels. On getting it out of its place of slumber, I realised that I had not cleaned it since I removed it from the car, so it looked like it had been on someone's driveway for several years. Oh, hang on... This was swiftly dealt with by the use of some window cleaning spray and using my razor-blade scraper - a marvellous bit of kit. It cleaned them up pretty well. Obviously it won't be perfect because it's 43 year old glass, but it's good enough for me! The glass, though would not go into the new channel easily. It was at this point I was made aware of the delight of silicon lubricant spray. It slipped in with no issues after that, and I tried another mock-up of the door. I have managed to make it work, so I riveted the first piece - the cover for the winder. I only needed to drill out one hole as it was slightly out. As my friend was due to come round the following week to do some wiring for me, I figured it was time to get something important: a battery and associated cables. We have a very useful local car electrical supplier, who is happy to make cables to size, so I took some measurements and popped to see him. I came away with positive cables for the battery to solenoid and solenoid to starter, plus 2 earth cables for the battery and engine to the earthing point I made earlier. I also picked up a battery from Halfrauds, as amazingly it was the cheapest in the area. My Mk1 has had a modification to the battery area, which enables me to use an 038 standard Mini battery. Connecting up these leads was straightforward, but I did remember I needed the cable guide that goes on the starter motor. However, the original one had "gone missing", or had never been there in the first place (the engine was in bits when I got the car). Making a new one was easy with a bit of steel, a stepped drill, a grommet and a bit of paint. I fiddled around with the battery clamp and it needed some modification - but this was easily done. I still need to make a bit of extra clearance for the nut nearest the bulkhead, but a couple of minutes with a power tool should sort that. Finally, this evening, Tink came round to work his magic on the electrics under the bonnet. The coil is all wired up, the fan now works, the headlights are ready to go, he's installed a master fuse holder (still needs to get the correct rating fuse for it). We did various bits of soldering and he's given me some easy to follow (written in crayon) instructions for me to deal with over the next few days (mainly creating and connecting up earth wires). I still have no idea what most of these wires do, but he does, and is making sure that everything works as it should. I am in safe hands. Incredibly dirty glass  Razor blade and glass cleaner...  ...made it look MUCH better.  More door mocking up took place...  And I actually did something riveting.  I bought something heavy  Along with the cables and terminals to connect it.  Earthing point has come in useful already  I remembered the cable guide, but couldn't find it, so made one.  Battery clamped up.  Coil is now connected  Tink doing electrickery. Or "dark magic, as it's known in my mind.  |
| |
|
|
|
|
|
|
|
Jul 14, 2024 20:10:06 GMT
|
Doing my best to avoid putting the door back together, which I can assure you is a hateful task, I took care of a couple of minor jobs which Mr Tink suggested I deal with. Task one was to run an earth cable from the started solenoid - this was a very simple thing to do - a couple of rings on a bit of wire and Roberto is your mother's Italian-sounding brother. Task two was extend the horn cable from one side of the car to the other. This should have been a simple solder and heatshrink job. Of course, it was not. I took the insulation off the wire at the passenger side of the car. It was completely oxidised. Not good. So I went a bit further up the loom, and tried again. Nope, still blackened. So I tried just by the junction to the driver's side headlight. A little better, but still mostly black. Given that I am very scared of electrics (more from a point of view of worrying what fires I might cause because I don't understand how electricity works), I did something that I am proud of. I looked at a wiring loom diagram in the Haynes manual (for a Mini). And UNDERSTOOD it. The purple and black wire for the horn does not go through the fuse box, so I followed the wire back to the plug for the column stalk, went forward a few inches, and cut it. I stripped off the insulation and it was beautifully copper-coloured wire. Excellent! So I ran a new wire alongside the main wiring loom, taping it up as I went along, and then soldered the two together, remembering to put the heatshrink on first. Before I wired them up permanently, I tested the horns directly on the battery. A small car needs to be noticed in case of danger. It will be. My ears are still ringing. "Extend this cable" said Tink. Nope.  Attempt 3 looked very much like attempts 1 & 2. A repeat of oxidisation.  So I took the vast majority of the oxidised wire out of the equation by doing this!  |
| |
|
|
|
|
|
Aug 31, 2024 20:36:52 GMT
|
I have finally got some time to get back into the garage and got back on to the door. I'd been putting it off for too long, just not having the impetus to get the door done. The basics were there, so all I had to do was to fit it together. Ok, it was a bit more involved than that. Why? The quarterlight glass would not sit right - it was proud at the bottom by almost 5mm. Turns out that the window channel was not quite letting the glass go in far enough, so I have amended this by some re-arranging (I made it into 2 sections at one of the corners, and gently "persuaded" the glass into place with a rubber mallet). Then what I needed to sort was the rivets for the door plate to make sure it didn't move. These actually went on without too much of a fight, although I did need to use some bigger rivets as the holes in the fibreglass door shell had elongated. In fact it took longer to sort the riveter out than it did to actually use it. I then screwed the frame to the door shell - the front proved to be more problematic than the rear, but again I used some "persuasion". It's now together. I have also put the mirror together with its plinth - I will fix this in place, and do both the door card and the clear plastic shielding sheeting once it's on the car. Finally, for today, I needed to make sure that there is as much clearance as possible under the bonnet - I know that there are only a couple of millimetres of clearance between the negative terminal and the bonnet. I have therefore modified the bolts on the terminal by thinning them down by a couple of mm. More soon. The door is together! Still needs the clear plastic sheet and the door card, but shouldn't be an issue to do...  Some bigger rivets were needed. Which is riveting. Or something like that, anyway. (Sorry).  Looks nice from this side!  I've started putting the mirror together. This is a rare beast - a Renault 14 item. I have 2 of them (the mirrors, not the Renault 14)  And - modified bolts on the terminal. Every millimetre counts under that tiny bonnet!  |
| |
|
|
|
|
|
Oct 12, 2024 19:10:06 GMT
|
Well I can only apologise for the ridiculously glacial approach to updating this thread. Life has been getting in the way a bit, and there has been much stress which I will not go into on here. However, on the upside, today has been a day of significant progress. My good friend and all-round electrickery guru Tink had suddenly become available (he'd escaped the wife and kids for a day), and he said he'd happily spend a few hours going through the electrics on the car (my bugbear) and we'd get some things working. I pushed Zippy out into the daylight and realised just how dirty the poor little thing was. However, no rest for the wicked - out came the soldering iron and other assorted electrical tools, and I put the kettle on for Tink. He arrived, deposited his boy at the party over the road and we set to. Or rather, he did, and I cut wires and soldered as required. Electrics are strange - easy if you know what you're doing, and utterly terrifying if you're a complete novice such as myself. Watching someone who is a bit of an expert is great fun indeed. We work well together anyway, and being part of the process as Tink worked his way through the various systems was a delight. There was a good bit of laughter as we were amazed that various things actually worked, as this is a 43 year old car with a similarly aged loom. Accidentally setting the horn off as my neighbour walked past with a jug of boiling water was highly amusing (sorry Lianne!). Getting frustrated by a dodgy earth wire was easily sorted by cutting it off and running a completely new wire. So, after connecting things and checking them with probes and testing many many things, we could list the following: Things that work: Horns; Sidelights; Headlights (dip and main beam); Indicators; Hazard Lights (front and rear); Rear Lights; Reverse Lights, Brake Lights; Numberplate Light; Fuel Pump; Electric Fan (squeaky); Fog Light; and Starter Motor - we only gave it a little bump as I am not ready to try starting the engine yet - however that bit was REALLY exciting! We only needed to replace 2 bulbs, which was a surprise. Things not yet tested or installed: Wiper Motor and Washers (one of which was a casualty of moving stuff around the bulkhead); Interior Light as well as Door Pins and Hatch Pin; any wiring for a stereo; installing a brake light switch - it's a Mk1 pedal box with a dual line braking system so there's not one fitted at present; any wiring for an alarm system; and the Fuel Sender wiring has yet to be connected. Things which don't work or need replacing: The ignition switch on the steering column really isn't very good. There are numerous dodgy connections, and although it could be taken apart and cleaned, I will need to spend ages attempting to undo the horrible shear bolts, and by the time I have finished that, I will WANT to throw the bleeping thing in the bin anyway. Plus the fuse box we used for testing was an old 1980s Mini one, and was horrendous. Loose fuses, curse word connections etc. This will be replaced with something better. Tink has given me a list of additional things to sort, which I shall deal with, and hopefully by the next time I do an update, certain things will have been dealt with. I need to also sort the loose connection on the fan and also make it not squeal. Zippy out of the garage for the first time in ages...   Tink as happy as a pig in brown stuff - sorting electrics!   Things were labelled up, once each circuit had been checked to make sure it was working  And just to prove that lights WERE working!  |
| |
|
|
|
|
|
Oct 12, 2024 20:10:58 GMT
|
|
Great to see some progress
Hope your life is back on track and all is well with you buddy
|
| |
Fraud owners club member
2003 W211 Mercedes E class
1989 Sierra sapphire
1998 ex bt fiesta van
|
|
|
|
|
Oct 15, 2024 15:34:59 GMT
|
A quick little update for you. Tink left me a small list of things to do, so I have started going through it. Number one was that the wiper wires needed to be joined up to the plug he'd left me. Out came the solder, the iron and the heatshrink. I had to shorten one of the wires due to a bit of corrosion, but once past that initial inch or so, it was beautiful copper again, and took the solder with no problems. I also needed to sort a longer earth cable. That was easy. Number two really was a number two. Tink had advised me that the ignition switch was somewhat faulty. He did say it could be taken apart to attempt a fix, but there would likely be a question mark over whether it would work properly. Given it had been in the car (and standing pretty much since 1999), it was an easy decision to spend a little bit and get a brand new one. This has been ordered and it should turn up tomorrow, should the delivery e-mail be believed. The issue then was removing the current switch. Unfortunately these are fitted using shear bolts, and there are various "work-arounds" that profess to get the stubs to turn. Unfortunately the remains of the bolts are in a shrouded area, which makes it virtually impossible to "grind a slot into the bolt stub", even using a Dremel. Another suggestion is to use a punch to gently tap the bolts round so they undo. I chose this as my initial solution. This had one specific effect: it made me swear, and produce appropriate anger that I downed tools and went inside for a bit of a think. Once I reappeared, there was a third option. I was getting a new switch. Therefore I didn't need the old one. Grinning maniacally, I grabbed the angle grinder with a cutting disc, and a few minutes of careful use saw the old switch off in pieces. Examination of the old bolts showed that I'd have really struggled to "tap it round"; there was corrosion on the threads which had basically adhered the screw to the housing. I guess 25 odd years of neglect does that to a key switch. I will continue once I have received the new one. Wiper wiring now connected, soldered and heat shrunk. I've tidied the wiring up since the picture was taken.  The remains of the key switch after it met my friend the angle grinder...  And one of the bolts which showed a bit of corrosion, meaning it would NOT move. It ain't gonna move now!  |
| |
|
|
glenanderson
Club Retro Rides Member
Posts: 4,352
Club RR Member Number: 64
|
|
Oct 15, 2024 19:24:06 GMT
|
|
When you fit the new switch, throw the supplied shear bolts in the bin and use a pair of socket head screws instead. 👍
|
| |
My worst worry about dying is my wife selling my stuff for what I told her it cost...
|
|
|
|
|
Oct 16, 2024 14:54:54 GMT
|
When you fit the new switch, throw the supplied shear bolts in the bin and use a pair of socket head screws instead. 👍 Nuts... Another quick update which is heavier on the pictures. Came back from taking Mrs Bounce to the opticians after she bent her glasses (no, I didn't sit on them...) and had received an e-mail to say my "Royal Mail parcel has been left in your safe place". Apparently my safe place is just dumped on the doorstep. Thankfully nobody had nicked it, and if they had, they would doubtless have been a bit disappointed if they were expecting a smart speaker or something electrical. So into the garage I went, and gave the lock mechanism a squirt of some special lock lubricant my friend Ray had given me (he used to be a locksmith). Why? The mechanism felt a bit "sticky", most likely because it had been sat on a shelf in a warehouse for a bit. And before tightening up those bolts, I remembered to line it up with the plastic covers first. It would have been a bit galling if I'd forgotten to do this... Once I'd established that everything was correctly aligned, i tightened everything up, and of course, the shear bolts did their thing. It's my intention to never move it again! Here is a box, a musical box, wound up, and ready to play. But this box can hide a secret inside - can you guess what is in it today?  One of Lucas' finest ignition switches, complete with 2 keys.  The key switch was a touch notchy - so I gave it a blast of this and it's now as smooth as silk. Cheers Ray!  I lined it up with the cowling, before...  ...tightening up the shear bolts, which, unsurprisingly...  ...did this!  |
| |
|
|
glenanderson
Club Retro Rides Member
Posts: 4,352
Club RR Member Number: 64
|
|
Oct 16, 2024 15:38:17 GMT
|
|
|
| |
My worst worry about dying is my wife selling my stuff for what I told her it cost...
|
|
|
|
|
Oct 19, 2024 19:50:20 GMT
|
I am steadily working my way through Tink's list of jobs that need to be sorted. The next on the list was something he'd noticed when playing about under the dash with wiring: the throttle cable was at a funny angle. This was completely down to me. I was certain I'd done it right but I was obviously tired and rushing at the time. The plan was simple - pull out the inner cable and re-insert it through the hole that made more sense - i.e. opposite the top on the throttle pedal, as opposed to a couple of centimetres off. At least it would have been simple. The reason it wasn't? Some idiot who shall remain nameless but bears a striking resemblance to me had put a brake limiter valve in the way of the correct hole. Now, this sounded as though it was not too bad a scenario, but the thing to remember about the Midas is that, like the Mini it is based on, it is rather small. This means that once everything is in place, it's really rather difficult to move it much more than a couple of millimetres. I took the brake limiter valve off. So here's how I managed to fix it. Firstly, the throttle cable was held in place by a proper "Heath Robinson" bracket with a brazed-on guide for the cable. This had been created by a previous owner. I didn't understand why they hadn't simply drilled a hole into the fibreglass to hold the end of the outer cable's ferrule. So I did this, and put the homemade bracket "to one side". Of course, I couldn't get the drill in there without taking off the coil and the breather, so I used one of my favourite tools - the right-angled drill chuck! This is a brilliant bit of kit and worked so well. I had bought a new limiter valve some time ago which I was going to fit anyway - the one on there was secondhand, and as EVERYTHING else in the braking system is new, it was a no-brainer to fit this as well. The issue was how. The new path the cable took was exactly in the middle of the valve's body - drilling through it would be an expensive way to ruin the brakes. It had to move! I looked at the design of the valve, and on the top I noticed an indentation, which looked almost perfect for the outer plastic sheath of a throttle cable to run over. I decided that this was going to be the way to do it. This meant I needed to effectively move the valve about an inch diagonally down towards the centre of the car. Only I couldn't. The bracket which held the clutch hose was in the way, and no amount of persuasion was going to work. Instead, I got creative. Out came the oscillating multi-tool, and I cut a 1/4" silver off the side of said bracket. The new valve fitted, the throttle cable went nicely over the top and I only needed to do some minor bending to the master cylinder brake pipes to ensure that everything connected together properly. Excellent. I even managed to get the spring back on to the clutch arm without swearing! I now just have the fun task of filling in the numerous holes from previous owners (and me) so it all looks a bit tidier. Talking of tidy, I also needed to sort a fuse box. I don't like fuse boxes in the engine - I simply don't understand why they need to be subjected to heat and/or damp, when they can be inside, where it is also easier to check to see if a fuse needs to be replaced. I have never been a fan of the Mini fuse box, so we're going to have a look at using a newer blade fuse design. Both Tink and I came up with the idea of having the lid for the fuses under the bottom of the dashboard. I marked up where it needed to sit before cutting an appropriate hole using the oscillating tool. A quick bit of filing saw the fuse box fit in nicely before the holes were drilled to bolt it into place. A quick check saw the fuse box poking out nicely under the dash. Nice. Cable used to go through the top hole and was at a funny angle. It needed to be passed through the hole about an inch below it. This was unhelpful...  Brazed homemade bracket needed to go, so I put it "elsewhere"...  Brake Valve needed to move, but there wasn't room.  There are too many holes in this bulkhead. Which one should we use?  It's this one!  However, it needed a hole enlarging to hold the ferrule, so out came this awesome bit of kit.  Much better than that silly bracket!  New valve to be fitted - but where exactly?  Goes in here quite nicely, after taking a bit of the bracket off with power tool violence and bending some pipes a bit.  A hole was cut into the dashboard shelf to accommodate the fuse box.  Fits in there really well!  Fuses are easily accessed from below.  |
| |
|
|
|
|
|
Oct 27, 2024 17:59:42 GMT
|
Two things that I took from the last time I chatted to Tink were the following: Test the wiper motor on all settings, and to sort the wiring for the screen wash pump. As my knowledge of electrics is utterly dreadful, Tink kindly leant me his probe and advised me on step-by-step basis what I needed to do. I decided to check the switch first, as this was the only thing that hadn't been looked at. With the probe connected up to the battery, I did as Tink told me and touched the probe to the appropriate wire at the stalk. I checked the normal speed - no problem. However, when I repeated the test on the fast wipe, I got nothing, pointing to a switch issue. There's precious little that I can do at present other than maybe give the whole thing a clean, but Tink has some spares kicking about, so he'll go through what he's got first, before I order a new one. Then it was time to check the washer pump. I love the way this fits - it's from a Mitsubishi, but I don't know which one - it was doubtless popular in the 70s & 80s but the chance of finding one now are pretty slim. It fits so nicely into the bulkhead. I'd already tested the motor itself, and knew it fired. I needed to figure which wire went from the stalk to the pump. I was able to establish through a process of elimination that the Light Green and Black did this job. I did check that the stalk worked using the probe. Then it was a simple matter of extending the wires. Oh yeah, that. Of course the wire in question was a bit greenish. Not black like the horn wire was, but on its way out. I trimmed a few inches off the end and got decent looking wire. I used some red wire to extend and soldered it then used heatshrink to insulate the join. I repeated this process with the Earth wire, before joining everything together. The question was, would it work? I connected the battery, turned the key to position 2 and pushed the wash button on the stalk. Nothing. Before letting out an almighty barrage of splendid swear words, I remembered that the fuse box we'd used for testing was a bit "flaky". I gave said fuse a wiggle and everything fired into life. Thankfully there's no screenwash in it, so I managed to avoid getting wet. Success! The high speed switch part of the wiper stalk doesn't do its job. Which is a pain...  Grim wire. Not completely oxidised, but not far off.  A few inches off the end gave us much nicer copper-coloured strands.  Everything soldered, heatshrink used and chucked through the bulkhead grommet.  Washer bottle looking awesome - the test proved everything works!  |
| |
|
|
|
|


