|
|
|
|
|
Putting a request in for some advice from @grumpynorthener (or anyone else who would like to throw their two cents in). I have cut my repair section to size, using the old wing. There was a little blob of what I thought was a rust bubble, I was going to clean it up once I had the whole wing back together.. But while tweaking the fit on the repair piece, it.. blew out more?  Better take a closer look, I thinks.  Oh go on then! 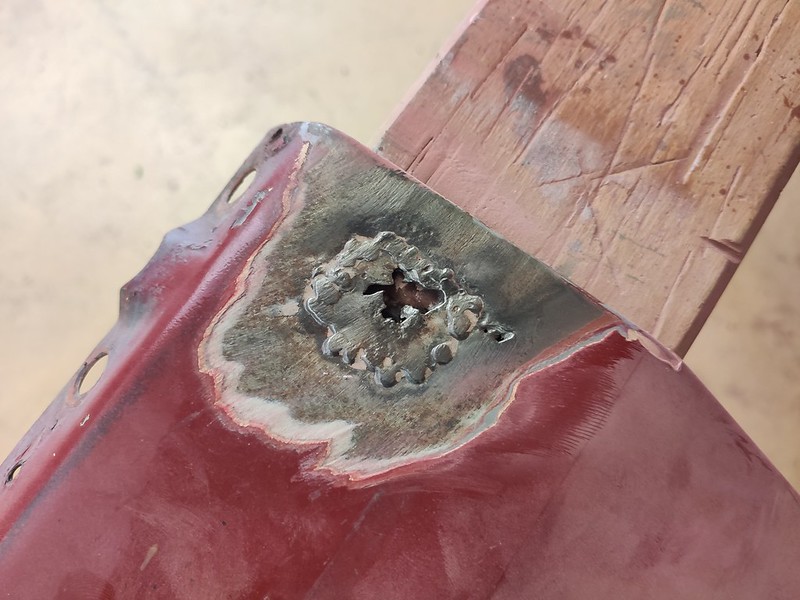 So... my question is this: Do I cut out a bigger little square and try and patch it up? If I do it this way I can dress it back slightly shallow and use a bit of filler... Or do I cut a rectangle out all the way to the edge including the flange lip (probably using a piece of the wing I just cut off to replace). This will give me better access to the support brace, so I can make sure it is clean and good. But I think will be harder to make the repair invisible-er. *Edit* Forgot to add the pic of the rear side and brace.  It IS pretty close to the bottom of the wing and won't be super visible. There's also a moulding just above it so that will help hide it some. I could even cut it a bit higher so that one edge of the repair is under the moulding, which is what I'm doing for the wing repair section. Thoughts? Cheers, Matt Matt - You are better going for your second option - use the first and you will find yourself up against the flange edge and burning through when welding due to thinness of the metal around that repair bodge - there will also be an element of rust between the outer wing skin & the flange that will need cleaning up & treating that you have already observed - I have recently done similar front wing flange edge repairs on the Jowett Javelin that's on the Readers Rides thread if you want to look at that for reference - but all means bug me if you want any further guiding / help - Chris |
| |
Last Edit: Jan 4, 2020 18:29:39 GMT by Deleted
|
|
|
|
melle
South West
It'll come out in the wash.
Posts: 2,011
|
|
|
|
Had to stop early today as my cutting disc got too small, and apparently I've misplaced the lock spanner thing for the grinder. You normally don't need one, unless there's really nothing left to grab hold of. |
| |
www.saabv4.com'70 Saab 96 V4 "The Devil's Own V4" '77 Saab 95 V4 van conversion project '88 Saab 900i 8V
|
|
|
|
|
|
|
Grumpy - thanks for your input.  Writing it out lead me in that direction but I wasn't sure if there was something else I should be looking at. Melle - it had been done up tightly many years ago and was locked on too tight to undo by hand, not helped by the 3cm of radius left on the disc  |
| |
|
|
C-rock
Part of things
 
Posts: 216
|
|
Mar 20, 2020 17:45:12 GMT
|
|
Is that a 4m engine
|
| |
|
|
|
|
|
|
|
Sure is. Isn't it bad when your own thread drops off your participated list... Update incoming... |
| |
|
|
|
|
|
|
|
Right, might as well follow the crowd and update this while I've got time spare..  I think I'll just go back to the start of the current stage of progress so it's not as disconnected. So, where were we..? I hadn't done much in a while, but I had a house move on the horizon, so I thought it would be a good idea to disassemble my car and do some welding as once it was apart I would have to put it back together again before I could move it, and the deadline would be helpful in motivation. You can see where this is going already, can't you?  So let's take a look at what we have to work with! Starting with the passenger side, as that's easily accessible. One nice crease down the wing. This can be dealt with later as it's not rusty, just needs tapping out and some filler.   At the front of the wing, there was this nice little repair to explore.  As well as this crease on the back edge of the bumper recess.  The lower edge of the wing is where my concerns have been. This has been steadily blowing out further and further as time goes by. 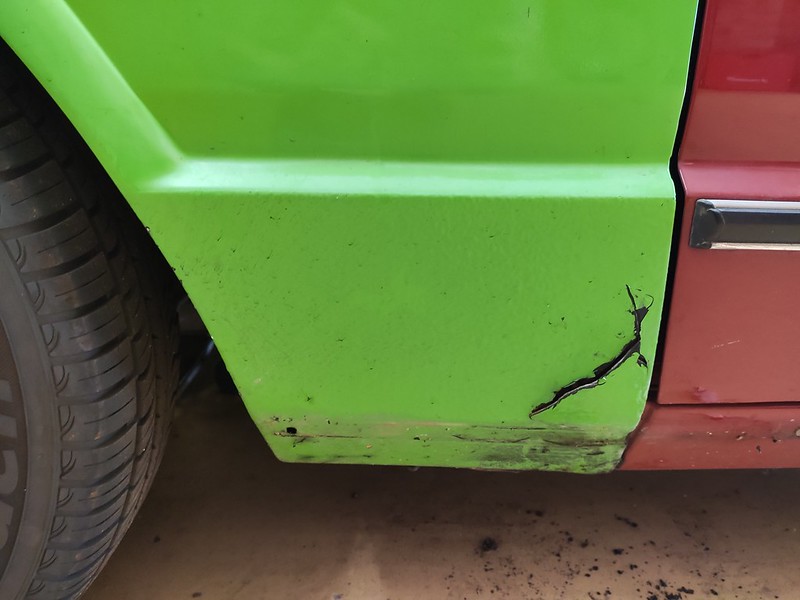 I knew there was some dodgy plating in behind it all, I thought that the patch over the top had blown out and was pushing outwards. Turns out, it was just a large slab of reinforced filler!  Seems like a bit excessive for what looked like a simple, reasonably flat surface. What's the other side like, then? 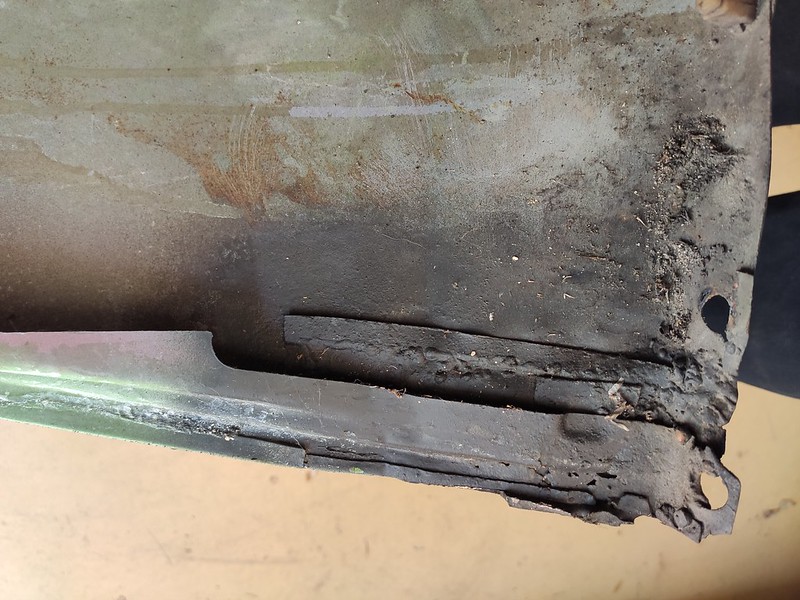 Mmm. I reckon I can do better than that. Now I have both damaged red wings still from the crash, and I'd already checked and they were still pretty good in these areas, so the plan was to cut the lot off and weld in the better sections. I had flip-flopped between butt welding them and doing a lapped joint for a while, in the end I went for a butt weld as I didn't have a joggler or the money for one (thanks, Japan holiday!). Originally I was going to weld the seam along the swage edge (where I've cleaned to on the below photo).  But I had a chat with my mate Jono, and he suggested that welding along the middle of that cleaned area would be easier to hide due to the plastic moulding that goes over the top, and would be easier to join on the rear due to the support brace on the rear. Somewhere about here.  Seemed like a reasonable argument, so I took some brave pills and had at it.  The support brace was cut staggered to the skin so the joins were offset for a bit of control and strength when stitching back together. Same done on the red wing, but with the cut line offset a bit so I had some extra metal left to tweak with.  This wing is pretty good.  Closeish.  Trimmed up betterer. Pity I can't cut straight!   Offered up to see how it was sitting. Yes, the panel gaps are pretty poor from factory!    SCA magnets are wibblepoo, by the way. Don't buy them.  That was pretty close, so feeling buoyed, I decided to investigate the little repair around the light housing.    That was a little disheartening. I set that aside for now, and had a look at the extent of the rot on the drivers side. It didn't look as bad from the front (famous last words).  The patch was even smaller!  After cleaning back.  Started to clean back the front side of the skin to see where I needed to cut to.  Hmm. You can also see a few more exploratory gouges with the wire wheel as I tried to determine where the filler ended.  Both sides had some surface rust around the side light apertures as well.  I repeated the process on the drivers side and got the repair panel trimmed up ready to weld. While fiddling with the repair on this side, I noticed that this bubble:  Had blown out a bit more, so I thought I'd better investigate.  Uh huh.  Didn't look terrible from the rear side though. All hidden under the brace!  So that bit needs a new bit of skin let in as well. I wouldn't be surprised if there was a similar problem on the other side as well... At that point I threw my toys out of the pram and flew to Japan. Matt |
| |
Last Edit: Apr 7, 2020 1:35:57 GMT by varelse
|
|
|
|
|
|
|
So, literally the day before we flew to Japan, we put bond down on a new rental place for me and my partner (first time we've lived together, so there was lots of to'ing and fro'ing trying to find something that worked for all four of us (dog and cat, too). Among the requirements of course was a decent sized garage/work space. The place we settled on had this, and was described as having power. But upon my inspection the day before we left, I pointed out to the agent that the power had been capped off. We were happy with the place, but asked that they shore up the fences in a couple of places and make sure power to the garage was working by the time we got the keys the week after we got back from our trip. Yep, hadn't done much packing yet, fly out for two weeks (narrowly dodging corona virus problems, although face masks were scarce over in Japan), and then only a week to pack two houses and move in. My partners lease was ending literally a week after that, so it was pretty tight! Fortunately I was breaking lease but my mate/house mate was staying on by himself, so we knuckled down and got my partner out and I just sorted myself out in between and afterwards. What this meant was that I didn't have the car welded by the time I was moving out! But I digress. What did I end up with? 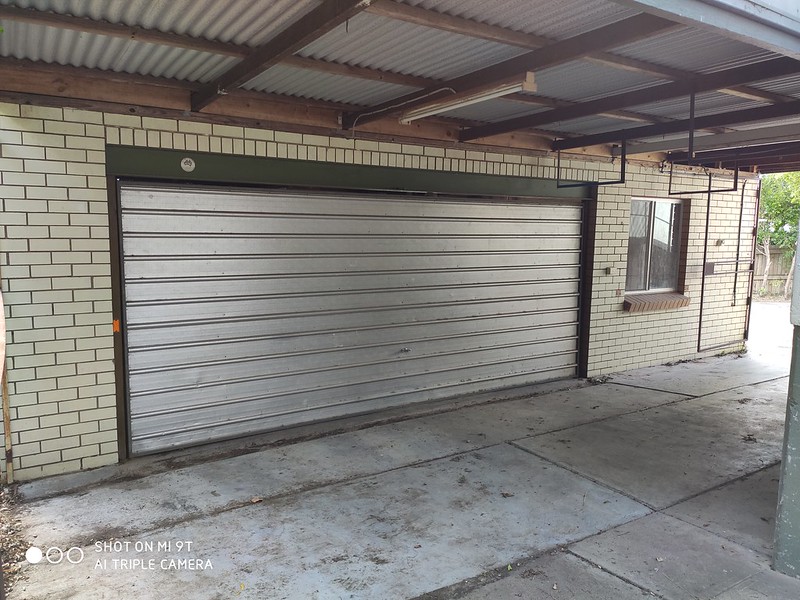 One nice double garage... 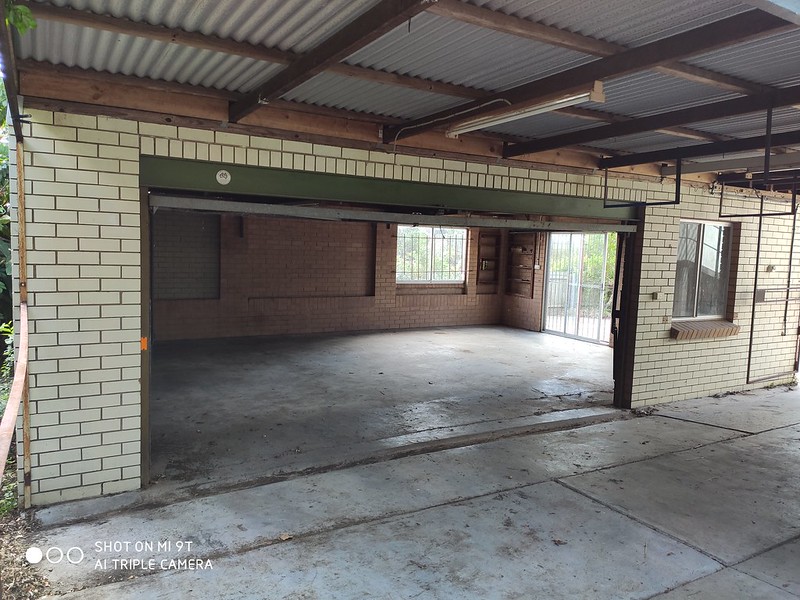 With some added space to the side! 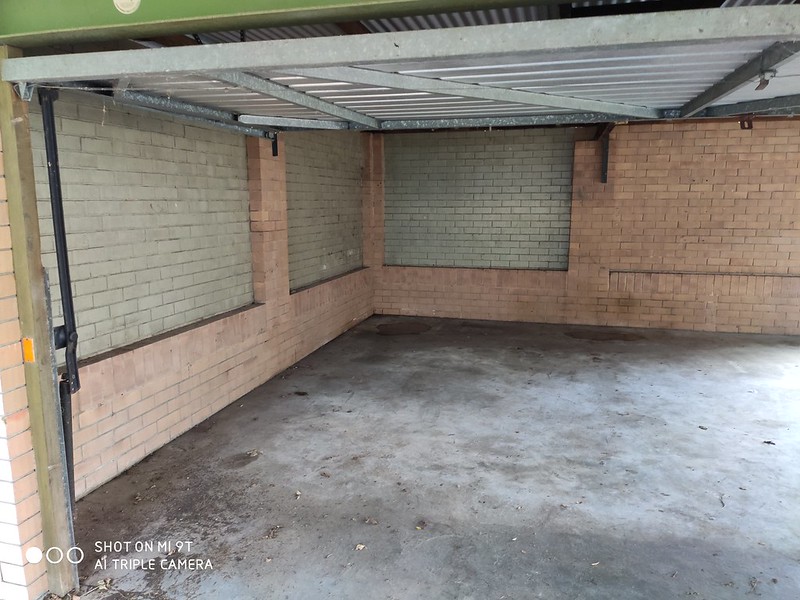 Nice amount of storage space off to the side.  Bit filthy though, and possums living in the roof!  This from a quick sweep of the floor and walls.  Oh, and I found this under the house.  Cheers, Matt |
| |
Last Edit: Apr 7, 2020 1:33:26 GMT by varelse
|
|
|
|
|
|
|
Oh, and I found this under the house.  Cheers, Matt I was expecting something dead, but I suppose this could fit the criteria!  |
| |
Last Edit: Apr 3, 2020 4:02:53 GMT by georgeb
|
|
|
|
|
|
|
Oh, and I found this under the house.  Cheers, Matt I was expecting something dead, but I suppose this could fit the criteria!  There was something dead in the walls in the kitchen if that makes you feel any better. Need to gap seal that this weekend, thanks for reminding me! More to update, but boss is in the office now and I need to achieve something for the day! |
| |
|
|
|
|
|
|
|
More to update, but boss is in the office now and I need to achieve something for the day! We've an online Building Information Management systems course starting any minute but, as this subject holds zero interest for me, I've cracked open a cold one instead. Don't have to worry about our boss, he does't understand what I do anyway!  |
| |
|
|
|
|
|
|
|
|
|
|
The amount of bog you Aussies slap onto your cars never fails to amaze me. Maybe the weight of it all is the reason why Australia is at the bottom of the globe🤣🤣🤣
I bought a totally overpriced panel in Aus a couple of years back. Sellers words were, “ Its mint, Mate”. Which, in retrospect when translated from Aussie back into English means, “ It’s only partiallyfucked with only one 5kg tin of bog to disguise its inner turdlike qualities”. 🙄🙄🙄
|
| |
|
|
|
|
|
|
|
The amount of bog you Aussies slap onto your cars never fails to amaze me. Maybe the weight of it all is the reason why Australia is at the bottom of the globe🤣🤣🤣 I bought a totally overpriced panel in Aus a couple of years back. Sellers words were, “ Its mint, Mate”. Which, in retrospect when translated from Aussie back into English means, “ It’s only partiallyfucked with only one 5kg tin of bog to disguise its inner turdlike qualities”. 🙄🙄🙄 JB - Believe me our Aus friends are not the only ones that have a liking for bog - over the decades I reckon that I could have infilled the English Channel enough to form a road over to France with the amount of it that I have dug out of UK based motors  What's alarming is the amount found used on a 'structural repair' basis  |
| |
|
|
|
|
|
|
|
|
I notice there are photos of the garage but none of the house.
Priorities correct - Tick!
What's the motor? (Apart from being a sinker to stop your boat floating away.)
|
| |
|
|
|
|
|
|
|
I notice there are photos of the garage but none of the house. Priorities correct - Tick! What's the motor? (Apart from being a sinker to stop your boat floating away.) I figured no one would be that interested in an old house.  It's a rental so we can't do much to it. Not sure on the motor, probably an old Holden of some variety. It's halfway down the house and you have to crouch to get there so not that interested in dragging it out for a better look. I had to scrabble around in the dirt at the tighter end to run a cat6 cable from one side to the other as the nbn box is in the living room and I would prefer the router in my office... Will finish updating tomorrow, I pulled all the pics off my phone on to my work pc. |
| |
|
|
|
|
|
|
|
Right, where was I? Had just flown to Japan for two weeks of relationship bliss. Was actually pretty great. Did some of this.  Stayed here (Christmas themed love hotel)  Scored major brownie points for that one! Sadly they didn't have any christmas themed costumes for hire... I wanted to dress up as Mrs Claus.  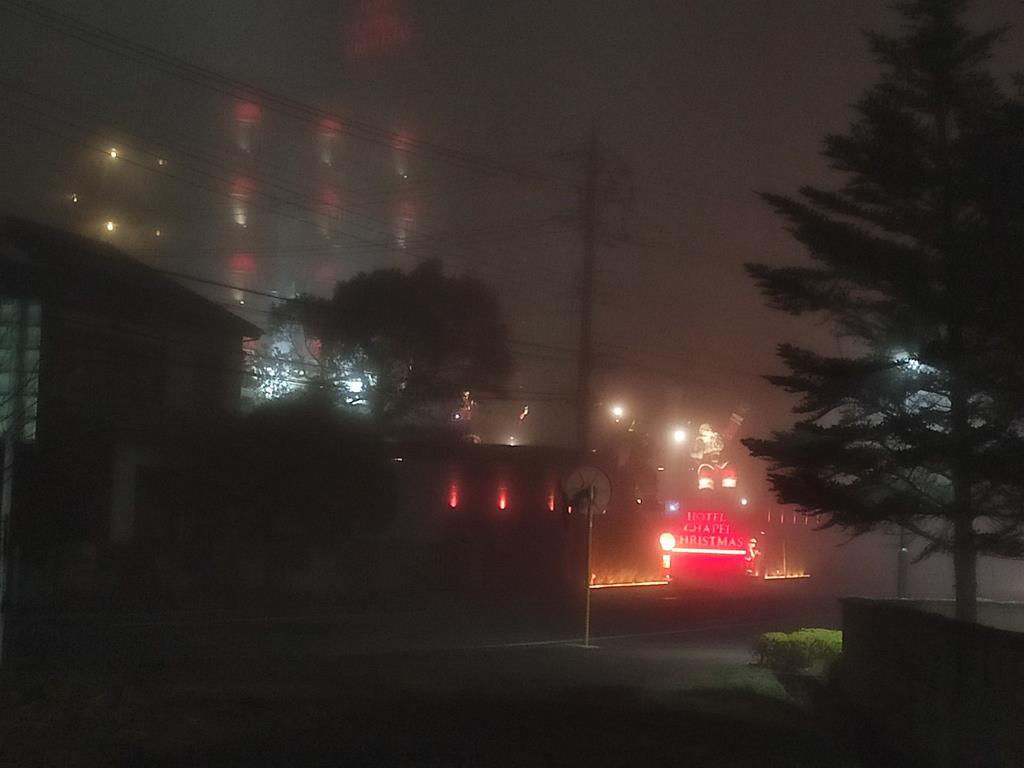  Got back, started moving all the things. Finished shifting my partners stuff and got everything out of my house except for the garage stuff within a week, which was pretty exhausting! Had time to get the car mobile again finally.. Not sure if I have posted this earlier or not, but last year I picked up a welder off a mate. 135AMP is a little larger than I need really, but it'll do.  Set everything up, and got ready for some practice on the spare wing.  That came out ok. Few more runs, of varied results and I was confident enough to have a crack at the wing itself.  The support brace wasn't quite lined up due to my mismatched cutting, so I had to bridge the gap a little. 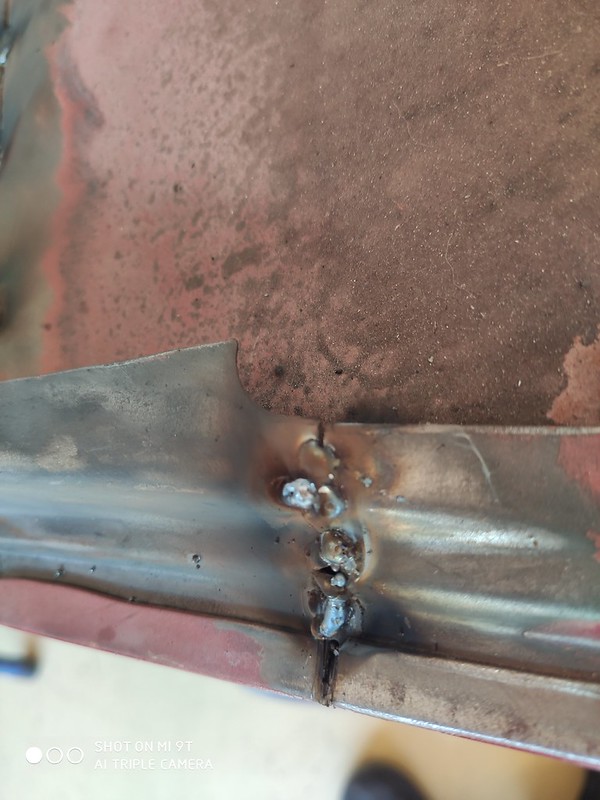 Not the best, but it'll do the job after some cleaning back. And on the front. Just tacked together enough for transport. 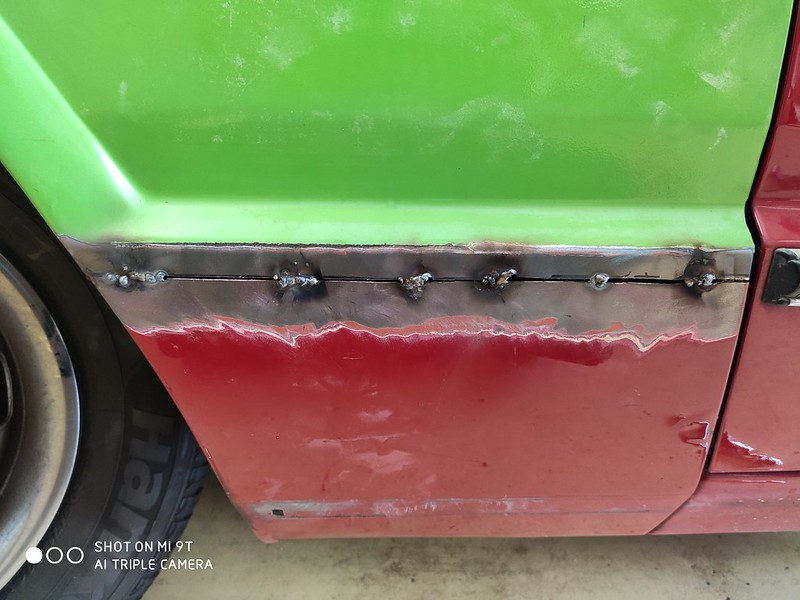 I had a few issues with burning it out, and it was only recently when i set up the welder at the new house that I realised why I was struggling. I was using the .8mm wire when I should have been using the .6mm wire for the skin. D: Oh well. Will try to remember to swap it over when I finish up welding the skin. The panel isn't quite right on the passenger side so I might end up splitting it again and redoing that side.  However! It was enough to achieve this!  Which left me with this at the old house...  Which has gotten progressively worse over the last few weeks. Looks like the seals on the auto have given after sitting for too long.  So that's kind of another nail in the coffin for this engine and box combo. Going to look at doing a conversion in earnest now. Cheers, Matt |
| |
Last Edit: Apr 7, 2020 2:49:32 GMT by varelse
|
|
|
|
|
|
|
So from now on it's more of a reasons I haven't done anything on the Cressida a la sweetpea  I had a solid list of to-do's from moving in, mainly shifting stuff and finding homes for things, which is getting there slowly. I had one major item that was stopping me from getting all the camping gear out of the foyer, which was building some workbenches with storage underneath. Took a little while for all the pieces to show up, and then for me to have time to do it. Started off with this almost 9m prep bench frame that had the middle cut out of it for transport, leaving me with 2x 2.7m long frames and some long lengths of stainless. Here's half of it.  Behind it is the 4x sheets of ply that I also obtained from work. All this was delivered by our driver when he wasn't too busy, so couldn't really complain seeing as I just had to start work a little later, and it was all free! I welded up 8x legs to go on the bottom middle rung so I had some support for the storage. Came out ok, considering I was using steel wire for stainless welding. Just gave everything a whizz with the wire wheel afterwards and some silver galv paint to keep it from rusting too quickly.  Welds came out ok on some bits! And terrible on others. I was surprised at how easily it blew out on stainless, considering how hard it was to drill! But it'll do the job. I spent most of a day drilling pilot holes with a carbon tip so I could get my self tappers (also from work) in, haha. I also received a delivery of one free piece of stone, which I figured would make a nice wet bench!  It's 2.7m long, and my bench frames came in at 2.73m. It's a little annoying that it's not quiiiite long enough, but I positioned it so that the short side is in the corner where I'm not likely to be.  I picked up some heavy curtain for the front side and a sheet for the rear side and screwed it all down under the ply tops. It's cut in to sections with overlap so you can get at it easily but still keep the dust out. Eventually I ended up with this: 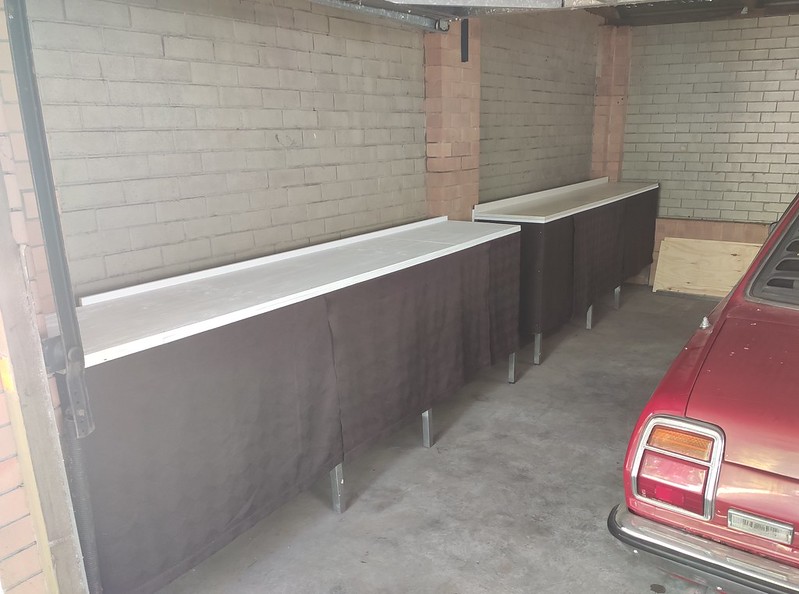 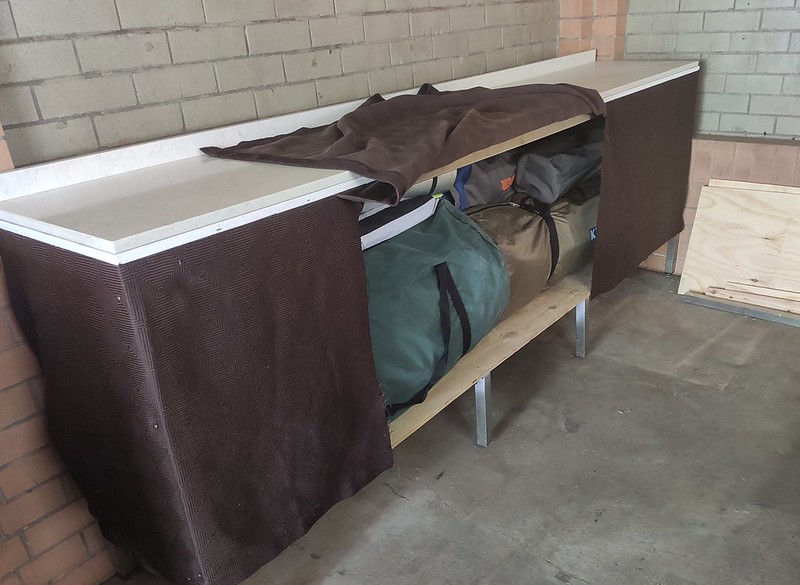 Which I'm pretty chuffed with!  Three things of note: When I welded the legs on, the one with the stone top was missing a foot, and it had rocked over when I positioned the feet, so they're canted a bit. Luckily i noticed before I got any further so I made that the side that's against the wall, and as the wall is also helping keep that foot up in the air by being pushed hard up against it, this is a non issue. I want to put a vice on the double ply bench, but I think it might need a bit more structural support, so I might end up taking the top off and welding another brace across the underside once I have found a vice and know where I plan on putting bolt holes. And lastly, When I trialled all of this, it fit perfectly, having maybe 10mm clearance for the garage door mechanism (benches are exactly 500mm deep). But then I went and put a little splashback on the back of it to stop stuff rolling off the back.  So this happened.  So now this bench is not quite square to the wall, but at least the door closes! My partner, who for some reason loves painting, painted the ply for me, which was great as I spent most of the same day drilling holes. Here's another shot of the nice stone I scored. Exactly the right size (except for that 30mm too short bit!) Couldn't have done much better if I'd paid for it!  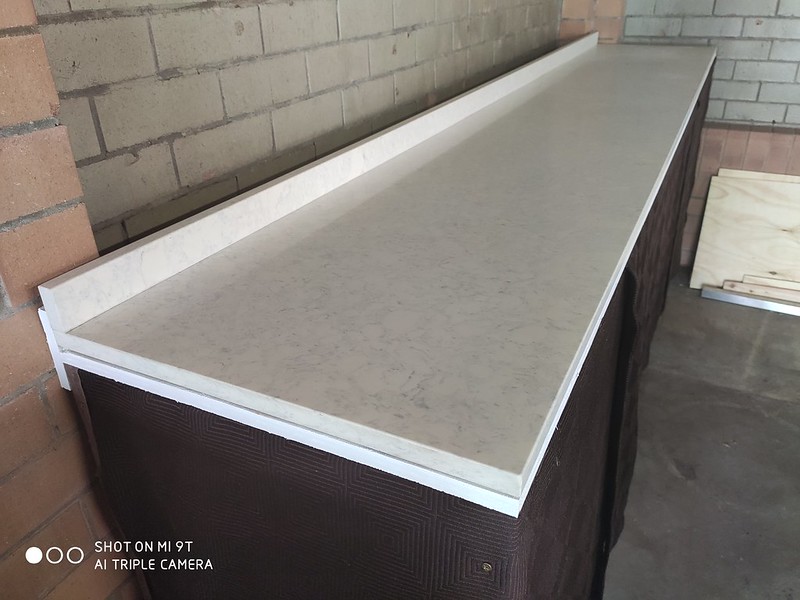 So not bad for $25 in fabric and a couple of days pottering! Cheers, Matt |
| |
Last Edit: Apr 7, 2020 4:24:39 GMT by varelse
|
|
|
|
|
|
|
Next up is a how to on budget window planter boxes. Our new place has lots of casement windows and zero fly screens. It's also within 200m of a creek, so we get a fair few mosquitos and flies. I've got quotes for flyscreens, which I plan on sending to the owner once this virus is out of the way, with the offer of me doing the install to save them some money. But in the mean time, we need a solution! My partner and I are both pretty keen indoor plant herders, so we thought that perhaps some window boxes full of plants like mint, basil, lavender etc that keep the bugs at bay would be the solution! Problem the first: It needs to be cheap. Problem the secondth: The walls are stucco rendered thats crumbling already so I didn't want to screw in to the walls themselves, which left just the sills. The sills are hardwood, but slope, as sills are want to do. Problem the fourth: There is not great clearance between the sill and the bottom of the casement windows, which limits the height for plants to grow. My solution is a little convoluted, but it seems to have worked.  Take some standard timber framing brackets, dip half of them in white paint to blend in with the wall, and then dip the other end in blue/charcoal paint to blend in with the window sill.  Lucky I had all those useless plastic clamps! Take a 3m length of plastic guttering (110mm for preference), cut it in thirds.  While you're a Bunnings, don't forget to pick up some extra bits. Like these gutter end caps!  And don't forget to glue them on, as they don't clip on so well by themselves.  And some of these fascia clips.  I worked off 3 per 1m window box which seems to have worked out ok. You should also get some PVC pipe fittings to thread in from underneath.  These stop muddy water pouring down your landlords walls and making a mess by creating a drip lip. As they thread IN, it also leaves some water retention inside the planter.  Stick it all together and you get this! 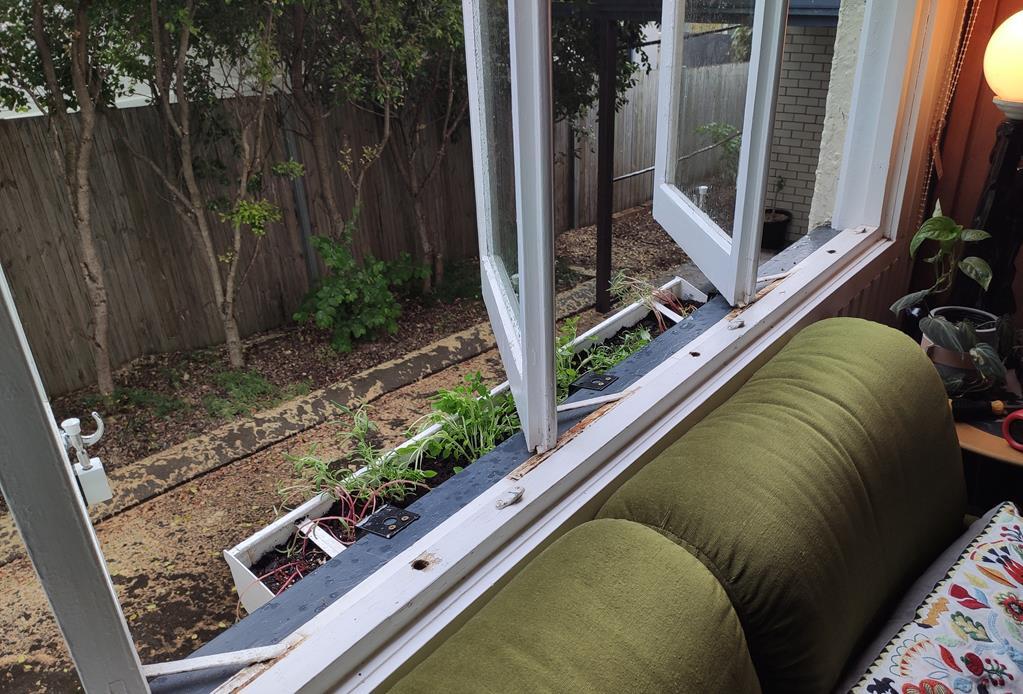 Essentially the gutter clips screw to the brackets which screw to the sill, dropping the boxes far enough that the plants have a chance of growing without getting their heads lopped off by the windows. The brackets needed to be bent out of square so that they dropped vertically despite the sill sloping. And I had to redrill some of the bolts holding the gutter clips to the brackets as they were interfering with the clip system for the gutter clips. I thought I had a better photo of that detail but apparently not! Will try and remember to take some pics showing that and the outside view. Duly filled with dirt and plants, they seem pretty happy.  $40 in brackets and gutter bits. Paint was from work. Solution found and my partner is pretty happy with them too! They should blend in a bit more once the plants start to overflow a bit. Oh, and the window next to the bar is filled with things like mint, so we can use fresh herbs for cocktails.  Cheers, Matt |
| |
Last Edit: Apr 7, 2020 5:04:01 GMT by varelse
|
|
|
|
|
|
|
Outside the house here is a large trough, like a cattle drinking trough, but obviously not. When we got here there was some unidentified bush that grows like mad, but some of the neighbours use the leaves for cooking. No problem, nick away. Just worrying that nobody knows what it's called. For ease, let's name it Nightshade. Then there's another bushy thing that appears to be no use to anyone. Let's ignore that. Then there's me. Hitler used Blitzkrieg, Tojo, Kamikaze, Gengis had his Whordes, whatever they are, and Troy, for some unknown reason, used a wooden horse, but... When it comes to world domination, I choose mint and, in keeping with the household ethos, rescue mint. Bought from the supermarket as cut stems and lovingly rooted before planting out. Already it's throttled some other bushy thing and is now advancing on the No Use To Anyone plant. I'll give that another month. Tops. I love the stuff and use it in cooking all the time, as well as making gallons of mint sauce. All being well, by the end of the year, it'll have taken over the entire street, Wonderful. P.S. and the actual point of the reply, nice herb solution!  |
| |
|
|
|
|
|
|
|
|
Did you not consider making the windowbox the full length of the sill?
|
| |
|
|
|
|
|
|
|
Did you not consider making the windowbox the full length of the sill? I did, and I may well, yet. These were prototypes made from one length of gutter to see if it would work, and get an idea of what kind of weight it could handle. The windows they are under are all different sizes, the bar one is pretty close to a perfect fit. At this point in time it was more about efficiency and getting something growing to combat the mosquitoes. SWMBO will decide whether or not they get enlargened probably. I forgot to take pics from outside when I got home... |
| |
Last Edit: Apr 7, 2020 12:49:38 GMT by varelse
|
|
|
|


