


So. Some details about the wheels and mudguards now.
As I said before I didn't want to go down the route of electrolysis on the wheels and would just wizzy-wheel them but this would still mean having to get the valves out the way (and the grease-nipples) so I ended up breaking the bead of the tyres which was much easier than I expected. I did have a go at getting the tyres off the rim but backed off when thigs got strenuous/tight.
I found that the first valve could quite easily be tucked inside the wheel and had the outside face cleaned and painted in an hour. Well chuffed. The grease nipples do have a shallow hex n them (7/16 AF) but I could feel they were going to round off before moving so just left them be.
The mudguards on this are really sturdy little galvanised ones and I did consider leaving them unfinished but they had traces of red/brown paint of them which kinda ruined it. I scraped this off and gave them a clean with scotchbright pads but they still looked a bit patchy so next thing I knew the better on had a coat of blue along with the wheel.
I think this will look really good actually because there is so much green. Need more blue to balance things out.
The following day I tackled the other wheel and mudguard. This wheel has a cranked valve in the tube which I thought would be a problem but, again, it tucked out the way fine to do the wire-wheeling. The 2nd mudguard actually has 2 rust holes despite being galvanised. It's due to mud collecting between the blade and the brackets rivetted on underneath. Nothing I can do about it so just gave it a clean and hit it with paint. I did both sides of the 2nd wheel. The backs are much more rusty than the front but still seemed to clean up well. One of the biggest problems cleaning the wheels was the old paint, believe it or not. The wheel wasn't shifting it and it took a lot of scraping with a sharp chisel to get it off then do the rust with the wizzy wheel
One little surprise that appeared out of the rust was 'Z242'stamped on the rims. I thought it looked familiar and checked back on the brochure pics on this thread (June 23) to see if it appeared - despite that range of trailers being different from this one - but 'no dice'. The wheels in that catalogue are like X123.
Anyway. It was nice to see altho completely useless. Not like I can Google the number and order new ones

mudguards are bare galvanised

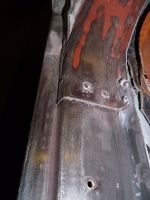
one has a dent at the end

one also has a couple of rust holes above the mounting brackets

grease-nipples have hex but felt too tight to remove

strange that the wheels were light blue then red in past lives

valve tucked away to clean rim

rear face still to be fully cleaned

Z242?

front face ready for paint

one face and one mudguard done

2nd rim looks more damaged at edges and lots of the original(?) light blue paint showing

bent valve getting in way of cleaning

looks like old paint on mudguard

rear face cleaned

front face and holed mudguard ready for paint

pitted rear face looking 100 times better after an hour's work

looking the bees knees
As I said before I didn't want to go down the route of electrolysis on the wheels and would just wizzy-wheel them but this would still mean having to get the valves out the way (and the grease-nipples) so I ended up breaking the bead of the tyres which was much easier than I expected. I did have a go at getting the tyres off the rim but backed off when thigs got strenuous/tight.
I found that the first valve could quite easily be tucked inside the wheel and had the outside face cleaned and painted in an hour. Well chuffed. The grease nipples do have a shallow hex n them (7/16 AF) but I could feel they were going to round off before moving so just left them be.
The mudguards on this are really sturdy little galvanised ones and I did consider leaving them unfinished but they had traces of red/brown paint of them which kinda ruined it. I scraped this off and gave them a clean with scotchbright pads but they still looked a bit patchy so next thing I knew the better on had a coat of blue along with the wheel.
I think this will look really good actually because there is so much green. Need more blue to balance things out.
The following day I tackled the other wheel and mudguard. This wheel has a cranked valve in the tube which I thought would be a problem but, again, it tucked out the way fine to do the wire-wheeling. The 2nd mudguard actually has 2 rust holes despite being galvanised. It's due to mud collecting between the blade and the brackets rivetted on underneath. Nothing I can do about it so just gave it a clean and hit it with paint. I did both sides of the 2nd wheel. The backs are much more rusty than the front but still seemed to clean up well. One of the biggest problems cleaning the wheels was the old paint, believe it or not. The wheel wasn't shifting it and it took a lot of scraping with a sharp chisel to get it off then do the rust with the wizzy wheel
One little surprise that appeared out of the rust was 'Z242'stamped on the rims. I thought it looked familiar and checked back on the brochure pics on this thread (June 23) to see if it appeared - despite that range of trailers being different from this one - but 'no dice'. The wheels in that catalogue are like X123.
Anyway. It was nice to see altho completely useless. Not like I can Google the number and order new ones

mudguards are bare galvanised
one has a dent at the end
one also has a couple of rust holes above the mounting brackets
grease-nipples have hex but felt too tight to remove
strange that the wheels were light blue then red in past lives
valve tucked away to clean rim
rear face still to be fully cleaned
Z242?
front face ready for paint
one face and one mudguard done
2nd rim looks more damaged at edges and lots of the original(?) light blue paint showing
bent valve getting in way of cleaning
looks like old paint on mudguard
rear face cleaned
front face and holed mudguard ready for paint
pitted rear face looking 100 times better after an hour's work
looking the bees knees


