|
|
|
Sept 26, 2017 1:04:40 GMT
|
|
Ive made some good progress on the bed of the truck lately, but all those hours bending metal in more complicated ways than I'm used to and I have very little photo worthy images to show you guys. I ended up learning quite a bit more about metal shaping, namely that complicated pieces are going to need more metal than the CAD template indicates......so I did end up "frankensteining" the biggest part of the inner fender. You can see the hole towards the front of the inner fender in the pic from my last post above (inside left). This piece follows the curve of the inner fender which is a compound curve, and bends to a straight wall that makes up part of the inner wall of the bed....I tried shrinking and stretching, hammer and dolly...but it ended up taking just more time than I had...so I decided to bend what I could manage and add more pieces. which is coming out nicely....I have one more big section to go then Ill update the thread with some pics.
In other news, I finally found the squeaky accessory that I have been trying to nail down these past weeks. It was the tensioner unit...not its pulley, but the spring assembly. Looking closer, the main hinging pivot that houses the big spring had begun to wear out of round....it was an aftermarket unit that was open to the air.....you could see the spring inside...the new one is still an aftermarket unit, but is sealed in that area...I expect better longevity....
JP
|
| |
I know its spelled Norman Luxury Yacht, but its pronounced Throat Wobbler Mangrove!
|
|
|
|
|
|
|
Sept 26, 2017 1:29:07 GMT
|
|
Well done on tracking that one down. Sometimes random noises can be a pig to source.
|
| |
|
|
|
|
|
Sept 26, 2017 1:51:24 GMT
|
Well done on tracking that one down. Sometimes random noises can be a pig to source. funny you mention that...this one sure was...I found out something else....the sounds a component makes when it is squeaking or whatever gets thrown around the engine compartment to wherever you are putting your ear to!!!!!! I ended up using a piece of cardboard to isolate each component (keeping it away from the spinning fan, of course) and this helped alot in the end. It seemed to block the traveling sound waves a bit....that method ruled out the alternator a few days ago, but I still was not totally convinced. I was happy when starting the truck back up after the fix that everything was quiet..... Even using a length of tubing or wood placed on each component helped, but all the while, I heard nothing from the real culprit using this method!!! JP |
| |
I know its spelled Norman Luxury Yacht, but its pronounced Throat Wobbler Mangrove!
|
|
|
|
|
Sept 26, 2017 1:53:19 GMT
|
|
Yup. I had a Subaru with a ticking that me and everyone else swore was coming from the back of the engine.
The cure? A new cam belt!
|
| |
|
|
|
|
|
Sept 27, 2017 20:02:24 GMT
|
|
Yep, had a strange noise coming from the front of the Chev-suzu, every once in a while when you started it it would groan, usually the first start of the day. I couldn't find it, I was all over that engine looking for it, I took it to my mechaninc in the end,and guess what, it never did it once for him!! Next day when i started it, did it first time! It doesn't do it so much at the moment, so I've decided to just wait until something falls off, then I'll know for sure what it is!
But enough about my truck, hows that bed coming along? Any pictures?
|
| |
|
|
|
|
|
Sept 30, 2017 1:14:42 GMT
|
|
thanks, Piston
yeah Ive been plugging away at it...I had a weird flickering with all the lights, interior, exterior, headlights, dash lights, and was getting readings off the battery when the truck was running that kept varying between 14.1 and 14.8v.....it just kept cycling up and down like that...
The problem was that it seems the sense wire that fed the regulator (switched wire coming from the fuse panel) apparently had resistance in that branch of the wiring and was reading low....the regulator thought the voltage was low because of this and would demand more from the alternator...which did not agree that it needed to do that as its sense wire was direct from the battery.
they were arguing!
solution was found over at the dodge forum....put the ignition switched sense wire for the regulator on the feed side of a fused relay and run the output wire directly from the battery to power the regulator through the relay....this way the voltage would be the same at the regulator and alternator and hopefully they would stop arguing.
I'm happy to say it is working like a charm...no more flickering lights, no more weird gauge cluster anomalies and the truck is actually idling better and has smoother power delivery...its not any more powerful, unfortunately......but is has smoothed out. The transmission is shifting much smoother, too....
the relay has a built in port for a 30a fuse, a plug with wiring and a mounting bracket......I got a 5 pack (they actually sent 10!!!) for under 40.00US.
The bed is coming out nicely and I'm almost done with the inner fender repairs on the worst side....Ill get some pics up this weekend!
thanks for looking
JP
|
| |
I know its spelled Norman Luxury Yacht, but its pronounced Throat Wobbler Mangrove!
|
|
|
|
|
|
|
So here we go with some pics.... engine compartment....new bearing and painted pulley on the AC clutch, new idler bearing, new alternator, new battery cables, new wiring for the alternator...... 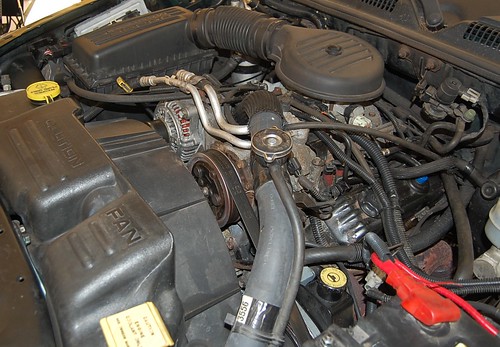 and here is the relay for the voltage regulator. it has its own fuse, wiring plug and mounting bracket. you can see the red sense wire coming from the ignition switch upper left of the photo. This was the magic trick for the flickering lights! 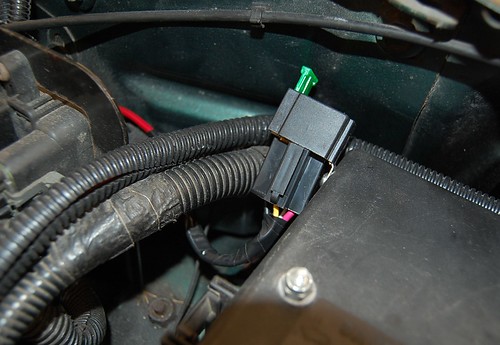 new tensioner and pulley assy...this is a "better" aftermarket unit than I had in there before..... 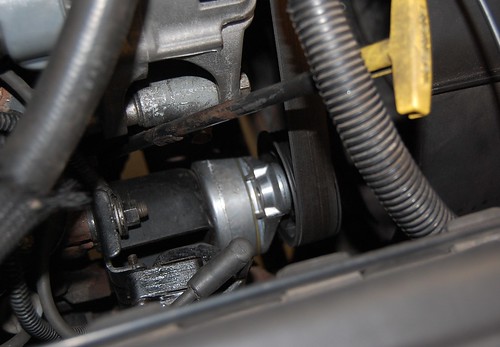 The body work continues on the bed.... here is the inner patch for the middle of the inner fender...this would be at the bottom when on the truck. my original bed is rotted here too..but much worse! I welded an "L" shaped piece that also matches the shape of the bed floor. ( piece goes to just below the pencil) 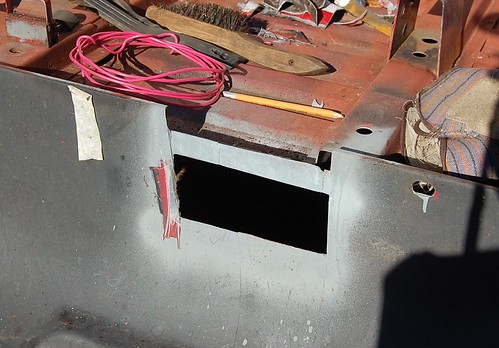 and this one shows the beginnings of the patch(es) for the inner fender area. This goes above (or behind, however you want to look at it) the inner most metal panel of the inner fender structure when right side up. This is the piece that I wanted to do in one piece...but could not get the metal to bend enough....and realized it was too much to do with limited skills and tools.... 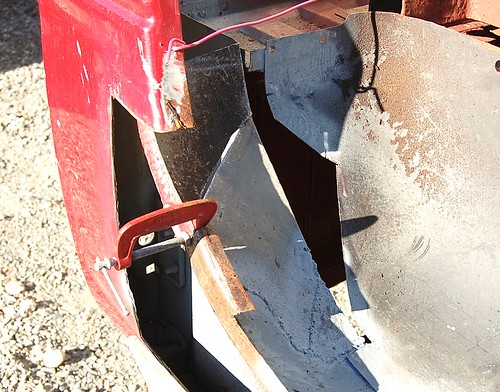 here is a better angle. you can see the structure a bit better here....the red wire holds the outer fender in the right place and both left and right fenders are measuring the same.....now. To get the patches on the truck, the previous owner cut the rust out, hammered the remains up and out of the way, then just bonded the panels in place. this distorted the inner fenders quite a bit and I had to reshape them so they would be as close as I could get them to matching the new outer fender patches. (which are a little out of shape too...but Ill do the best I can ....) 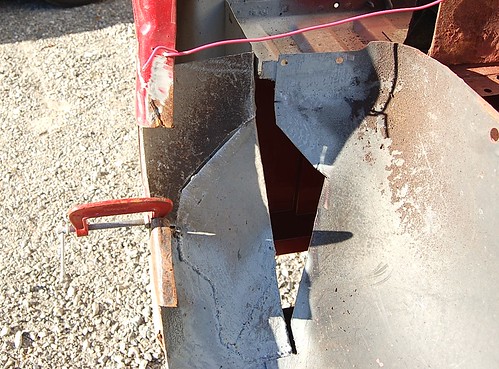 this shot is from the other side of the panel...you can see the welds to the left which attach that lower patch....its a complicated shape in my mind and I'm still not finished yet!...The inner fender lip still needs to be shaped and attached...but I can do this with the shrinker/stretcher....( I hear Lazze's voice whenever I type "shrinker stretcher" ) 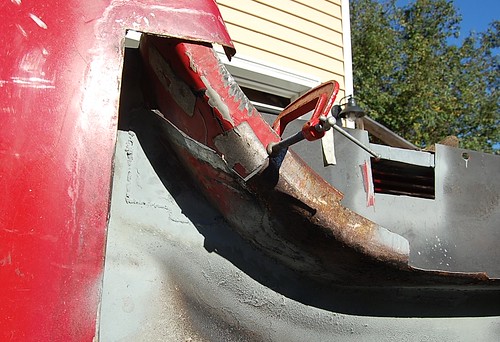 Well, thats about it for now...I had to get a lot of house stuff done today, so unfortunately no work on the truck..... thanks for looking JP |
| |
I know its spelled Norman Luxury Yacht, but its pronounced Throat Wobbler Mangrove!
|
|
|
|
|
|
|
|
forgot to mention, when they glued in patches to the inner fender area they used both caulking, epoxy and panel adhesive and tar for roofing. I'm hoping it was not done at a body shop. The caulking was not adhesive based and let enough moisture in behind the panels to further rot out that section of inner fender. This is why I have to rebuild the whole section.
Perhaps this week Ill get a bit more done...
JP
|
| |
I know its spelled Norman Luxury Yacht, but its pronounced Throat Wobbler Mangrove!
|
|
|
|
|
|
|
|
I am happy to report that the truck made it 6 hours up and 6 hours back from a trip to New Hampshire this past weekend. I got a digital voltage monitor for the accessory port that showed me how the truck was charging and after the relay I put in, it was 14.2-14.4 with no fluctuations, just steady voltage readings.....
This solved several issues from rough idle to fuel economy...I put in 2 bottles of injector cleaner and ran it on high test for a couple of tank fulls, I am very happy with the results.
It even pulled a utility trailer the whole way and brought back my grandfathers antique Grandfather Clock.....
I was also able to help set up a charity event that we are going back up to NH for in 8 days.....
JP
|
| |
I know its spelled Norman Luxury Yacht, but its pronounced Throat Wobbler Mangrove!
|
|
|
|
|
|
|
|
Good,result.
And saving family antiquities an even better outcome.
|
| |
|
|
|
|
|
|
|
Oct 14, 2017 22:29:45 GMT
|
|
thanks, Grizz....I had to repair the pendulum and post as it had broken last summer getting it home....once the clock was here, I could put the two together again!....a little light brass polish on the numbers, pendulum weight and hands, some winding and adjusting and it lives happily in our dining room, clicking happily away and keeping good time....a very nice nod to my grandparents. cool note of interest, I have pictures taken of my grandparents in their late 20's just after they had bought the clock and it sits proudly in their dining room in "the city of gracious living" Yonkers NY....of course then, in the 20's, that city now was a very quiet suburb of NYC......
Ill post if there is interest....
thanks!
JP
|
| |
I know its spelled Norman Luxury Yacht, but its pronounced Throat Wobbler Mangrove!
|
|
|
|
|
Oct 15, 2017 16:25:55 GMT
|
|
I'd look at that, I quite enjoy looking at old photographs.
|
| |
|
|
|
|
|
Oct 15, 2017 18:49:52 GMT
|
|
Yep, same here. Especially with a family related back story.
|
| |
|
|
|
|
|
|
|
|
okay, Ill post up some now and then pics!.....thanks, guys
JP
|
| |
I know its spelled Norman Luxury Yacht, but its pronounced Throat Wobbler Mangrove!
|
|
|
|
|
Oct 16, 2017 16:52:37 GMT
|
well guys after traveling down memory lane, I could not locate the photo of my grandparents with the old clock, but I will find it when I have time to look....in the meantime...here is the clock on our dining room.....  in other news, I found some very cool photos of my dad and his 54 Chevy Fleetline...which Ill post in that thread today.... thanks for looking! JP |
| |
I know its spelled Norman Luxury Yacht, but its pronounced Throat Wobbler Mangrove!
|
|
|
|
|
Oct 17, 2017 13:56:39 GMT
|
Inner fender lip construction...a little more of "I need to learn how to do this" and get better with the shrinker/stretcher exercise. I did discover that making shaped pieces bigger than the paper template allows fitting the piece after you have stretched it, ect...then, cut or grind the shaped piece to its final form. Before, it was like cutting dough for a pie shell by only tracing the circle of the dish....I wasn't taking into account how much more metal was needed to fill the "dish" its one of those afterthoughts....DUH!....of course you need to do this...but, my stinginess with materials clouded my judgements!  Inner patches cleaned up 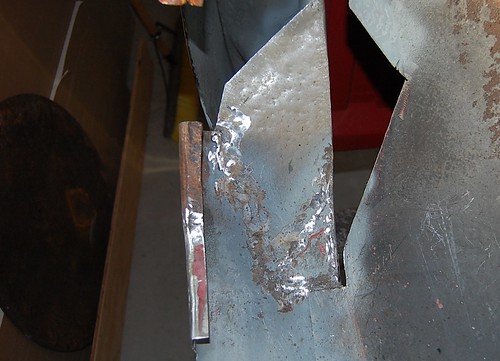 here is the area now with a small section added for the inner lip...this was my experiment to see if I could get the bend I wanted and it worked well enough to move ahead.... 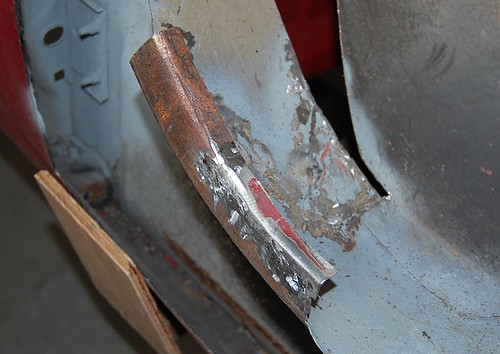 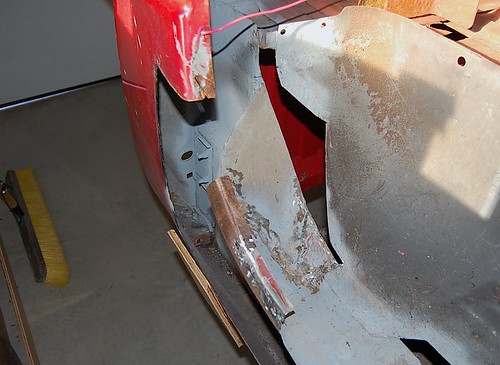 and the new lower inner section, taking shape....looks a bit rough, but those flux core welds clean up nicely.... 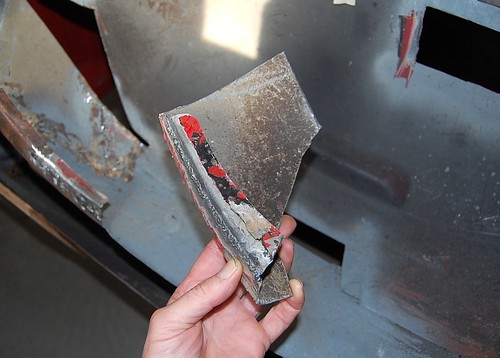 and it goes here 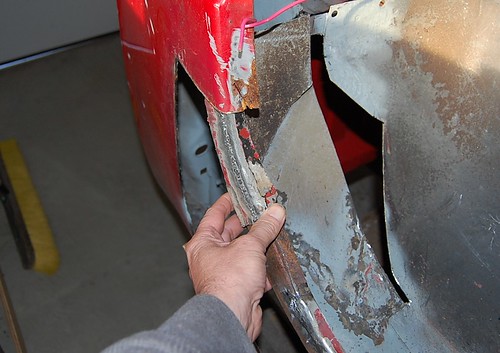 I still have final shaping to do to straighten out the lip, and I will need to fit the outer patch in place so I can locate the final angle of the inner lower patch and make sure it all lines up.... thanks for looking JP |
| |
I know its spelled Norman Luxury Yacht, but its pronounced Throat Wobbler Mangrove!
|
|
|
|
|
Oct 19, 2017 14:42:05 GMT
|
Heres the latest on the inner fender patches. I thought I had trimmed the lower patch too small once I started fitting it in place for real....but with some massaging and bending I have it to a place where I can work with it...some of the gaps here and there are a bit excessive, but Ill use the old copper piece behind the gap trick to fill it in..... 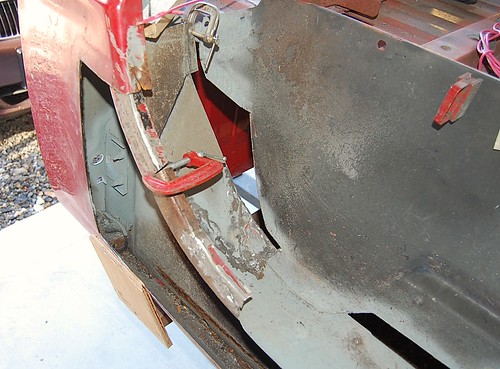 getting the inner fender lip formed by using two pieces worked well...perhaps a bead roller is in my future.....who knows? Inner wall and floor area 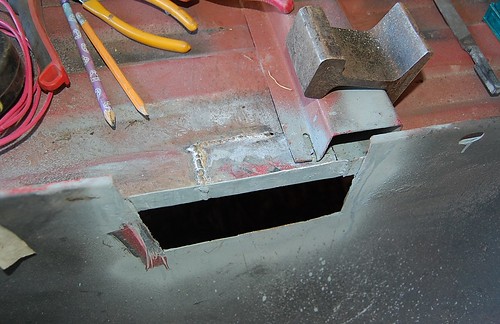 and its patch piece 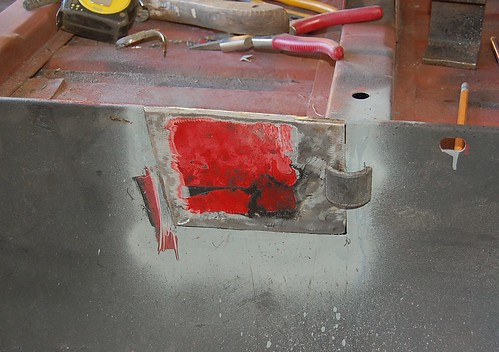 slowly taking shape... JP |
| |
I know its spelled Norman Luxury Yacht, but its pronounced Throat Wobbler Mangrove!
|
|
|
|
|
|
|
|
Finally got some time to weld in that lower front inner fender piece...was putting the finishing touches on it just as it was getting dark and the wife got home from the gym.....so no pics yet...but it measures out, lines up and is very strong again, so all I have left on that side is the inner fender lip and I can get started on the other side which is much less rotted.....
pics tomorrow, but its a big step forward....
JP
|
| |
I know its spelled Norman Luxury Yacht, but its pronounced Throat Wobbler Mangrove!
|
|
|
|
|
|
|
|
I continue to be amazed at your work.
It has to be a rare thing, restoring a new truck.
|
| |
|
|
|
|
|
|
|
I continue to be amazed at your work. It has to be a rare thing, restoring a new truck. yup...just like an old truck...only, errrr, newer....and the metal is thinner, and I continue to curse planned obsolescence. I have seen on the net, similar trucks in a different part of the country in great shape...our roads, the humidity and use of salt or sodium chloride spray reduce our vehicles to corroded hulks in short order...car washes 5-6 times mid winter are mandatory. Here are some pics.....lower inner fender area welded in: 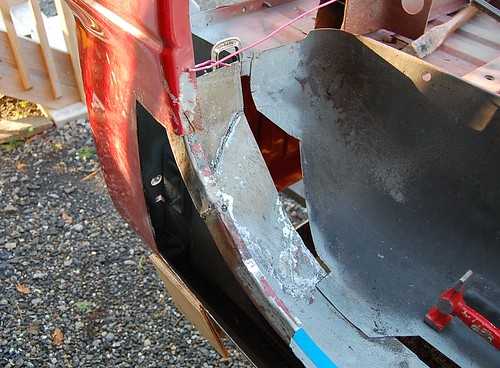 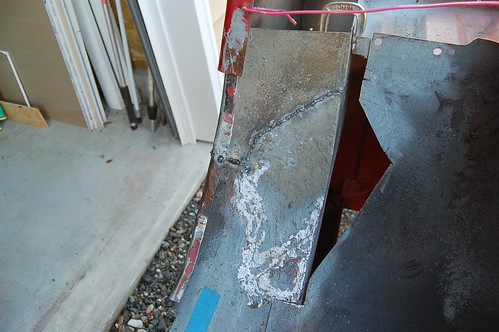 side view: 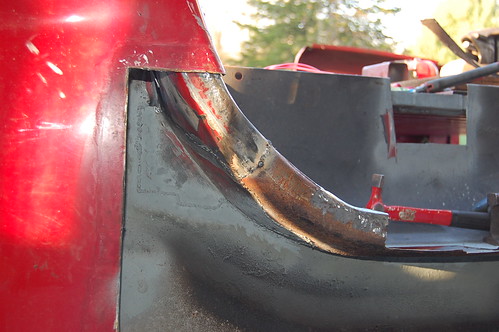 The flattened copper pipe clamped under the gaps came to the rescue for sure!....these gaps were pretty big...but the pipe made it easy...... This is the area left to go....its a little big for one piece, but I'm going to give it a try..... 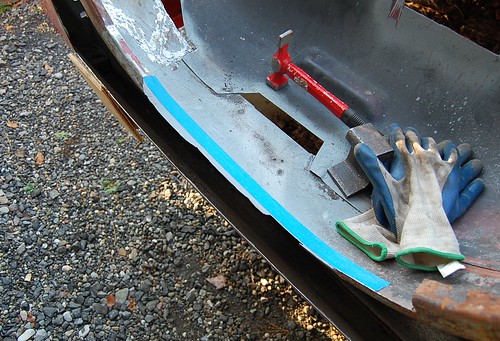 The lip formed fairly well and conforms to the replacement piece perfectly....now, If it all matches up when I go to weld it all in place, we should be good to go!  You can see a gap in the piece to the left, I just didnt have a strip of metal wide enough, but Ill patch that in later..... thanks for looking JP |
| |
I know its spelled Norman Luxury Yacht, but its pronounced Throat Wobbler Mangrove!
|
|
|
|


