vulgalour
Club Retro Rides Member
Posts: 7,286
Club RR Member Number: 146
|
|
Apr 27, 2024 22:05:32 GMT
|
|
As expected, the fuel pump is leaking oil again now. Not much, it's only just started, but I'll have to pop it off and re-gasket that to see if i can seal it again.
Happily, the other oil leaks seem to have remained fix, so it's not all bad.
|
| |
|
|
|
|
vulgalour
Club Retro Rides Member
Posts: 7,286
Club RR Member Number: 146
|
|
|
|
Happy days, had a little payment come in so I could order those LED headlights. 10% discount knocked them down to £230 for two pairs, and there was free postage. Brightness - should be much improved helping me see where I'm going much better Aesthetics - indicators and sidelights are incorporated into the headlights, this is a lot tidier than the current set up. Wipers - When I've got all systems running in the rain, my wipers can slow down when I'm stood on the brakes at a junction (heated rear screen, headlights, sidelights, indicators, all five brake lights, heater, blower fan, and the wipers themselves) so hopefully LED units will help out a bit there. They do look to be plug and play so even an idiot like me should be able to fit them and since I already have a digital flasher instead of an old bimetallic one I shouldn't need to worry about flash rates on the indicators. These are the ones I got in the end: www.originalcaferacer.com/product/5-75-monaco-gp-led-headlight-pair-50w-drl-dot-e-marked/I think they'll look okay because while they are black which I didn't exactly want, that should blend in to the black plastic trim on the front of the car. I just hope it doesn't end up looking a bit 'modernised hot rod'. |
| |
|
|
|
|
|
|
|
|
Your choice, but I think you would have been better off with the led bulbs I recommended.
|
| |
|
|
vulgalour
Club Retro Rides Member
Posts: 7,286
Club RR Member Number: 146
|
|
|
|
|
The bulbs were more work (EDIT: by which I mean I'd have to find somewhere to put the sides and indicators after fitting the bulbs for the look I want on the front), hence the decision I made. I want the sides and indicators in the headlight bowls and this seemed the best way to do it in one shot with the least hassle.
|
| |
Last Edit: May 3, 2024 14:42:29 GMT by vulgalour
|
|
vulgalour
Club Retro Rides Member
Posts: 7,286
Club RR Member Number: 146
|
|
|
|
|
I'm not doing much in the way of pics and vids lately, cba I'm afraid.
Anyway, had a look at the fuel pump oil leak this afternoon. The phenolic spacer is well bonded to the cambox, that side isn't leaking which is great so I left that alone. The pump side, on the other hand, was leaking because the paper gasket had failed. Cut and fit a new cork gasket then went for a test run and it seems to be leak free now. I don't think it will last very long, it never normally does. I'm hoping the cork is just that bit more flexible than the paper, and obviously a little thicker, so should take up any variances. A go over with a sanding block didn't highlight any particularly egregrious surface deviations so I just have to keep trying. Next attempt at sealing will be cork gasket and goop if this one fails.
Happily, the oil filler tube gasket has proven successful and I'm getting no oil from there and while there is oil residue on the belts side, I'm not seeing any new appearing from any particular spot. I think I'm getting close to the point where I can just degrease everything and keep an eye on things now. There's also less spots of oil appearing on the drive when I park up, so that's good too.
|
| |
|
|
vulgalour
Club Retro Rides Member
Posts: 7,286
Club RR Member Number: 146
|
|
|
|
Hey I did some photos for once so let's do an update on today's adventure. Recently I found a little hole in the floor under the pedals, I'm pretty sure this is down to my leaking windscreen seal and a big chunk of underseal that had fallen off on the outside of the car... and my general neglect while I was working on other cars before pressing the Princess back into daily duties. Got it up on an axle stand so I could pop the wheel off and clean up the area. 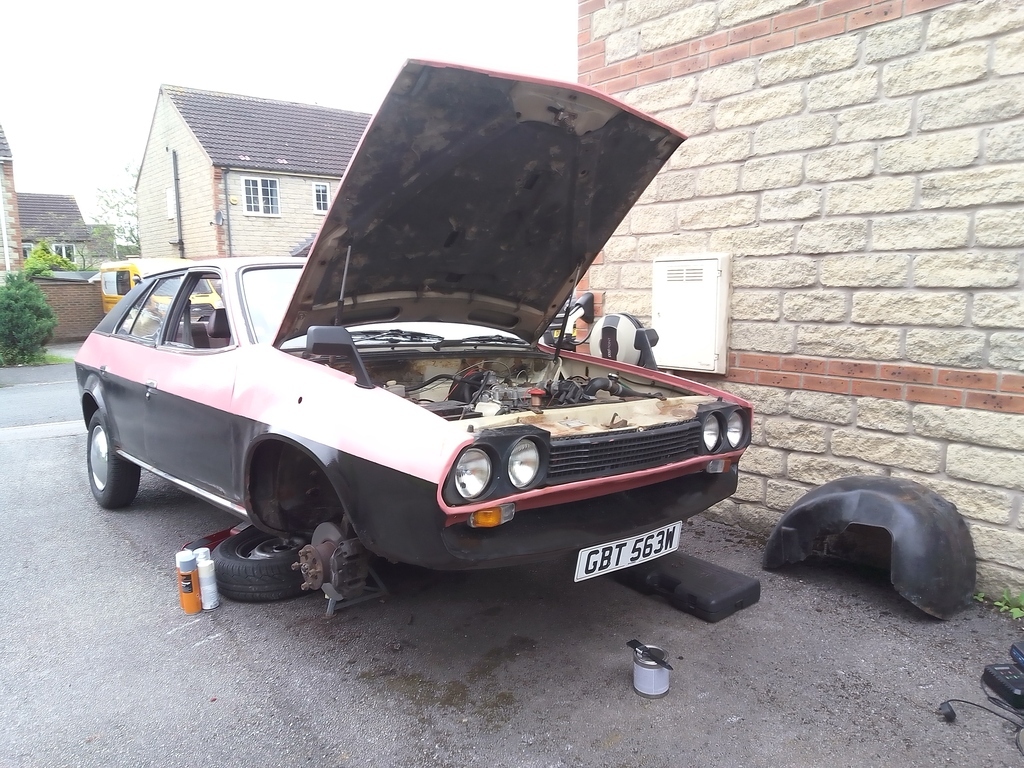 I completely failed to get any before photos, I just wanted to get this job done. Working in footwells is not my idea of fun, nor is welding upside down on the drive. There had been a larger repair done to this area well before I got the car so that was done at least 12 years ago, probably nearer to 30 which is when the car was restored in the '90s. For the most part, that repair is holding up just fine so I left it alone, the issue is where water has been sitting inside the car from the leaking windscreen seal, and the missing underseal on the outside I didn't know about. Some chopping and grinding and rust treater later and it was no longer a hole nor was it rusty. 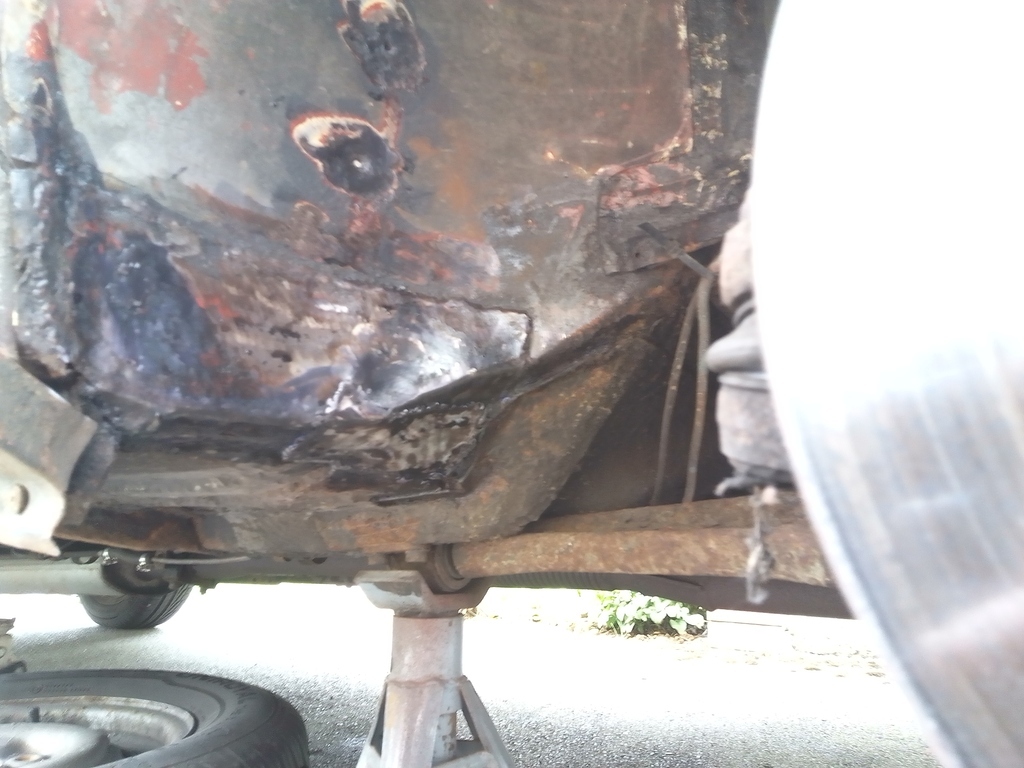 Had a bit of an explore of the rest of the inner arch and found some flaking paint and surface rust, a couple of localised bits of rot that need welding up, and not much more than that. Picking battles again with this one, I only really had an afternoon available so decided to leave the welding that requires partial dismantling of the suspension alone for the time being. 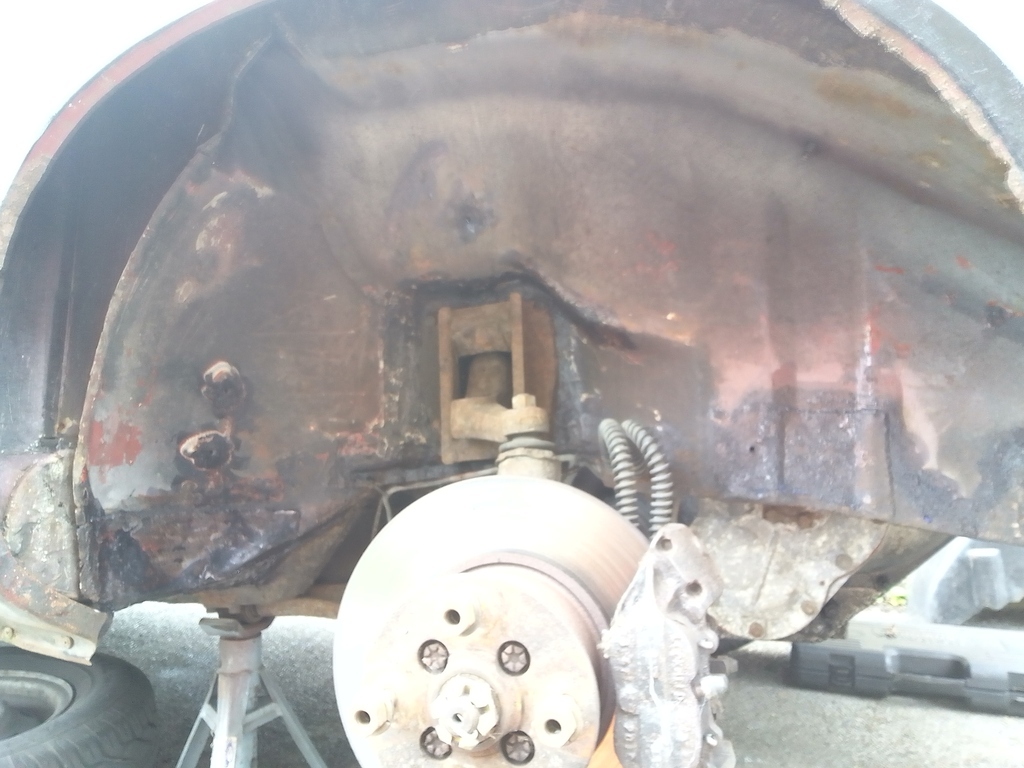 While I had the car in the air I went over the sill repair, caught any pinholes that appeared after grinding off the welds, and just gave things a general tidy. I've got a full outer sill to go on this side when I have time so I didn't go nuts. 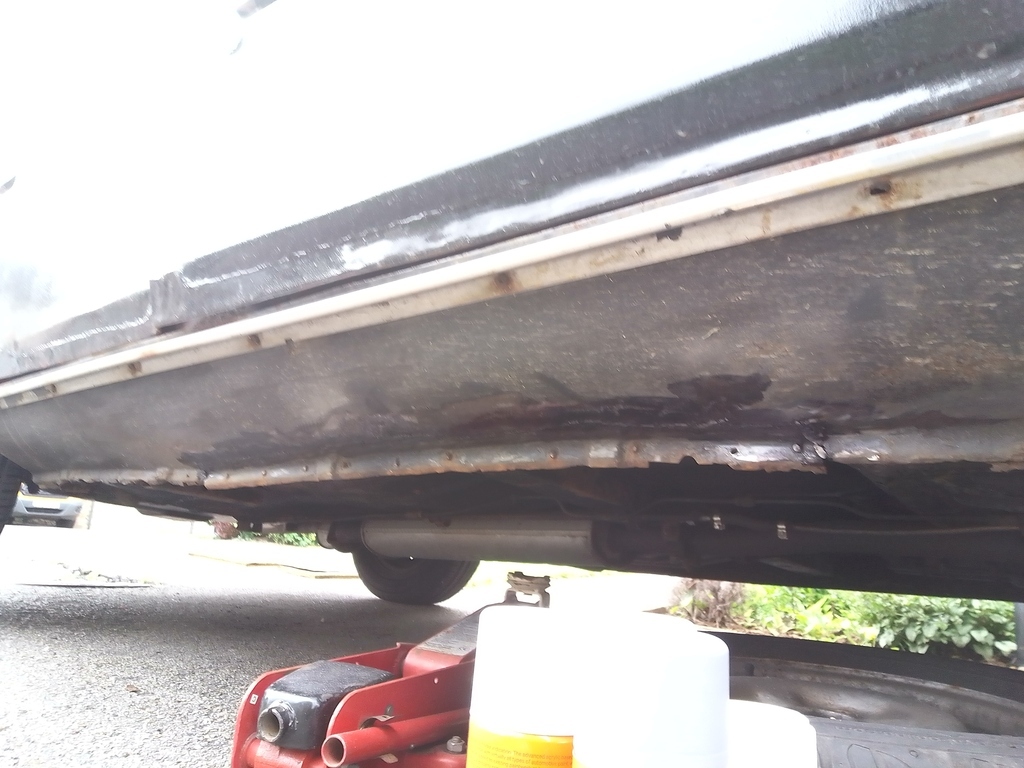 Inside wasn't too bad, bit blurry for the photo because it had got to that point in the job. This did end up being a much larger repair than I was expecting, there was a lot of overlapping panels and sealant going on here which I think had exacerbated things. 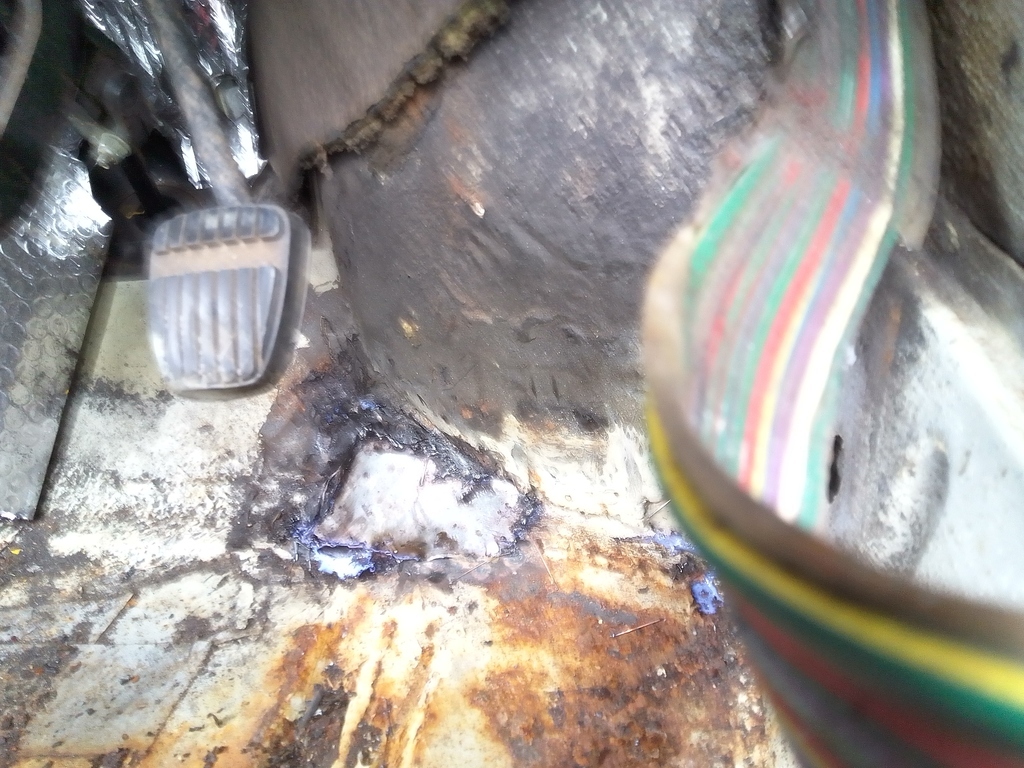 Passenger side didn't have the same problem, although it was a bit damp from the recent downpours. I took out the foam sound proofing panels from the front of the car since they are definitely holding on to water, the red carpet barely holds on to any water at all so that can stay for now since I hate driving around with no carpets in the car. Annoyingly, it wasn't until after I had put all my tools away and was refitting the carpet that the light caught what turned out to be a tiny hole in the middle of the passenger floor pan so I'll have to come back and sort that out, it's so small you could probably drill it and fit a bung to repair it. 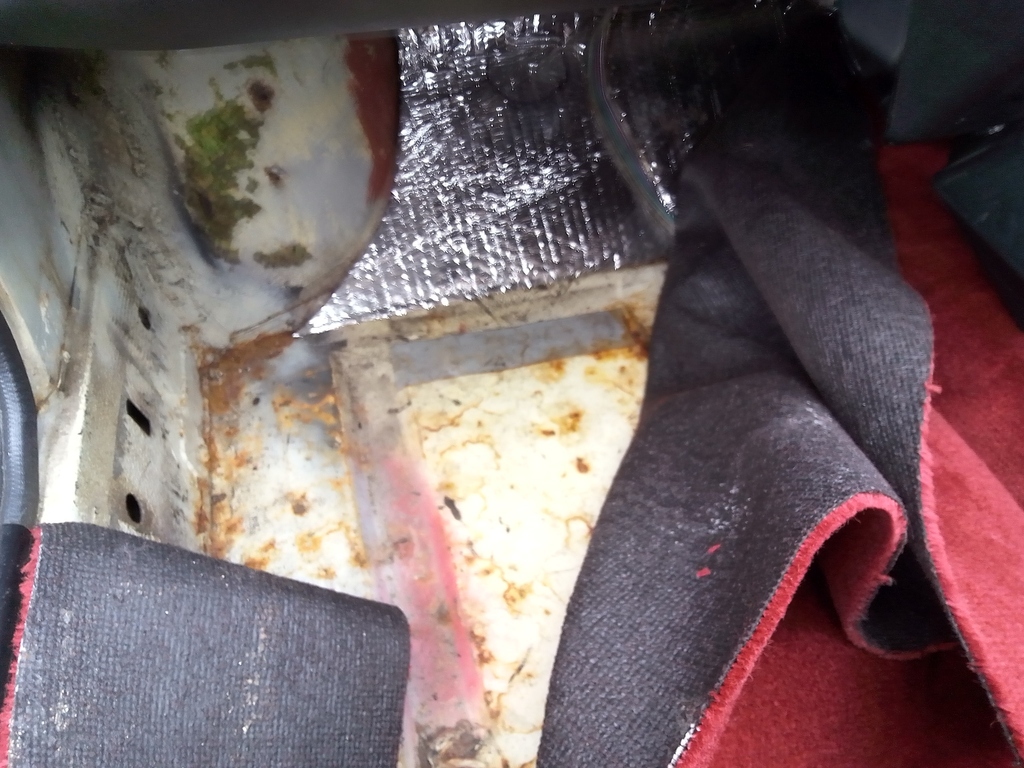 A break to let things cool down and whatnot, flatting off of the repairs, and then a nice dose of primer and seam sealer on both sides to keep the weather out and the rust at bay. Actually ended up looking a lot better than I was expecting. 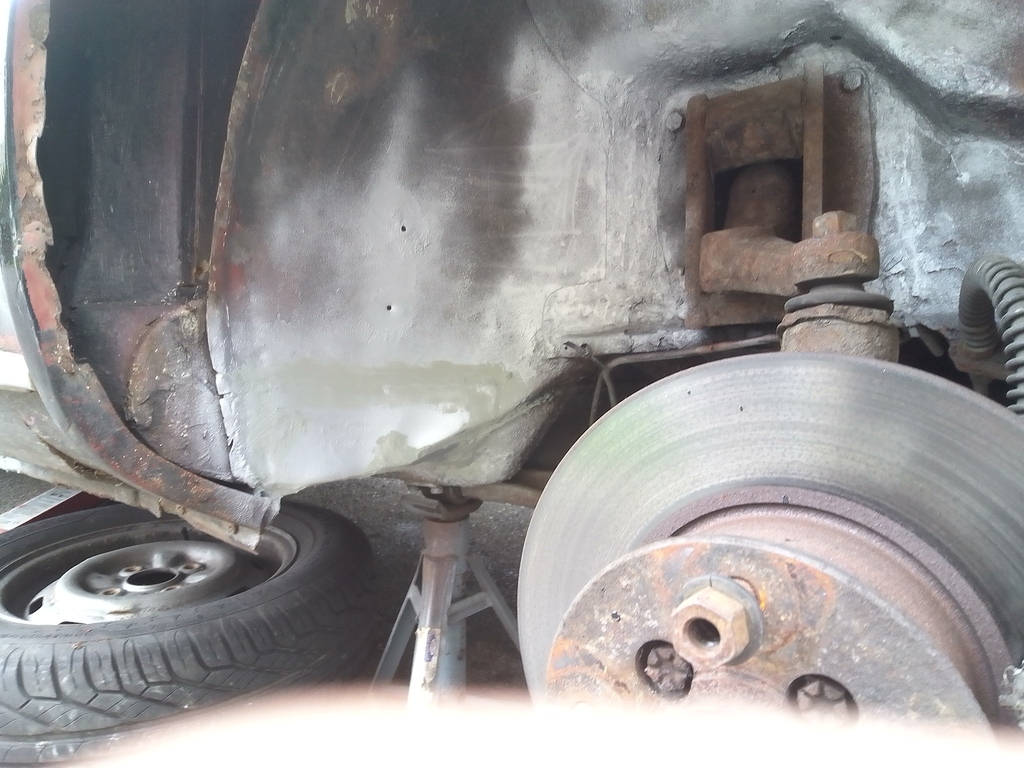 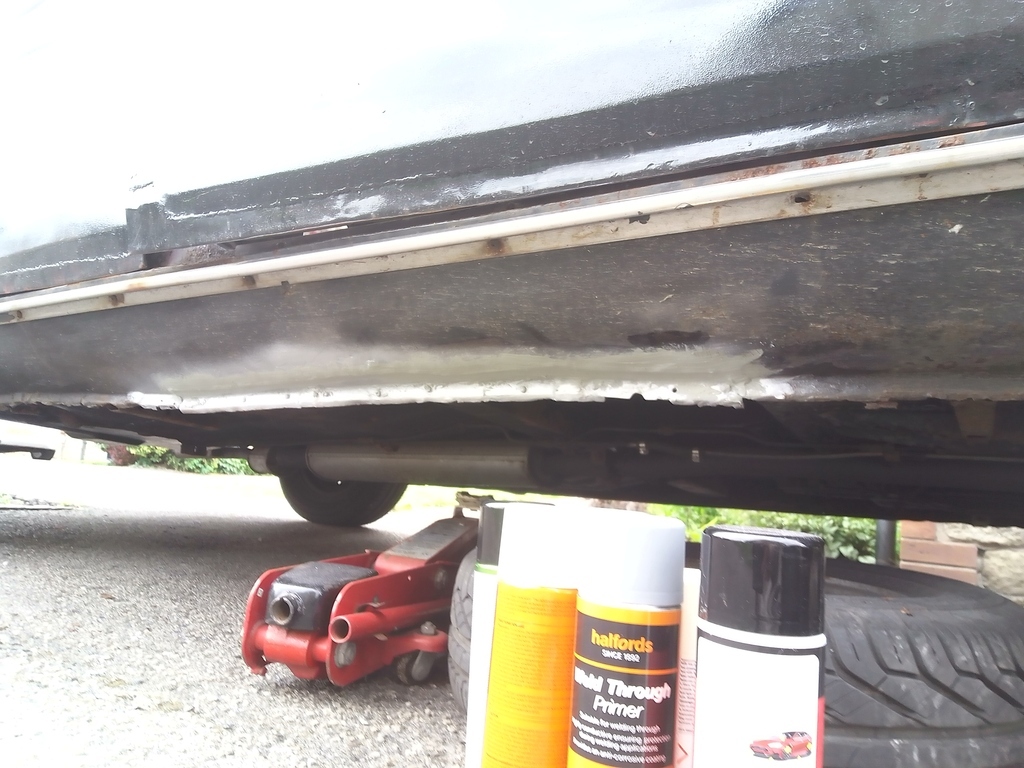 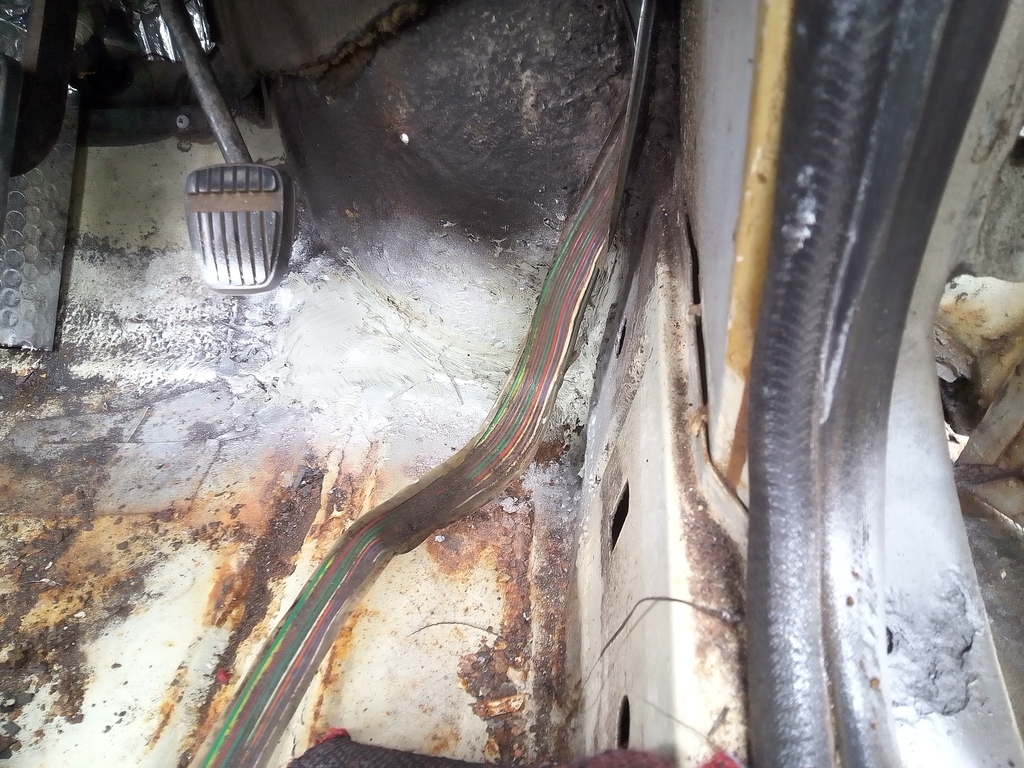 Finished it all off with some top coat and a spritz of underseal, forgot to photograph that, and let the underseal cure a bit before letting it down off the jack. That's when the jacking point - which has always looked pretty mangled on this corner but never offered a problem - decided to make some awful crunching noises, try and push up through the floor and generally give me The Fear. Found another point to jack from and all was well so I could investigate. It looks like the seam between the jacking point and the inner sill has partially failed, hidden by a very thick layer of factory underseal. There's also been a repair to the floor over the jacking point which might have been me, I'm not sure, and that still looks perfectly sound. I'll have to pull the carpet back again and have a bit of an explore, it'll either just need a quick line of stitch weld or for the jacking point to be removed and straightened, the floor likewise, and the whole lot put back together again. There's no obvious holes or rust so it's a bit of an odd one. I'm tempted to take a few days off work since May is always super quiet and just do as much welding as I can to deal with all these niggly little bits in one go before work gets busy again. We shall see. For now I'm just happy the big hole in the floor is now a big steel patch. |
| |
|
|
vulgalour
Club Retro Rides Member
Posts: 7,286
Club RR Member Number: 146
|
|
|
|
|
Small update here.
That weird deadspot issue has totally gone. It must have been the air in the clutch hydraulics, it's the only thing that's changed since bleeding it out and I simply can't get the car to repeat the deadspot issue at all.
Recently I brimmed the tank for the first time in ages. New problem is that it is definitely dragging some rubbish through from the tank. I do have a filter before the pump so I'll swap that out, it's probably clogged. Over the years I've had periods where a red sandy sediment (not rust) has been pulled through from the tank so it's probably flushed a bit more of whatever that is out.
Oil leak from the fuel pump appears to be solved too, the cork gasket has thus far done the trick. Normally it would have at least started weeping by now and it isn't yet.
There's been a bit of a delay delivering my new headlights because of bank holiday so I'm still waiting on those arriving.
I've not done a list in a while, so here's where we're at on that:
Windscreen - order and fit (maybe order it next month if things go to plan). Already have a new seal to fit at the same time.
Roof - paint when new windscreen is fitted.
Front Driver's Inner Wing - small repairs to driver's side
Front Driver's Outer Wing - media blast and paint NOS wing before fitting
Front Passenger Wheel Arch - cut out rot, fit repair panel
Rear Passenger Wheel Arch - cut out rot, fit repair panel
Driver's Outer Sill - fit NOS outer sill
Driver's Front Jacking Point - straighten, weld, and otherwise sort out
Passenger Front Floor Pan - weld small hole
Passenger Front Door - repair, paint, and fit spare door
Driver's Front Door Hinge - determine what's worn and repair/replace it. Probably the top hinge pin.
Suspension - Full regas of all units. Ideally find someone to remake the interconnecting pipes too, tricky since I have no template to work from.
Rear Passenger Axle Mount - replace metalastic bushing
Steering Rack - replace boots
Headlights - Fit new LED units when they arrive
Valve Shims - adjust to correct values
General Service - We are due an oil and coolant change this year, perhaps a little past due now.
ICE - fit head unit, speakers, and aerial. Still fancy twin electric aerials on the rear wings.
Spoiler - repair crack in fibreglass spoiler and then get it painted
Boot - make and fit interior trim panels for boot lid and boot interior
Protection - cavity wax all the things, underseal all the things
MoT - I'm exempt, and taking full advantage while I've got other things going on in my life right now. I would prefer to have an MoT all the same, just so I can be sure I've not missed anything daft.
Profit? - unlikely.
|
| |
|
|
vulgalour
Club Retro Rides Member
Posts: 7,286
Club RR Member Number: 146
|
|
|
|
Been trundling around no bother today when I could smell fuel sometimes. That could have been all sorts of things really, Scunthorpe has a fair few filling stations and industrial zones and whatnot so I just put it down to Someone Else and carried on until I could park up. Took some pics when I got home of the carnage, I forgot the Princess does this. 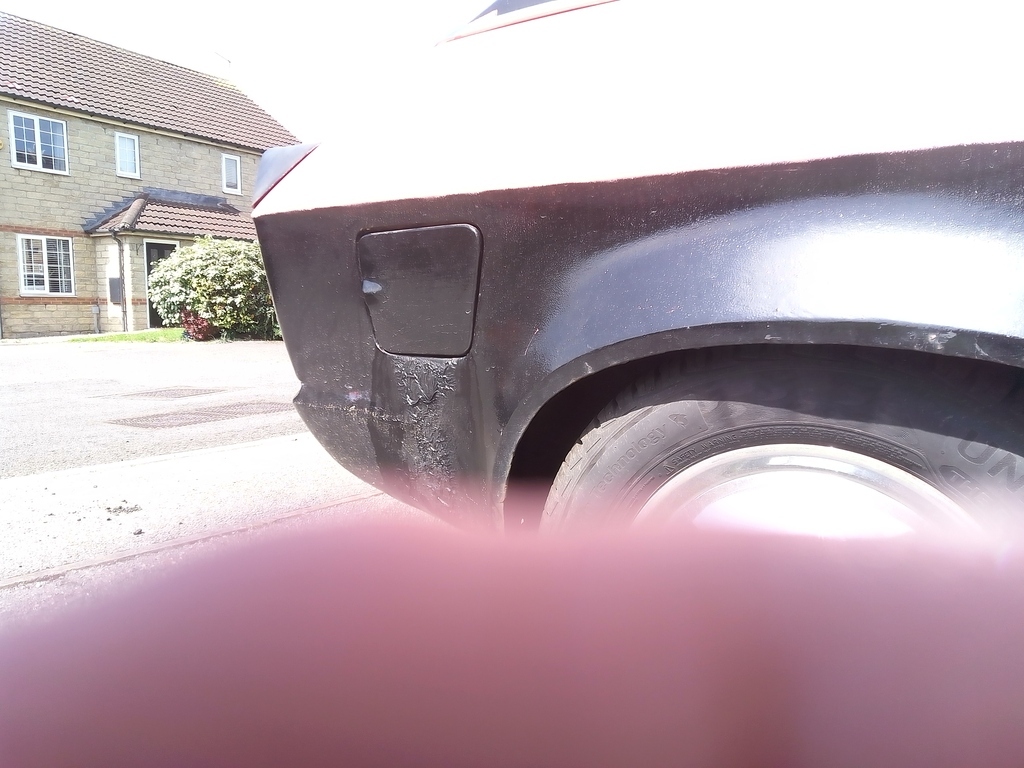 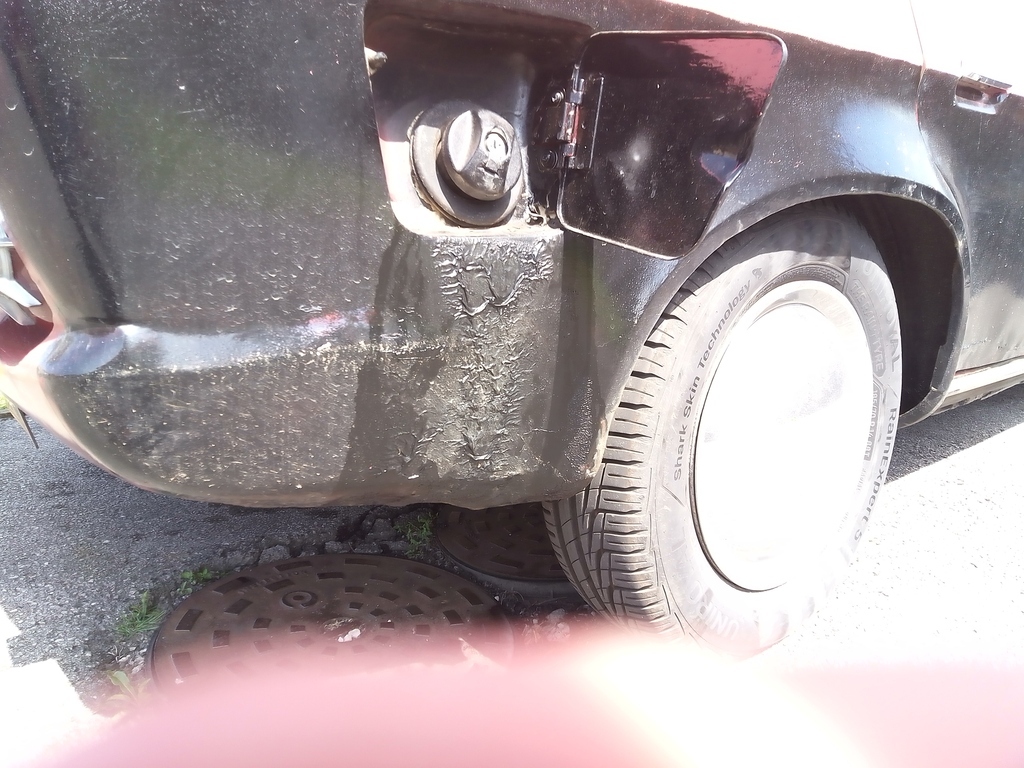 Yeah. Well that goes to show the paint I bought is not only nowhere near the quality I was expecting, it's also not fuel resistant. Can't really do much of anything about this until its dried out now. The cause I'm not entirely certain because it only happens when I brim the tank and it's a hot day, which is why I don't normally brim the tank. Maybe modern fuel pumps have the cut off trigger a bit higher in the neck of the fuel tank than they did when the Princess was new, allowing it to be technically overfilled? Maybe there's an issue with my filler cap (it never leaks any other time, only under these specific circumstances)? Maybe I shouldn't brim the tank. Easy fix at least, just need to let this dry out, scrape/sand off the ruined paint, and redo it in something fuel resistant instead. On the plus side I now know the easy way to get this paint off the car should it turnout to be a sanding pad clogger when we prep for proper paint in the near future. |
| |
|
|
vulgalour
Club Retro Rides Member
Posts: 7,286
Club RR Member Number: 146
|
|
May 11, 2024 12:54:20 GMT
|
I've got a job interview tomorrow, it's a round trip of about 60 miles, so today I wanted to make sure I did all my pre-roadtrip checks. I know 60 miles isn't a lot in the grand scheme of things, I just wanted to be certain I was as prepared as I could be. Popped the wheel trims off and checked the tire pressures and found the passenger side was a few PSI low so topped that up, also check the wheel nuts since it's been a while and a couple needed a tiny tweak. Checked the spare tyre too and that needed 10PSI putting in, I normally forget to check the spare so I'm proud of myself for that one. Checked the oil and the consumption has reduced dramatically since sealing up the oil filler tube properly, unsurprisingly. Only needed a little dribble to bring it to the full line rather than a couple of glugs (these are very accurate measurements). Coolant, brake fluid, and clutch fluid all exactly where they should be. Topped up the screen wash as that was quite low. Then on to actual fixes, first up was replacing the fuel filter since some red sediment had been pulled through from the tank and the filter was looking pretty grubby.  Next up was to do the leaking fuel pump gasket. The cork gasket did hold for about 50 miles before starting to weep, and then leak, so that's better than I've had before from a plain gasket. You can just see where the oil pools in the cambox casting under the fuel pump, when enough oil gets in there it overflows on to the exhaust manifold and stinks so it's not my favourite thing.  With the gasket removed you can see that oil leaks past it on both sides below the bolt line. There is good compression of the gasket and it is conforming well to the surfaces which don't appear to be significantly warped after having sanded things, it just isn't quite good enough on its own to seal everything up. I left the fuel pump draining the oil out so it was as dry as possible before reinstalling. The phenolic spacer is still firmly bonded to the cambox and isn't leaking so I left that alone.  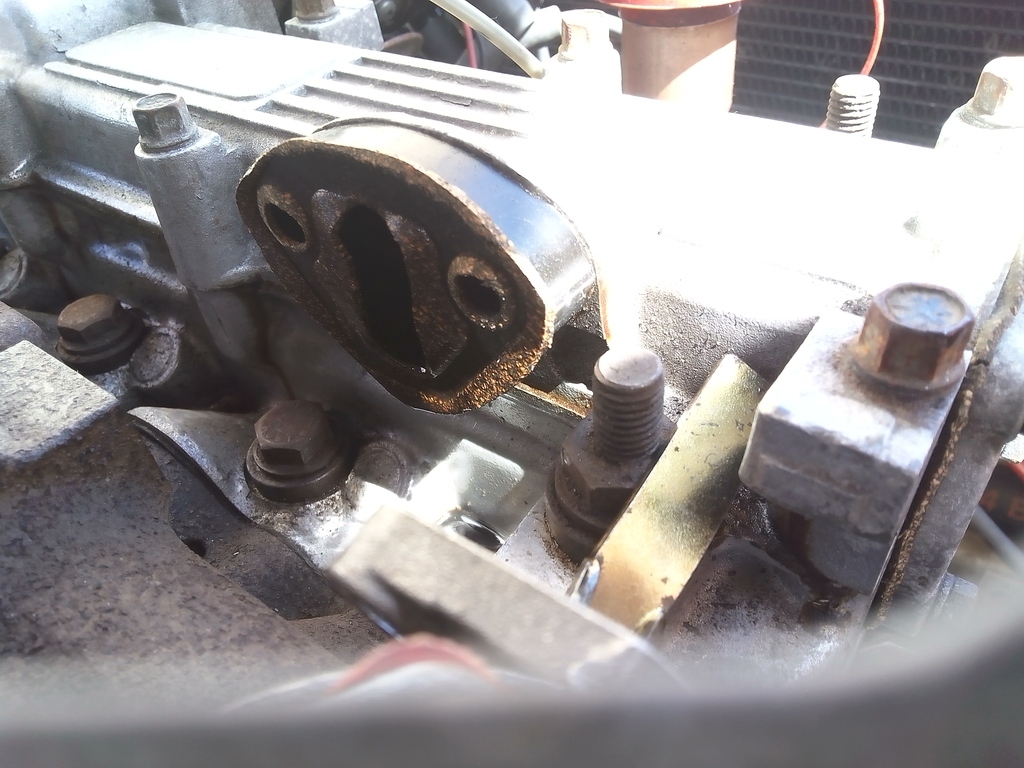 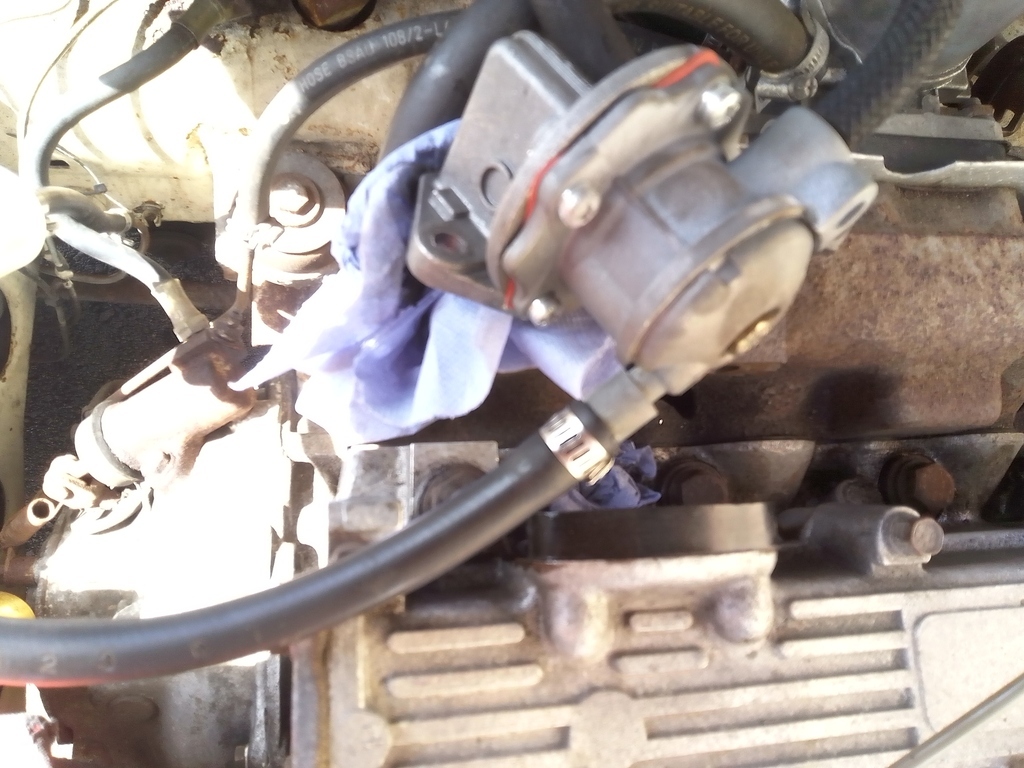  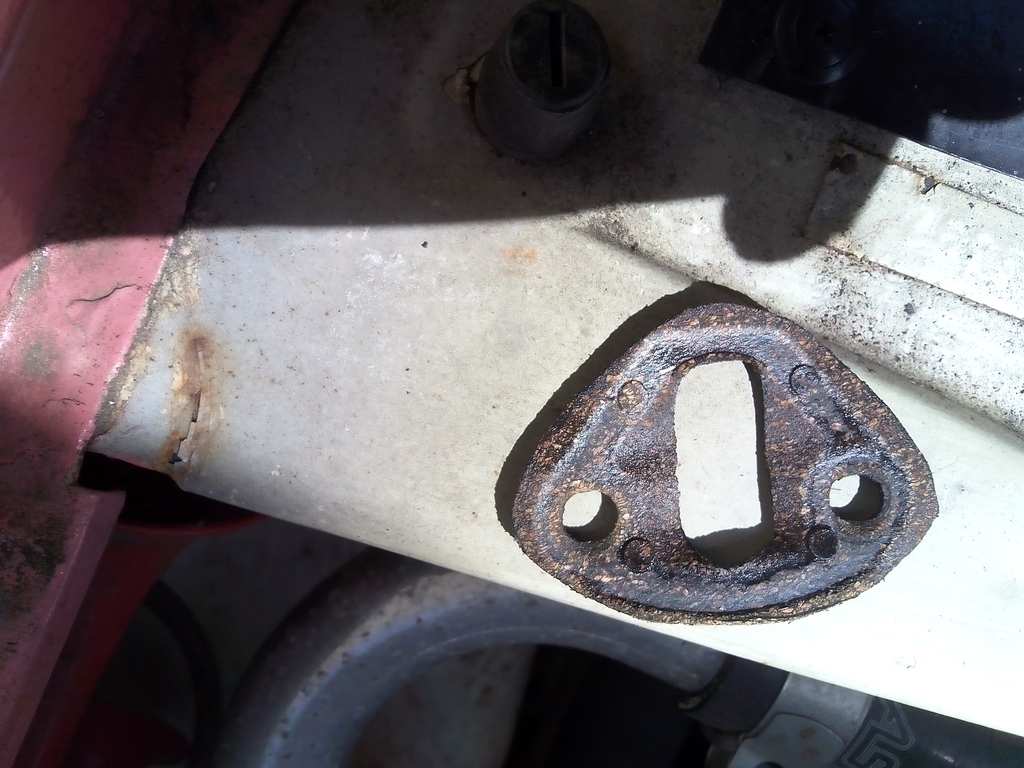 Weapon of choice for resealing is some Wurth red sealant which I'm told is supposed to be good for this sort of application since it's got good plasticity and I suspect part of the problem with this leak is that the vibration of the pump is breaking the seal with paper and cork gaskets so it needs a bit of help. Also cut a new gasket even though I could probably have re-used the one I had in there before, it's such a tiny gasket and I've got material it made no sense to penny pinch by reusing the old one that might leak again. 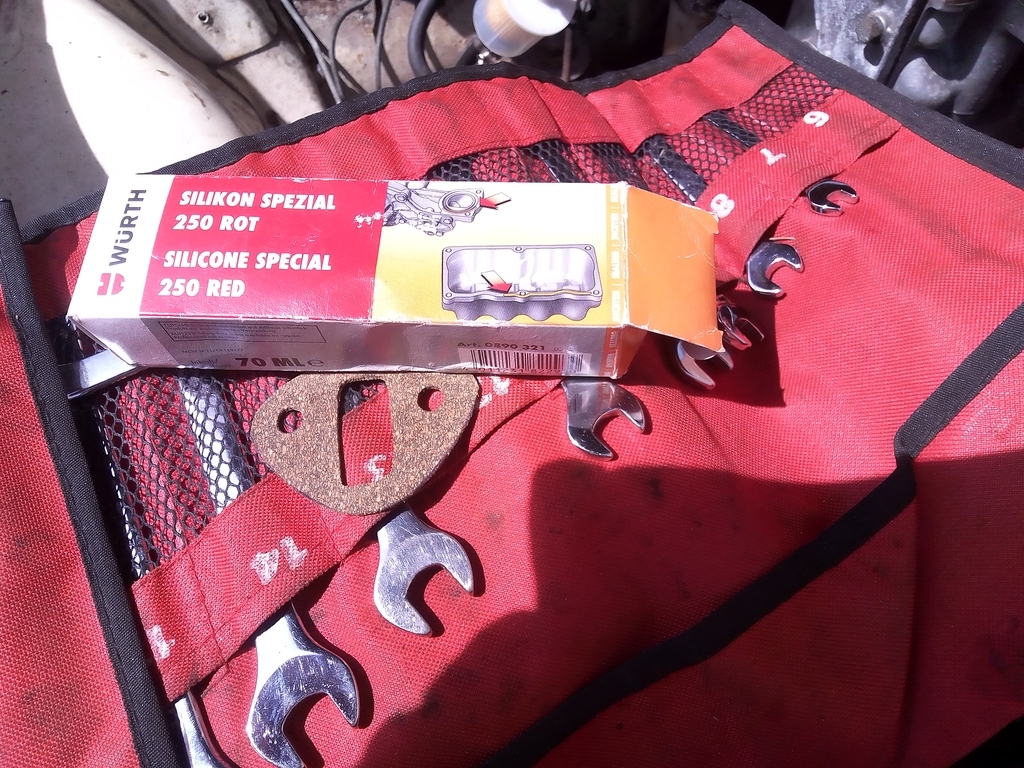 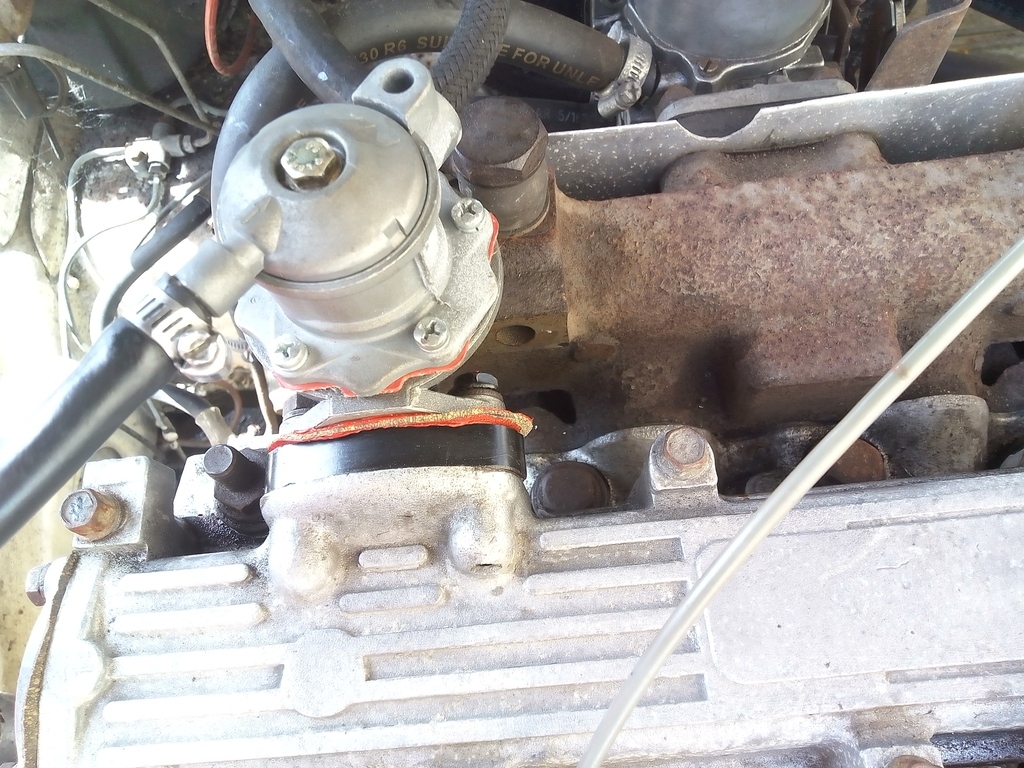 That needs to be left alone for at least 30 minutes, which is why I'm typing this up while I wait since there's an errand I want to run but I can't while I'm waiting for the goop to set. I did a couple of small jobs, one of which was adjusting the striker on the driver's front door so that closes a bit better now, another was adding a dab of glue to the back of the velcro strip holding my carpet down since the self-adhesive on the velcro had failed. I also fixed my flaps. Whenever the weather gets warm the steel rod comes out of the plastic socket that operates the flap, pretty much every year without fail on this one. I should fit something to the end of the steel rod so it can't pop out really. I didn't this time, just relocated everything and put it back together so I can actually have some fresh air to the face again. 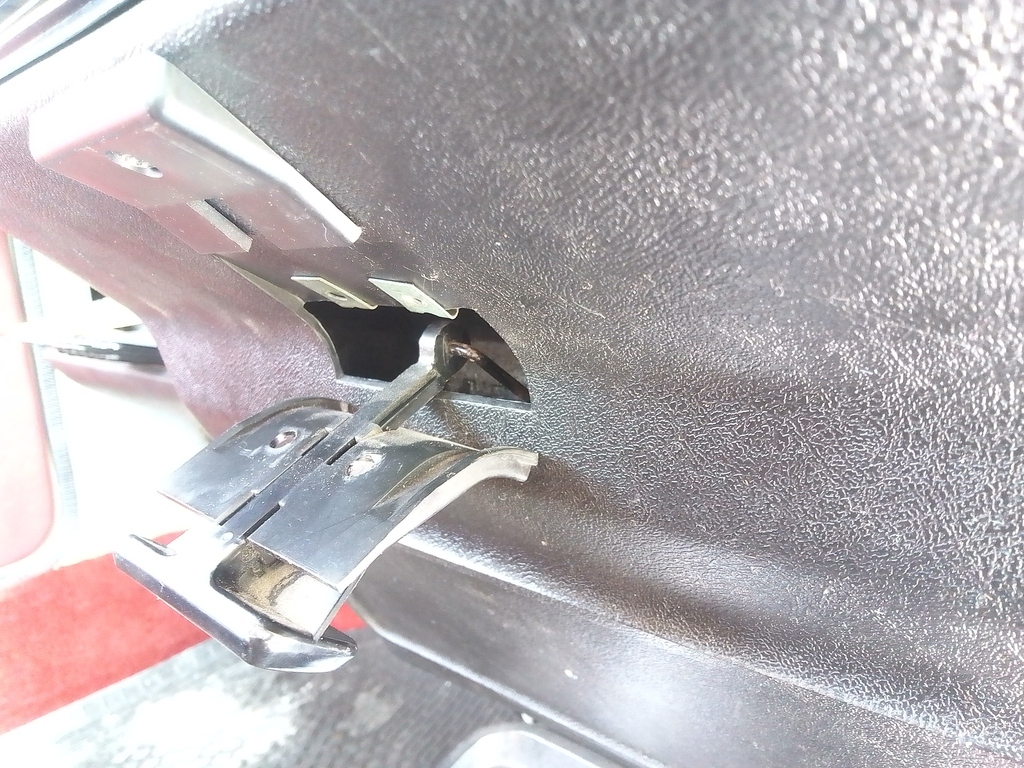  Only other thing I want to do today is clean off that fuel-damaged paint and redo it in some fresh, something I can do once the goop has set and I can go get some black paint since I'm all out. |
| |
Last Edit: May 11, 2024 12:57:41 GMT by vulgalour
|
|
vulgalour
Club Retro Rides Member
Posts: 7,286
Club RR Member Number: 146
|
|
May 11, 2024 16:59:56 GMT
|
Little before and after. Just a quick clean up to get rid of the old paint (it had lifted all the way down to the steel), fresh primer, fresh black aerosol. The goal here is to make it look a bit less unsightly and prevent water getting trapped and causing rust and I achieved that.  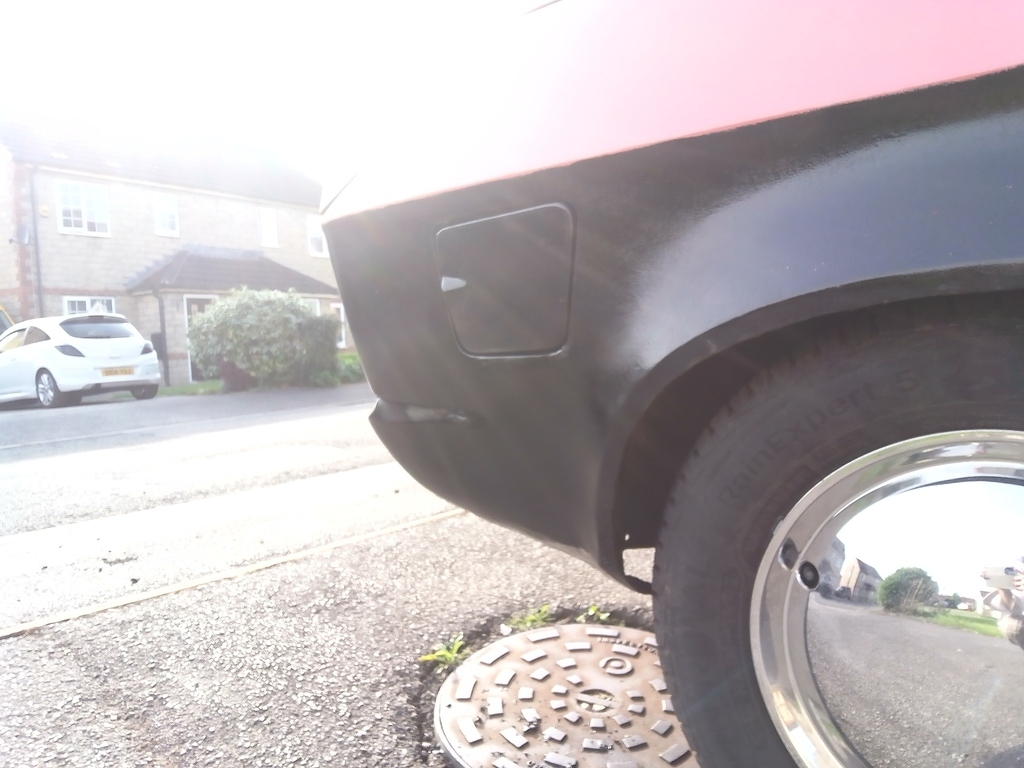 If I've got time and weather tomorrow I might just go over the back panel that's still red, just to make it look a bit more finished. Again, not aiming for perfection, just making it look okay from 250 yards or so. |
| |
|
|
vulgalour
Club Retro Rides Member
Posts: 7,286
Club RR Member Number: 146
|
|
May 12, 2024 10:59:38 GMT
|
|
Did a 60 mile round trip this morning for a job interview. Princess performed just fine, don't know what I was worrying about. Didn't go over 50mph though partially because I didn't know the roads - lots of wiggly Lincolnshire country roads since I'm avoiding motorways at the moment - and purely out of mechanical sympathy. Fuel pump gasket is still bone dry so that feels like an achievement in and of itself, temperature stayed nice and constant, dropping down to 1/3 on the gauge on the faster longer stretches of road.
LED headlights arrived while I was out too... well one pair did. Have left a message with the supplier to see what's happened to the other pair, I suspect a packing error because who orders two pairs of headlights?
|
| |
|
|
|
|
|
May 12, 2024 11:18:04 GMT
|
|
If you have further trouble with the fuel pump, you could convert to a remotely-mounted electrical pump instead...
|
| |
|
|
vulgalour
Club Retro Rides Member
Posts: 7,286
Club RR Member Number: 146
|
|
May 12, 2024 13:09:59 GMT
|
I could but I hate the dugga-dugga noise they make which is why I've been avoiding doing it. Had a go at fitting the LED headlights and have encountered some small issues. Nothing terrible, I'm pretty sure it can be worked around, but these aren't quite as plug and play as they might be. I do know these aren't really being sold as a twin headlight solution, so I did expect a bit of wiring shenanigans to get that aspect to work. This is fine, it can be done. What I hadn't expected was that they wouldn't actually fit without modifying the car a bit. The headlights on the Princess are held in place with standard classic car adjuster bowls that locate on two screw threaded bolts and one retaining spring, like so.  The trouble is the shape of the back of the LED unit is such that it can't sit down in the adjuster bowl properly and the retaining ring can't be attached. So, I need to chop off a lot of the adjuster bowl which I could do by the magic of having a spare set and this is why it's not hoarding. 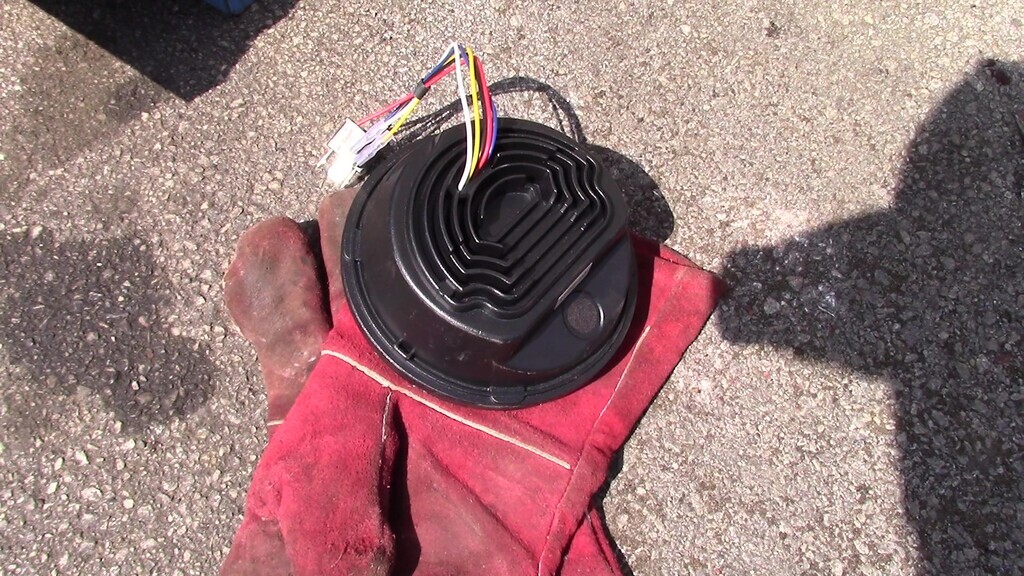 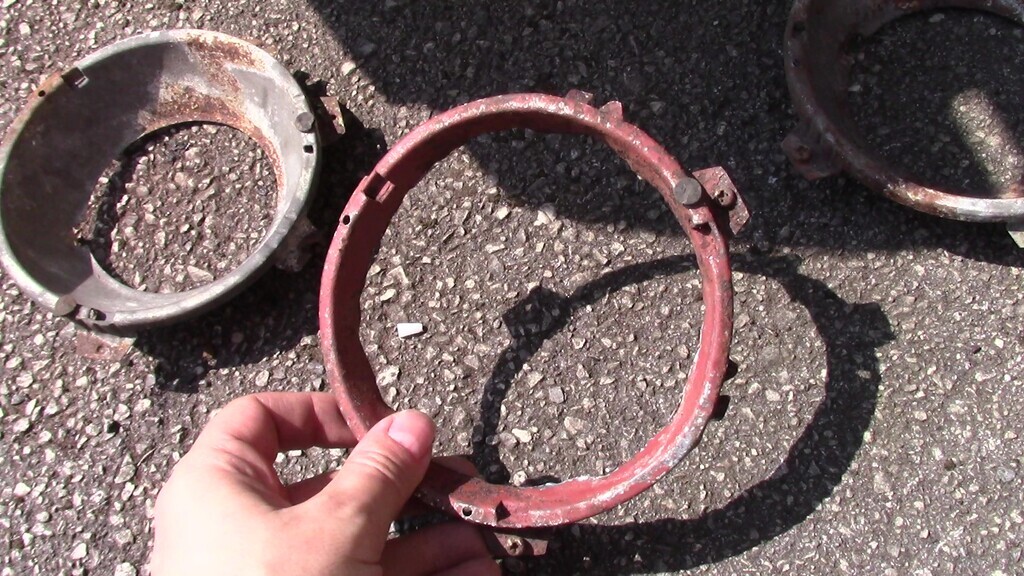 A little bit of massaging of the metal to stretch it a little further and it does fit. However, there's now nowhere to put the retaining spring that stops the bowl from falling off so I'll have to modify these further to accomodate that somehow. That put paid to fitting these new headlights today, that's more work than I want to get into right now.  Then I tried plugging in the LED unit to the outer pair as you would any other headlight and found it wouldn't turn on at all. It's only when I remove the twin headlight harness that runs from the outer to the inner light (inners are H1, and do main beam only) and plug the LED light directly in as if the car has only got single headlights that they work properly. What did surprise me is that I actually do like how these look on the car, you end up with a mostly black front panel with the chrome retaining rings for the headlights and that actually looks very smart. I couldn't mock it up safely for camera, too many bits to hold on to, so all you get is this shot of me showing just how much brighter the LEDs are compared to the halogens. If they're this bright in daylight I should be fine at night.  Finally, the sidelight and indicator function on the new headlight units. The new headlights came with no instructions at all, not even a basic wiring diagram to say what things were for. Fortunately I found a listing showing the standard wiring practices on LED replacement units and now know that the white wire is for sidelights and the yellow is for indicators they just plug in like the originals did so that's easy. My next challenge is figuring out how to wire everything to do what I want. Wiring wise, they are pretty much plug and play, it's just the challenge of physically fitting them to my particular car. Is there some sort of standard harness I can use to wire the headlights together? At the moment, there is a three pin socket on the main harness that you plug a three pin plug into that then feeds another three pin socket for the outer headlights, and two female spade connectors for the inner headlights. I'm guessing if those female spades were replaced with a three pin socket it would work for the set up I plan to fit with the LED units? I hope it's something that simple at least, then the only hard bit is modifying the adjuster bowls to suit the LED units. |
| |
|
|
glenanderson
Club Retro Rides Member
Posts: 4,359
Club RR Member Number: 64
|
|
May 12, 2024 14:50:13 GMT
|
|
It should be relatively simple to piggyback one to its neighbour. Personally, I’d try and design two mini looms that the original harness can just plug into, and then each headlight unit plug into that in turn.
How did the interview go?
|
| |
My worst worry about dying is my wife selling my stuff for what I told her it cost...
|
|
vulgalour
Club Retro Rides Member
Posts: 7,286
Club RR Member Number: 146
|
|
May 12, 2024 15:17:05 GMT
|
|
yeah, I'm thinking maybe have a loom that goes from the main harness and then splits to two plugs for the headlights themselves, a bit like it was done factory just with different connectors. Keep it as simple as possible.
Interview went okay I think. They're pretty desperate for reliable staff so I might stand a chance, and they asked me for my uniform size which always bodes pretty well I think. I'll know by the end of the week, it's a part time role but it's a long commute so I need to do some maths to figure out if it's actually worth it, and I might be borrowing a friend's car that's newer and better on fuel than the Princess just to get me going since it doesn't exactly feel fair to shove a 60 mile commute on the Princess just at the moment.
|
| |
|
|
vulgalour
Club Retro Rides Member
Posts: 7,286
Club RR Member Number: 146
|
|
May 12, 2024 16:48:27 GMT
|
Sometimes, you just have to take a step back and have a think and that's what I did with this. Why don't I just use longer screws to hold the retaining rings in place, thought I, and then I gave it a go. 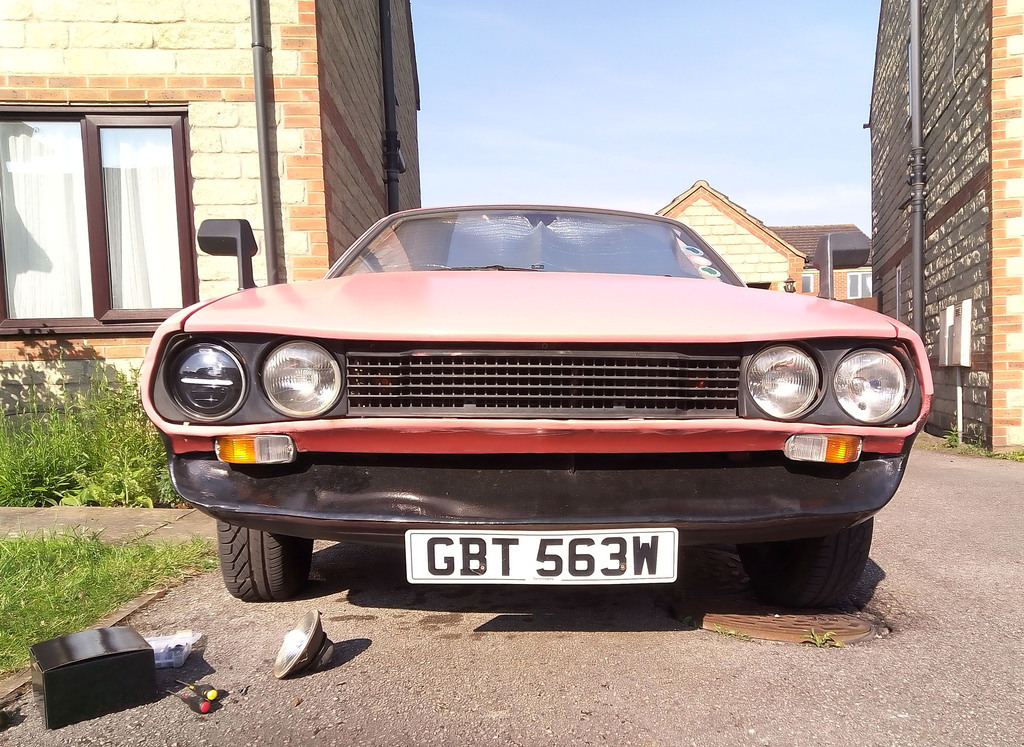 Well, that actually worked. It holds the headlight securely enough that I can wiggle the car with the headlight so I doubt it's going to be a problem! Did the other side too.  Can't tell if the slight frown is an optical illusion due to camera fisheye and car styling, or if they're actually wonky, they don't look that wonky in person. Trims are all sorts of wobbly too so that's not helping. Anyway, by simply using much longer screws to hold the retaining rings these do fit and because the depth of the trim on the front of the Princess is what it is, there's enough space to push the headlights forwards a bit without it looking goofy. Shall we turn them on? 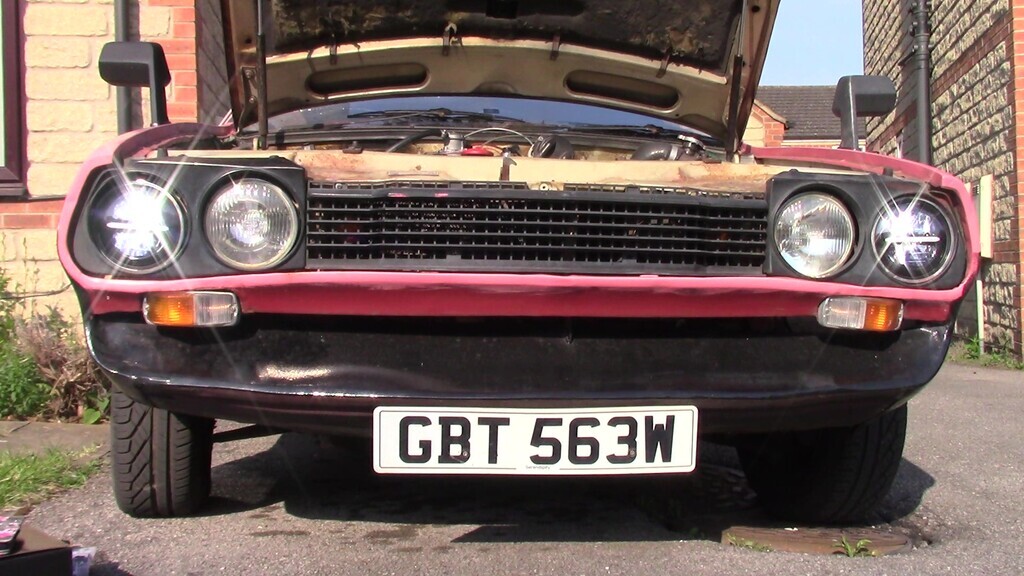 Umm... yeah. I reckon those will do and I'll have another pair going on when they arrive so I think I might be okay seeing at night. |
| |
|
|
vulgalour
Club Retro Rides Member
Posts: 7,286
Club RR Member Number: 146
|
|
May 12, 2024 21:32:24 GMT
|
Well... it got dark so I could try the new lights out and wow, I can actually see. When I was sat in the car to set off and turned the lights on I had to turn them off and back on again to be sure I was seeing what I was seeing, I genuinely didn't expect so huge a light output increase over a much better area. The other nice thing is because they draw so much less power than the halogens the car in general just seems happier about the whole thing. I found a dark car park to pull into so I could demonstrate with some photos, very aware of the connotations...  Phone camera didn't know what to do with a head on shot, focus was all over the place, but you get the idea. Now, when I did the test trundle I did get flashed once by oncoming traffic and it's due to the oblique angle where the lights do dazzle. They were turning across the road in front of me and I think they got hit by the dazzle. Everybody else seemed not to notice. They do cancel out oncoming curse word lights except for one German SUV I encountered so that too is a huge improvement. I felt a lot safer because I could see more than I think I ever have in any car I've driven.  I didn't change the alignment and honestly I don't think it's far off where it should be if it did move at all. I can see pedestrians at the side of the road much better now, and reflective signs show up at a more sensible distance than before. The quality of the light is very blue, a lot of other headlights I encountered looked very yellow by comparison. 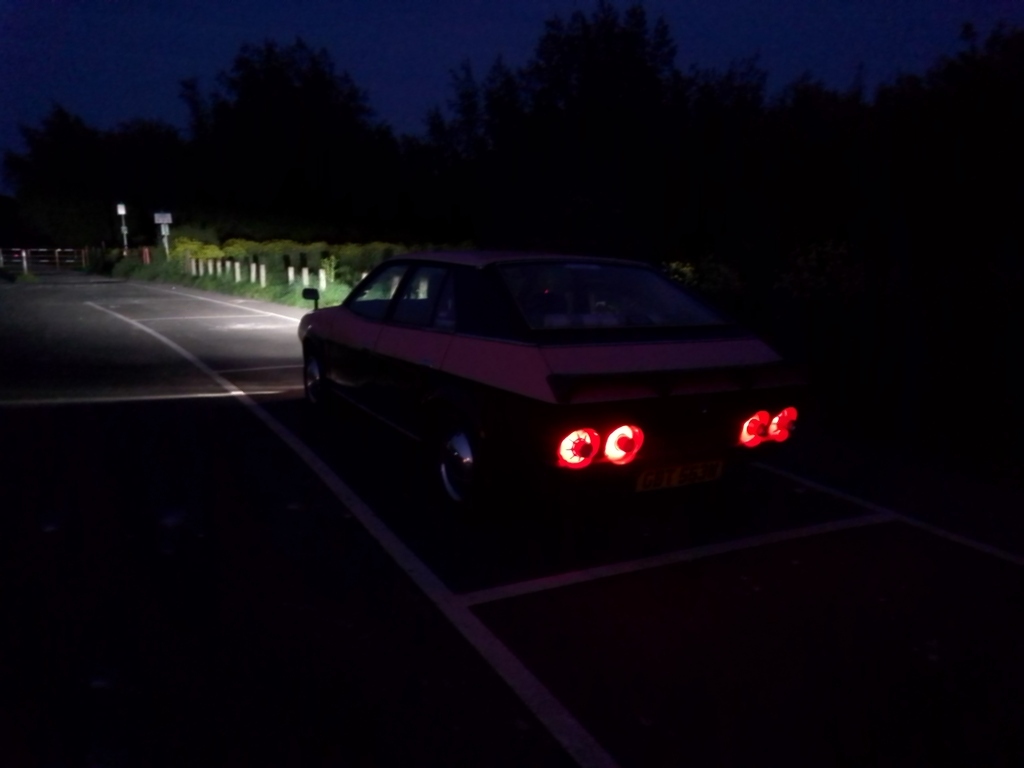  One of the bulbs for the speedo might have fallen out of its socket again, it does that sometimes which is why you can barely see it. I don't think I'm going to upgrade the rear lights to LEDs just yet, they're incredibly visible purely due to their size and I've got a third brake light. To celebrate, one of the wires to the spade connector for the flasher relay snapped and left me without indicators for the way home so that was neat of it. Quick bit of crimp work in the dark and I got them back again. 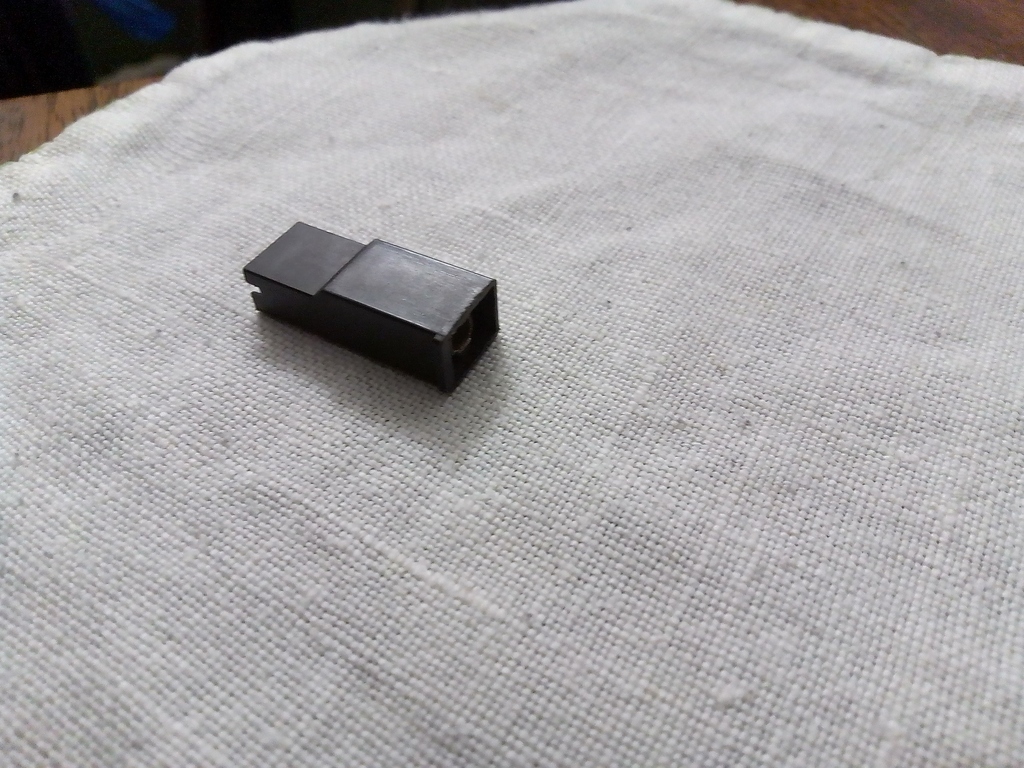 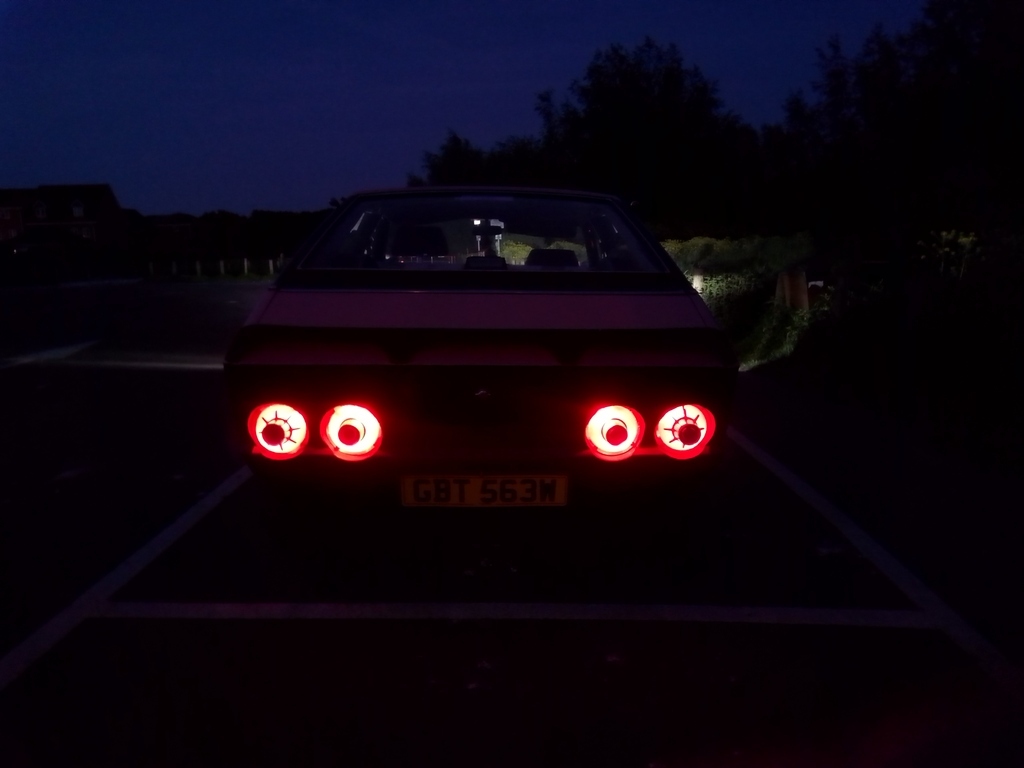 Overall, I'm really happy with this as an upgrade at the moment. The only concern I now have is that when I do fit the new inners it might be too much light because just this one pair is significantly more light output on dipped beam than I was previously getting from twin main beam halogens. |
| |
|
|
Davey
Posted a lot
 Resident Tyre Nerd.
Posts: 2,348
|
|
May 13, 2024 11:03:44 GMT
|
|
Could always mount the inners and wire them to be on main beam only?
Looks like a huge improvement.
|
| |
K11 Micra x3 - Mk3 astra - Seat Marbella - Mk6 Escort estate - B5 Passat - Alfa 156 estate - E36 compact
Mk2 MR2 T-bar - E46 328i - Skoda Superb - Fiat seicento - 6n2 Polo - 6n polo 1.6 - Mk1 GS300
EU8 civic type S - MG ZT cdti - R56 MINI Cooper S - Audi A3 8p - Jaguar XF (X250) - FN2 Civic Type R - Mk2 2.0i Ford Focus - Mercedes W212 E250
|
|
vulgalour
Club Retro Rides Member
Posts: 7,286
Club RR Member Number: 146
|
|
May 13, 2024 13:40:38 GMT
|
I ordered a splitter harness, I'm guessing I can modify it by de-pinning the relevant socket so I've got main beam only function on the inners, I'll find out when it and the second pair of headlights arrives. --- DRAMA! Got hit-and-run today in broad daylight. Had parked up at the local supermarket as usual and once I was stationary the car next to me started to leave. Was getting a bit close... and then the car wobbled and he KEPT GOING. I honked my horn and got out and shouted at him and he only seemed to stop when he realised he'd drawn a lot of attention. Opened his window and stared at me while I proclaimed he'd hit my car. He just stared. He looked at the other pedestrians and then very slowly drove away. No apology, nothing. Just... drove away. I don't know if it was a shock response or what and it's not like I'm going to put this through insurance since it's only a paint scuff but still, the sheer shittiness of it! I didn't get his number, and the store CCTV wasn't on so I'm just sort of impotently angry about it.  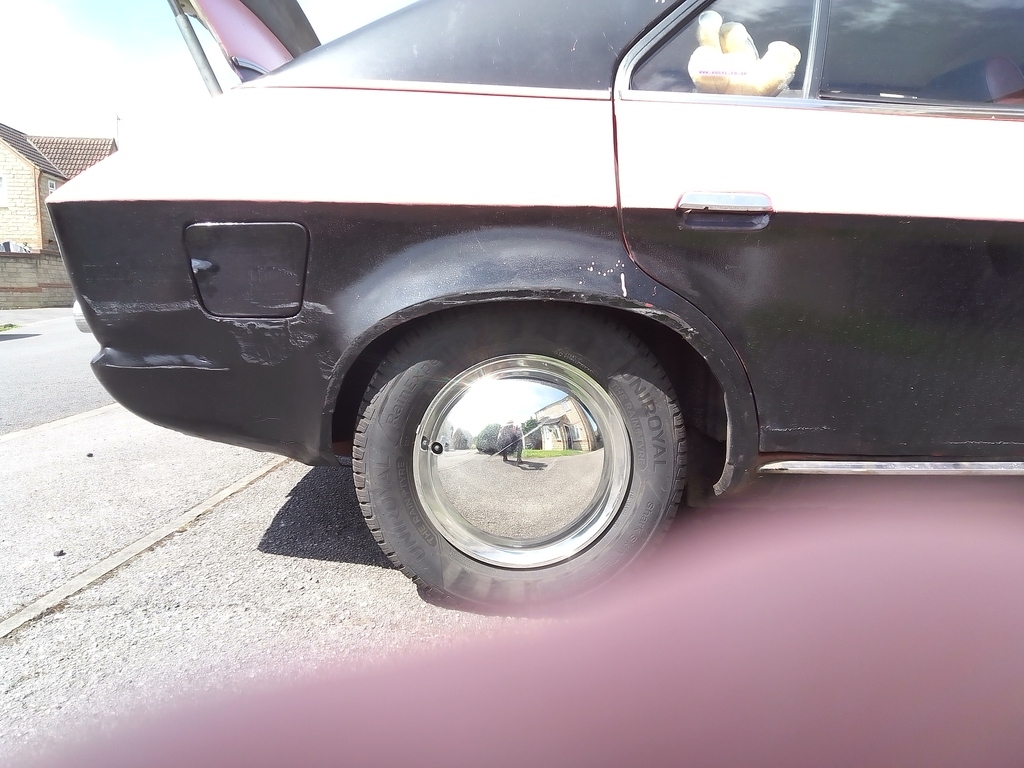 Luckily it's only paint damage and the paint isn't very good, except for the nice scratch he's put on my wheel trim right down the centre. The car that hit me was some big dark metallic blue mpv thing, maybe a VW Touran I'm not sure, bit new for my knowledge base. I hope he gets an itchy bum for the rest of the year. |
| |
|
|
eurogranada
Europe
To tinker or not to tinker, that is the question...
Posts: 2,556
|
|
|
|
|
The audacity! Really, I have so much issue with the type of society we live in these days... On the one hand this type of thing and worse is a daily occurance, on the other hand there's the initiative on here to help a fellow out with his Pop. It's hard to rhyme some days but common decency seems to be like chivalry, dead (and buried!).
In this video happy smartfone world there was no-one who bothered or had the license plate no?
|
| |
|
|


