vulgalour
Club Retro Rides Member
Posts: 7,287
Club RR Member Number: 146
|
|
|
|
|
Okay, now I'm confused. Got the camera out to document what the engine is doing and now it isn't doing it.
Compression figures are reasonable, if not great:
1 - 145
2 - 140
3 - 150
4 - 135
Could be better, obviously, but could also be a lot worse. The other strange thing is that it's putting no bubbles in the coolant at all now and the coolant is clean again where when I was having issues it had gone a bit murky. Could it be that I've simply driven it enough to dislodge some grime somewhere in the system and had a minor airlock somewhere? Something else?
I have no idea. I still want to get the engine rebuild but now it's magically fixed itself I guess I'll keep using it until it randomly pretends its broken again. This makes no sense at all to me, to be quite honest.
|
| |
|
|
|
|
|
|
|
|
|
|
Compression is fine as its all (well not quite, but close enough) within 10% of each other which is the yardstick for measuring. Not terrible pressures either.
You could possibly re-torque the head again but up the torque setting a little - say another 5lbs/ft.
Otherwise just enjoy it as it is.
|
| |
|
|
vulgalour
Club Retro Rides Member
Posts: 7,287
Club RR Member Number: 146
|
|
|
|
|
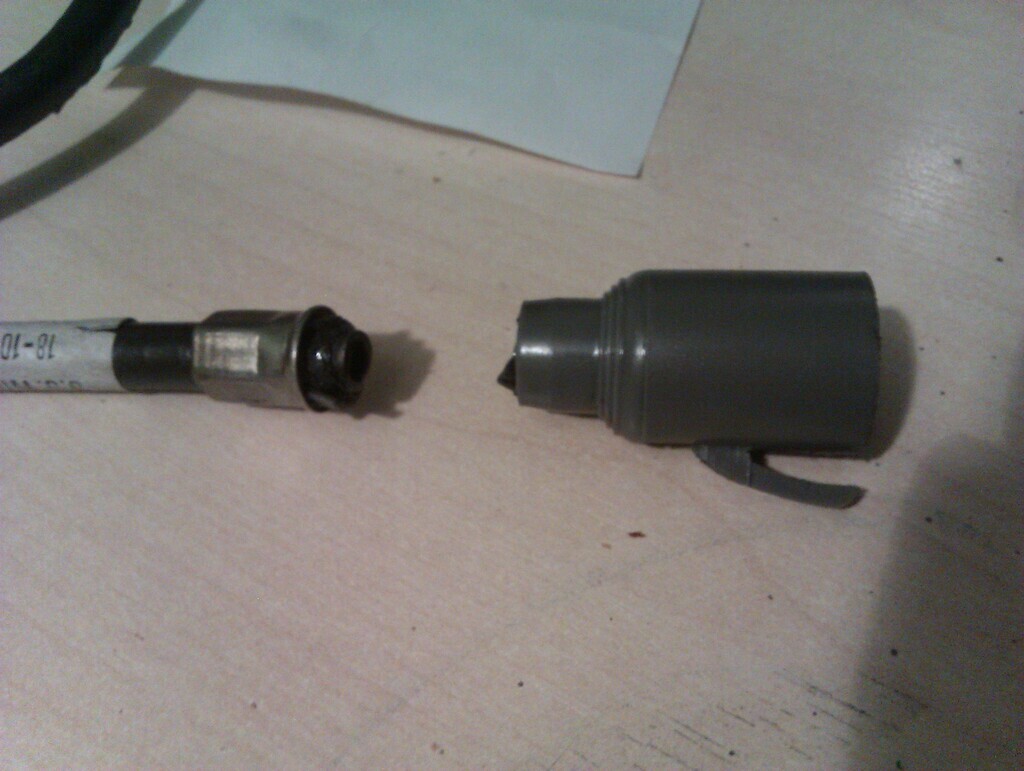
I've been trundling about in it today and on a whim booked it in for an MoT. Driving away from the garage of course it snapped the speedo cable. Again. I'm hoping I've got one in stock, otherwise I'll have to get the TomTom out until a replacement arrives. I know what it's done, the plastic collar at the back of the speedo will have gone weak and snapped like the last two. You need the hands of a child to sort it out so I'll be squeezing my spades in there and probably come out looking like I've been in a fight with a hamster and lost.
Also, the horn stopped working, or rather it didn't work when I needed it to, and one side repeater blew. At least it did it today and not on MoT day, and replacing a bulb and wiggling some connectors got things sorted. I'm not aware of anything it might fail on other than headlight alignment after going through that flood (which might also be what shortened the lifespan of the side repeater, to be fair) so we'll just hope it lurches through okay.
|
| |
|
|
|
|
|
|
|
|
May be a very fine crack that closes up once things get hot. Does it pressurize the coolant system when it's switched off?
What the plugs looked like?
|
| |
|
|
vulgalour
Club Retro Rides Member
Posts: 7,287
Club RR Member Number: 146
|
|
|
|
That's the thing though, I tested it when cold, no bubbles. Ran about it in today and no bubbles when hot either. Plugs all look clean, possibly a little on the lean side, but all the same. No soot or oil on the plugs, and no striking difference in condition with any of them in particular. westbay suggested a sticky thermostat and they may be on to something. As I was doing pre-MoT checks, the engine nice and toasty after its trundling about, I could hear a noise coming from the overflow pipe of the fill point near the thermostat. Sort of like an air escaping/moving noise, but also sort of not, I'm not really sure how to describe it better than that. Anyway, what I wondered is if maybe there's an intermittently sticking thermostat because of the time the car spend laid up when I didn't want to do the head gasket and as various other systems have started to wake up, minor issues like this have surfaced and self-fixed as we've gone along. I don't know. Oh, and the fog light switch decided to stop working almost entirely. Annoyingly, even though I have a spare of every dashboard switch, a fog light switch isn't one I do have. Gave things a wiggle and almost got reliability out of it, and then the switch stopped working again. Bulb, connectors, and fuse are all good, it's the connection at/in the switch at fault. That's probably going to be an issue at MoT since I believe the car is just new enough that a fog light is legally required. I'm just going to hope it works on MoT day. Side repeater I couldn't get to work and I can't find my spares, that's a corrosion issue since the inside of the bulb holder refuses to turn into shiny metal and remains steadfastly crusty brown. Fortunately being pre-85 side repeaters aren't legally required so I've unplugged them (which doesn't alter the flash rate of the indicators, probably because of the digital flasher can I've got fitted instead of the old bimetallic type) and taped over the holes which is legal as far as I'm aware. It's a fix, just not a proper fix, when I find the spare side repeaters I know I have I'll refit good ones. I also don't have a spare speedo cable in stock so I'll have to order a pair so I've got one to fit and one in stock again. TomTom to the rescue in the meantime so I don't accidentally speed.
 |
| |
Last Edit: Apr 9, 2022 20:27:43 GMT by vulgalour
|
|
|
|
|
|
|
|
My TR7v8 almost boiled over when the restrictor in the degas line behind the thermostat was blocked leaving a air bubble behind the thermostat, in you case I don't think you have a such a hose but is there (or is there supposed to be) a jiggle pin or hole in the thermostat, if so make sure it is at the top and not teaching you to suck eggs but that the thermostat is the right way round.
|
| |
|
|
vulgalour
Club Retro Rides Member
Posts: 7,287
Club RR Member Number: 146
|
|
|
|
I'm running a Renault 5 style in-the-pipe thermostat rather than your more typical UFO shaped one, or the Princess' strange factory waxstat thing. As far as I know it's the correct way around and you can't really put a jiggle pin in it because of the design of the thing. I'm running this type because the original waxstat housing broke apart due to a bad casting and this was the solution created at the time. 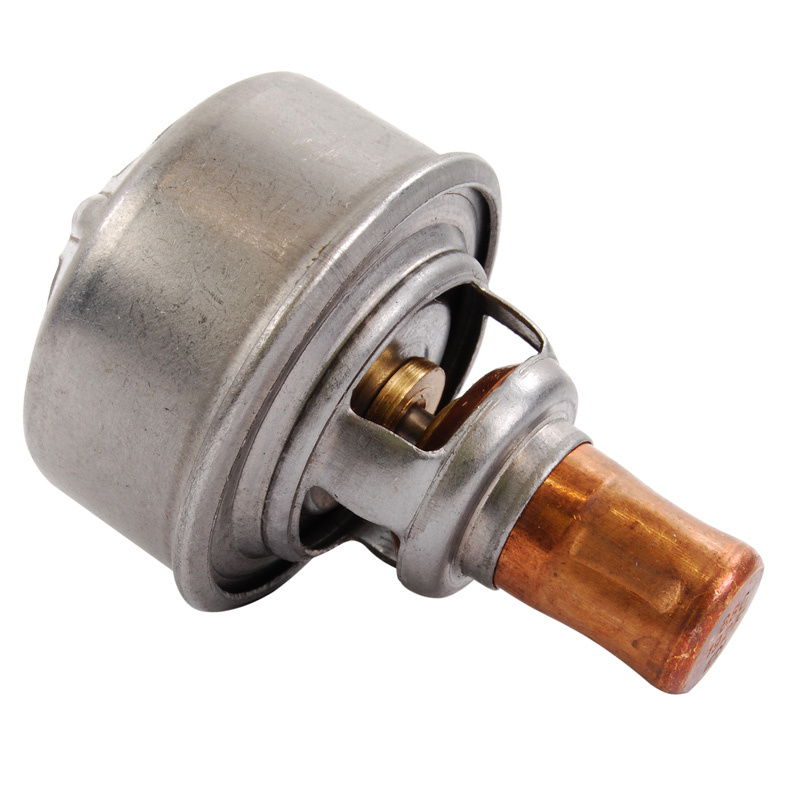 I do have a spare, but it's a bit of an  to remove and refit so I'm just going to keep an eye on this for now. I don't believe I have any sort of restrictor like your TR8, it's all very simple plumbing in the Princess. |
| |
|
|
|
|
|
|
|
|
I've never in 40 years known a sticky stat. Ones that don't open enough, yes, but never a sticky one.
|
| |
|
|
|
|
|
|
|
|
I had a look online and the standard thermostat looks like it is designed to close off a bypass channel when it opens, if you are missing this the cooling system will not work properly.
|
| |
|
|
vulgalour
Club Retro Rides Member
Posts: 7,287
Club RR Member Number: 146
|
|
|
|
kevins I'm not so sure on that. The original housing pushes into the head (and then corrodes into place, sealing it forever), and has one outlet that goes to the radiator top hose. The top of the housing has a cap you remove to fill the system. There's no other outlet, so water can only really go through the housing to one destination, it doesn't bypass elsewhere. The system I've fitted copies this, just with hoses instead of the original housing. There are several different Princess thermostat housings and some things listed as Princess thermostat housings which aren't anything of the sort. A 1700 O series has a housing like this: 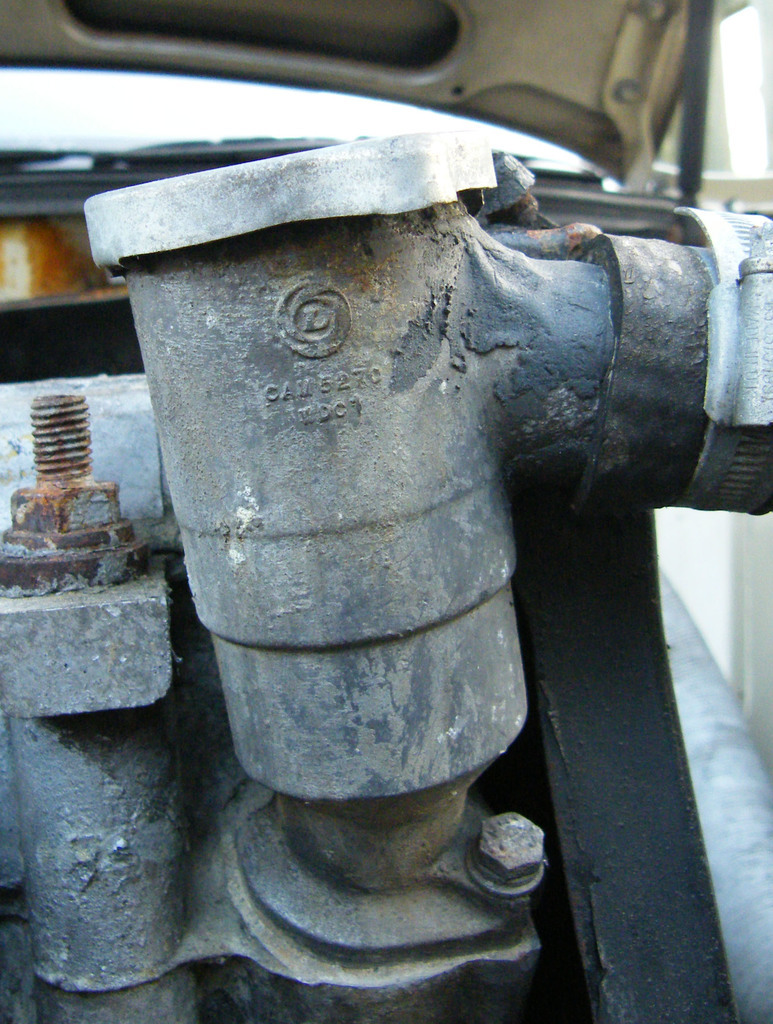
|
| |
Last Edit: Apr 9, 2022 22:11:03 GMT by vulgalour
|
|
|
|
|
|
|
|
So, it is "doing a BL". It is merely going slightly on strike because you fitted French parts.
Drive and enjoy. Fix, drive, enjoy. Repeat.
|
| |
Last Edit: Apr 10, 2022 1:37:29 GMT by PhilA
|
|
|
|
|
|
|
Looking around it seems in typical Leyland style there are loads of versions! So if there's no bypass I reckon air and stagnant flow is behind the stat delaying opening, the stat should be instaled with the bulb facing the engine, to add a bleed hole just drill a 1/8" hole in the flat ring as I have tried to show below and pop it back in with that at the top. 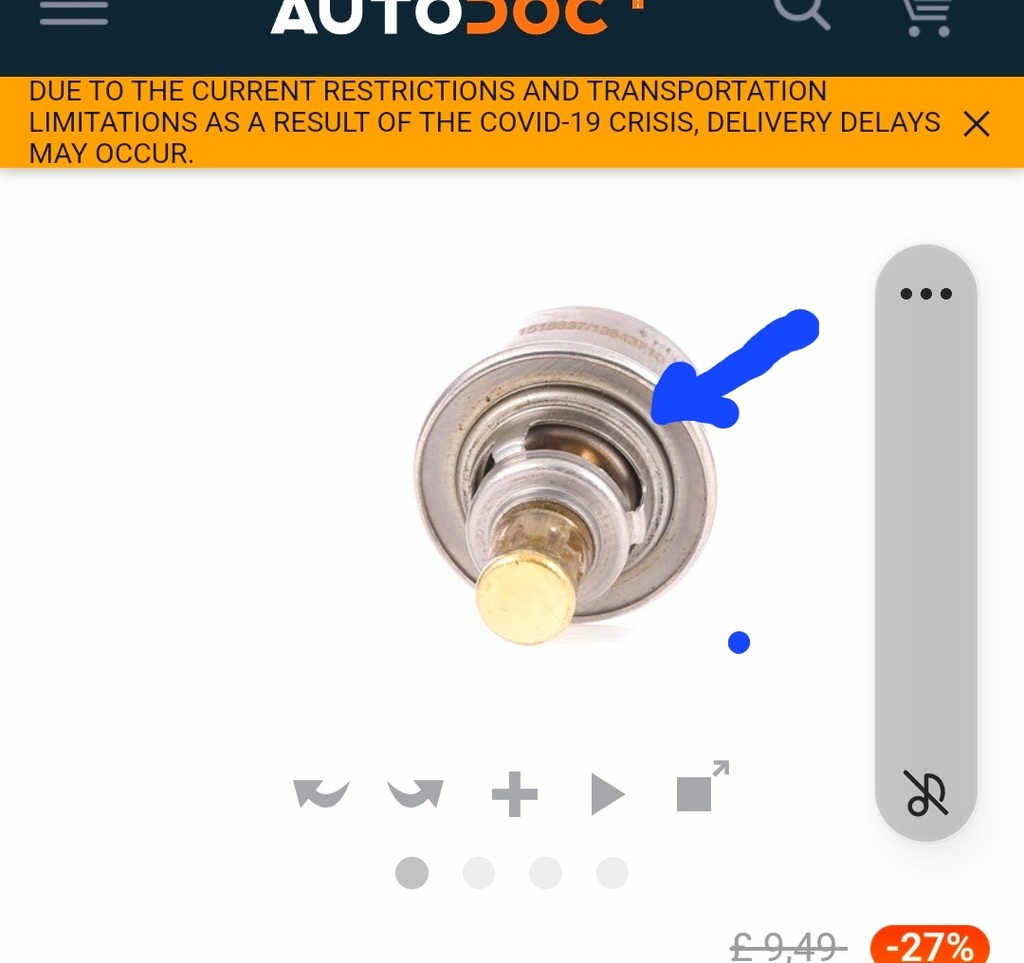 |
| |
Last Edit: Apr 10, 2022 9:46:20 GMT by kevins
|
|
vulgalour
Club Retro Rides Member
Posts: 7,287
Club RR Member Number: 146
|
|
Apr 10, 2022 10:13:25 GMT
|
|
I'll give it a go at some point. Not right now like, can't be doing with it right now.
|
| |
|
|
vulgalour
Club Retro Rides Member
Posts: 7,287
Club RR Member Number: 146
|
|
|
|
The disappointment of calling to cancel an MoT on the day of the MoT because your car won't pass if you submit it  Ah well. I did find a small area of rust on the sill that I thought was dirt when I washed it in preparation for the MoT so I'll need to attend to that too, nothing serious (I hope) since it's just the edge of the pinchweld under the B pillar, but I'd rather it be sorted. Weather's nice and I'm stuck at the desk today. Hopefully I can clear responsibilities early enough to get out and get some welding done on at least one car, that would be nice. |
| |
|
|
vulgalour
Club Retro Rides Member
Posts: 7,287
Club RR Member Number: 146
|
|
Apr 11, 2022 17:51:27 GMT
|
Tomorrow is Lanchester video day. Hardly know where the time is going lately. Today amazingly I had some free time and almost perfect weather for welding outdoors so fiddled about with the new RTech welder and set to on the Maestro while I wait for parts arriving to sort the Princess out. To everyone that recommended the RTech welder, thank you! It's an astonishing bit of kit, once I had it dialled in I could point the gun at whatever I needed to and it just worked. Least frustrating welding experience I've ever had. Now, my welds aren't pretty and my scratch build repair sections are somewhat crude, but it's better than rust and filler so I'm not about to complain. I wanted it solid and weather proof and now the inner arch is. Finished off with seam sealer, primer, gloss coat, and underseal since I can't get to any of this once the outer arch goes on which might even happen tomorrow if the weather is nice. It feels good to finally get this repair done, I'm almost looking forward to fitting the outer arch. 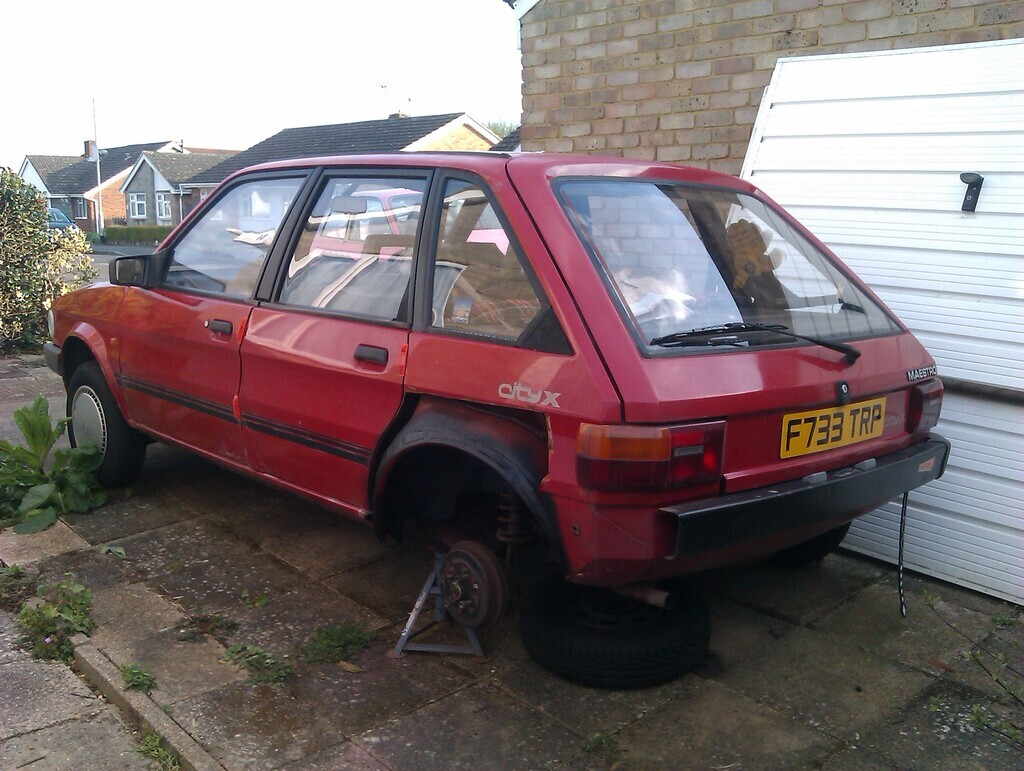 |
| |
|
|
vulgalour
Club Retro Rides Member
Posts: 7,287
Club RR Member Number: 146
|
|
Apr 12, 2022 15:11:49 GMT
|
|
This week's video is a Lanchester one. All of the old wiring is finally evicted from the car.
Write ups for videos will be along eventually, I've not had any time to sit and do them lately, too many other demands on my time.
|
| |
|
|
vulgalour
Club Retro Rides Member
Posts: 7,287
Club RR Member Number: 146
|
|
Apr 12, 2022 19:41:02 GMT
|
Maestro progress update too, just briefly. Ran out of gas and flapwheels and the weather was threatening rain, so didn't get the job completely finished. Not much to go, bit of sill and arch to fabricate and then it's grinding, filler, and paint. Not a bad job as it goes, was astonished that I kept my panel heat down throughout so that not only is the repair pretty smooth, the fragile city X sticker has remained unharmed. 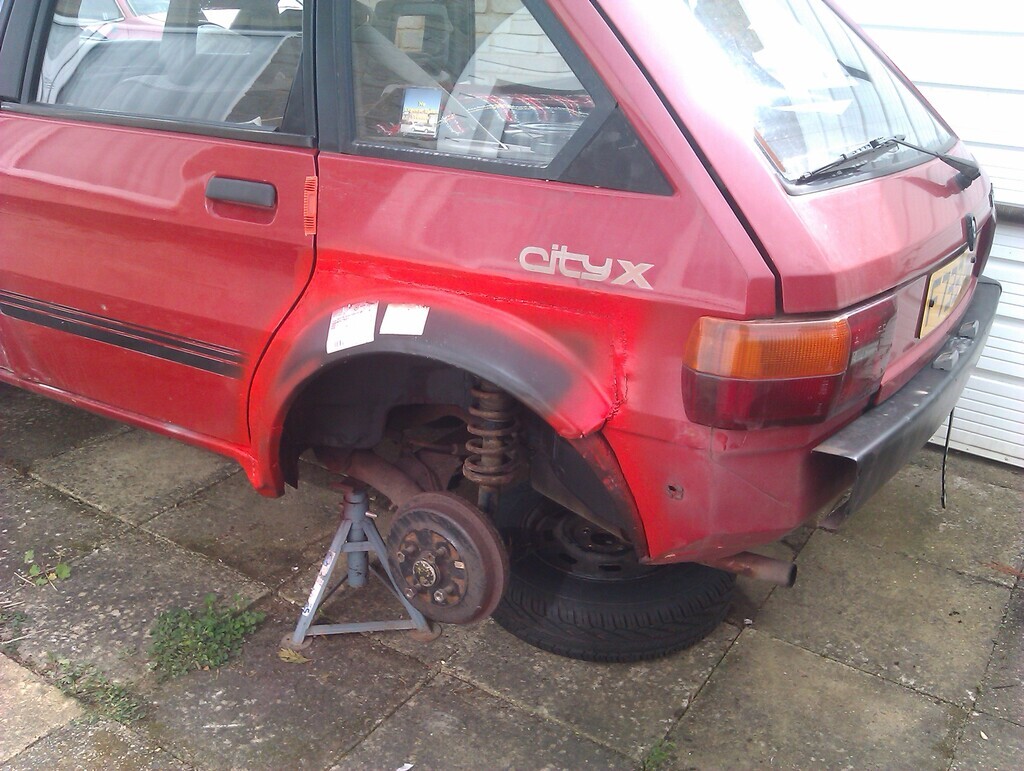 |
| |
|
|
Rich
Club Retro Rides Member
Posts: 6,341  Club RR Member Number: 160
|
|
Apr 12, 2022 20:19:14 GMT
|
Maestro progress update too, just briefly. Ran out of gas and flapwheels and the weather was threatening rain, so didn't get the job completely finished. Not much to go, bit of sill and arch to fabricate and then it's grinding, filler, and paint. Not a bad job as it goes, was astonished that I kept my panel heat down throughout so that not only is the repair pretty smooth, the fragile city X sticker has remained unharmed.  If you take a square-on photo of the logo with dimensions I can recreate them in vinyl for you should you need them. |
| |
|
|
|
|
|
Apr 12, 2022 20:37:35 GMT
|
|
is this with the new welder? how are you finding it compared to the old one?
|
| |
|
|
vulgalour
Club Retro Rides Member
Posts: 7,287
Club RR Member Number: 146
|
|
Apr 12, 2022 21:11:44 GMT
|
Rich: I can go one better, I've got a NOS one still on the paper I could send you. I didn't want to put it on the car but I did want to find someone to use it as a template for replacements eventually so... I choose you? blackpopracing: This is indeed with the new welder. It's like magic. Either every single welder I've ever used has been garbage (very possible), or this one is just really good. I'm an average hobbyist welder, if a weld is pretty it's normally by accident. This thing though, those accidentally nice welds happen so often even when working outdoors that it makes me look like I know what I'm doing. I can absolutely see why people rave about RTechs as being the best bit of kit out there for the price at the moment because it really is. The only real issue I've faced is that the wind sometimes blew my gas away as I was working but that's not a fault of the welder, just my working situation. Even so, I've worked with welders indoors that couldn't make as nice welds as this one is doing outdoors. Not only that, I haven't had to fiddle with the wire feed or the torch once. The torch is comfortable in a gloved hand and the trigger sensible about sensitivity. I could go on, the thing is astonishing for the price. The old welder doesn't even come close, in part because it's basically worn out now, but I'm not even sure a new version of the same welder would be as good. In short, I love my little RTech welder and I wish I'd been able to buy one years ago. It takes a massive amount of stress out of the job and, when you're working outdoors with limited tools and materials, is a massive boon. I reckon it's already saved me several hours on this job purely because of how good it is at ironing out my inadequacies.
|
| |
|
|


 to remove and refit so I'm just going to keep an eye on this for now. I don't believe I have any sort of restrictor like your TR8, it's all very simple plumbing in the Princess.


