|
|
|
Mar 12, 2023 18:59:45 GMT
|
|
The woodworm is probably 40 years old, I'd not over worry about it. Car has not fallen apart yet, so it's unlikely to do so if you use wood epoxy filler.
|
| |
|
|
|
|
vulgalour
Club Retro Rides Member
Posts: 7,078
Club RR Member Number: 146
|
|
Mar 14, 2023 17:04:16 GMT
|
|
Time for a Lanchester video.
|
| |
|
|
vulgalour
Club Retro Rides Member
Posts: 7,078
Club RR Member Number: 146
|
|
Mar 17, 2023 15:14:35 GMT
|
|
With the Lanchester jumping the queue and eating up my meagre funds, the Princess has been sat patiently waiting for me to have the means to get the tools to finish the brakes. Or pay someone else to do it for me. Anyway, I'd forgotten to disconnect the battery and realised the car hadn't been started in quite some time so decided to see what the state of things were. Normally when the car is sat idle for any amount of time, things get damp and grumpy.
Happily, it fired up willingly, all the electrical things work that should and while it is a little damp inside because it's been raining all day, getting in and out of the car a couple of times soon had it all dried out. Nice little motivation booster for when I've finished the emergency repairs on the Lanchester that at least and I'm feeling a bit better about getting back on the Princess once I'm able. I'm also pleased to report I found some NOS rear axle tube mounts so I can replace that delaminated one and resolve another issue while I'm doing the brakes.
Tomorrow, all being well, Pat and I are taking the Maestro over to Torque Moto for the coffee morning meet that Furious Driving has organised. It'll be the first show/meet for the Maestro since I bought it, and the first show/meet Pat and I have been to since before the pandemic began. I've no idea what's going to turn up or how busy it will be, I just hope it's a nice morning out for us. We very much need it.
|
| |
|
|
vulgalour
Club Retro Rides Member
Posts: 7,078
Club RR Member Number: 146
|
|
|
|
|
So much for today's plans. Other half is quite unwell so we've had to cancel last minute. Disappointing in all honesty, but they do come first.
|
| |
|
|
vulgalour
Club Retro Rides Member
Posts: 7,078
Club RR Member Number: 146
|
|
Mar 19, 2023 18:32:39 GMT
|
Today I spent a bit more time on the Lanchester, namely getting the next round of wood treatment done now the supplies have arrived. First was an injection of woodworm killer in any of the holes I could find, followed by a third and final coat of it over all the wood that I could get to in both inner arches. Once that had dried out, it was time to drill some small holes into the frame as per the instructions on the wood hardener, and inject a bunch of that into all the affected areas of woodworm and rot, followed by a liberal brushing of all the exposed wood with the same. That then had to be left to cure for a couple of hours, leaving me no time to do the wood epoxy filler to get the surface stable again. The badly affected rear arch feels like it has had some flex removed, not much, but enough that it's noticeable when shutting the door so perhaps that's been compromised for quite a while without showing any signs of it. Since nothing else could be done on the frame I decided to rebuild the boot interior. There was no reason not to at this point and it would be good to get stuff out of the house and back on the car. Reinstalled all the lower boot floor hardware and the petrol tank access panels (less the rubber sheet since I'm still waiting for my order to be delivered) and then sorted through the fixings the intermediary boot floor was held down with when the car arrived. After working out what bolts should be used and what shouldn't I had it all back in properly. I also made sure to fit new anti-rattle wool strips to replace the old and missing ones. The rear arch interior trims and padding were also reinstalled, neither of which are in the first flush of youth, but both of which are good enough to go again for what we're doing here. 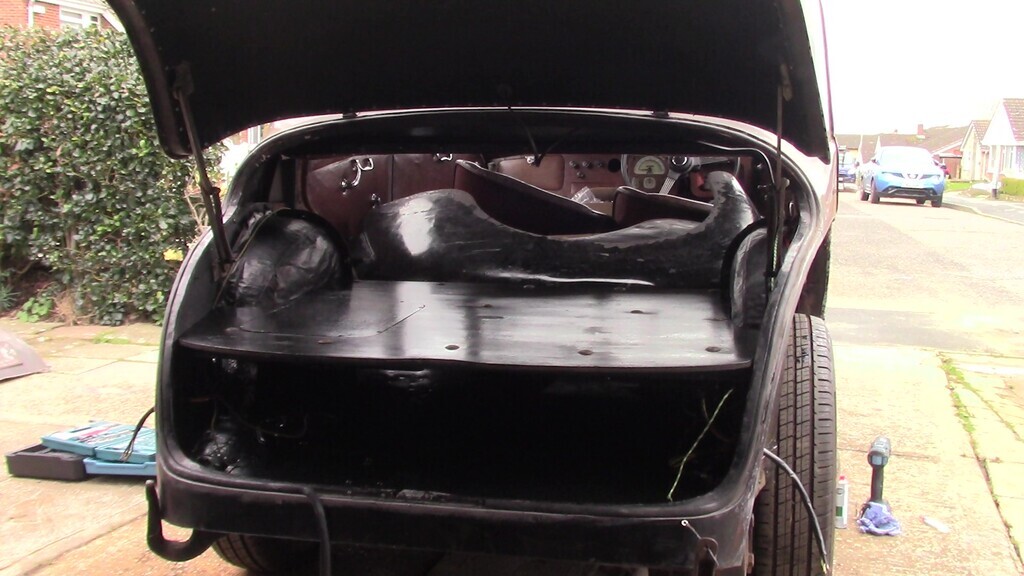 All that done, the new grommets for the wiring installed, the new wiring for the high level lights routed, I could finally put the rubber mat back in and call this area as done as it needs to be. 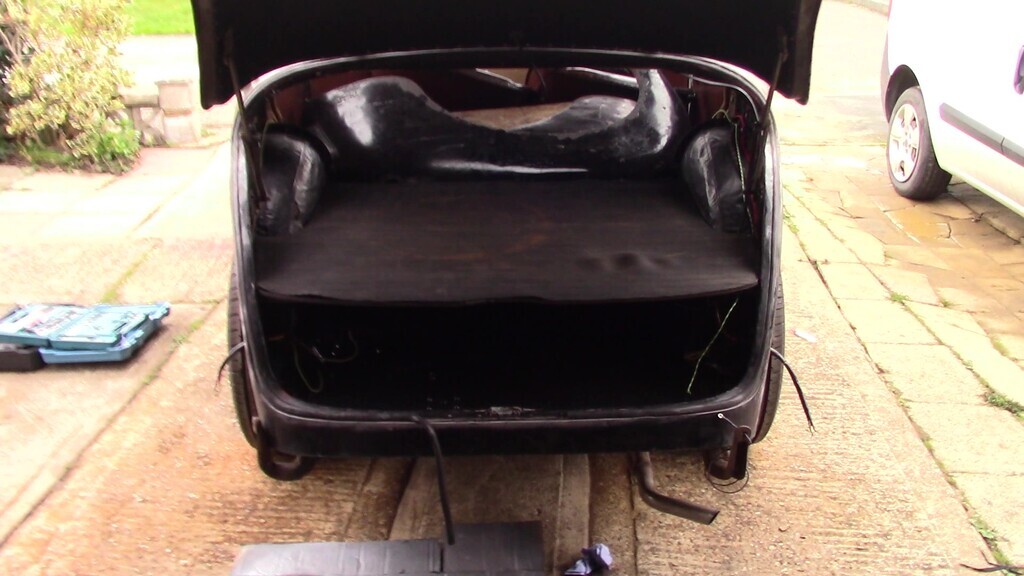 This job wasn't supposed to be a priority, it was supposed to be tackled after all the wiring was completed and the car was able to move under its own power. I am glad it's done, it's been involved and taught me a lot about how things go together on this car. It's also made every job ahead of me look a lot smaller and easier because, like when the interior was cleaned up, I now have something nice to look at it to motivate me to go further. The goal now is to focus on the jobs that will allow me to get the car back in one piece. That means the rear outer wing repairs have been shoved down the list a good way as non vital. Instead I'll be doing the wood epoxy filler work on the frame, removing the seized bolt remains, welding the sill ends and floor corners, and reinstalling the interior that's missing. There's also a bunch of smaller jobs that are easier to do with the floor removed, like replacing the main battery cable, securing the wiring loom to the chassis rail, and replacing the brake light switch. If I can keep chipping away at this every weekend at this rate, it should be up and together pretty quickly. |
| |
|
|
vulgalour
Club Retro Rides Member
Posts: 7,078
Club RR Member Number: 146
|
|
Mar 23, 2023 20:45:14 GMT
|
www.carandclassic.com/car/C1563686 So I'm going to buy it right? I'd love to. Pat and I have looked through the few pictures and noticed quite a bit of useful stuff on it and since the seller is willing to sell the car whole and deliver it, that makes purchase a lot easier. We've a space on the driveway and motivation to strip it for everything of use. Unfortunately, we're still recovering financially from getting Covid at the end of November and while our incomes are back to what they should be, recouping those lost months has set us back. That's just how it is. We've put feelers out anyway, just in case, since if you don't ask you don't get. This is another one of those reach outs. If anyone reading this can give us a leg up financially short term to acquire this that'd be neat. No worries if not. Does no harm asking, right? It probably doesn't come with the V5 since it isn't mentioned (I've not bothered the seller, don't want to waste their time with that sort of thing until I've got cash handy) so there's likely no money back on the plate. We'd have no intention of attempting to restore this car or put it back on the road, it would be acquired solely as a donor and source of items for a spares stash should we need them in the future. Thankfully, we have very understanding neighbours.
|
| |
|
|
|
|
|
Mar 23, 2023 22:18:37 GMT
|
|
The, uh.. glass on it looks okay?
|
| |
|
|
vulgalour
Club Retro Rides Member
Posts: 7,078
Club RR Member Number: 146
|
|
Mar 23, 2023 23:04:00 GMT
|
|
It's definitely not a resto project, it's too far gone for that. There is a lot of stuff there that we could use though. All four wings are salvagable, as is the rest of the front sheet metal. Boot lid looks good too and that roof is a massive sheet of aluminium just waiting to be repurposed. All the glass would be nice to have since we do need to pull the rear screen and don't have a spare, so having a bit of security there would be handy.
Couple of seats remain inside and should be good for doing all the repair work on our existing seats that's needed in a better way than I've done them already. Dashboard instruments might still be present. At least some floor boards are still in, they might be better than what we currently have. Some of the interior wool remains which would be a perfect match for the B pillar I need to make that's missing (got the other materials, just not any suitably aged wool). All the hardware on the doors is good to have, especially the exterior handles which I believe are unique to the LD10.
Mechanically, the wheels look restorable and it would be nice to have a spare set, especially since one of ours is slightly buckled. Steering box might be good and there could be spares like starter motor, dynamo, and wiper motor to be salvaged, all of which tend to be a little pricey. If the carb is still present and good that's also worth having. Engine probably isn't any good but if the gearbox is there, that's worth keeping. Rear axle too would be handy to have as a spare.
If the outriggers are present on the chassis, even if they're rough, I can cut those off and get replacements made a lot easier and then install them to replace the ones on our car a lot easier. Likewise with the sills, even though they're quite bad on this donor car, being able to cut them off would make understanding making repair sections a lot easier on ours though it's unlikely they'll provide any donor material.
There'll be all sorts of fixings throughout too that our car is either missing, or has turned to rust, which should match up and fill some gaps. There's always lots of fiddly items that can be hard to track down that are available on a donor vehicle and now we know very well what we need, it'd be good to go through a complete car and strip off everything we need and rehome the rest.
As it happens, amazingly we have already had a lead with some help in acquiring this car. Nothing concrete yet, but hopefully it pans out so we can all get a good visual poke around this hulk.
|
| |
|
|
vulgalour
Club Retro Rides Member
Posts: 7,078
Club RR Member Number: 146
|
|
Mar 25, 2023 18:55:10 GMT
|
Spent a bit of time on the Lanchester again today, trying to wrap up the back end as much as I can really. As always there will be videos on this in the future at some point covering it in more detail, for now here's a snapshot of the day's events. Namely, I was taking the aluminium liner from the scrap boot lid and repurposing it into splash guards to replace the rotten steel originals. I could definitely have repaired the steel ones but for less effort I could also just remake them in something that will hopefully be more rot resistant. There's also something satisfying about using bits of another Lanchester to fix our Lanchester. On the driver's side I also had a go at using the JB Weld Quickwood epoxy and didn't enjoy it at all. I'll be doing a bit of research to find either a better product, or find out what I did wrong. It just wasn't at all satisfying to work with, apply, shape, or smell. It probably does a really good job at filling the voids and all that, it just wasn't any fun to use. This side went nicely other than that, a few fresh holes in the repaired body work and the new splash guard was in. I used some 1.5mm rubber sheet to isolate the splash guard from the body work to hopefully reduce chances of dissimilar corrosion and hopefully prevent water getting trapped between layers of metal. 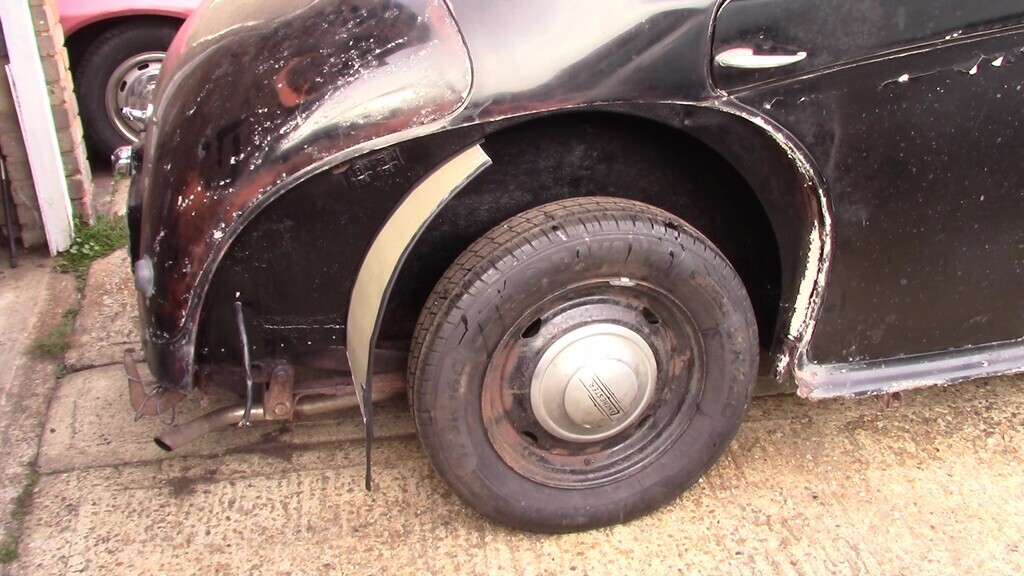 Remade both sides using the original splash guard remains as a template, that means there's a cut out for the filler neck on the passenger side. Cut the rubber sheet here with an extension to cover the fuel filler neck hole which I will cut another hole in when the tank is ready to go in, that way I won't cut the hole in the wrong place. Originally there was only a square of rubber sheet for the filler neck hole and none between the splash guard and body, so it's very similar to factory. 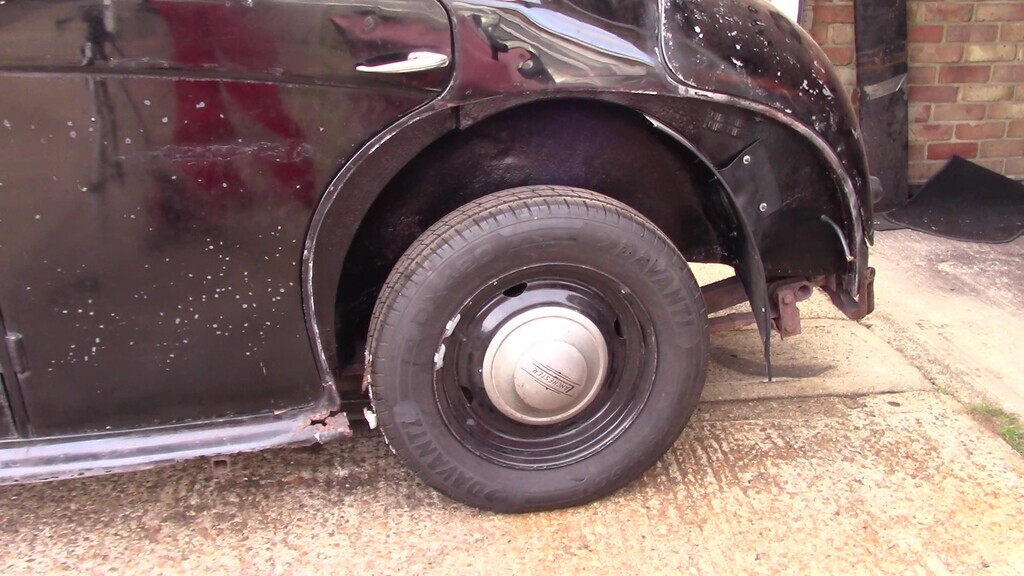 I left the fixing tabs/brackets the screw into the underside of the rear wings over-long. I wasn't sure exactly what length they should be and erred on the side of caution, this way I can bend, drill and fit once the rear wings are repaired and ready to go back on the car. I did add a rubber u-channel to the outer edge of the splash guards to hopefully help seal them against the inner wings a bit better and reduce any rattling or other noises the two parts might make if they make contact while driving.  One of those jobs that's worth doing while I have everything apart rather than saving it for later and having to dismantle things just to fit these. It does seem that the order of construction is that these go on before the boot interior so it would have been better to do it before I refitted the boot floor, but never mind, it's done now. |
| |
|
|
vulgalour
Club Retro Rides Member
Posts: 7,078
Club RR Member Number: 146
|
|
Mar 26, 2023 15:34:04 GMT
|
I put a deposit on this one today. 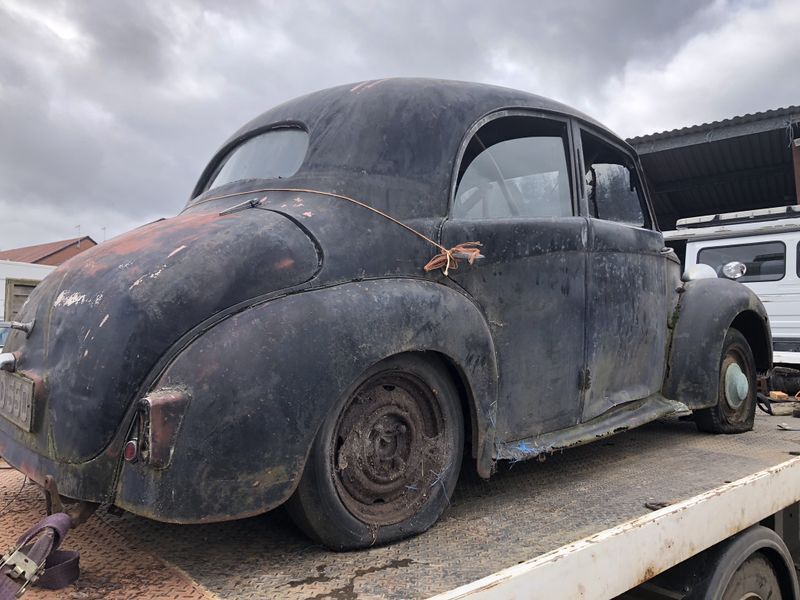 The car community, as always, has proven awesome and helped us secure the funds for this. Sometimes, being cheeky does pay off. Very grateful for the financial assistance offered in acquiring this donor car, we were concerned we'd miss out on it if we had to wait the extra few weeks to be in a position to acquire it without the assistance. LD10 donors aren't exactly commonplace. |
| |
|
|
vulgalour
Club Retro Rides Member
Posts: 7,078
Club RR Member Number: 146
|
|
Mar 26, 2023 15:58:17 GMT
|
|
As a little billy bonus, here's a short video walkaround from Flower Farm today. Was a great run out for the Maestro, about sixty miles all in and the car feels better for it. First time it's been able to stretch its legs for a while.
|
| |
|
|
vulgalour
Club Retro Rides Member
Posts: 7,078
Club RR Member Number: 146
|
|
Mar 28, 2023 16:31:03 GMT
|
|
Obviously, if you've seen the Flower Farm video above you'll know the outcome of this particular job so, spoilers I suppose. Anyway, here's how the passenger side rear arch repair went, which was arguably the easier side to do in theory.
|
| |
|
|
vulgalour
Club Retro Rides Member
Posts: 7,078
Club RR Member Number: 146
|
|
Mar 29, 2023 12:37:13 GMT
|
|
Donor Lanchester is arriving on Saturday, which is pretty handy because I have nothing planned this weekend.
|
| |
|
|
vulgalour
Club Retro Rides Member
Posts: 7,078
Club RR Member Number: 146
|
|
|
|
It has landed. The Maestro didn't have enough grunt to pull it up the drive (the flat tyres on the Lanchester certainly aren't helping matters) and I've now got to wait until Pat finishes work before I can have a proper rummage.  I'm just hoping the neighbours don't think this is an elaborate April Fool's Day joke. The inner tubes are all holding air, amazingly, so I'll see if I can get some more in them with my foot pump, empty out the heavy stuff inside the car, and perhaps Pat and I can move it further back then. It is definitely too far gone to reasonably restore and contains treasures that we are after so it feels like a worthwhile investment even without having a rummage. It's also clearly been in this state for a very long time. Three of the four doors are stuck shut, which isn't ideal, but I reckon Pat and I can get this all broken down and into useful parts pretty quickly. |
| |
Last Edit: Apr 1, 2023 11:07:18 GMT by vulgalour
|
|
MiataMark
Club Retro Rides Member
Posts: 2,961
Club RR Member Number: 29
|
|
|
|
|
I've currently got an abandoned Land Rover Discovery on the drive, although to be fair it's not a wreck (at least externally).
|
| |
1990 Mazda MX-52012 BMW 118i (170bhp) - white appliance 2011 Land Rover Freelander 2 TD4 2003 Land Rover Discovery II TD52007 Alfa Romeo 159 Sportwagon JTDm
|
|
glenanderson
Club Retro Rides Member
Posts: 4,100
Club RR Member Number: 64
|
|
|
|
|
Excellent.
Looking forward to seeing how much you can salvage. 👍👍
|
| |
My worst worry about dying is my wife selling my stuff for what I told her it cost...
|
|
vulgalour
Club Retro Rides Member
Posts: 7,078
Club RR Member Number: 146
|
|
|
|
|
After some time, Pat and I have cleared out the interior, the boxes and boxes of stuff, and found some actual treasure. Also a lot of rat poop. Every piece of plywood is riddled with woodworm to the degree that some of the car has self-disassembled. The rot to the steel is pretty extensive in places.
Perhaps the most exciting find in the whole car has been a NOS looking front engine mount which is something our car needs and isn't available to buy.
The only disappointment thus far has been discovering the seats are red, not brown. We've salvaged the material anyway because antique leather is hard to get for repairs, especially in less usual colours. Headlining on this car used to be green, which was a surprise, but has faded to the same sort of brown as our once-salmon-ish headlining so that's going to help with the last of the interior repairs I need to do.
Haven't even started on the body of the car, it's taken us this long just to clear it out and we still haven't gone through all the boxes yet so there's bound to be more treasure hiding. This was a shockingly good purchase and should pay for itself in the parts we use alone.
|
| |
|
|
|
|
|
|
|
|
If it's got a registrstion and the chassis is ok it could be great basis for a special.
|
| |
|
|
vulgalour
Club Retro Rides Member
Posts: 7,078
Club RR Member Number: 146
|
|
|
|
We're going to find out if that's possible. Won't hurt to try and since the plate isn't showing up as being assigned to another vehicle, it might be possible. The ID tags are still present on the car so we might stand a chance. It would be nice if the ID and chassis could help someone with their project rather than us just weighing it in. Today has been a very busy day. When the engine was removed and dismantled someone had the foresight to heavily grease the crankshaft bearing faces and the cylinder bores and... that was it. All of the fixings are just in unlabelled plastic tubs, mixed along with trim fixings. I've been patiently going through what I can to find some semblance of order and have most of an engine coming together. It might even be rebuildable, just not by me. 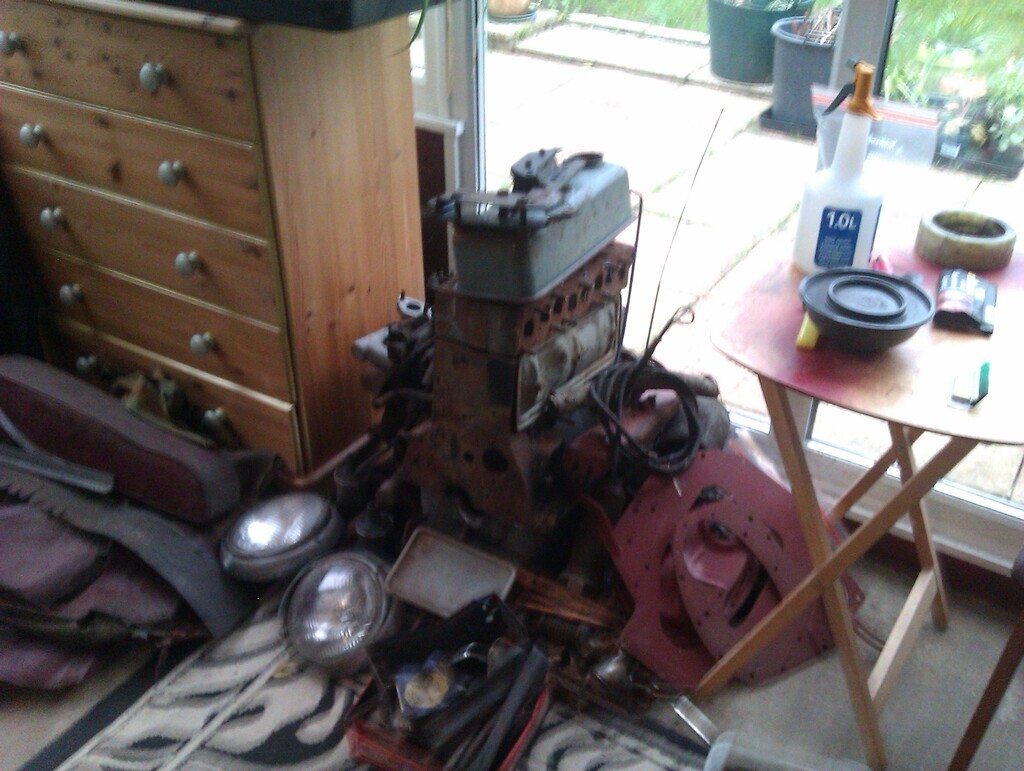 The car itself is in rough shape, as expected. All of the plywood is so heavily riddled with woodworm that it's disentegrating. Several parts of the interior and floor have literally fallen off. Surprisingly, the solid wood frame doesn't seem to have been attacked, though we'll know more obviously on that front once we dig in. If we're really lucky, the corner I want to salvage to repair ours better will still be sound.  The bodywork is bad on the sills, as expected, and some of the boot floor is just missing entirely. The rear wings are marginally better than the ones on our car it seems, and the front wings while not great certainly have potential as donors for repairs on our car do remove some of the necessity to make compound curves and the like. In places the sills have been repaired with pop rivetted aluminium and the outriggers have had some seriously agricultural engineering decisions made to them. 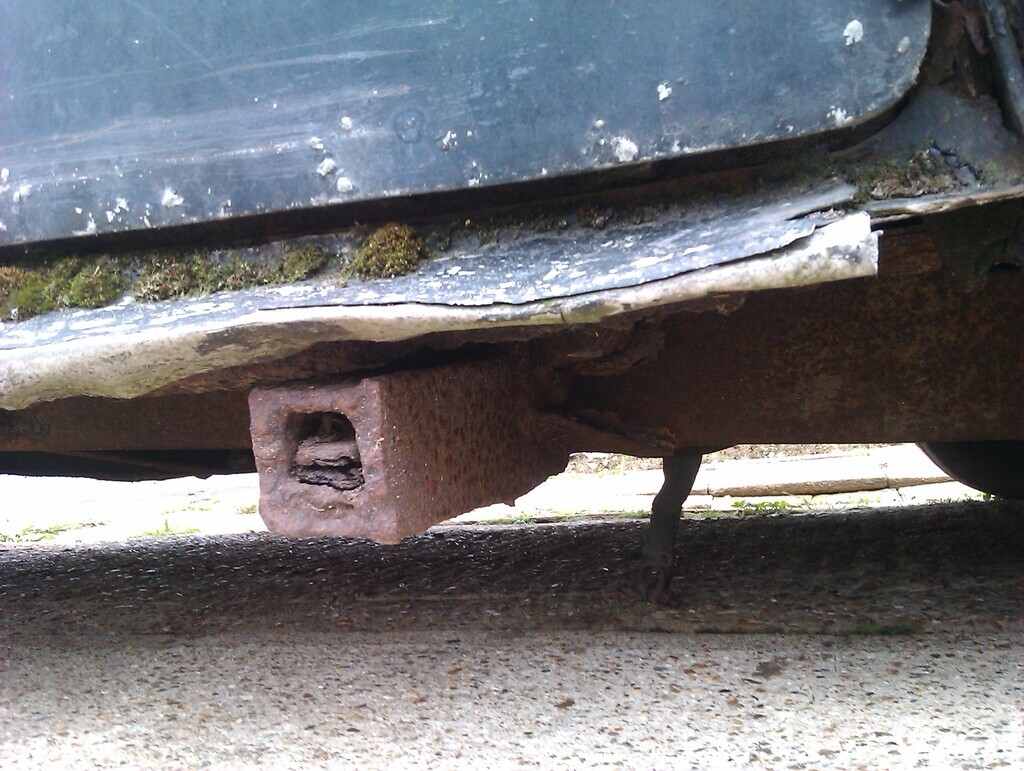 The best find for us so far has been what looks to be a NOS front engine mount. This is a part that's incredibly hard to get hold of and one that we need so having this one is a big deal to us. It also means our old mount can hopefully be remanufactured so we have a spare shoudl we need one in the future. 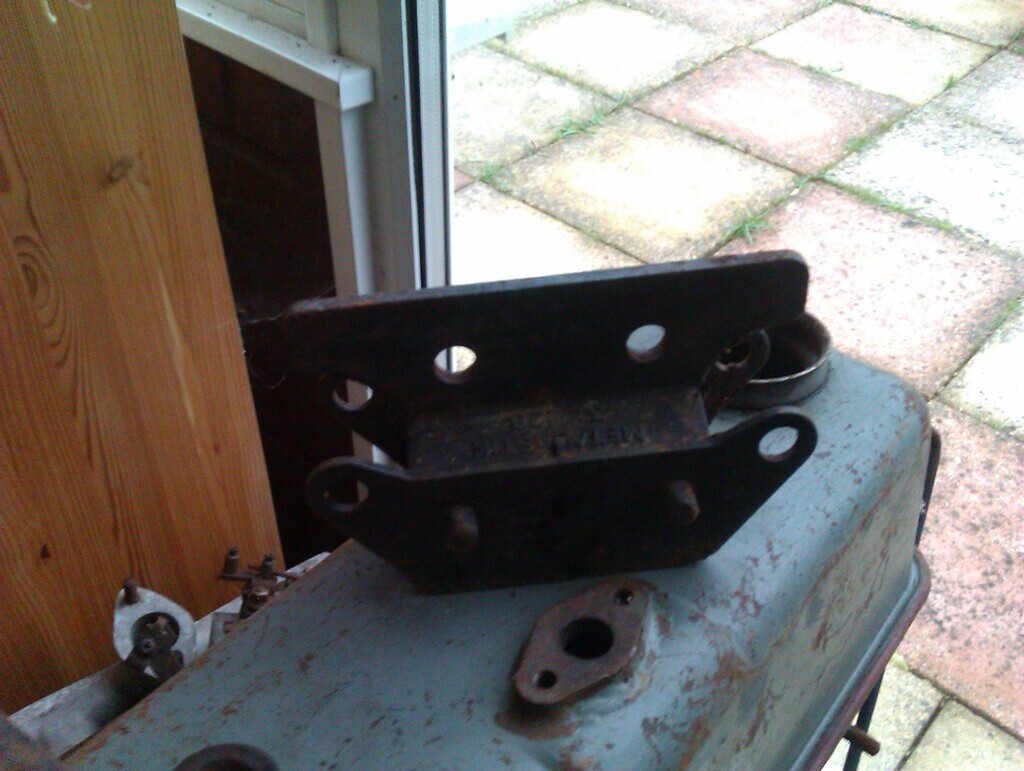 This donor has highlighted just how good our car really is and how worthwhile the effort has been in putting it right. 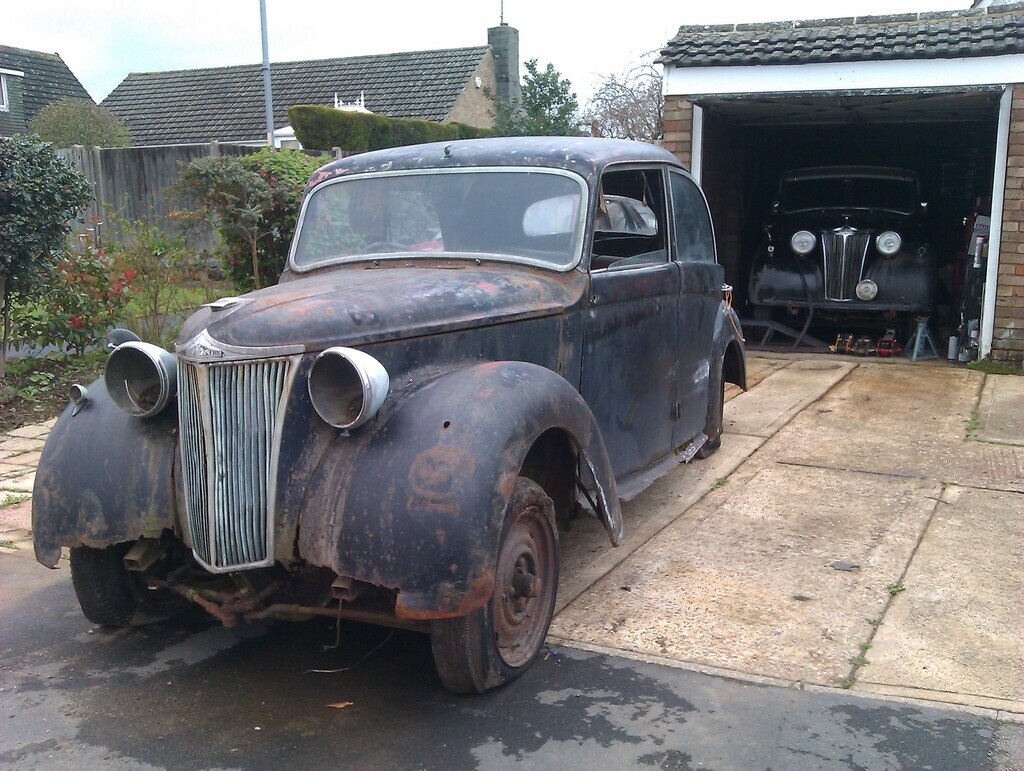 There's still plenty to get out of the donor, and some valuable spares have been unearthed. Amazingly, the factory wheel brace and post jack were still in the donor and in pretty good condition, they just need a thorough clean and lubrication so they're fit to live in our car. I'll be doing a more full update on this when Pat and I have been through everything properly and figured out just what spares will be available. We've already found some items we don't need that will be sold on and we may find more as we sort through the muddle of fixings and boxes that were inside the car. |
| |
|
|
vulgalour
Club Retro Rides Member
Posts: 7,078
Club RR Member Number: 146
|
|
|
|
Been a long old day here. Documenting reference on the donor car such as the wiring routing since the donor has its original wiring in place and unchanged, learning a few bits about the trim that's missing on ours and somehow still present on the donor car, clearing out more of the rotten plywood, and formulating a plan of action for dismantling the big bits. Pat spend the day indoors mostly going through all of the loose hardware and cleaning it, taking many trips back and forth to the ultrasonic cleaner and laying parts out for drying and inspection. He then established a sorting method and I finished off organising, spritzing with WD40, and bagging all the cleaned hardware. 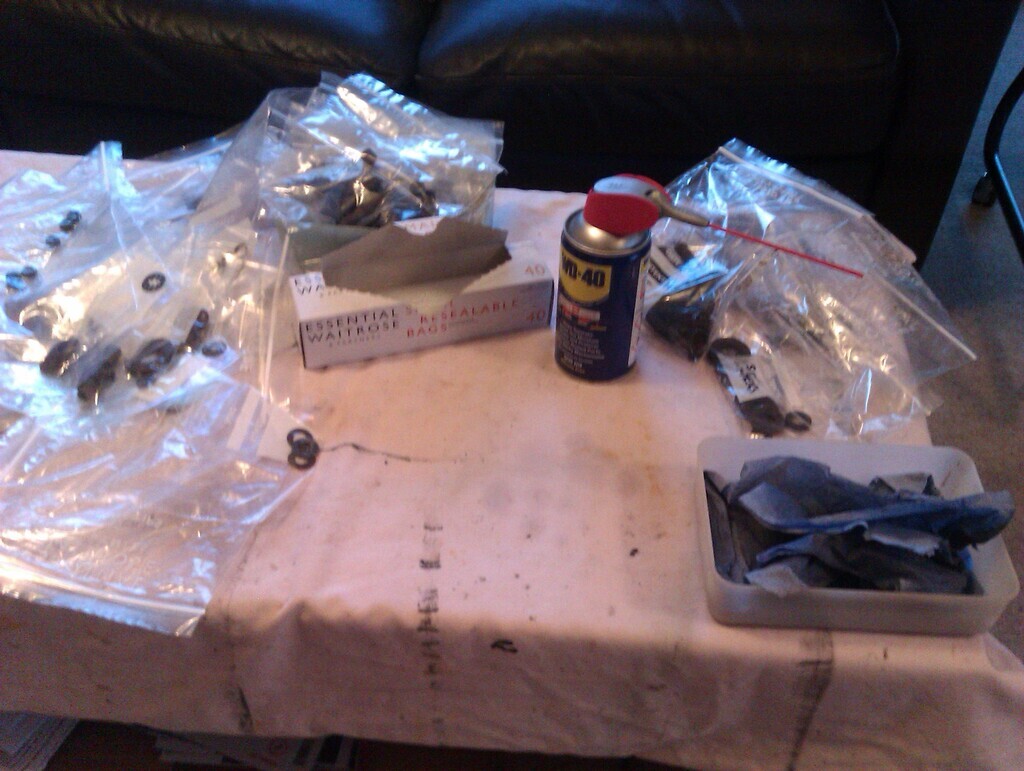 It took forever! However, we now stand half a chance of figuring out what goes where on the engine, and what belongs to the not-engine bits of the car. Work like this done now will save us a lot of headaches later since we can see at a glance what we do and don't have. While I was doing reference archiving on the donor and figuring out what next to remove when we've dealt with the stuff we've been organising, I discovered a bracket on the driver's side inner wing that is missing on our car. It's too small to hold the coil (and on the wrong side of the engine), and too large to hold the wiring harness so its purpose is something of a mystery. If you know what it might be for, let us know. 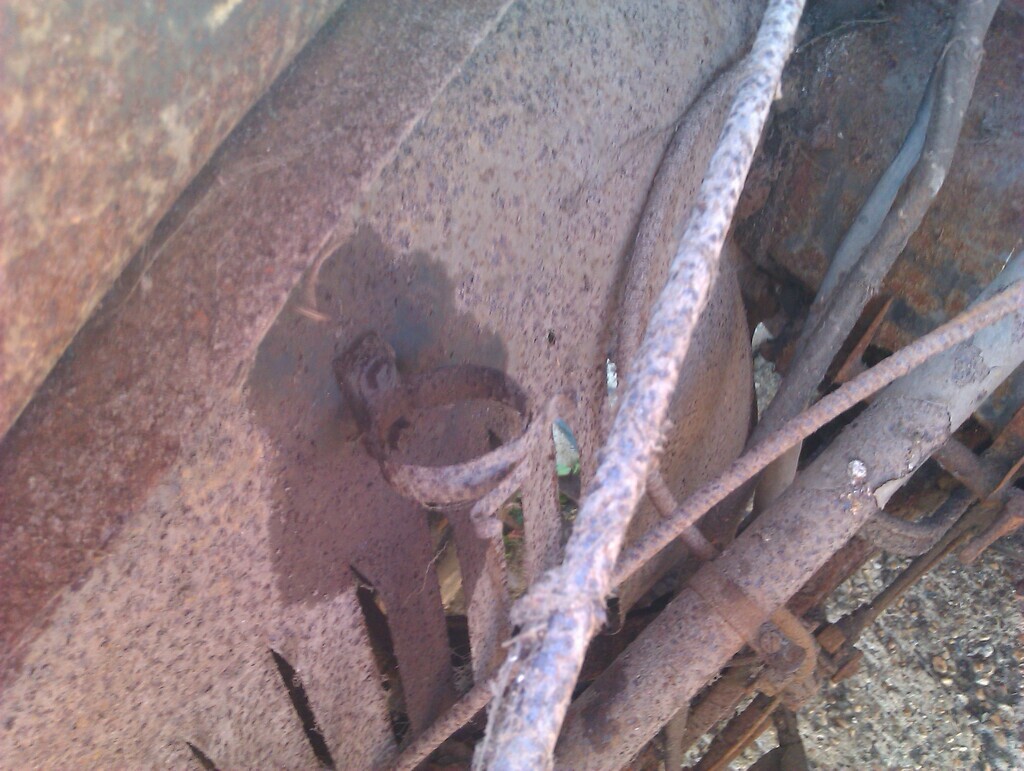 |
| |
|
|


