vulgalour
Club Retro Rides Member
Posts: 7,279
Club RR Member Number: 146
|
|
Jun 19, 2020 17:53:08 GMT
|
Right then, we're nearly there. All the tools and parts I need to get the engine back together have now arrived and I had enough time to do some of the work today. New torque wrench is worth what I paid and not a penny more, it does the job but it's hardly a high quality thing, typical Draper really. Just belts and timing to go and we can get this running, I hope, possibly even tomorrow. 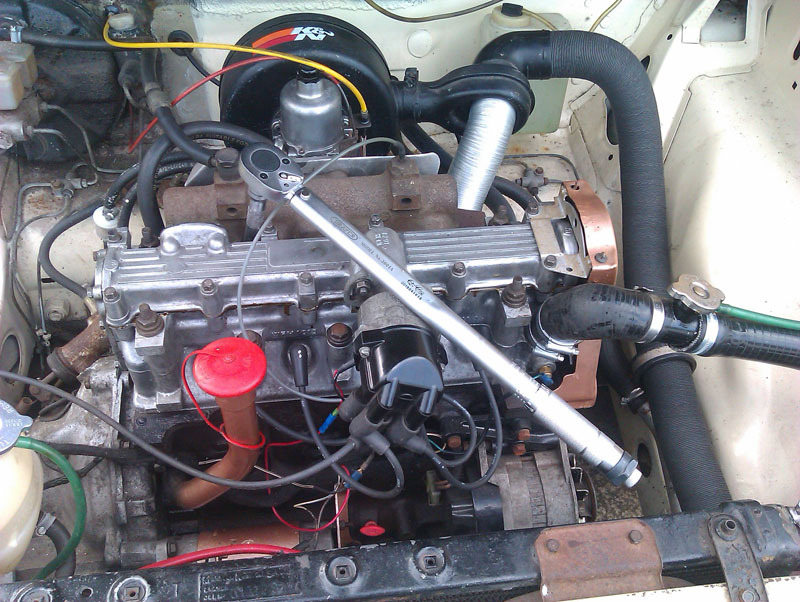 I did that after the drill work. Been keeping an eye on the weather and made use of a sunny spell during food break to crack on with fitting the spoiler. Worked out where I wanted it, marked the holes with the template I made, realised I'd got the template off centre only after drilling the holes, so redrilled the holes in the correct place and fixed the spoiler down. 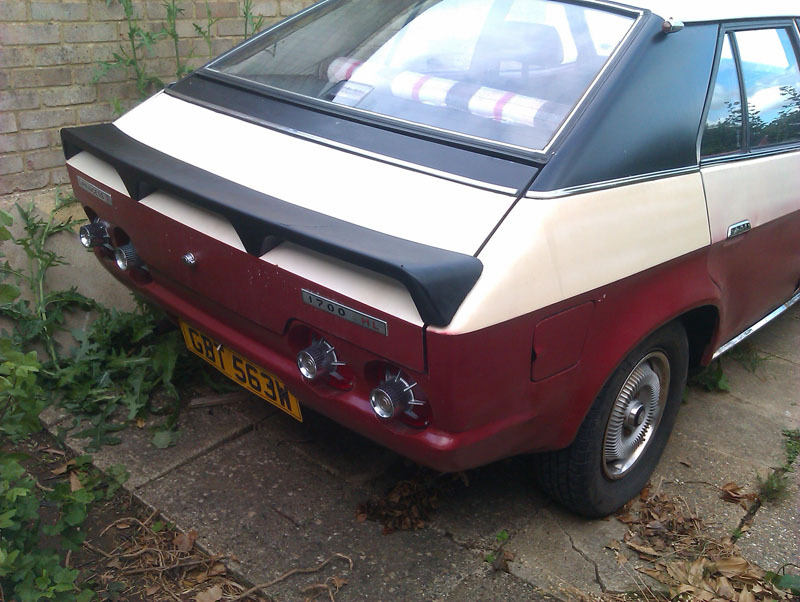 The inner bolts are easy to get to from inside the boot lid. The outer ones not so much, I'm going to have to drill the holes made in the bracing somewhat larger so I can get to the bolt and get the nut and washer on, as well as removing the boot struts to do so. Something of an oversight on Unipart's part there, if the fixings had been a bit further in board on the spoiler I wouldn't have this issue. Fairly standard It'll Do approach I've come to expect with anything British. 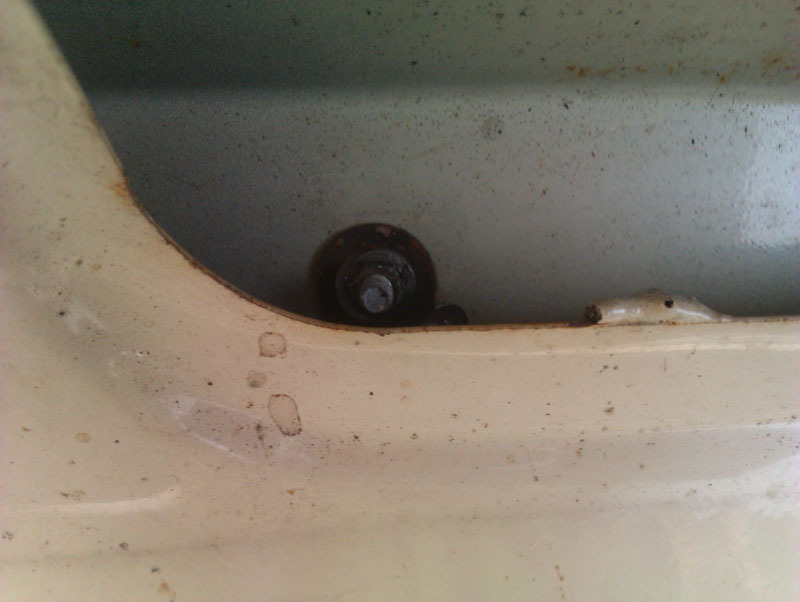 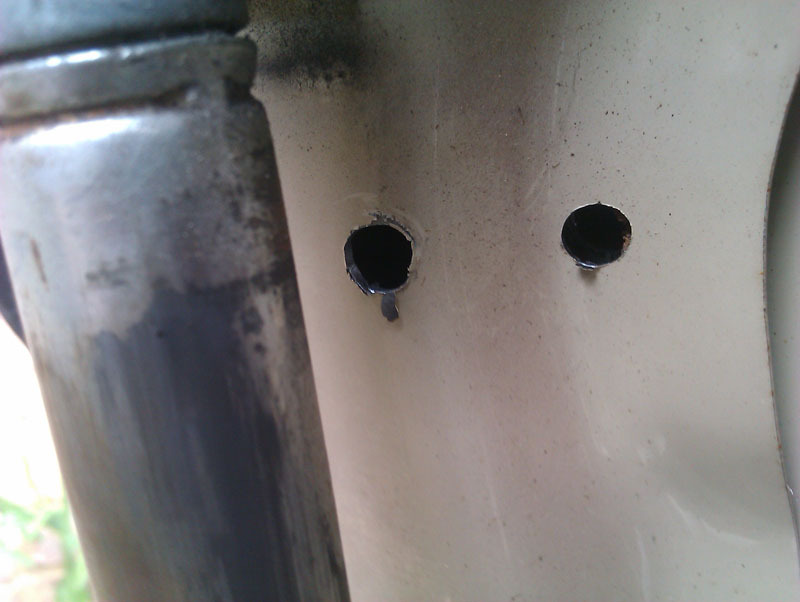 The spoiler is really light, being just a fibreglass shell, so the boot lid isn't noticeably heavier and doesn't droop. Because of the way the spoiler is shaped, you don't have to touch it to open and shut the boot lid either, so that at least is good. I'm probably going to paint the spoiler beige, that seems to be more the norm for 80s modified stuff of this type. Badges will be removed from the boot lid too and when my welder is set up I can plug all the holes I don't want and repaint everything. 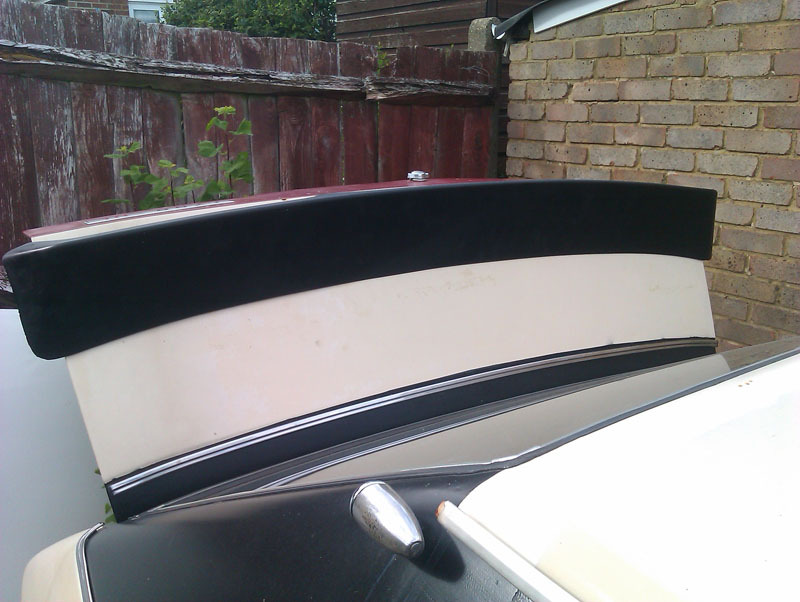 With the spoiler now safely out of harm's way since I can't now knock it off onto something by accident, or whatever, I also fitted the new door mirrors. They're a copy of classic mirrors as fitted to many cars in the 70s with a larger mirror head than the originals. They are not fantastic quality, plenty of flashing on the edges and I doubt the chrome is going to last very long. They do look better than the Acty ones that were on there and the mirror heads are a similar size so are as functional so they'll do. I doubt I'll ever find mirrors I like for this car that look good and function well. 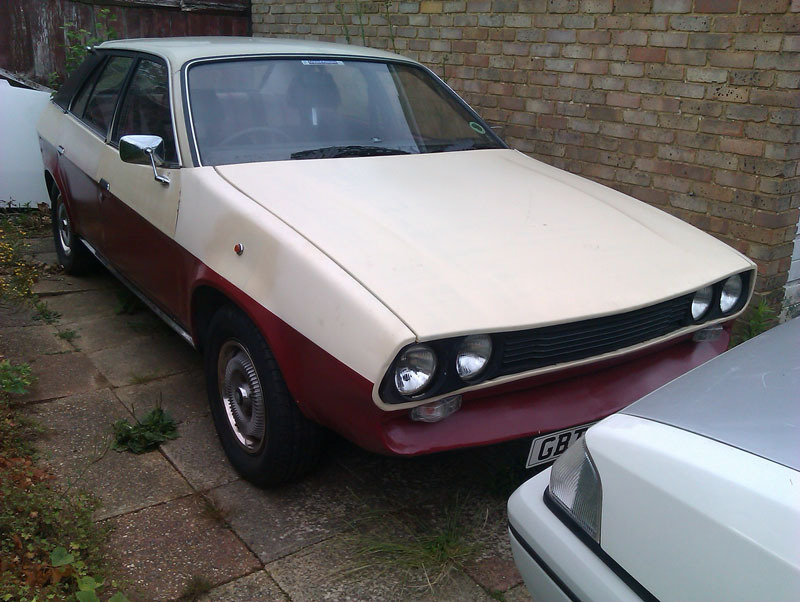 Finally, tried to get a long shot of the spoiler and how it relates to the rest of the car. It's very cramped on the driveway just at the moment and not something I can solve while both cars are currently immobile. Hopefully it at least hints at how much better the spoiler shapes actually work and, if painted beige, I think it will blend in nicely enough. 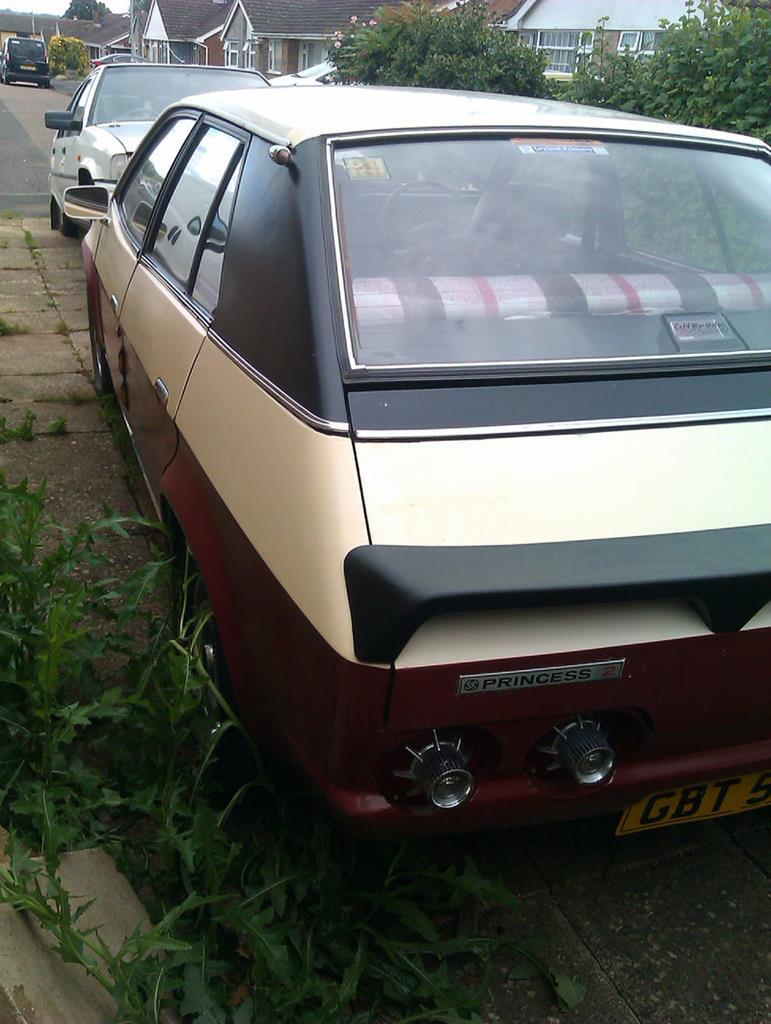 |
| |
|
|
|
|
vulgalour
Club Retro Rides Member
Posts: 7,279
Club RR Member Number: 146
|
|
Jun 20, 2020 14:30:27 GMT
|
Today has been a good day. Started by fitting the new cambelt and auxiliary belt and rotating the engine by hand several times to be absolutely certain I wasn't going to have another valve incident. Then set the distributor and hooked up the battery, did lots of checks, and eventually stuck the key in the ignition to see what would happen. What happened initially was a healthy cranking over and a brief firing before having to try again, there was no fuel in the carburettor, it was taking a little time to bring some up from the tank. Eventually that was solved and it was then a case of finding the right amount of choke (turns out that was ALL OF IT) to get the car to run, which it did for a bit, and then didn't. That's fine, it's been about 6 months, grumpiness is expected. Turned the key and only got a click, no firing. Poked around in the engine bay, turned the engine by hand again (phew, it's not a valve party), and noticed that I hadn't tightened up the distributor and it was rotated all the way around, reset that and the car fired up, and then died. Another check and realised I'd forgotten to top up the dashpot on the carburettor, sorted that and the car fired up and ran. It was hunting a fair bit but the fuel is quite old (for modern fuel) and everything needed to bed in. Left it idling for a bit and the temperature started to come up quite rapidly. There was water in the expansion bottle so I assumed, erroneously, there was plenty of water in the engine. Five litres of water later, no harm done, though getting all the air out of the radiator proved to take rather longer than usual. With all the air out of the coolant system the temperature dropped to a reasonable half to three quarter on the guage and the hunting mostly settled out. The longer the car has run today, the more settled its become. To celebrate, I moved the car back and forth until the rear brakes freed off and I can say that I've now actually driven the car, allbeit for only around a dozen feet. 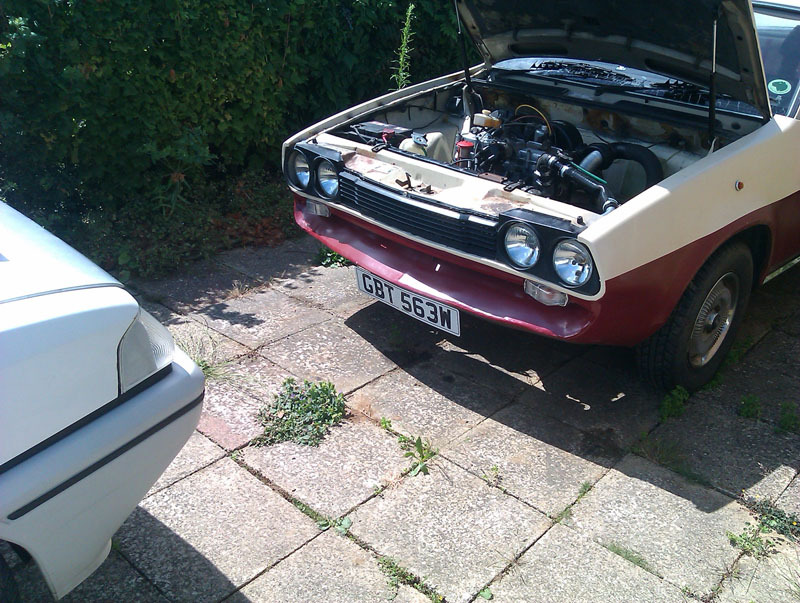 I'm pretty chuffed it's running again. Here's a terrible video. |
| |
|
|
|
|
|
Jun 20, 2020 18:25:13 GMT
|
|
Great success. Very nice cine footage 😊
|
| |
|
|
vulgalour
Club Retro Rides Member
Posts: 7,279
Club RR Member Number: 146
|
|
Jun 21, 2020 19:15:46 GMT
|
Got the tools out again today and cut one of the access holes for the outer bolts on the rear spoiler. 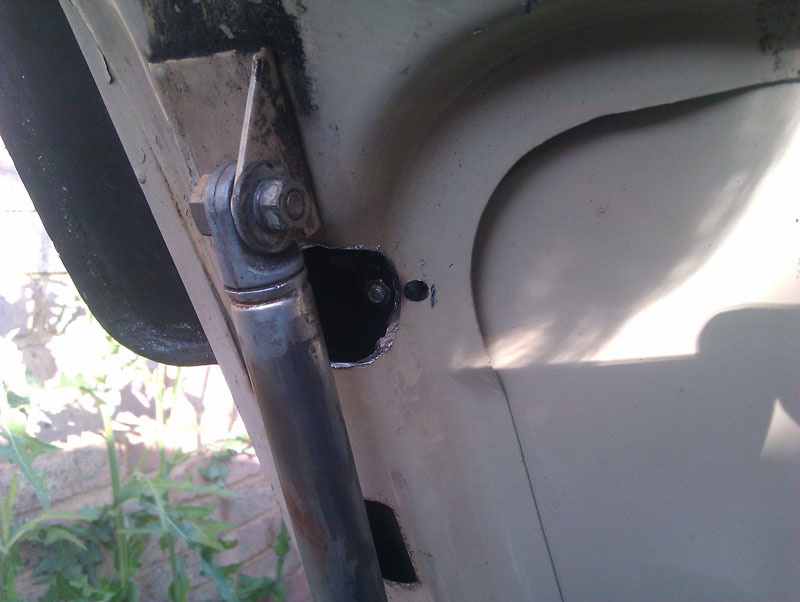 Unfortunately, I couldn't cut the other access hole because the hole saw I've got turned out to be unsuitable for the task. I guess it must be for wood or something. I did use oil when cutting to prevent it getting too hot and blunting. Ordered another one that's listed as being for steel so for now the spoiler is held on with three of four bolts. I need the spoiler fully bolted down before I can do the repair to the damage it suffered in transit, I want the spoiler to be repaired in the shape it will be when fitted rather than doing it off the car and potentially setting it in the wrong shape. 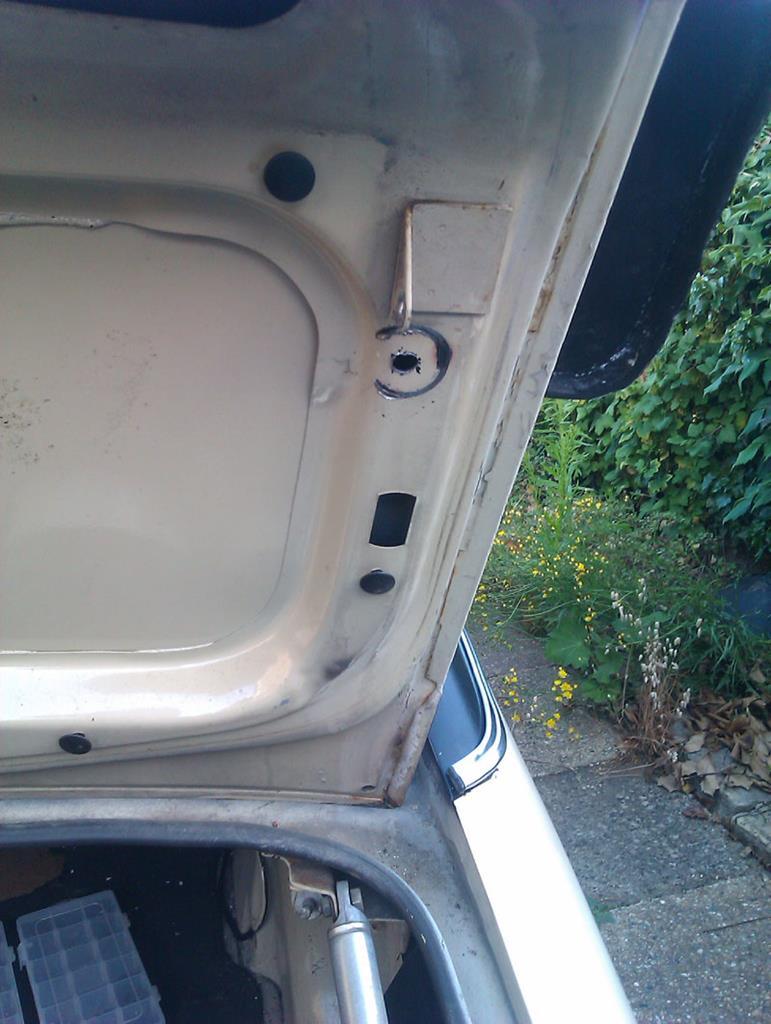 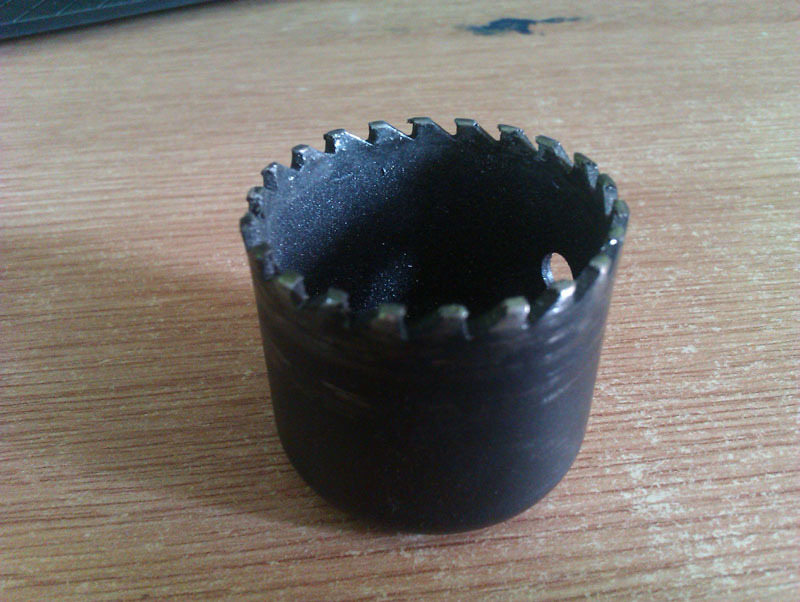 Turned attention to the front end and the sidelights. I can't fit those yet because I need to modify the headlight bowls a little bit so the tangs on the back of the sidelight bulb holder will clear. Then I need some fresh connectors and a few tools to reconnect the wiring correctly. I've ordered some wiring stuff since I don't have any so I can sort this when that all arrives. Just sat the sidelight holder up in the blue wires here, you can see the circle in the back of the headlight bowl where this pushes into place. 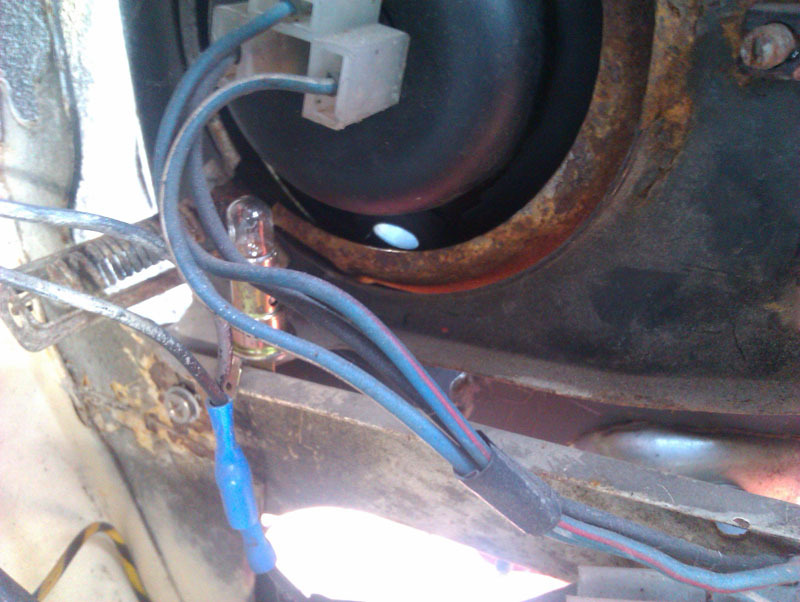 Can't do that, and I can't wire in the new front indicators, but I can fit them. These are intended for motorbikes, I got the largest I could fit in the available space. Drilled into the upright that holds the front grille and then simply fixed the indicators in place. I did have to unbolt and lean the radiator out of the way for the passenger side one as it was a little tight to get it in with the fan motor, the threaded post on the indicators is quite long. 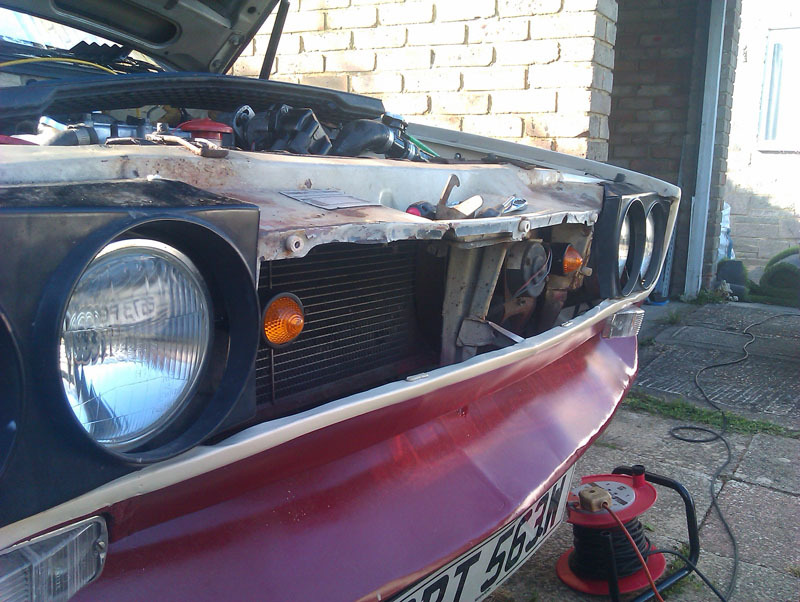 These should be large and bright enough to e seen, while also being far enough away from the headlights to not be obscured. They sit just nice behind the grille without restricting airflow to the radiator. Changing the bulbs is easy enough too should I have to since the screw that holds the cover on the bulbs is to the centre of the grille opening. The grille is open enough that it doesn't obscure the indicator particularly, I can always cut a couple of uprights out to make the light brighter if I feel I need to. I really like how invisible the indicators become in this location, it should really tidy the front end up a lot. 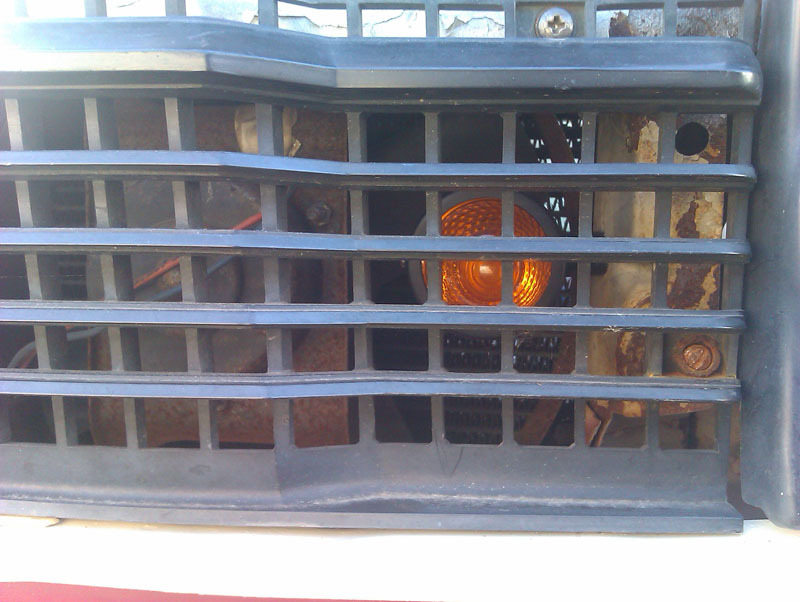 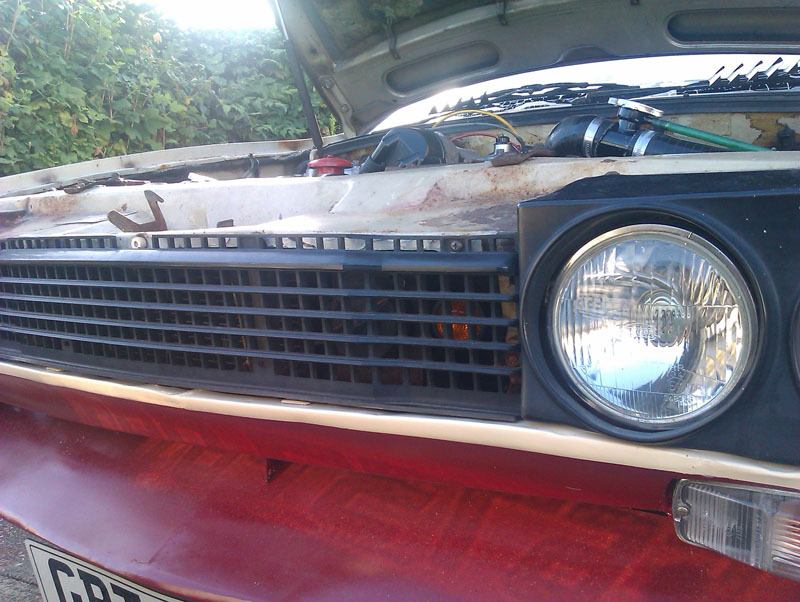 |
| |
|
|
vulgalour
Club Retro Rides Member
Posts: 7,279
Club RR Member Number: 146
|
|
Jun 22, 2020 11:23:26 GMT
|
The mojo, it has returned, because today I drove the Princess up and down a nearby private track and did a few emergency stops to wake the brakes up, which seems to have done the trick. Since the BX is immobilised currently and likely to remain so for another week, I wanted to be able to shunt the Princess about and work on it a little easier, so I swapped them around... and pulled the front bumper off the BX on one side when it rolled off the ramps but shhh that's our little secret and it's all back together now so it's like nothing happened (except for breaking a clip on the indicator shhhh). Topped the coolant up in the Princess after a bit more air was evacuated, only needed a cup or two really, checked all the lights are operating which they are, though the indicators had a good long think about it before they wanted to join in, and left the car to idle for a while. I still haven't done the fine tune yet, I'm waiting on a digital tachometer tool to arrive so I actually know what the rpm is. The car smells like its running a little rich, and it's hunting a little at idle too which is likely down to the tune and the old fuel. Happily, once you actually drive the car the hunting goes away and its quite responsive. The other irritation is that it's a bit tappy, this is quietening down the more the car is run so I'm guessing it's just because everything is new and is bedding in, as the car warms up the tappiness does reduce and it's not Talbot levels of engine castanets so I'm not that concerned. First job after car shunting was to fit the speakers up front. These are originally rivetted in place, I'm using self-tapping screws because it's what I have. They're only screwed into metal clips in the door card, the screws don't go into the door frame. I've only fitted these to cover the holes in the door card, there's no sound system fitted so the speakers are purely decorative at this point. My camera seems to think the door cards are dark magenta now too. 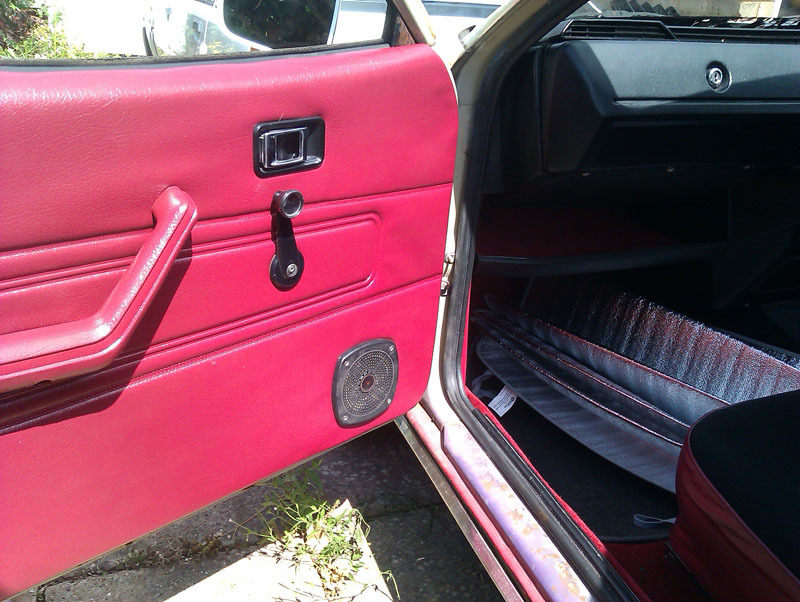 With the Princess in a more open space I could get some better pictures of that spoiler so you can see what I can see and why it works best at the bottom of the boot. I will be painting it beige rather than leaving it black, it should work better that way. 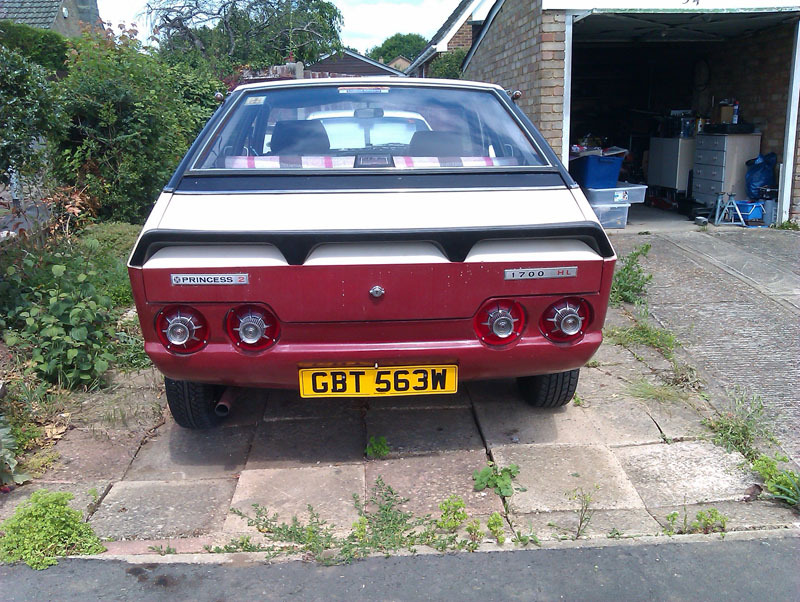 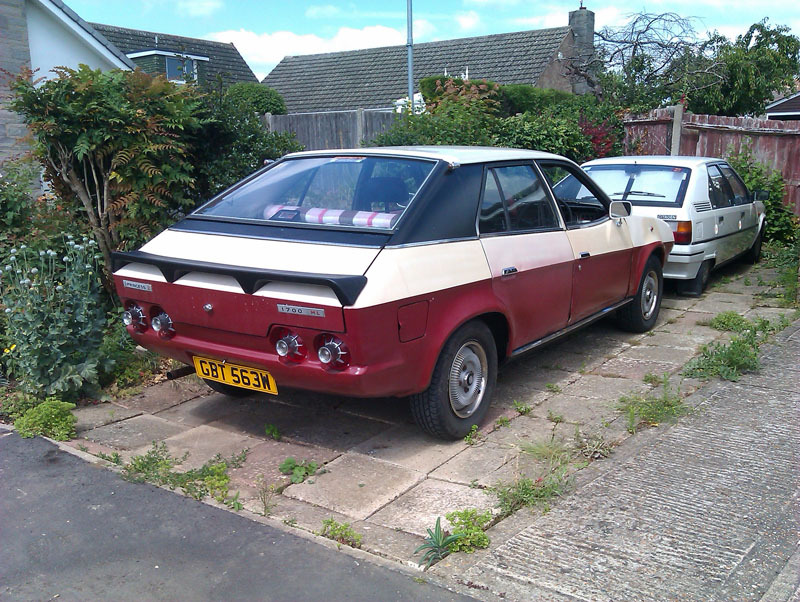 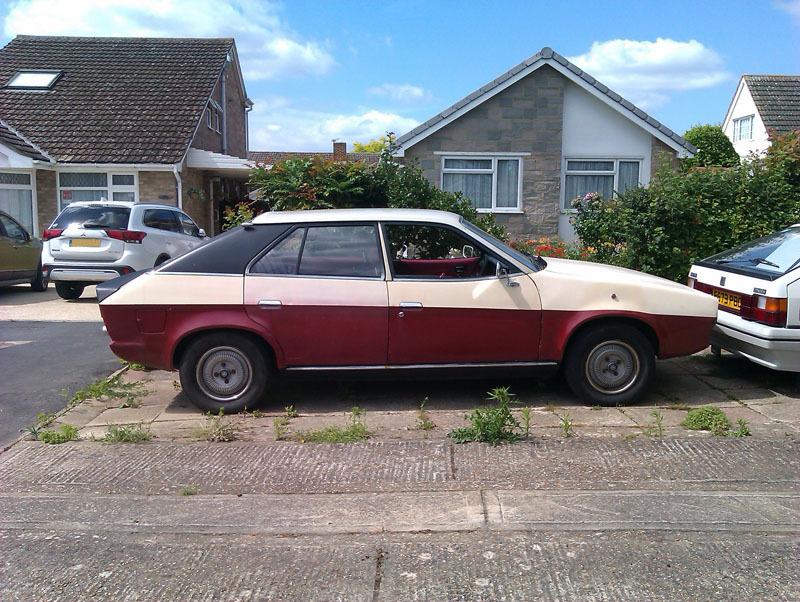 I also dug out the Lotus alloys. They need refurbishing so I have a lot of sanding in my future. Best of all the Lotus alloys drop straight on, I've got a full set of the proper original Lotus tapered-sleeve wheel bolts so there's no worries over spigot rings and that sort of thing. The only real difference on fitment is the offset since the Lotus is rear wheel drive where the Princess is front wheel drive but last time I had them fitted I didn't find I was destroying wheel bearings so I don't reckon it's an issue. 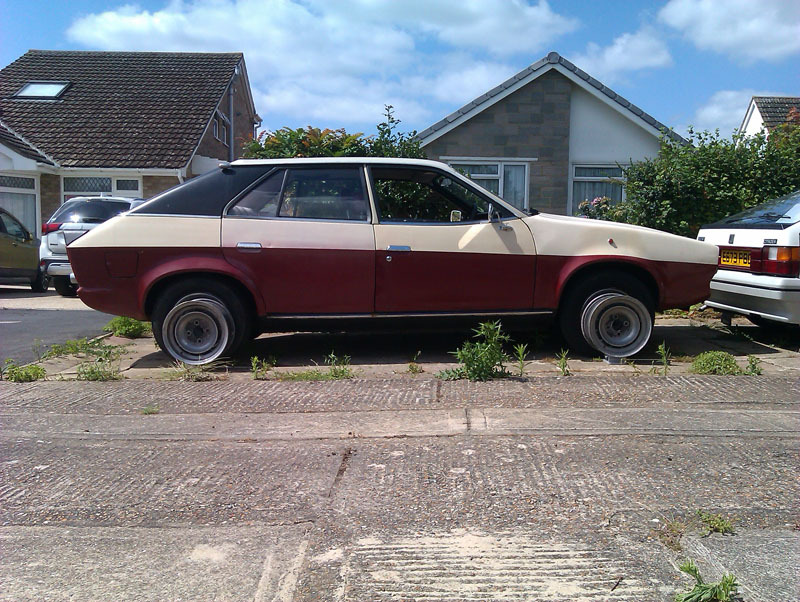 Pretty sure I'm down to just cosmetic work now, of which there's a fair bit. Other half really wants the car properly resprayed, though was a little horrified when they found out how expensive that is until they learned just how labour intensive it is if you want a nice job. Ahead of the respray I want the displacers regassed (which I've been saying for years now) and there's a few little bits to address like the rear driver's door that hasn't had the final shaping on the lower trailing corner and the extra holes in the doors from previous mirrors. No really major jobs remain at least, aside from the paint, so it should be easy enough to chip away and get through it all. |
| |
|
|
eurogranada
Europe
To tinker or not to tinker, that is the question...
Posts: 2,556
|
|
Jun 22, 2020 12:07:28 GMT
|
|
Good to see mojo restored as well as drivability of the Princess!
I know how important mojo is with these old beasts...
|
| |
|
|
|
|
|
Jun 22, 2020 12:20:45 GMT
|
|
Have you checked the indicators are less than 400mm from the outermost edge of the body? *possible MOT fail if not.
You can get round this by adding in the tiny ones I linked to in between the headlamps as well (so running 2 per side at front).
*depends if the MOT guy is picky or not.
|
| |
|
|
glenanderson
Club Retro Rides Member
Posts: 4,340
Club RR Member Number: 64
|
|
Jun 22, 2020 12:52:02 GMT
|
|
If you’re feeling wealthy, and don’t want to spend time wearing your fingertips away on the wheels, Lepsons in Gillingham do a good job of refurbishing alloys. Not cheap, but they do a proper job.
|
| |
My worst worry about dying is my wife selling my stuff for what I told her it cost...
|
|
vulgalour
Club Retro Rides Member
Posts: 7,279
Club RR Member Number: 146
|
|
Jun 22, 2020 13:42:24 GMT
|
blackpopracing: I hadn't checked so I just did and it's 400mm to the outer edge of the orange lens. I suppose technically that makes them too far in board, but only by the length of the stalk that supports them. I can probably dismantle the units and shorten the stalk to fix that if I have to. glenanderson: Other half was just mentioning Lepsons today when someone was showing off the new wheels they'd just had done and comparing them to the mess they were before the work so they're filed under 'expensive but worth it'.
|
| |
|
|
vulgalour
Club Retro Rides Member
Posts: 7,279
Club RR Member Number: 146
|
|
Jun 25, 2020 19:31:53 GMT
|
Got a welcome delivery the other day. Work deadlines and the heat are preventing me from actually fitting it just yet. 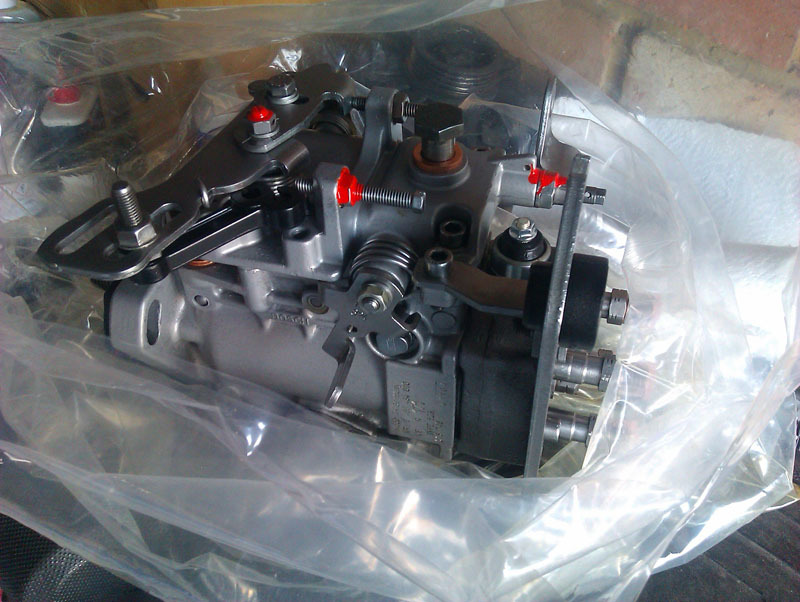 It's the original pump fully rebuilt so it should have no air ingress issues and will, I hope, cure the air ingress issue that I've been having since I'm at a bit of a loss as to what else it could be at this point. Once this is fitted and I've got things working again, I'm on the lookout for someone to paint the bonnet and one wing, and deal with a few other paint blemishes around the car. Doesn't really need a full respray, just a tidy up to get rid of some historic chips and parking dings. |
| |
|
|
vulgalour
Club Retro Rides Member
Posts: 7,279
Club RR Member Number: 146
|
|
Jun 29, 2020 14:53:43 GMT
|
Had a go at installing the pump today and found out quite quickly that I couldn't do it. For one thing, I don't have a dial indicator so I need to get one of those to set up the pump in relation to the engine so that the timing is correct. However, that shouldn't stop me installing the pump itself, that should be a nice straight forward job. The most difficult bit is getting the woodruff key slots lined up. There's a slot in the pulley, like so. Note one of the mounting studs is removed here, I'll come to that in a moment. 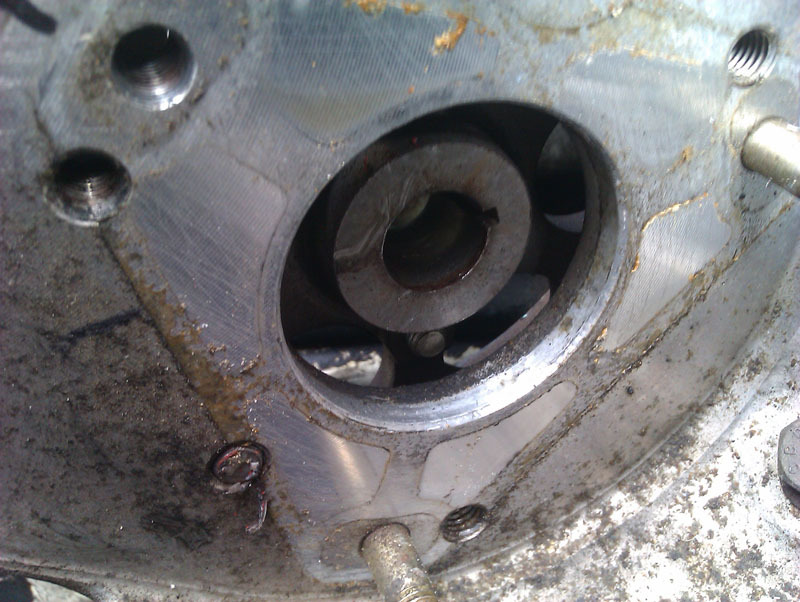 There's another slot on the pump shaft that goes through the pulley and bolts from the other side. 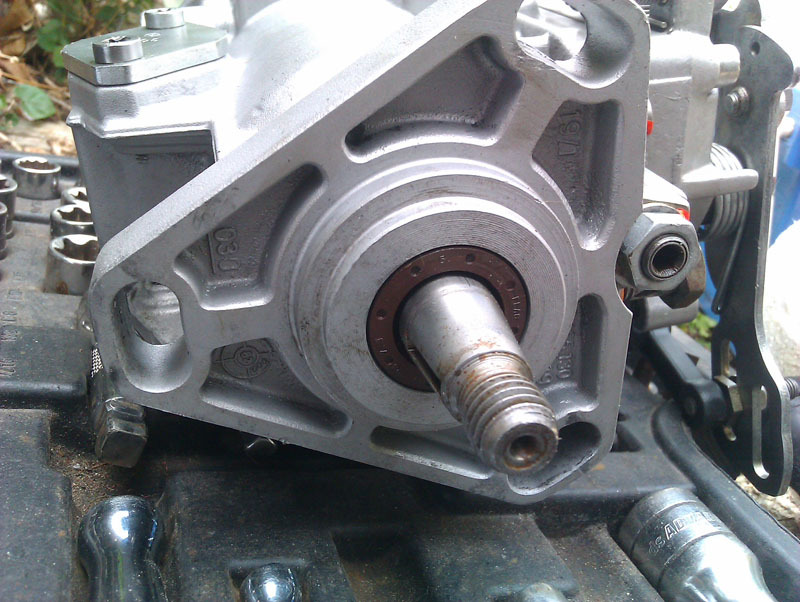 However, the two slots are misaligned quite a lot. I didn't set the engine to TDC when I removed the pump because that wasn't in the instructions. Rather, the engine was rotated to the point that the bolts could be put through the pulley and into the pump mounted plate which means you don't have to remove the timing belt, etc. and, in theory, makes for a quicker job if you're just dropping the old pump back on. The problem here, is that I'm dropping what is effectively a new pump on and that's why there's this alignment issue. 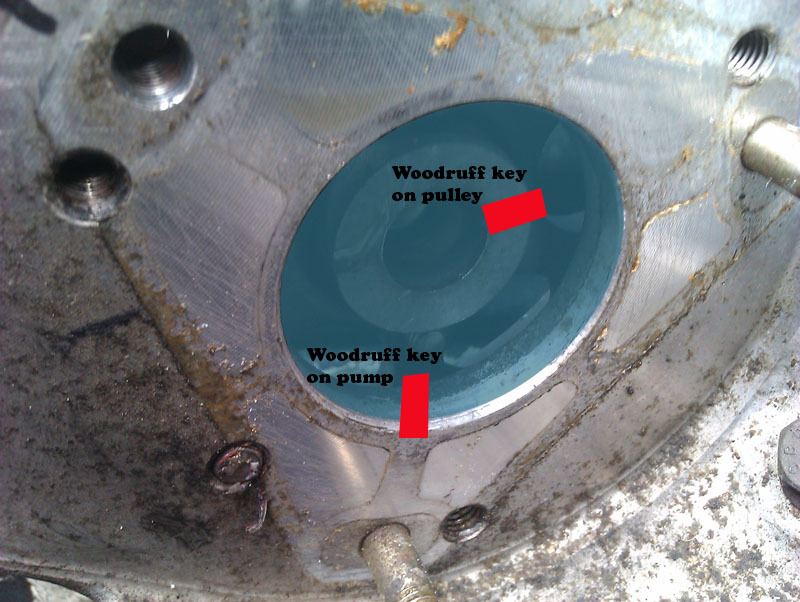 I got one of the pump mounting studs out fairly easily, the other two don't want to budge. My thought there was to line up the pump with the pulley without the studs and then rotate the pump to the correct position while the pulley was still locked which, in theory, should allow everything to line up nicely and I can then order the tool I need and be done. However, because I can't get those two studs out with the tools at my disposal, this option is a no go. Also, I can't figure out how to rotate the pump off the car to make the key slot line up, and I daren't force anything since I've only just forked out a considerable sum to get it made nice again. Either way it's faff to fix. I either need to get the tools to remove those two mounting studs so I can fit the pump in the wrong orientation and then rotate it to the correct orientation, or I can remove the timing belt and pump pulley, fit the pump and then fit the pulley to the pump, after which I'd have to make sure the timing was correct, etc. Third option is to save up some more cash and just get someone else to do it which honestly, is my preference at this point. I'm fed up of working on engines, I don't understand how anyone derives any joy from any of it. |
| |
|
|
Phil H
Posted a lot
  
Posts: 1,448
Club RR Member Number: 133
|
|
Jun 29, 2020 16:15:12 GMT
|
|
Surely you need to turn the pump shaft to match the engine, not remove studs??
Pair of decent pump pliers, line the jaws with a bit of old inner tube (or similar), job done?
Or have I missed something here?
|
| |
|
|
melle
South West
It'll come out in the wash.
Posts: 2,010
|
|
Jun 29, 2020 17:17:08 GMT
|
|
Or rotate the engine?
|
| |
www.saabv4.com'70 Saab 96 V4 "The Devil's Own V4" '77 Saab 95 V4 van conversion project '88 Saab 900i 8V
|
|
glenanderson
Club Retro Rides Member
Posts: 4,340
Club RR Member Number: 64
|
|
Jun 29, 2020 17:53:43 GMT
|
|
You need to turn the pump shaft. Turn it in it’s normal direction of rotation only. It will want to spring 90° at a time. Get it close enough to go over the studs.
I know you’ve followed the “how to just change the pump” instructions, but be honest, if you’re in this deep, you should change the timing belt and whatever ancillary parts are appropriate to this engine (idler, waterpump, whatever). Unless you know, absolutely for sure, that the timing belt has recently been changed.
|
| |
My worst worry about dying is my wife selling my stuff for what I told her it cost...
|
|
glenanderson
Club Retro Rides Member
Posts: 4,340
Club RR Member Number: 64
|
|
Jun 29, 2020 17:55:49 GMT
|
|
To be brutally honest, I genuinely think that you should get someone else to do it, rather than slogging on with it on your own.
|
| |
My worst worry about dying is my wife selling my stuff for what I told her it cost...
|
|
vulgalour
Club Retro Rides Member
Posts: 7,279
Club RR Member Number: 146
|
|
Jun 29, 2020 18:55:53 GMT
|
melle: you can't turn the engine because the pulley for the pump is driven by the cambelt. If I remove the bolts locking the pulley then the pulley falls off and the belt would need to be removed and refitted. Unless you fit the pump so you can hold the pulley on which I can't do. It's irritating. Phil H and glenanderson: The timing belt (and other associated bits) has been done within the last year, by a friend and I, so I don't want or need to replace it all. The two main obstacles here are a lack of desire to work on this engine (or any engine) and a lack of certain tools. I have ordered the dial indicator gauge anyway, even though I'll likely only ever use it once. I'm really cautious of trying to put anything on the pump shaft and turning it in case I break something. So yeah, the ideal at the moment is give the job to someone else, that comes with its own issues of course, such as relying on someone to come to me and do it, or getting the car to someone else. Being skint from sorting the pump out doesn't help much either. Ah well, it's nearly July and the Princess has MoT, so I'll just tax and insure that instead. How does the Princess keep being my back-up car for my supposedly reliable car?
|
| |
|
|
|
|
|
Jun 29, 2020 19:08:15 GMT
|
I hate deisels - did I mention that before  Setting up the pump is a bit tricky - even with a dial indicator. I did it with the engine out (I was rebuilding it) as the dial indicator went under the pump (Peugeot) so I think like Glen, you may be better with a mobile mechanic. |
| |
|
|
Phil H
Posted a lot
  
Posts: 1,448
Club RR Member Number: 133
|
|
Jun 29, 2020 21:51:15 GMT
|
You need to turn the pump shaft. Turn it in it’s normal direction of rotation only. It will want to spring 90° at a time. Get it close enough to go over the studs. Looks like a 90 (or is it 270?) rotation will get it close enough to line up? |
| |
|
|
vulgalour
Club Retro Rides Member
Posts: 7,279
Club RR Member Number: 146
|
|
|
|
well, I ordered some more tools for doing the BX job so until those arrive, I switched back to the Princess to see if I could get it to be a little happier. First tool to arrive was the new timing light. This really only confirmed what I already hoped I knew, which is that the timing was where it should be. It's a useful tool to have in my arsenal, just not one I'm likely to use very often. 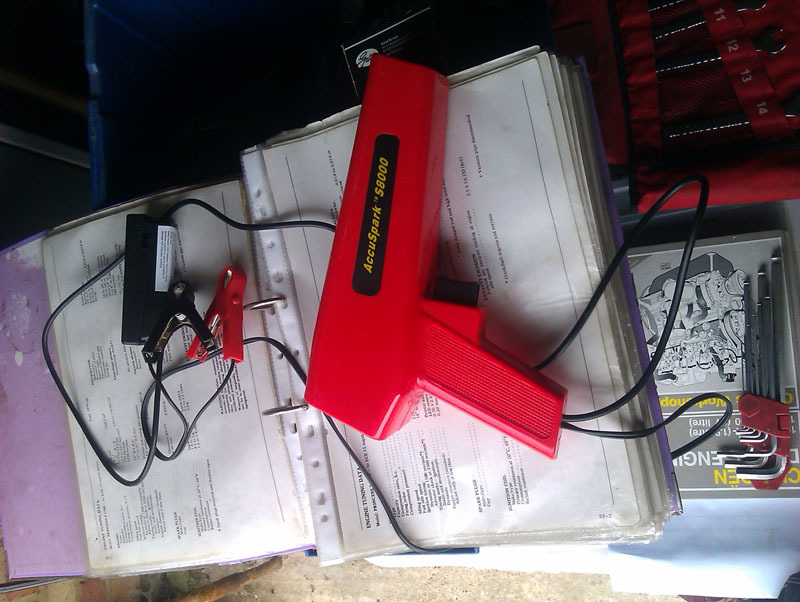 When the car had ben running for a while I had noticed some moisture at the head gasket seam and retorqued the head bolts which has prevented a comeback of this. I did expect to have to retorque the head bolts after the engine had been run up to temperature a few times since it's always needed that in the past and only a couple needed any attention. I'll check them again periodically once the car is in regular use. 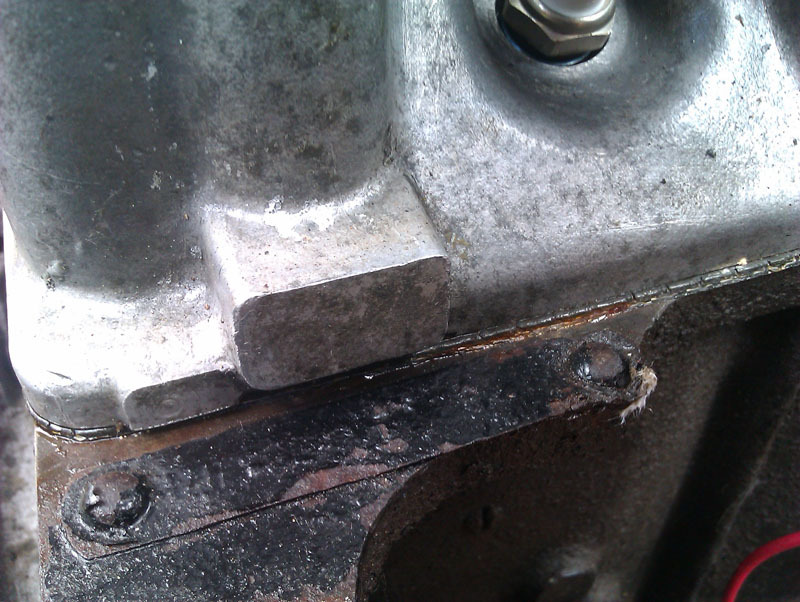 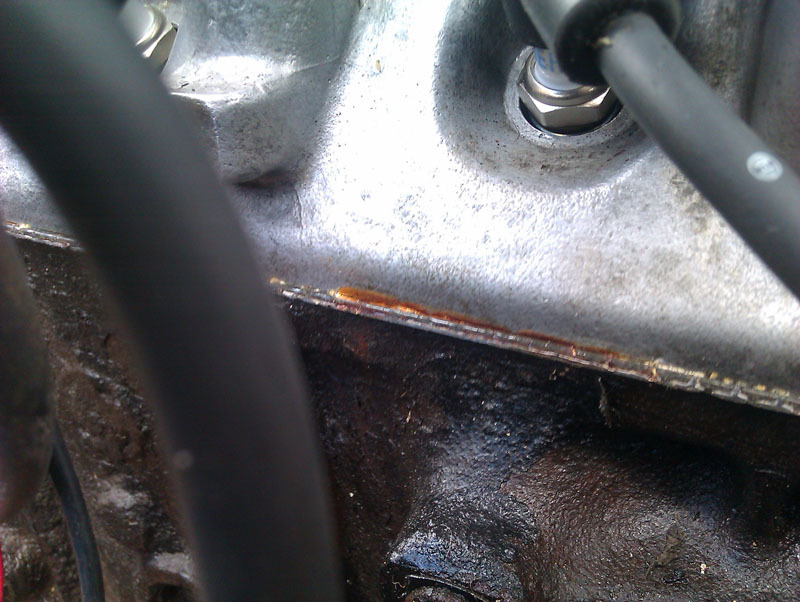 Next thing was a cheap remote digital tachometer. There is a specific way of setting up a sensor and whatnot in the manual, this is cheaper and easier. The first mistake I made was listening to the wrong advice and putting the reflective tape on the belt, this gave me an rpm reading of about 50% of what I was expecting judging by the engine noise. 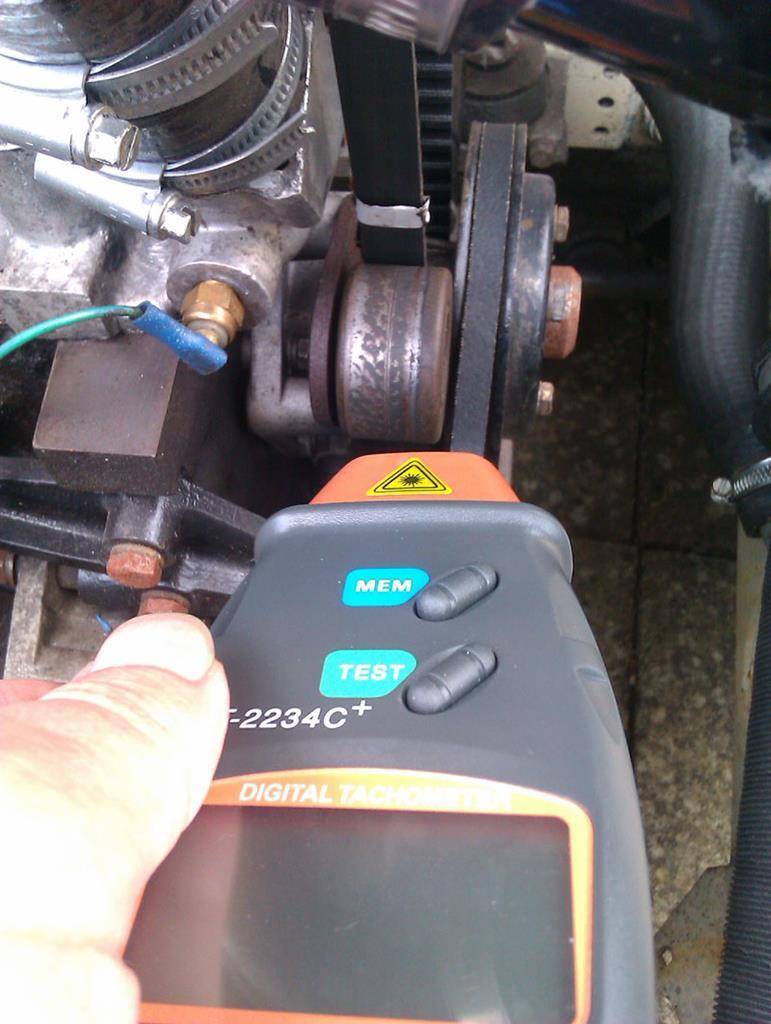 Some better advice came along and I put the tape on the crankshaft pulley instead. This confirmed what my ears were telling me. First attempt to get things set up today saw the car running incredibly rich for no discernible reason, I suspect it was a sticky component in the carb or something of that sort because no adjustments made any difference. I came back to it later when it had all cooled down and while the car is now running a little richer than I'd like, it's within tolerable levels for a car of this age now rather than stinking the place up like a 1960s banger. The book calls for 750rpm at regular idle, this car has never managed that in my ownership, no matter who has tried to set it up, so when I got it to the 800rpm it likes (or thereabouts, the tachometer is not particularly precise) it was deemed good enough. The carb had been returned to the book baseline and needed a tiny tweak of the mixture screw to make things settle nicely and then I just let the car idle for a bit. I now feel confident that I can take the car to the fuel station for some fresh petrol which will no doubt improve the running and iron out the remaining niggles. Before I do that I need to get the car taxed and some fresh insurance on it, and swap my good wheels and tyres on. It starts willingly every time so it can't be that bad. There's a bit of a fruity note to the exhaust that seems to be coming from around the backbox area and while I can't find a leak, I wonder if there's one about to start. The brakes still feel good, just not as good as when it was put away. The brakes aren't spongey or hard, they're just not as strong as I remembered, though my memory could be tinted slightly by the time I've spent in the BX with its ludicrous stoppers. I've got a few insurers to try out for a quote and will give classiclineuk a go because hey, I'm a club member, so why not? The Princess is rarely expensive to insure, even with the cosmetic mods it has declared. |
| |
|
|
|
|
|
|
|
|
Have you ever changed the su jet?
On virtualy every old SU fed car I have worked on changing this has improved running, they wear oval with age.
|
| |
|
|


