vulgalour
Club Retro Rides Member
Posts: 7,280
Club RR Member Number: 146
|
|
Jul 17, 2021 13:20:16 GMT
|
Bit of pre-work tinkering and I've come unstuck, unlike the job I'm trying to complete. Should have been a simple one this, just removing the stator tube wiring. Should be a case of undoing the nut that the wiring goes through at the end of steering box, removing the olive behind, and draining the oil. Both the user manual and the online directions don't give any idea of how you drain the oil. There was no obvious drain plug. The olive was fixed very firmly in place and, since it seems to be brass, not something I wanted to apply any amount of force to in case I damaged it. After much deliberation, it was decided the best course of action was to undo the four bolts holding the end plate onto the steering box. This then released the SAE 140 oil messily as it started coming out of the top right bolt hole first and then all around the sealing edge. Allowed to drain, and expected the olive and wiring to now be free and easy to remove, or at least have enough play to slide the end plate down to see/remove any sort of retaining device. No such luck. You can get a few millimetres of play but there's a very obvious something physically stopping much movement in any direction, like there's some sort of retaining grub screw I've missed somewhere. Again, rather than force anything I've left the oil to drain and will reassemble just so we can get the car back in the garage. Without the end plate bolted on the steering wheel can't really do anything and we can't exactly leave the car sat stuck half in half out of the garage overnight. For illustrative purposes, some photographs. If anyone can see what I might have missed here, or know what else I should do, please let me know. It's going to be something obvious, I just can't see it. 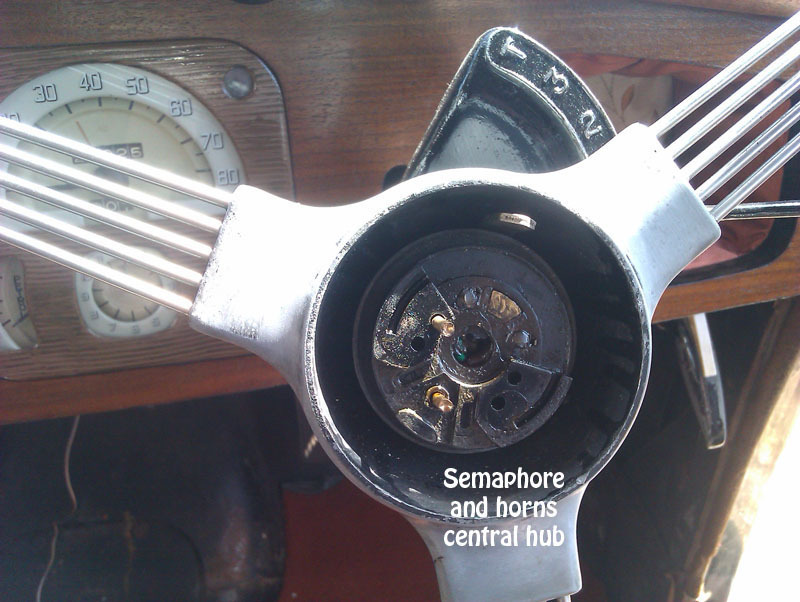 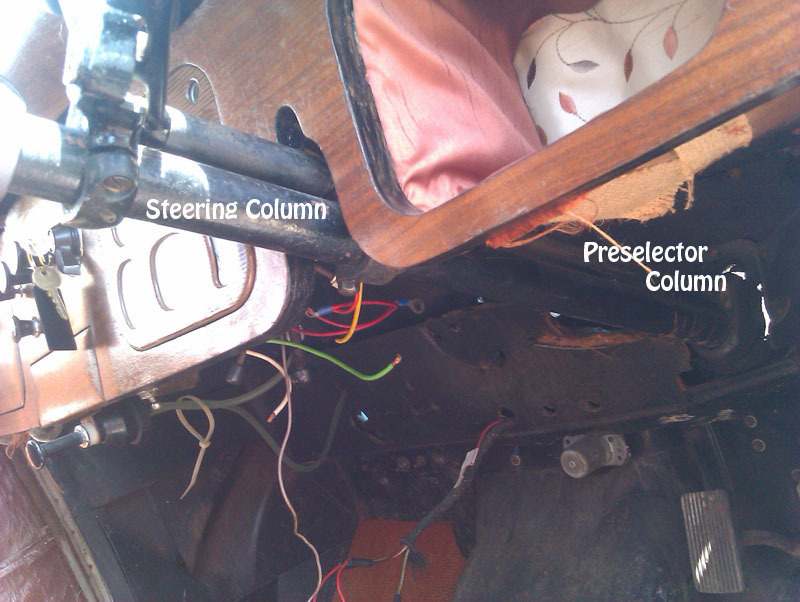 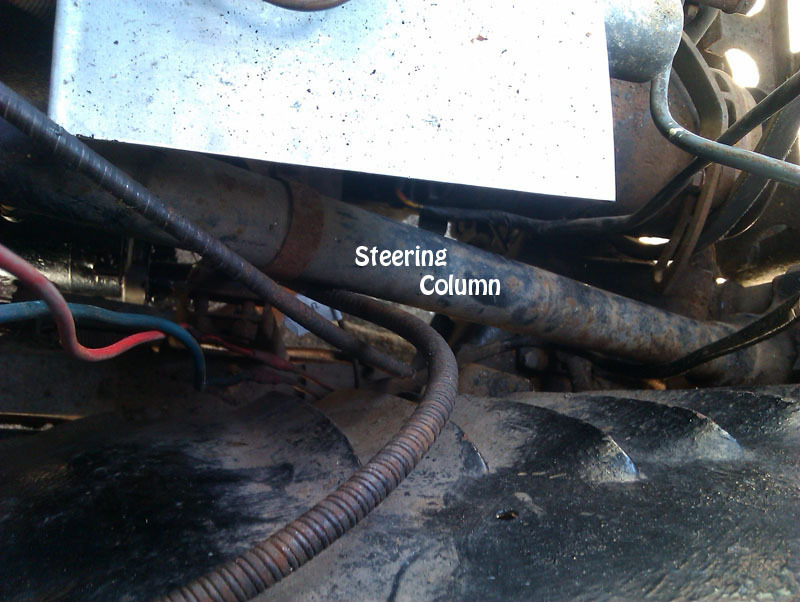 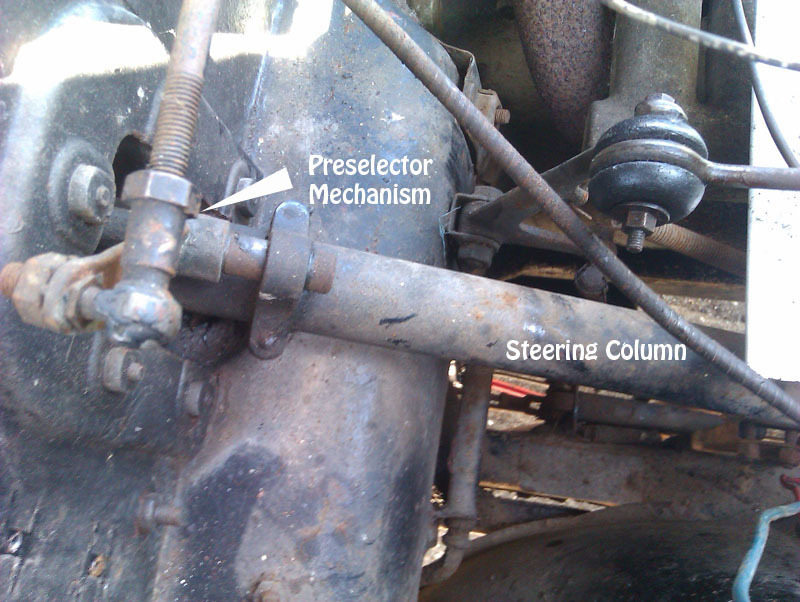 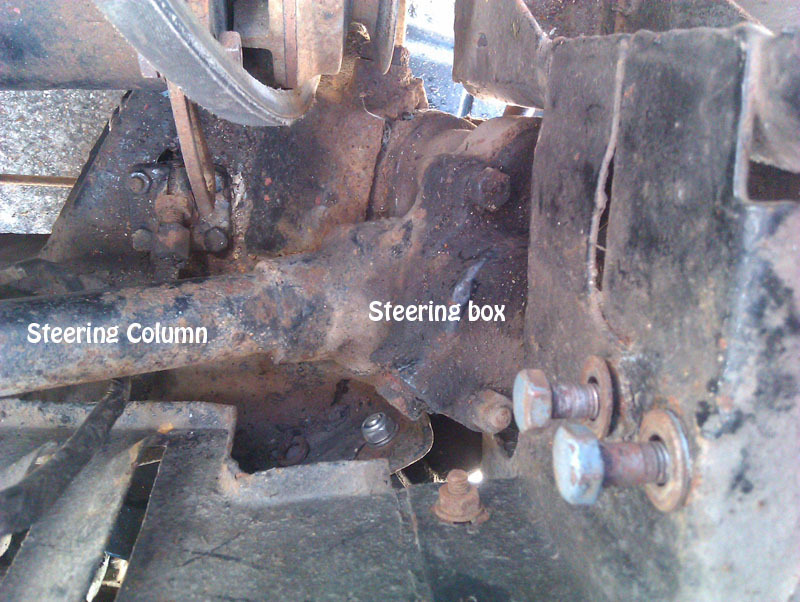 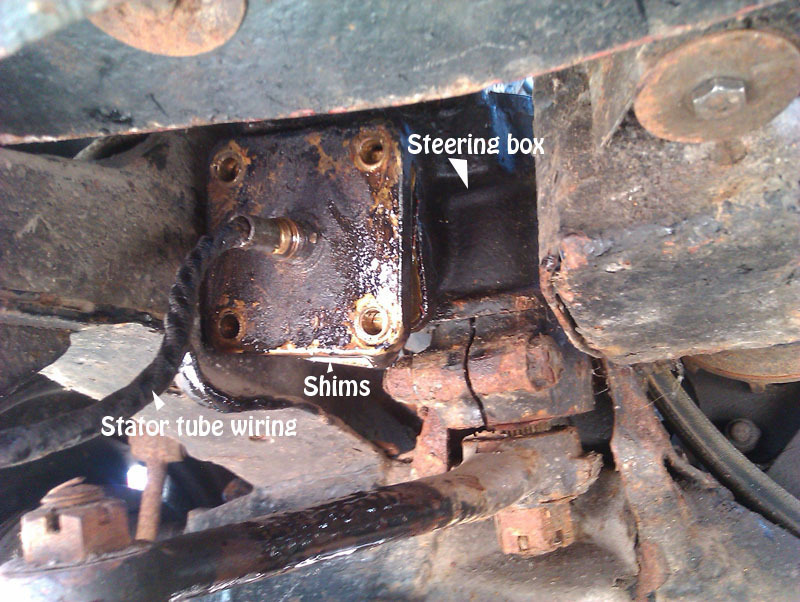 |
| |
Last Edit: Jul 17, 2021 13:20:44 GMT by vulgalour
|
|
|
|
glenanderson
Club Retro Rides Member
Posts: 4,341
Club RR Member Number: 64
Member is Online
|
|
Jul 17, 2021 15:21:12 GMT
|
|
Is there a parts diagram anywhere online that you can access? They’re often more help in working out how assemblies fit together than workshop manuals.
|
| |
My worst worry about dying is my wife selling my stuff for what I told her it cost...
|
|
glenanderson
Club Retro Rides Member
Posts: 4,341
Club RR Member Number: 64
Member is Online
|
|
Jul 17, 2021 15:56:03 GMT
|
|
On my P4, which had a similar hollow steering column setup, if you could remove the steering wheel, you could pull the wire out, leaving the tube in place. A length of mig wire could then be used to draw the new wire back up.
|
| |
My worst worry about dying is my wife selling my stuff for what I told her it cost...
|
|
vulgalour
Club Retro Rides Member
Posts: 7,280
Club RR Member Number: 146
|
|
Jul 17, 2021 21:59:23 GMT
|
|
I can tell you it's a Bishop Cam steering box and the diagrams I have found don't show the wiring that goes down the middle, only the mechanical bits that surround it. On those diagrams I can't see anything obvious that would be causing the problem and I'd been led to believe that once disconnected where I have the whole unit 'simply pulls out into the car'. Which it doesn't. Even if I hadn't disassembled the control unit in the steering wheel hub you'd not really have any better purchase for pulling, and there's this sensation that it's hitting a stop somewhere when you try rather than it being a tight fit. It's like I've missed a grub screw or something of that sort somewhere, I was hoping removing the end plate would have released everything, or that it would have come off separately to the little screw thread bit in the middle but it doesn't appear to and with everything being made of things like cast iron and yellow metals I don't want to be applying too much percussive persuasion.
|
| |
|
|
mtjm
Part of things
 
Posts: 107
|
|
|
|
Don't know if you've seen this article, but it talks about giving a tap to a tube to move it up into the box and then the olive falling off: 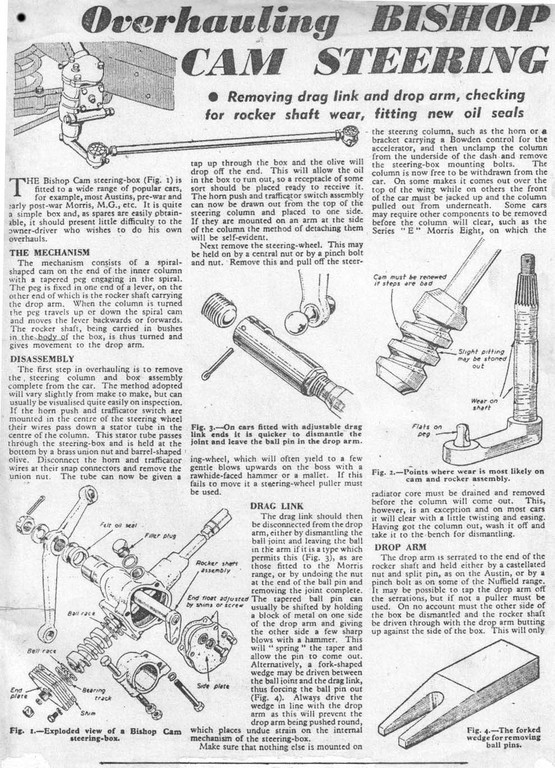 You may need to zoom in to read it |
| |
|
|
mtjm
Part of things
 
Posts: 107
|
|
|
|
here's the rest of the article: 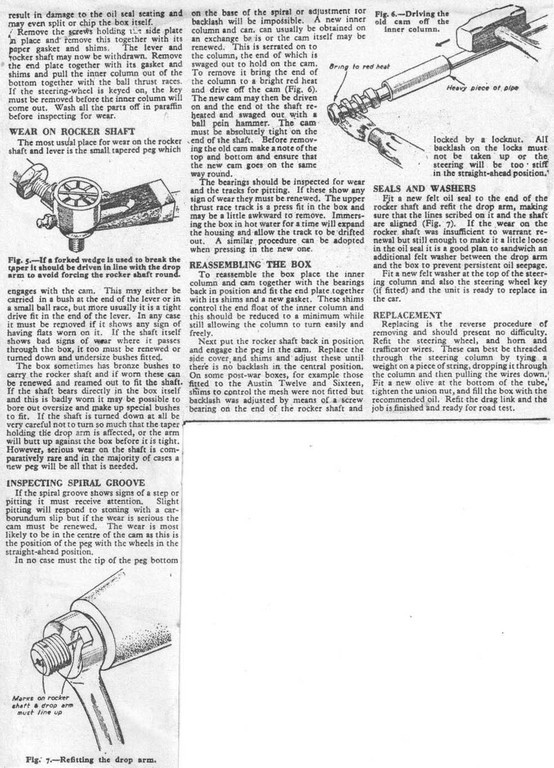 |
| |
|
|
vulgalour
Club Retro Rides Member
Posts: 7,280
Club RR Member Number: 146
|
|
Jul 18, 2021 10:25:48 GMT
|
|
I had, and that's one of the methods attempted. Advice from another forum suggests the olive can sometimes cut into the stator tube if the nut is done up too tight and it's possible that is our issue. Solution: more hammer (with care).
|
| |
|
|
vulgalour
Club Retro Rides Member
Posts: 7,280
Club RR Member Number: 146
|
|
Jul 18, 2021 18:15:22 GMT
|
|
Foolishly spent the day doing more wiring removal. Semaphores, interior light, and brake lights now all removed. Bits of string hanging out of the headlining for routing the new wiring easier, and much learned about how things go together. It is possible to remove the wiring without removing the headlining, it's just also quite difficult. Am hoping I can get enough tension on the headlining fabric to re-tack it once the new wiring is in, there's not a lot to work with but the fabric isn't actually as brittle as feared.
The only bits of wiring to remove now is the run along the chassis, the tail going to the fuel sender, the brake light spur that runs across the bottom of the boot shelf (screws that hold the wire clips are properly stuck), and a few odds and ends under the dashboard that are still attached to the instruments. Feel like we've done the very worst of it now at any rate. Oh, and the stator tube wiring needs to be done too, ignored that one for today since I wanted to do something that was a slightly easier win.
The wiring doesn't come up the B pillar as expected, it actually runs along the chassis, up into the boot, back into the car via the driver's side C pillar, and then over the rear driver's door and across the middle of the roof above the headlining.
A rewarding, if slightly crispy, day's work at any rate and I feel a bit more confident about the bulk of the rewiring job.
|
| |
|
|
vulgalour
Club Retro Rides Member
Posts: 7,280
Club RR Member Number: 146
|
|
Jul 20, 2021 16:01:23 GMT
|
|
A Maestro update this time.
I need a new tailgate. This solution will have to do. Words and pictures and closed captions soon, just need to find the time to do it.
|
| |
|
|
vulgalour
Club Retro Rides Member
Posts: 7,280
Club RR Member Number: 146
|
|
Jul 25, 2021 15:42:30 GMT
|
As part of the rewiring job on the Lanchester, I have had to dismantle the boot lid a bit. Namely, I've had to unscrew the aluminium interior trim panel. The panel screws into the wooden frame of the boot lid with about 75-80 tiny once-chromed screws, of which about 20 snapped or had to be drilled out. I've got everything cleaned up and ready to go back together but I'm loathe to screw the panel back on. With the exception of rewiring there's no reason to really ever remove this panel, there's nothing inside the boot lid you need to get to and the trim doesn't cover the release mechanism so should that need attention the trim can stay in place. 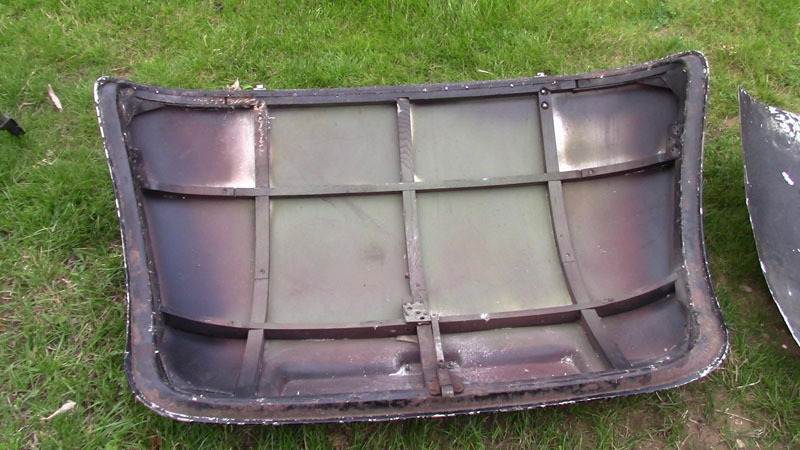 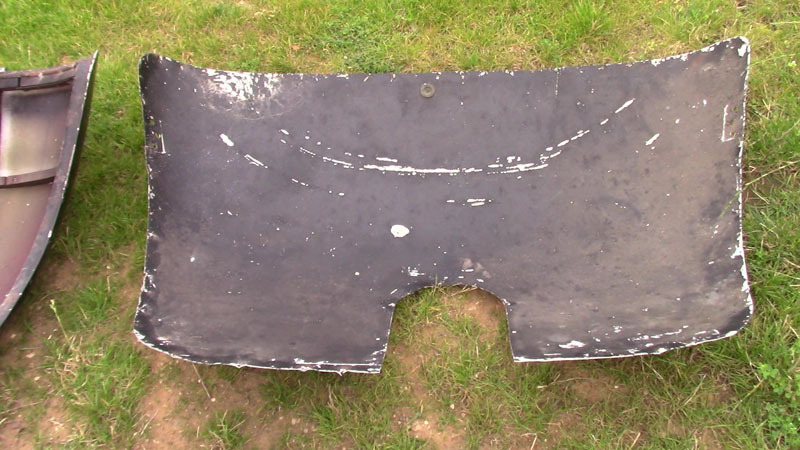 I'm wondering if I can use the butyl tape I have leftover from the Maestro leak hunting to bond the aluminium back onto the wooden frame of the Lanchester boot lid instead of using loads of screws. That's basically how caravans were put together so it seems like a sensible use of it on this panel since it's made in much the same way as caravans used to be. Ideas welcome, especially if it turns out using butyl tape for this would be a bad idea for some reason. It doesn't need to be water tight since this is just a trim panel,there's a separate seal to keep the elements at bay. |
| |
|
|
glenanderson
Club Retro Rides Member
Posts: 4,341
Club RR Member Number: 64
Member is Online
|
|
Jul 25, 2021 16:36:22 GMT
|
|
Screwing it back on will give a significant amount of structural rigidity to the the boot panel. It might be stiff enough just now, but without that inner any stresses on the panel will all be taken by the joints in the timber, and it won’t take long before the 70+ year old glue in the joints gives way.
Personally, I’d look for some quality raised head screws to re-fix it into place. There is a bloke on eBay selling vintage aluminium slotted screws that I recently bought a thousand off for the Austin project. He’s got lots of sizes.
|
| |
My worst worry about dying is my wife selling my stuff for what I told her it cost...
|
|
vulgalour
Club Retro Rides Member
Posts: 7,280
Club RR Member Number: 146
|
|
Jul 25, 2021 16:50:22 GMT
|
|
The frame seems very stable though, the outer of it is all held together with a pressed steel panel so there's nowhere for the wood to spread out into and then the outer skin is going to be applying pressure on that. Combined with the curved shape of it all I'd expect it to be pretty stable indefinitely. The inner aluminium piece just seems there to keep things tidy in all honesty, there's no tension in it at all when applied and it only screws around the outer edge so it's not holding the middle of the frame in any more than the other parts.
That said, I don't know one way or the other, so you could well be correct, I can only report what I've observed. Maybe with a few operations the boot lid will start to twist without that inner aluminium trim? Not something I'm wanting to find out, I know that much.
|
| |
|
|
|
|
|
Jul 25, 2021 18:54:48 GMT
|
|
Agreed, fixing the inner panel to the frame will turn that into a hugely strong and stiff structure. That's useful as all the wind load on it when you're driving is held by 3 points. It'll help prevent it from warping, whistling and leaking over time.
Phil
|
| |
|
|
|
|
|
Jul 25, 2021 19:01:45 GMT
|
|
Pu sealer might be an option
|
| |
|
|
vulgalour
Club Retro Rides Member
Posts: 7,280
Club RR Member Number: 146
|
|
Jul 25, 2021 21:02:24 GMT
|
PhilA: Technically five points: exterior hinges, interior hinges, and latch. I wonder now if the panel is made in aluminium rather than millboard (like the rest of the boot interior trims) because of tensile benefits rather than ease of creating a compound curve. That said, is there still a benefit in using screws over a good panel adhesive given how far modern adhesives have come? tineca: not had much joy with pu sealants on less than perfect surfaces and I wouldn't trust it to bond to the wood.
|
| |
|
|
|
|
|
Jul 25, 2021 21:08:33 GMT
|
|
Bonding with say PU adhesive would be far stronger than screws.
|
| |
|
|
|
|
|
Jul 25, 2021 21:20:20 GMT
|
|
Pu wood glue might be the best option it sticks to metal well.
Though I would stick to stainless or bronze screws, it's lasted 70 odd years so far and if anyone ever needs to repair the frame (rot or accident) it will be accessable without destroying parts.
|
| |
|
|
vulgalour
Club Retro Rides Member
Posts: 7,280
Club RR Member Number: 146
|
|
Jul 25, 2021 22:15:05 GMT
|
|
The other advantage I'm thinking with a bonding agent is that you can cut it free rather than fighting with screws, so if access is required it's not going to mean resorting to a drill and is probably easier to do with the boot attached to the car. Taking out the screws was almost impossible with the boot on the car so any sort of benefit it might have for repair/maintenance didn't really apply.
I suppose the other option would be a mix of half as many screws, and strategic blobs of sealant rather than a continuous bead? You folks definitely know better than me on this one, I'm just throwing ideas out.
|
| |
|
|
jimi
Club Retro Rides Member
Posts: 2,201 
|
|
Jul 25, 2021 22:51:41 GMT
|
Though I would stick to stainless or bronze screws, it's lasted 70 odd years so far and if anyone ever needs to repair the frame (rot or accident) it will be accessable without destroying parts. That would be my thinking as well 👍 |
| |
Last Edit: Jul 25, 2021 22:53:00 GMT by jimi
Black is not a colour ! .... Its the absence of colour
|
|
|
|
|
Jul 25, 2021 23:07:32 GMT
|
|
A quick tip when removing screws from a wood frame if they show any sign of resistance especially brass screws that have very poor shear strength.
Apply a hot soldering iron to the head of the screw, to expand the shank and screw thread, this in turn will push the wood fibres apart, allowing for easier disassembly when the screw has cooled ( very important when dealing with brass).
Remember to coat the threads with bees wax or even paraffin candle wax on reassembly.
Tip No 2,
Obviously use a well fitting screwdriver, a freshly ground tip on a traditional screw driver or a parallel ground tip as found in multi bit sets are excellent as long as they fit the screw properly.
Gently tighten the screw (a couple of degrees is all it takes) before attempting to unscrew this will help break any corrosion bond that may exist.
|
| |
|
|


