vulgalour
Club Retro Rides Member
Posts: 7,270
Club RR Member Number: 146
|
|
|
|
|
Took a while to find the cause of the blowing fuse. It was only after removing the passenger seat, lifting the carpet, and inspecting the wiring that the culprit was discovered in the boot. The switch for the boot light was grounding out somehow so after unplugging it, normality is restored. The factory boot light barely illuminates the cavernous boot anyway so it's no great loss and I have upgrade plans for the boot lighting when I retrim it all.
Princess is presently my sole transport too since the Rover has been taken off the road so I can build a set of good doors from the two sets I've got, weld up that rear arch, and do the interior swap. It's a little strange returning to the Princess as my daily, and a little frustrating when I don't get the choke just right on those very cold or very damp days, but it's otherwise perfectly fine to live with.
Now I've got some miles under the tyres I have found the driveshaft oil seals are weeping a little oil so they're on my list to do. Distributor O-ring seems to have stopped leaking of its own accord to balance things out. I'm also looking at installing an MP3 player instead of a radio-cassette since I turn the radio off more often than not (even in the Rover), and my casettes are all wearing out from a couple of decades of almost constant use. I've got some options, just a case of finding the best fit for what I want.
It's all good in Vulgalour land.
Oh, and the 1100 is up for sale.
|
| |
|
|
|
|
Rich
Club Retro Rides Member
Posts: 6,320  Club RR Member Number: 160
|
|
|
|
|
Sounds like an issue with the bulb or holder rather than the switch, usually door switches do earth when they are in the open position. They provide a path to earth for the bulb. They won't cause a fuse to blow unless the load on the circuit isn't there, and is just shorted straight through. Sounds like an issue with something else that you are circumventing.
|
| |
|
|
glenanderson
Club Retro Rides Member
Posts: 4,320
Club RR Member Number: 64
|
|
|
|
|
All good stuff.
After the Renault saga, I’d been mildly concerned that, once again, you were in danger of having too much on your plate. Selling the 1100 is a wise move if it’s just going to drain your resources. If you don’t physically fit it either then getting out now at a stage where you’ve added value/saleability from your start point, but not got too deep, is a very wise move.
👍
|
| |
My worst worry about dying is my wife selling my stuff for what I told her it cost...
|
|
vulgalour
Club Retro Rides Member
Posts: 7,270
Club RR Member Number: 146
|
|
Apr 12, 2018 14:50:32 GMT
|
|
I don't want to get deep into the wiring thing at the moment, I will address it more fully lately. Working theory is that the boot light unit itself is faulty and the issue is just being highlighted through the boot light switch. With the boot light isolated from the wiring loom everything else behaves completely normally so my solution at the moment is to just leave it isolated until I've the time to go back and investigate just what is wrong with it exactly. Since everything works as it should bar the one item I've isolated, personally I don't see any issues with this. I will be going back and addressing it eventually since I want to upgrade the boot lighting anyway, but the car doesn't seem in danger of combusting or whatever so I'm sure it'll be okay.
The 1100, on the other hand, is a fairly reluctant sale. I'm very fond of it, but there's no point keeping a car that's painful for me to pilot and the money would be better served going in the house move pot. As it happens, if anyone is interested in it and the panels etc. I'm only after £500 and can deliver (at cost) anywhere in mainland UK. The brand new panels it comes with make this a bit of a bargain, really, especially since Earlpart don't exist anymore so getting the closing sill panels is much harder now.
|
| |
|
|
|
|
|
Apr 12, 2018 17:35:30 GMT
|
Distributor O-ring seems to have stopped leaking of its own accord its BL you have run out of oil |
| |
|
|
vulgalour
Club Retro Rides Member
Posts: 7,270
Club RR Member Number: 146
|
|
Apr 14, 2018 18:24:38 GMT
|
I checked, amazingly there's still oil in it! It's very weird. --- Had a go at sorting out the very annoying driver's door today which has been sagging since I bought the car. Sometimes the sag seems to be caused by the hinge pin moving too much, sometimes it doesn't, I've never really got to the bottom of it. However, Des suggested I try jacking the door up with a block of wood which may reset things that might just have drooped with age and use. On the passenger side that worked moderately well and the door frame no longer contacts the B pillar at the top, the panel gap is a bit more even, and it shuts a bit better. It's not perfect by any means, but it's okay.  20180414-01 20180414-01 by Angyl Roper, on Flickr The driver's side was more problematic. I repeated what I did on the passenger side and got some small improvement on fitment, but it was still catching on the B pillar at the top because of the door sagging.  20180414-02 20180414-02 by Angyl Roper, on Flickr  20180414-03 20180414-03 by Angyl Roper, on Flickr The bottom of this door is a bit tender, has been all the while I've owned it, and when I moved the jack and wood for a better place to lift it, the block of wood vanished inside the door. Looks like the tender bit is actually rotten now and it needs a repair to the frame and door skin. I've got a spare door and some steel so it's repairable, but it made the realignment a little more difficult.  20180414-04 20180414-04 by Angyl Roper, on Flickr Not quite as effective having the block to the front of the door as I can't really lift and bend things to counteract the sag as effectively.  20180414-05 20180414-05 by Angyl Roper, on Flickr I got the door close to shutting without catching the B-pillar and then resorted to moving the latch on the door and the pin on the B pillar to help me out.  20180414-06 20180414-06 by Angyl Roper, on Flickr The door gap is at least even now but the whole door seems to be pushed back about 2mm or so too far.  20180414-07 20180414-07 by Angyl Roper, on Flickr I'm going to drop the door off, knock the hinges forwards a couple of millimetres and refit the door. I'll pull the wing off when I do this too so that I can repair it properly, a job I've been putting off for ages. I don't think this issue is from the damage it got in my care because the door was like this when I got it, I think this is a more historic problem, and a little persuasion with a large hammer should see it right again. |
| |
|
|
vulgalour
Club Retro Rides Member
Posts: 7,270
Club RR Member Number: 146
|
|
Apr 15, 2018 17:24:39 GMT
|
This job went surprisingly well. I believe this is the first time I've taken the driver's door off. Initially I did tape the door switch down but the tape wasn't strong enough, so I disconnected the bulb instead, didn't want a flat battery or, worse, a melted interior light.  With the door off I could check the hinges out. There's no play in the bottom hinge, but there is a little in the top one, so I knocked the hinge pin out. Annoyingly, the replacement pins I've got are all bottom hinge pins which I can't really use in the top hinges and you can see on this one that there is some wear. It's not enough to cause the sagging/alignment issues I'm having so I just cleaned it up, greased it, and put it back in after knocking the top hinge forwards a bit to counteract the sag.  Realistically, I need to whack both hinges forwards a smidge more with a larger hammer than I had to hand today and that should sort out the alignment but I'll also have to pull the wing off because it's quite tight to the door at the moment due to it being slightly deformed. First fit of the spare door was quite positive. The gaps are more even all around now and the sag is much reduced.   You can see here where the swage line of the wing is pushed in too far, closing up the gap. I can sort this out when I remove the wing and repair it, the panel just needs a little massaging to sort out the clearance. Surprisingly the door doesn't catch the wing, though it does come very close!  The spare door is probably a bit far gone to repair having looked at it with a critical eye compared to the one that came off. There's rust in places that are going to be difficult to repair and several stress fractures in the frame and outer skin. It's also slightly deformed on the lower edge, so it doesn't line up quite as well as it might with the car. I can repair it if I have to, and I may well do so because having a spare panel is useful. For now it's ideal for filling the hole while I repair my better door and with Princess doors being quite difficult to find in any condition, I do have to work with what I've got.  After a little more fettling I had the door fitted and annoyingly even though it's in worse condition than the one I'm repairing, it fits the car better! The lock works with the key I've got which saved me swapping the more awkward linkages over, it just looks dreadful.  On screwing the window guides back to the door frame I was a bit confused at first as to why the window would drop happily enough but wouldn't go up evenly. Turns out that one of the guides for the window regulator rollers has rotted away completely so the back edge of the window doesn't lift evenly and tries to drop into the door. Because this is likely to be a chore and I don't want to go for the window out of habit, I didn't refit the window winder. If nothing else, that'll be good motivation to get the door I removed repaired and back on the car.  I reattached the weather strip/stainless trim and the door mirror to complete the day's work and loaded the spare door into Mike's estate. I hope to be tackling the repairs and repainting the door I removed over the course of this week. If I can find a new or really good pair of upper hinge pins that would be neat too as every little will help with alignment.  |
| |
|
|
vulgalour
Club Retro Rides Member
Posts: 7,270
Club RR Member Number: 146
|
|
Apr 16, 2018 15:56:53 GMT
|
I was going to start dismantling and cleaning up the door I removed ready for welding and paint. Before that, I wanted to see if I could move the wing at all so I could push the A pillar hinges forwards a smidge without the door catching the wing. The simple solution is big hammers, but I want this to look nice when I'm done so we shan't be doing that. Instead, I double-checked what I needed to do to remove the wing with minimal damage to it so I can repair it off the car. I'll likely convert to bolt-on because alignment, etc. is going to be a lot easier and, if I get a really nice pair of wings in the future, it will be a lot easier to remove these old ones. So, to remove the wing you have to unbolt the 4 bolts that attach it to the A pillar. You can't get to these bolts without removing the door. You can't remove the door without stripping the trim off it again and the door is held on with six nuts at the hinges. Then you have to drill out the spotwelds holding the wing to the car. There's a lot of spotwelds. I had enough time today to remove 26 of them.  20180416-01 20180416-01 by Angyl Roper, on Flickr There's another half dozen or so spotwelds at the nose end of the wing around the headlight aperture and a few more on the wing rail that I can't get to because the bonnet is in the way. So I'm going to have to take the bonnet off too. Added to this is the complication that this is my everyday car, so it can't really come off the road while I do this during the week. I hate welded on wings, they're a chore to remove. |
| |
|
|
glenanderson
Club Retro Rides Member
Posts: 4,320
Club RR Member Number: 64
|
|
|
|
|
I can’t help myself. I just have to ask.
Why on earth are you doing this whilst the Rover is in bits?
One job at a time.
|
| |
My worst worry about dying is my wife selling my stuff for what I told her it cost...
|
|
melle
South West
It'll come out in the wash.
Posts: 2,006
|
|
Apr 17, 2018 12:00:31 GMT
|
|
Same thought occurred to me...
|
| |
www.saabv4.com'70 Saab 96 V4 "The Devil's Own V4" '77 Saab 95 V4 van conversion project '88 Saab 900i 8V
|
|
vulgalour
Club Retro Rides Member
Posts: 7,270
Club RR Member Number: 146
|
|
Apr 17, 2018 12:01:14 GMT
|
|
I just wanted the door to shut better, and it became one of those "while I'm at it I might as well..." sort of jobs and kind of spiralled a bit.
OH WELL.
|
| |
|
|
|
|
|
Apr 17, 2018 12:06:59 GMT
|
|
It's all progress.
|
| |
|
|
|
|
|
Apr 17, 2018 13:35:27 GMT
|
|
I envision the guy who is spinning dinner plates on top of dowels...he just keeps adding one more until he has several in the air at once....
I feel your pain, man...It is a huge challenge sometimes to keep the projects down to 1 or two...especially when they are daily drivers.
the wife's car is minus 2 coolant hoses (special order of course) and sitting in the driveway right now, the truck needs a differential seal and the wagon is waaaaaay overdue for an oil pan gasket changeout....
Ive decided to scrap the lot!.....or fix them all...IDK!
JP
PS....the more I look at the princess the more I like it. great lines. nice thing is, you have 2 doors to work with...get the one right whilst the other is on there...then, swap them out. I'm wondering if you can have a couple of pins machined and hardened.....should not be too pricey...
|
| |
I know its spelled Norman Luxury Yacht, but its pronounced Throat Wobbler Mangrove!
|
|
vulgalour
Club Retro Rides Member
Posts: 7,270
Club RR Member Number: 146
|
|
Apr 17, 2018 14:09:13 GMT
|
|
Thing is with the Rover, I basically need to explode it all apart so I can put it together again and that needs a lot of space, which there hasn't been at the unit just at the moment. I don't like sitting on my hands, so decided to look at smaller, more managable jobs I could do and the saggy door on the Princess was just really annoying because it was difficult to shut properly and often required just the right kind of slam, which I don't want to be doing all the time.
It really was just supposed to be a quick repair and repaint of the old door and refit it, but there's no point doing a job if you can't do it right when you've got all the bits to sort it out properly and I have put this one off for literally years, so it's well overdue.
It is plates on sticks though. I'm a devil for putting plates on sticks.
|
| |
|
|
|
|
|
Apr 17, 2018 15:19:42 GMT
|
|
Sometimes a job you want to do in the future just gets to the point you decide to do it RIGHT NOW. No proper planning but you steam in anyway - sometimes this is the only way the job ever gets done.
|
| |
|
|
|
|
|
Apr 18, 2018 10:20:31 GMT
|
needing a door on to be able to use the car definitely increases productivity  |
| |
|
|
|
|
|
Apr 18, 2018 18:39:16 GMT
|
The princess is coming on great. I feel the pain with the spot welds cos I have to remove my sd1's wings and it has 90 plus spot welds on each one going by the rover manual. Keep up the good work  |
| |
1984 Rover SD1 Vanden Plas 2600 Auto
1985 Rover SD1 2300s Auto
2005 MG ZT 1.8 Manual
|
|
vulgalour
Club Retro Rides Member
Posts: 7,270
Club RR Member Number: 146
|
|
Apr 19, 2018 18:12:02 GMT
|
It's not plates on sticks if I finish something, right?  --- Mike has been really rather unwell lately so I've not had a helper for the next stage of wing removal. He's on the mend, happily, but a trip to the hospital was rather more important than taking my car to bits. As a result, with today being the first really nice day of the year and me hoarding a few supplies in preparation, I decided to make a start sprucing up the outside of the Princess much like I did the engine bay. We're not going for super professional show quality here, just tidy and clean. I'm focusing on the passenger side as that needs less work and I'm breaking the job down into smaller sections so I can deal with the best bits first and leave the repairs for last. This is an odd way of doing it, I'm aware, but if I make as much of the car presentable as I can, blending in the repairs will I think give me a much bigger boost and allow me to properly draw a line under things. Aiming for perfection with this car at this stage is silly, far better to aim for presentable. Right, excuses out the way, here's what I got on with today. Only tackled the beige on the passenger side doors and rear wing.  20180419-01 20180419-01 by Angyl Roper, on Flickr  20180419-02 20180419-02 by Angyl Roper, on Flickr It's quite difficult to photograph! I didn't mask off the lower portion because I'll be redoing all of that with fresh paint. The purple on the lower half was fairly hastily applied for the most part so I'll be sanding back through a lot of it when I do the preparation. There's a couple of areas that showed up as needing a little more attention once I started getting a shine on the panel, which I'll likely tackle in the future, but they're not bad enough that I feel I have to do them right away. There's a huge amount of overspray on the lower half because there was no point wasting materials masking it off since I'll be keying it all back and dealing with imperfections before putting fresh paint on. I'll obviously take more care masking off the fresh beige when I do the lower portion though. Here's a shot without so much exposure. The finish is pretty reasonable. There's a couple of spots where historic dents are visible in person from certain angles that just don't show up in photos. So that's fine really, isn't it? The beige is pretty flattering to panel imperfections.  20180419-03 20180419-03 by Angyl Roper, on Flickr The boot lid was never finished either, I had to rush to get that back on. You can see that the paint on it is far too thin, especially compared to the rear wing. I'll wet sand and polish things once I've got everything tidied up properly like this.  20180419-04 20180419-04 by Angyl Roper, on Flickr I'll put the trim on either much later tonight or tomorrow, I don't want to accidentally damage the fresh paint refitting trims since I can still use the car with them off. Now the sun has gone down a bit I could get a better shot of the finish. Only one bug (successfully removed without paint damage) and minimal dust issues is pretty impressive for a driveway rattlecan paintjob, if I do say so myself.  20170419-05 20170419-05 by Angyl Roper, on Flickr |
| |
|
|
vulgalour
Club Retro Rides Member
Posts: 7,270
Club RR Member Number: 146
|
|
Apr 20, 2018 17:51:27 GMT
|
Today involved some of this because it's once again glorious and lovely. 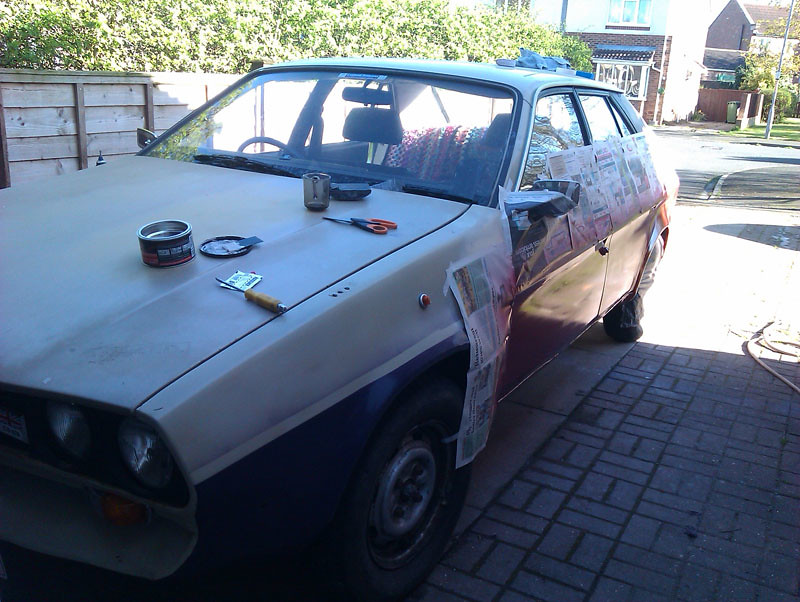 20180420-01 20180420-01 by Angyl Roper, on Flickr The back door needed rather more filler work than I'd expected and there's plenty of imperfections still remaining on this side. I'm fed up of constantly trying to find enough time to make things perfect so I'm embracing the imperfections that need hours and hours of hand sanding to resolve and instead getting myself a reasonable 6' finish on everything. Much less stress and the car will look much nicer. I can always deal with those imperfections a panel at a time in the future, or get someone else to do it for me if ever I can afford a proper respray. For now, it's all a case of Thistle Dew. 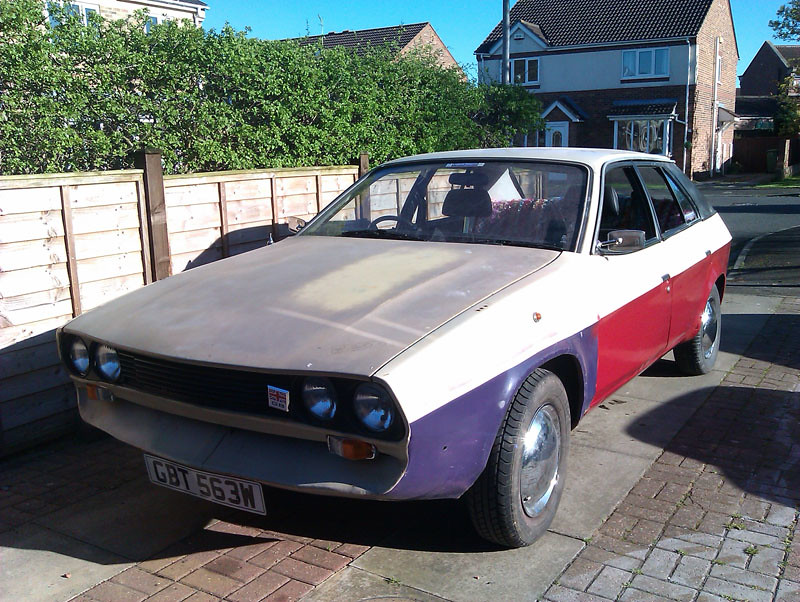 20180420-02 20180420-02 by Angyl Roper, on Flickr 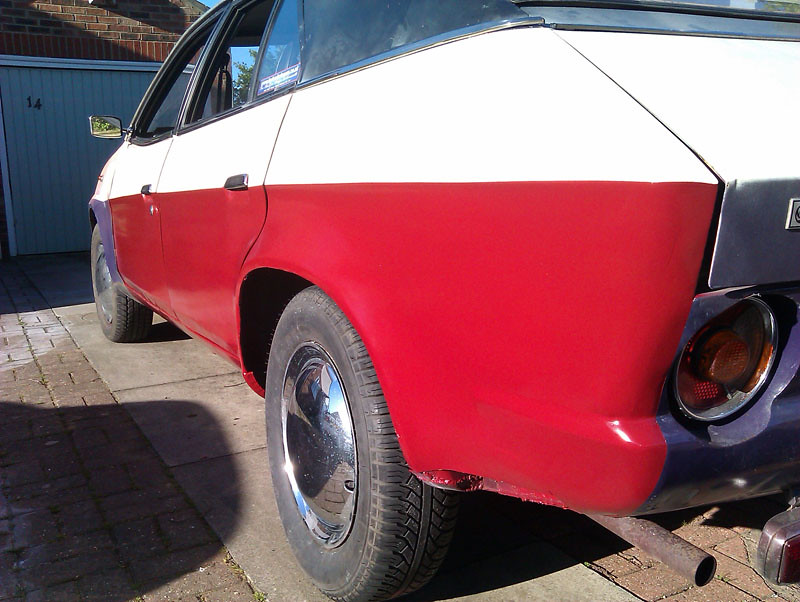 20180420-03 20180420-03 by Angyl Roper, on Flickr 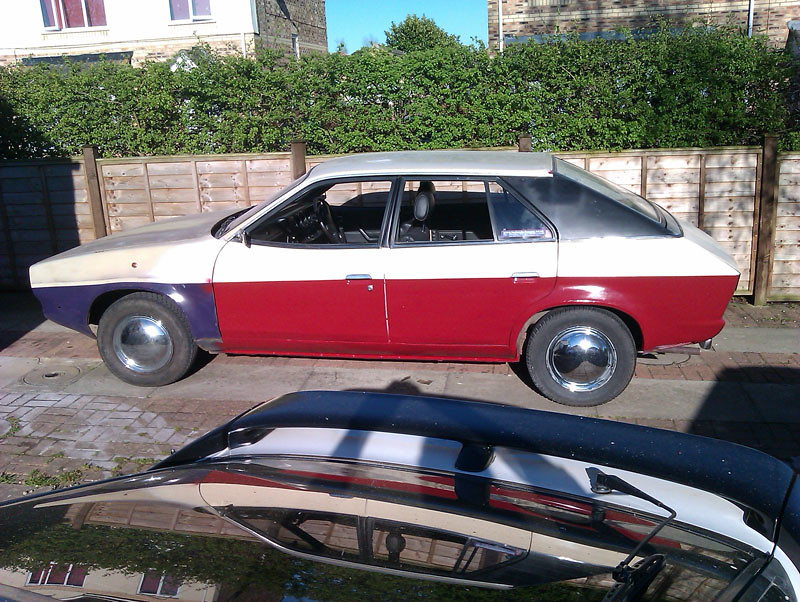 20180420-04 20180420-04 by Angyl Roper, on Flickr Oh yeah. I changed the colour again. Thank you to the three people I told for keeping it secret! When I redyed the orange carpet the result was so good it made me rethink the purple and what I could go with that would match the beige. I had briefly considered two-tone grey with an orange pin stripe but the amount of work involved to redo things like the engine bay put paid to that drastic a colour change. Orange, equally, didn't go so well with the beige and I didn't fancy brown because there's already two-tone brown-and-beige Princesses in existence. So I went with Rustoleum Balmoral to compliment the Rustoleum Antique White. I'm glad I took the chance, I like this more than the purple, and if it mellows a little darker I won't mind that at all either. Why Rustoleum? It's easy to get, it's cheap, and it's proven to be really good for this sort of work on other cars. I've used lacquer over the top of it in addition for the extra protection and to hopefully prevent colour fade but, really, I've found this paint to be pretty durable even when applied hastily and neglected. It's good stuff, I'd recommend it. You'll just have to pretend the whole car is going to look this smart when I'm done. 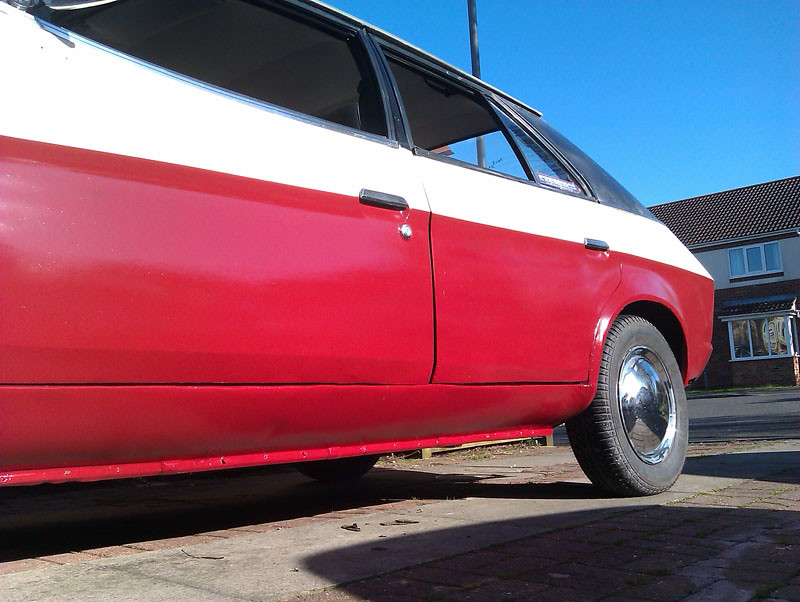 20180420-05 20180420-05 by Angyl Roper, on Flickr |
| |
|
|
glenanderson
Club Retro Rides Member
Posts: 4,320
Club RR Member Number: 64
|
|
Apr 20, 2018 18:14:34 GMT
|
|
Nice. Much better than the purple. 👍👍
|
| |
My worst worry about dying is my wife selling my stuff for what I told her it cost...
|
|


