vulgalour
Club Retro Rides Member
Posts: 7,284
Club RR Member Number: 146
|
|
|
|
With thanks to someone on the brown forum throwing some wire my way, it was more than enough to make the little extra bits I needed to connect the new lights to the car's harness. Nothing fancy, just turning a single output from the harness into two outputs so I could feed both headlights. It was so easy even I could do it. Now all the lights work and I've removed the MG B units so the front end is looking a lot cleaner. Still undecided on number plate location, I did try it out on the front valance and the plate is too big, standing it up looks okay but blocks a lot of air feed to the radiator so isn't ideal, current location might end up being the best compromise. A smaller plate might work better, or an offset square motorbike style plate (although a 6 digit reg would be better for that, and I don't really want a private plate). The other thing of note is that the inner pair of headlights shouldn't really have dipped beam. I need to either de-pin the connector or split the feed wire to the dipped beam or something, it's not urgent right now. Sidelights. 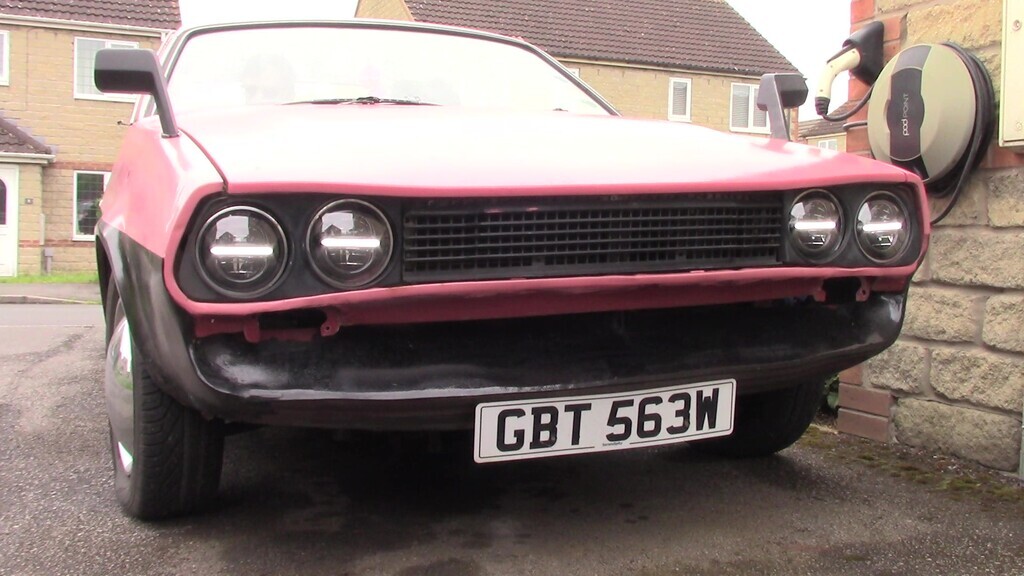 Dipped beam. 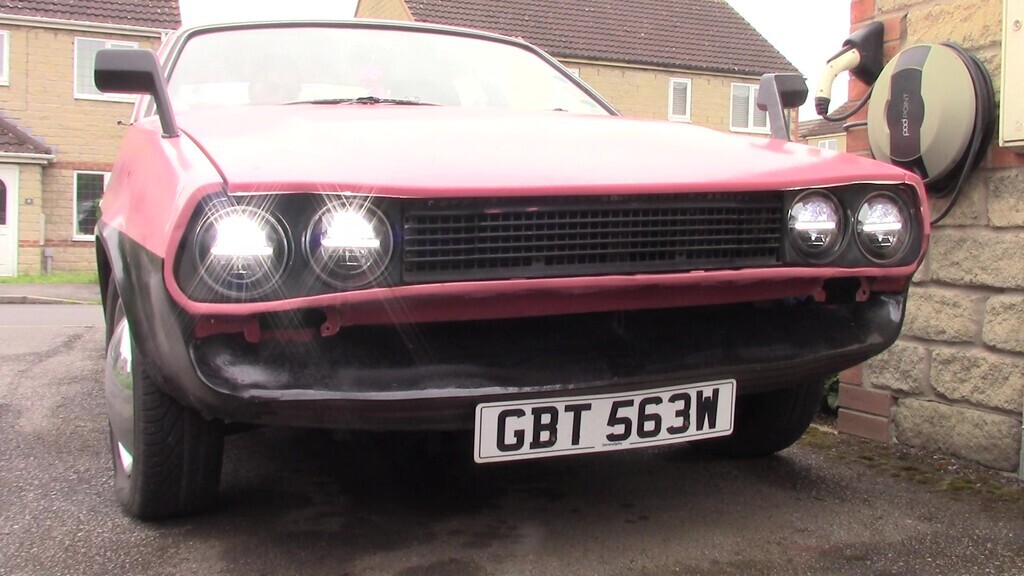 Main beam. 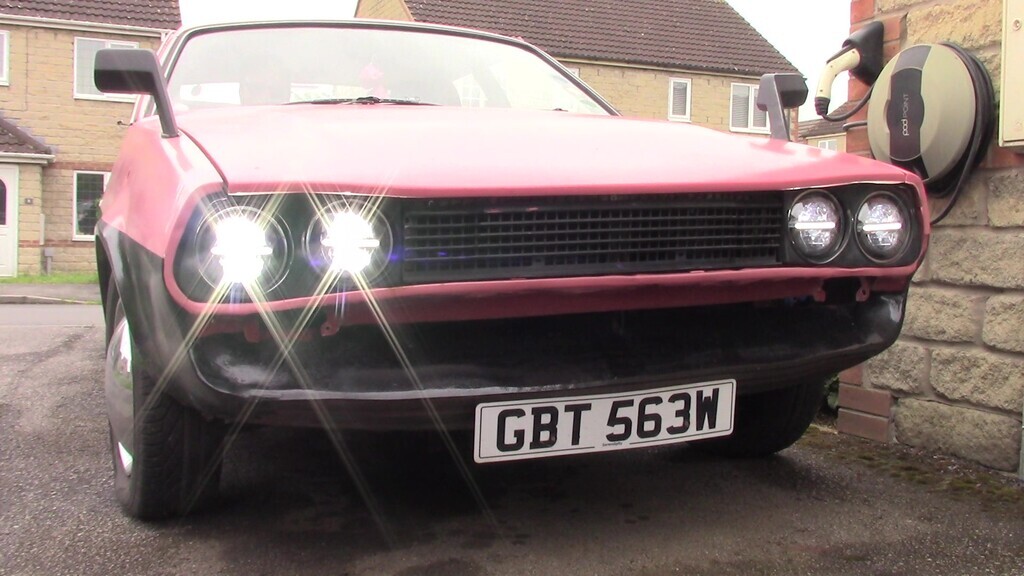 Dipped beam with indicator. 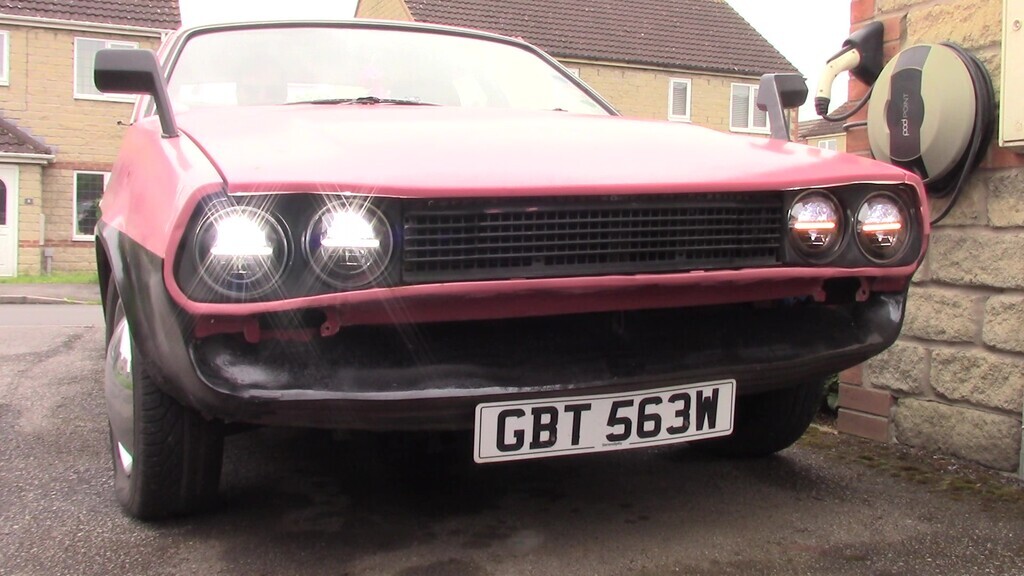 Hazards. 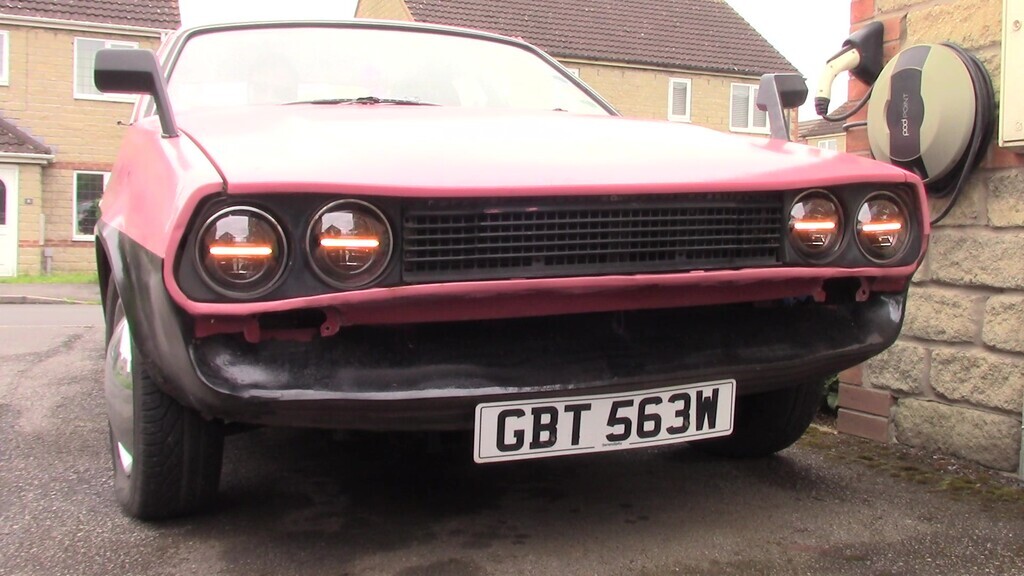 One thing I do like is because of the shape of the headlight outer lens and the fact the units are pushed slightly further forwards than the originals, you do still see the indicators a bit from the side of the car. I'm probably going to put a side repeater in at the front of the wing when I can find one I actually like and I'd put that ahead of the front wheel arch rather than above it since it would be more visible there given how long the nose is on the Princess. I've also got to do things like blank off where the MG B units were and return that strip to factory, then tidy up the paint and whatnot. |
| |
|
|
|
|
eurogranada
Europe
To tinker or not to tinker, that is the question...
Posts: 2,556
|
|
May 23, 2024 10:58:45 GMT
|
|
Nice update. Now you only need pink painted blanking plates for where the MGB units were! ;-)
|
| |
|
|
vulgalour
Club Retro Rides Member
Posts: 7,284
Club RR Member Number: 146
|
|
May 23, 2024 11:44:31 GMT
|
Ta! Actually I'm going to be removing the recessed where the MG units were and smoothing it out back to the factory profile. Originally, that piece under the lights and grille was smooth all the way across to fill the gap between the black trim and the chrome bumper the car used to have. 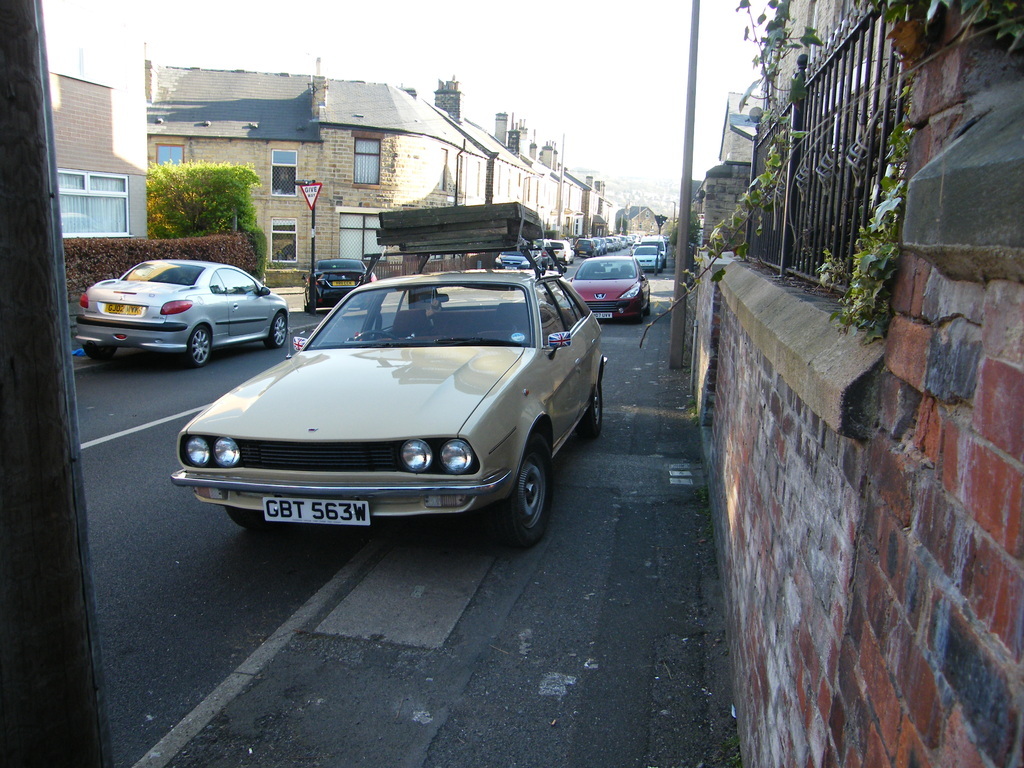 |
| |
|
|
vulgalour
Club Retro Rides Member
Posts: 7,284
Club RR Member Number: 146
|
|
May 25, 2024 12:30:06 GMT
|
|
Turns out I don't need a radiator fan switch after all, it does work just fine. Doing some checks and nudged the wiring near the radiator and now the fan switch works just fine. Just old car stuff. It's probably a slightly corroded connection from when the car had been sat idle for a while so I'll just keep an eye on that for now.
Amazingly, the fuel pump still isn't leaking oil, and neither is the oil filler tube. The oil leak on the belt side has reduced too, whatever is causing it, so when I finally get opportunity to clean everything down I should be able to find that easier. It does seem to be coming from somewhere higher up than the oil pump/filter assembly so I'm thinking it's probably something like a camshaft end seal which is a moderately easy thing to replace and pretty common as a failure. The leak is definitely more in the weep territory than an actual honest to goodness leak so I'm not that worried about it.
|
| |
|
|
vulgalour
Club Retro Rides Member
Posts: 7,284
Club RR Member Number: 146
|
|
May 26, 2024 19:43:18 GMT
|
Remember these Lotus alloys? 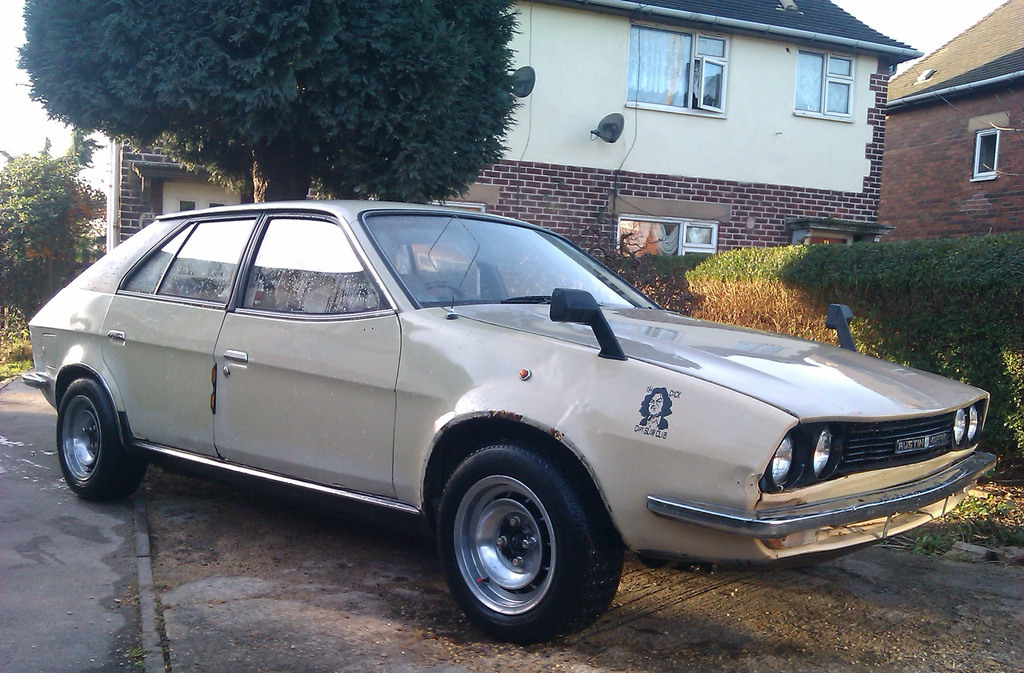 I've had these for nine years now and lugged them with my stuff over several house moves and never put them back on the car. Time to admit I probably never will since I've been perfectly happy with factory steels and trims. I've got a set of proper Lotus tapered sleeve wheel nuts to go with them too. Honestly, the money from selling them could be better spent on the car too, there's a bunch of jobs that need doing like getting the suspension regassed, and ordering supplies to get the paint done properly, that I'd rather have than the Lotus alloys. I'm glad I tried them and proved a point, now I think it's time to move them on. |
| |
|
|
misteralz
Posted a lot
   I may drive a Volkswagen, but I'm scene tax exempt!
Posts: 2,494
|
|
May 27, 2024 10:40:44 GMT
|
|
Ooooh, they look fantastic. I hate to say it, but I like that a LOT more than the Kustom vibe that's going on now. Sorry.
|
| |
|
|
vulgalour
Club Retro Rides Member
Posts: 7,284
Club RR Member Number: 146
|
|
May 27, 2024 11:22:50 GMT
|
That's fine, everyone is entitled to an opinion  I liked it on the Lotus alloys and beige paint, but the current direction is much more me and since I'm building it for me it makes more sense to follow that direction. |
| |
|
|
|
|
|
May 27, 2024 17:25:49 GMT
|
Just some photoshop thing I was messing with. Thought you might be interested... 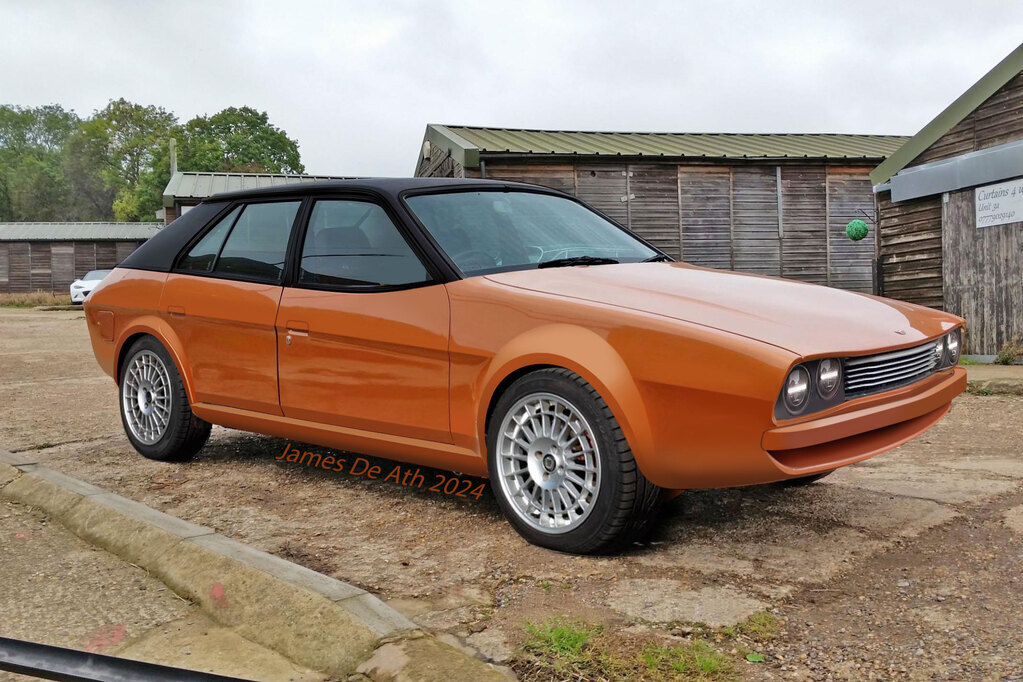 |
| |
|
|
vulgalour
Club Retro Rides Member
Posts: 7,284
Club RR Member Number: 146
|
|
May 27, 2024 17:33:52 GMT
|
|
I do like the front bumper treatment on that. Lots of nice tweaks to modernise the shape the more you look.
|
| |
|
|
|
|
|
May 27, 2024 17:39:05 GMT
|
|
I changed as little as I could. It's really raised and slightly more angular enlarged arches and some side skirts and then the cut down bumper. Thought it might be possible to replace the chrome part of the door handles with body coloured flat metal, to blend them in. I didn't even change the stock colour.
|
| |
Last Edit: May 27, 2024 17:39:48 GMT by horrido
|
|
vulgalour
Club Retro Rides Member
Posts: 7,284
Club RR Member Number: 146
|
|
May 27, 2024 18:30:03 GMT
|
|
You don't really need to change Reynard, it's a cracking colour. There's probably enough meat on the stock handles to actually do what you've done there and I do have a spare set... maybe an experiment for another day that one. Like the desire to fit a Mercedes single wiper that does the middle-bob thing so it actually clears the screen and properly hides beneath the bonnet line.
|
| |
|
|
eurogranada
Europe
To tinker or not to tinker, that is the question...
Posts: 2,556
|
|
|
|
I changed as little as I could. It's really raised and slightly more angular enlarged arches and some side skirts and then the cut down bumper. Thought it might be possible to replace the chrome part of the door handles with body coloured flat metal, to blend them in. I didn't even change the stock colour. Nice and subtle! I really like the division of colours on your version too. Now with the lotus wheels... ;-) Sorry, couldn't resit stirring the pot. But this looks like a very doable customisation. I like it (not such a fan of the colour though)!! |
| |
|
|
|
|
|
|
|
The colour of the most famous wedge car, the Stratos Zero! |
| |
|
|
vulgalour
Club Retro Rides Member
Posts: 7,284
Club RR Member Number: 146
|
|
May 31, 2024 14:05:05 GMT
|
|
I have a Mystery Squeak. First noticed it a few days ago pulling into the street and at about 7mph I got this rotational squeak from somewhere. Could not identify it with the car stationary and then the squeak just disappeared.
It came back today, again at about 7mph while trundling around a car park - though I did notice a couple of other much newer SUVs doing a similar noise so I wonder if it was actually the very broken up tarmac - and again while pulling on to the street. It was also doing it at 28mph, any faster or slower it went away. Turning right sometimes makes it squeak, turning left doesn't.
Inspected what I could, and found that the lower balljoint dust covers have split so they need replacing, looks like they've gone recently since they were fine last time I looked as far as I remember. The balljoints seem okay so I might just replace the boots instead of the whole balljoint.
The only way I can generate a very similar noise with the car parked is to have it running and to wiggle it a bit, then the stainless steel trim on the boot lid squeaks when you get everything wiggling and vibrating in just the right way. I don't think this is the Mystery Squeak though because I wouldn't expect that to sound rotational. I can't see signs of anything rubbing on anything it shouldn't like a dropped wheel arch liner or something like that.
I'm thinking it might be front brake related (no dust shields, they rotted off, but it could be low pads), perhaps some grit or low pads or something like that, even though the car seems to stop perfectly fine and the discs and pads on the front don't have many miles on them.
The most awkward thing is if it is from the front corner I think it is, that's the same corner with the bad jacking point that I've not been able to repair because it won't stop raining, so jacking the car up is going to be challenging on that side. Here's hoping the weather is good this weekend so I can get that repair done, jack the car up safely, and inspect the corner properly.
Knowing my luck this squeak will be something daft like a bit of trim in the dashboard or, as it was a little while ago, an empty plastic jerry can rubbing on the inner wheel arch in the boot.
|
| |
|
|
|
|
|
May 31, 2024 14:10:33 GMT
|
|
Try nipping up the wheelnuts, we had the same on our minor and it was one front wheel where a couple of the wheel nuts had lost some torque.
|
| |
|
|
vulgalour
Club Retro Rides Member
Posts: 7,284
Club RR Member Number: 146
|
|
May 31, 2024 15:32:16 GMT
|
|
I think I've found it and thankfully it's not the wheel nuts, though that was a good call.
Had to run an extra errand and caught it squeaking, jacked it up and the front brakes both are dragging just a tiny bit, except when they're not. Doesn't seem to be warped discs, I can't feel it through the pedal even under very heavy braking, I think the damp weather lately has just made things a bit sticky. It would explain why I heard a couple of other cars making a similar noise.
|
| |
|
|
vulgalour
Club Retro Rides Member
Posts: 7,284
Club RR Member Number: 146
|
|
|
|
|
Amazingly, the weather hasn't broken into rain today so I got the welding done on the front jacking point. I'll sort some photos and whatnot out later. This job is one of those where it's actually a bit bigger than I can tackle properly at the moment, so I've had to sort-of-bodge it.
I wanted to find out why the jacking point had failed and correct it. The reason is rust, and I've fixed part of it. A combination of rust and repairs from before my ownership had seen the floor and inner sill separate next to the jacking point bar that runs from the inner sill to the chassis leg. That meant the floor got pushed up, leading to the look of a collapsed jacking point. The rust was invisible because of the thick layer of factory sealant inside the car, and the multiple layers of steel panels on the outside of the car, the rust was buried in the middle of it all.
I got the rust repaired where needed so the floor and inner sill are tied together again and I could jack the car up now without pushing the floor up. However, I did start getting crunchy noises and when I let the car down off the jack the actual jacking point bar has now failed since the floor is stronger than it. This is really old damage, that bar was crushed when I got the car and I don't have the means to replicate it with the tools and skills I have. Spares don't exist, obviously.
I've seen other Princesses with the front jacking points replaced by square bar tubing stuff and that might be a route I go since it's easy to get hold of, strong, and unlikely to rot out particularly quickly. It's just a really unpleasant job however I try to go about it doing it on the driveway outside at home. What I wouldn't give for a ramp to work under so this job was at least tolerable, and an assortment of nice air tools, and maybe someone else to do it for me since we're asking.
|
| |
|
|
|
|
|
|
|
|
Could be worth inspecting the front brake pads, and that they are still properly attached to their metal backing; I recently replaced my Minor's front (Ford Escort/Orion/Sierra) pads that have been on there since 2006 because of some sqeaking and rather dull feeling brakes, then on removing the old ones I found they were partially lifting away from the metal backing, despite only being half-worn.
Much nicer overall feel with the new Mintex ones fitted, and no noise.
|
| |
|
|
vulgalour
Club Retro Rides Member
Posts: 7,284
Club RR Member Number: 146
|
|
|
|
|
The noise has gone away and the brakes feel pretty good. Had call to do a couple of almost-emergency-stops and I have no cause for complaint on how quickly the car can stop so I think it was just one of those random things.
Pilkingtons got back to me with prices for a new windscreen, there's options so I could have all sorts of tints and shade bands but I'm keeping it simple and going clear like the original so it matches the rest of the glass on the car. I can always add a vinyl shade band if I really feel I need to further down the line. Cost delivered is around £500ish which I didn't think was at all bad for a brand new windscreen for a car whose manufacturer no longer exists. Lead time is 12-15 weeks, so I'll have plenty of time to do lots of other work on the car while it's made.
|
| |
|
|
|
|
|
|
|
|
Before you press the order button with pilkingtons, see if anyone can cross reference the screen for you. Many times screens are shared, so you may find it's still current for another car.
I'd advise a light tint, you wont really notice it from the outside but it will be nicer to look through.
|
| |
|
|


 I liked it on the Lotus alloys and beige paint, but the current direction is much more me and since I'm building it for me it makes more sense to follow that direction.

