|
|
|
Feb 19, 2015 16:13:08 GMT
|
thanks for all the positive comments guys  really appreciated AND james; I ran mine up to 12psi. it was awesome but 8-10 was best. After 10psi I was getting trouble with detonation so I had to put lots of fuel in and retard the spark alot more. Will you be running wasted spark with edis? Or will you use the direct coil drivers? I'm going to modify my megasquirt so that it's running the 4 coil drivers which allows fully sequential ignition. This gives you better control on the turbo'd engine as the wasted spark on the wasted spark setup can interfere with antilag and rev cut limiters. If you want any more info about the megasquirt just let me know. It can be frustrating at first, then all of a sudden it all comes together and the car will fire straight up!
apart from the retarded and sequential spark, and the turbo's psi, none of that made any sense lol which is what I mean... I really need to start researching it all properly hahaha
also for the look of the car, looking at my bank balance, a respray was a bit ambitious haaa but for the wheels, I like the current ones, but I also have a set of bbs on my daily fiesta which I could fit if I ever wanted. just visible in the crappy picture of I have..... 
btw what does the term "sleeper" actually mean? I've never really got it lol
|
| |
Last Edit: Feb 19, 2015 16:19:00 GMT by code109
|
|
|
|
vulgalour
Club Retro Rides Member
Posts: 7,286
Club RR Member Number: 146
|
1975 Hunting Boost :Pvulgalour
@vulgalour
Club Retro Rides Member 146
|
Feb 19, 2015 16:42:47 GMT
|
|
Your Fiesta looks surprisingly like a 90s Honda in that picture, and I mean that in a good way.
Sleeper: a car that looks completely standard but hides enough power to embarrass more powerful vehicles.
Some folk have different definitions, but that's the one I go for. If it looks just like an ordinary Hunter on the outside but is a turbo-monster on the inside then you're on the button with it. Soon as you start putting fancy wheels, lots of lowering, different interiors and the like it drifts away quite quickly from sleeper territory.
|
| |
|
|
|
|
|
Feb 19, 2015 16:55:46 GMT
|
ahhh I seeeee! well its a nice idea but I do love a car that's slammed on deep wheels  |
| |
|
|
|
|
|
Feb 19, 2015 17:19:01 GMT
|
right then, here we go! If you use the EDIS system, there are 4 parts to the ignition system, the Plugs, the coil pack, the EDIS4 (the number denotes how many cylinders you have) and your megasquirt. the signal from your crank position sensor sends a signal to the EDIS, which then sends a signal to the megasquirt. The megasquirt then calculates how much advance you need and sends a signal to the EDIS which then tells the coils to fire. The coils are connected in pairs so when it sparks, one cylinder is on the power stroke and the other exhaust. the exhaust spark is wasted hence the name wasted spark If for some reason the signal from the megasquirt is lost, the EDIS system will default to 10 Degrees of advance, this is a sort of limp home function. BUT, if you cut the signal from the megasquirt for launch control or a rev limiter, the EDIS will think the spark is lost and will default to 10degrees advance so it wont work! You also cant also retard the ignition below 10 degrees as the EDIS will default back to 10 degrees when you want, say, 6. The other system uses 3 components, the Plugs, Coils and Megasquirt. The crank position signal goes straight to the megasquirt, as does the connection to the coils. Unlike the EDIS system that requires 1 wire to the Megasquirt, then 2 wires to the coils, Both wires from the coils will go to the megasquirt. You will need to modify the megasquirt to have 2 coil outputs for this (which is why alot of people use EDIS instead as no modifications are needed) This system then works the same with the wasted spark as the EDIS, but you have unlimited control over the spark advance! I ran a retard of -10 degrees on the launch control for big bangs  The last system is sequential coil control. 1 coil per cylinder and 1 coil driver for each coil (4 in total for us) This system only fires when the spark is needed, so no wasted spark. There are other benefits but i cant remember them off the top of my head. If i was building my megasquirt again, i would use the last method, as its actually cheaper than the EDIS setup as the components to make it are about $8 each (3 extra needed as 1 is already on the kit so $24) and the EDIS unit was about £30! I buy all my gear from the states from DIY Autotune, who have been great so far and work out cheaper than any UK dealer that i've found. Extra info here aswell as the wiring diagrams for the modifications required: www.diyautotune.com/tech_articles/using_bosch_bip373s_with_megasquirt.htmLocations to get the signal for spark A,B,C and D 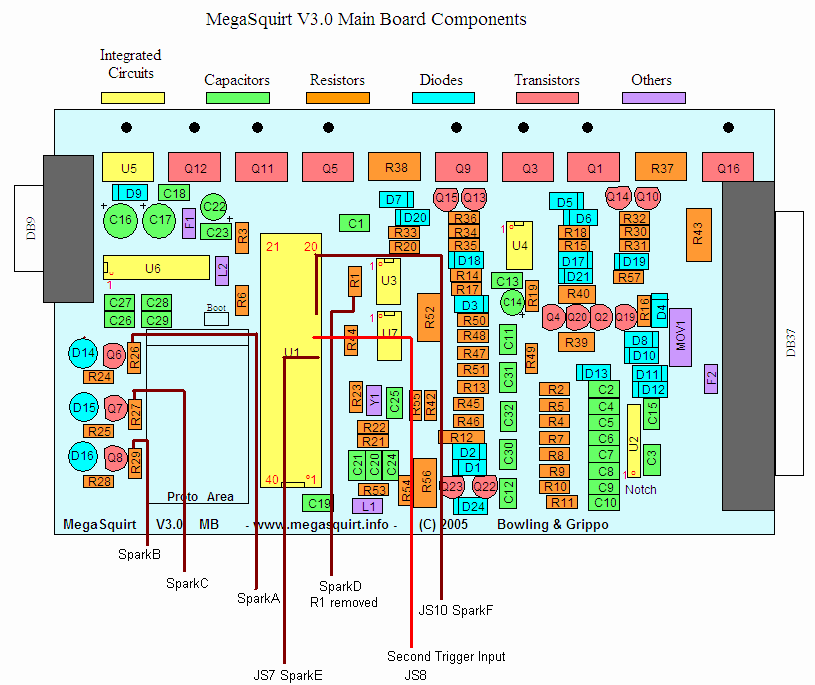 What it'll look like when its done:  Hope that helps! Have a read of the assembly guide and the MSExtra websites along with some of the forums. Its work reading some of the help threads just to get an idea of the usual suspects for the faults. James |
| |
Too many projects, not enough time.
|
|
|
|
|
Feb 19, 2015 17:54:23 GMT
|
jeeeeeeesus! ha it does help a lot thanks  where is the crank position sensor on an mx5 engine though? or it it just the dizzy thing on the back? |
| |
Last Edit: Feb 19, 2015 17:55:15 GMT by code109
|
|
|
|
|
Feb 19, 2015 20:05:11 GMT
|
The distributor looking thing on the back of the engine is the Cam position sensor. Theres also a Crank position sensor thats already on there. I chopped off the Cam position sensor so i could put the engine further back. To get the Crank signal i put a 36-1 trigger wheel on the pulley and made up a bracket for a VR sensor as you cannot use the crank trigger wheel on its own on the MX5. If you have a MX5 loom for the engine, then you can basicly chop off the plug and make up a new plug to suit the Megasquirt and follow all of the instructions HEREMore info can be found HEREJames |
| |
Too many projects, not enough time.
|
|
Rich
Club Retro Rides Member
Posts: 6,339  Club RR Member Number: 160
|
1975 Hunting Boost :PRich
@foxmcintyre
Club Retro Rides Member 160
|
Feb 19, 2015 22:23:18 GMT
|
jeeeeeeesus! ha it does help a lot thanks  where is the crank position sensor on an mx5 engine though? or it it just the dizzy thing on the back? Its a twin optical cam and crank position sensor. Loads of useful info on wiring a MS to an MX5, you can use the MX5 'CAS' unit to supply cam and crank angle data. My MS is wired to run using it just fine. Can't tell you much more than that though as I didn't build it.  |
| |
|
|
|
|
|
Feb 20, 2015 19:22:28 GMT
|
okay so my turbo arrived today  everything is spot on! bearings are fine, no visible wear or even use...! ha everything is spot on! bearings are fine, no visible wear or even use...! ha
the beaut... 
this turbo needs an external wastegate fitted, so first thing was to disassemble the cold side housing and tap into the pressure source; 
disassembled then just drill and tap; 
with a fitting for now until the 90 degree elbow arrives 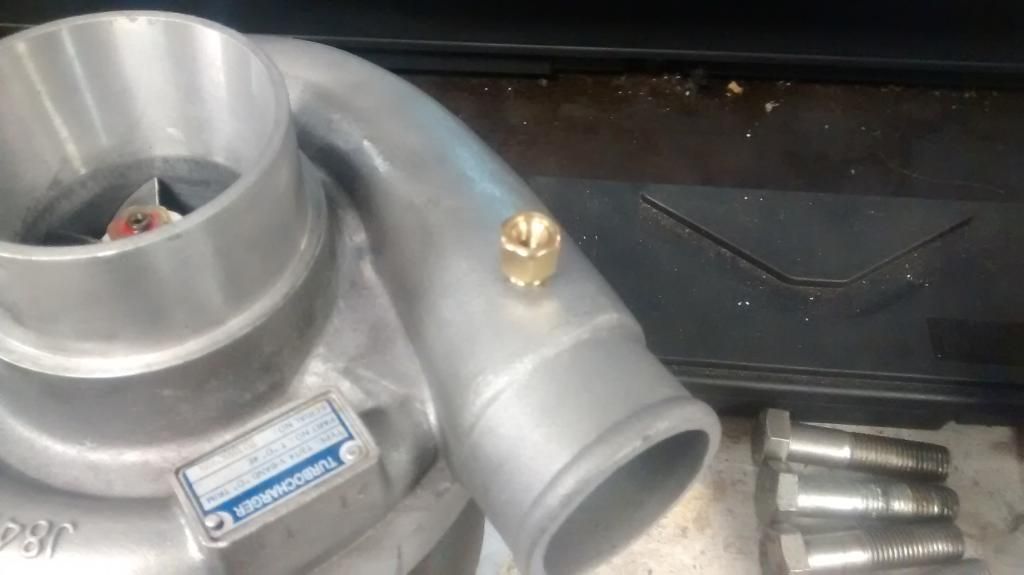
ive also got a lot more done on the fuel rail tonight... all on the thread in the technical section 
chowwwww for nowwwwww |
| |
|
|
|
|
|
Feb 20, 2015 20:35:04 GMT
|
|
Now that's a turbo! It'll be awesome with this on. Makes me want to stick one back on mine haha
James.
|
| |
Too many projects, not enough time.
|
|
|
|
|
Feb 20, 2015 20:42:32 GMT
|
do it! ha have to meet up at some point when I eventually get this running lol
the plan is for there to be a small amount of lag, then all hell breaking loose 
I'm thinking a boost gauge and controller will be wise as I like having an engine haha |
| |
Last Edit: Feb 20, 2015 20:43:23 GMT by code109
|
|
|
|
|
|
|
|
|
|
Yeah a meet up sounds good!
. Unfortunately I have a lot of work to do before I can get mine finished!
|
| |
Too many projects, not enough time.
|
|
|
|
|
Feb 24, 2015 16:22:24 GMT
|
|
Haaa have you seen my car?! Lol
Will be a few months before it even starts haha
|
| |
|
|
|
|
|
Feb 25, 2015 15:01:14 GMT
|
Finished the fuel rail last weekend  just waiting for the posteeey to deliver the bits to plumb it in now but this is it ATM; 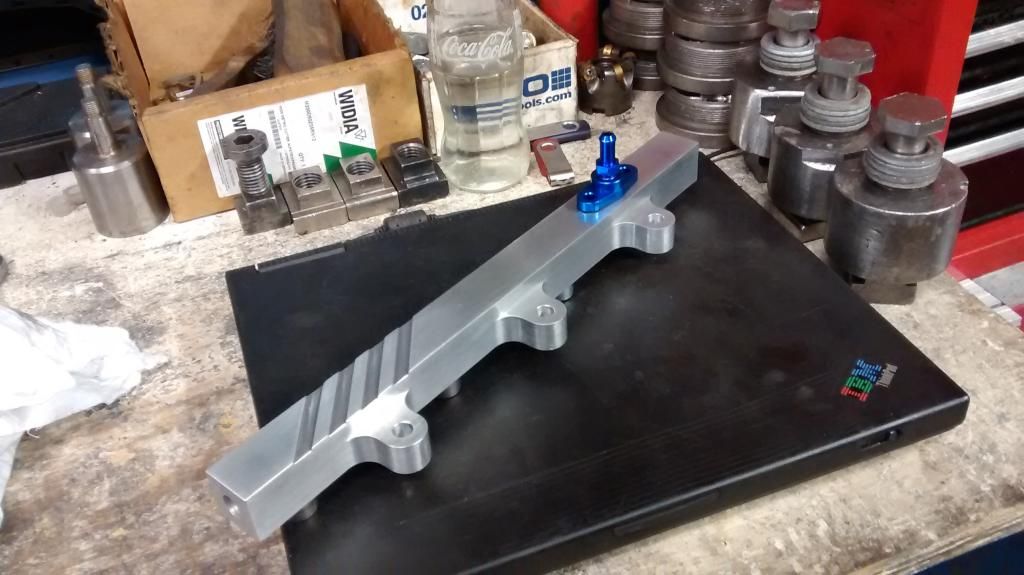 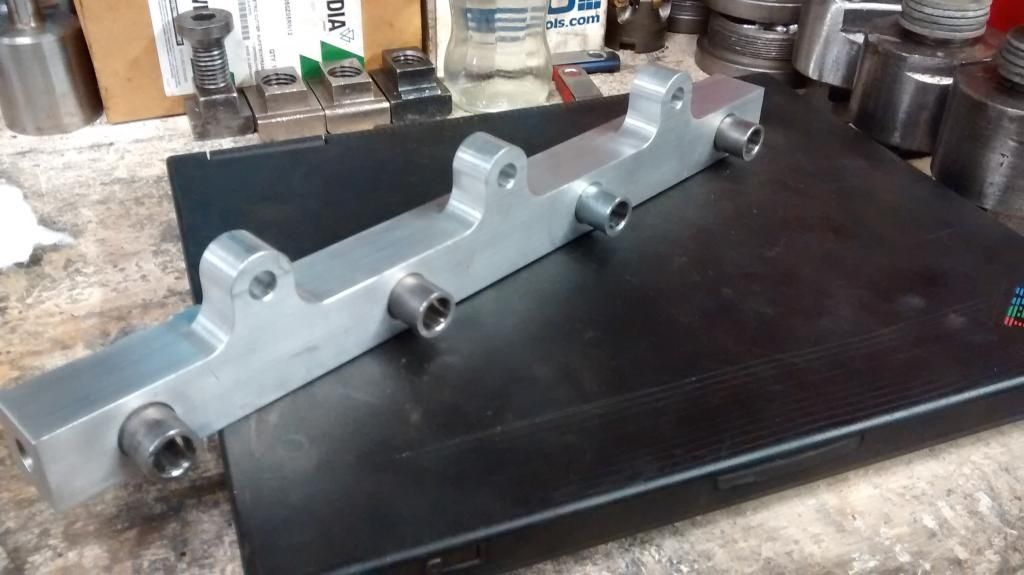 Should be in the engine bay this week or next  |
| |
|
|
|
|
|
Feb 25, 2015 19:25:59 GMT
|
|
fuel rail looks great!!
|
| |
|
|
|
|
|
|
|
|
Is your head a BP4W head (1998-01 engines) and if so would you like me to get an inlet manifold flange cut for you when i get one done for me?
Might come in handy if you want to make up any custom manifolds in the future!
James
|
| |
Too many projects, not enough time.
|
|
|
|
|
|
|
hi sorry haven't been on here for a while! Ha I wont lie my fabrication work isn't up to making manifolds yet lol but thanks for the offer dude  I'm still thinking how I'm going to tackle making an exhaust manifold! got a stainless flange but mot sure where to go from there haha |
| |
|
|
|
|
|
|
|
Mar 14, 2015 13:15:44 GMT
|
Weld elbows! Already chamfered for butt (hehe) welding and relatively cheap. I was going to use thes ones HERE until i found some steam pipe elbows that were fine in the bin at work which just needed preping for welding. There's loads of room in the hillman engine bay so you can get quite creative with the manifold, just remember to brace the turbo so that the weight of it isn't taken by the manifold itself as that can result in cracking. Found a decent guide thats easy to replicate if you have an angle grinder: GUIDE James |
| |
Too many projects, not enough time.
|
|
|
|
|
|
|
started moving along in the turbo manifold department... my efforts so far
BEGIN PHASE 1 OF OPERATION "DESTROY PERFECTLY GOOD MANIFLD".....; 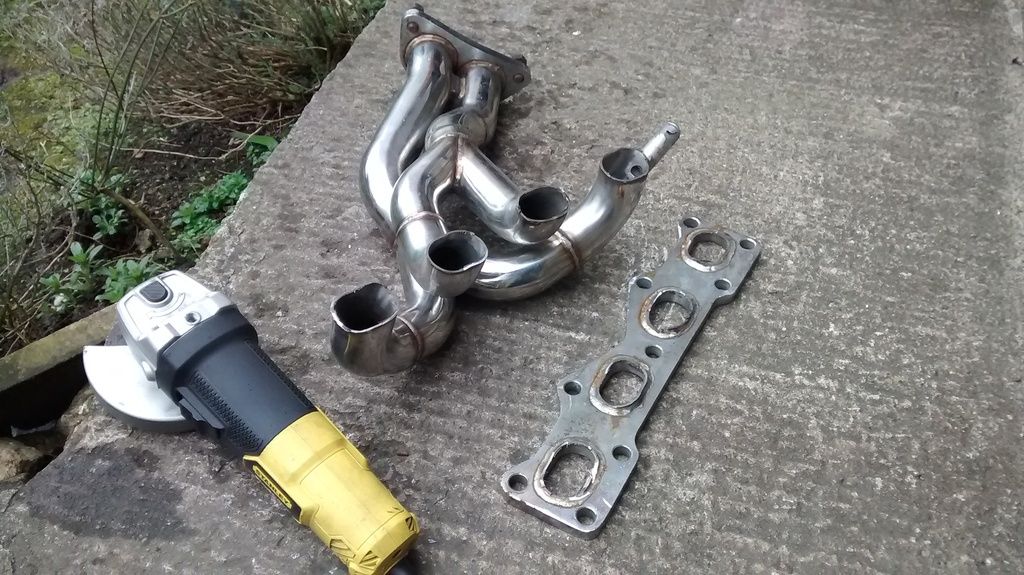
turns out there was only 1 phase to operation "destroy perfectly good manifold" and I just completed that part so all that was left was to grind the flange off and begin OPERATION "MAKE NEW AWESOME MANIFOLD"....; 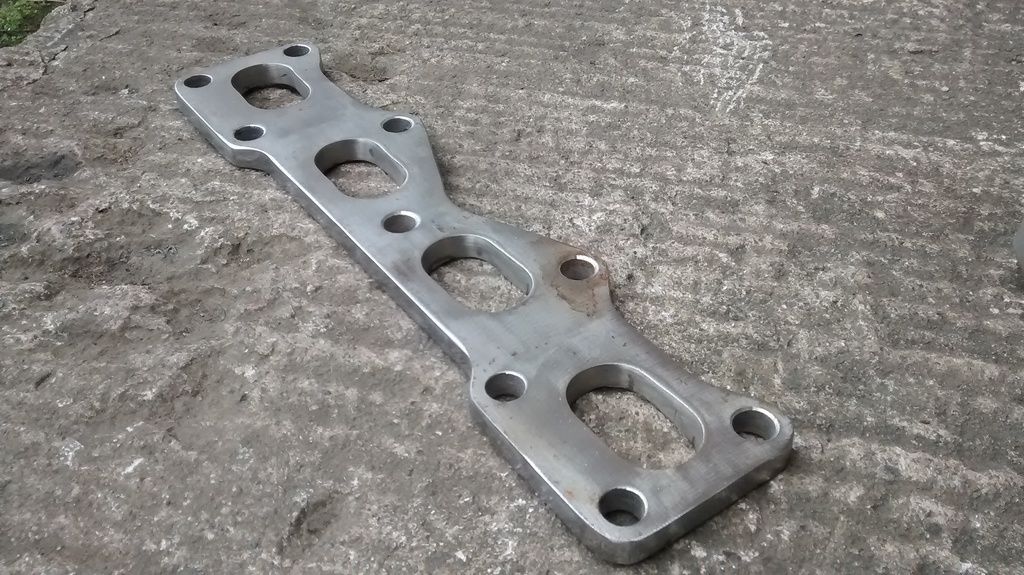
That's actually as far as ive got with the manifold haha I'm waiting for some stainless pipe bits and stuff to arrive from the interweb! however I did also finish the fuel rail fittings so its ready to be fitted to the car; 
and put some RX8 injectors in ready for the madness; 
on another turbo note, I found my natural aspiration air filter slid on the turbo entrance like the proverbial glove so that's the intake bit sorted; 
Now I have also finally got around to disassembling the leaf springs and grinding them down, greasing them up, and reassembling. just need a lick of paint now! but here's a spring after quickly wire brushing, and another after properly grinding; 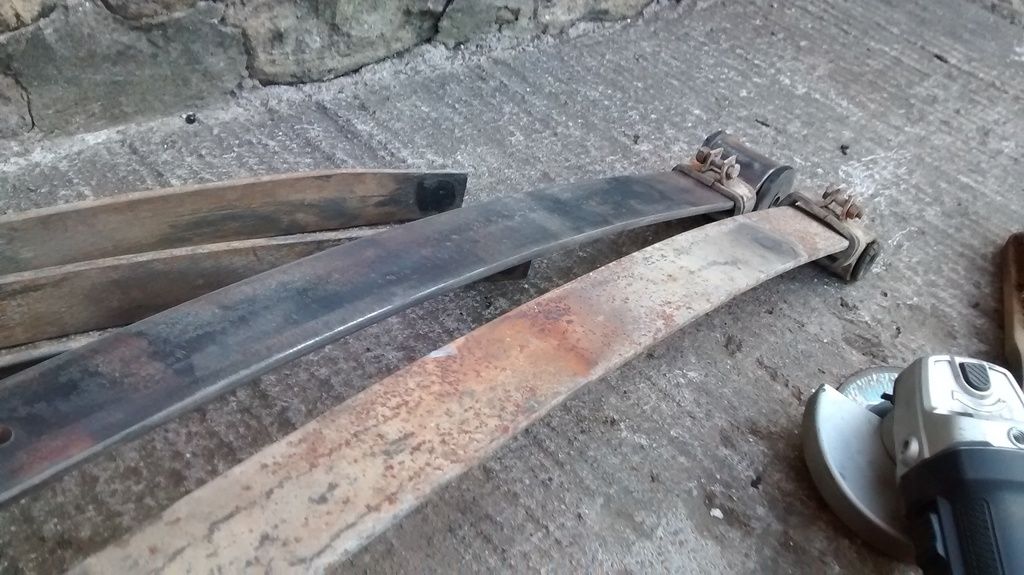
they were really rusted up, but they came out great... and seem to run a lot smoother now!
I am looking at all the peripherals need for the turbo atm too. oil lines, external wastegates, screamer or no screamer pipes (I'm thinking no screamer pipe as I personally think they sound rubbish unless its a crazy twin turbo skyline monster or something) I had a boost gauge turn up in the post too so ive been playing around with that seeing what pressure I can blow with my mouth hahaha
oh and james, where did you plumb your oil return pipe to?
cheers for all those interested  |
| |
|
|
|
|
|
|
|
|
As much as that looks ok, I would be looking to get some cold air feeding into your engine bay/air filter, otherwise you'll just be sucking in hot air through that filter.
|
| |
|
|
|
|
 really appreciated
 I ran mine up to 12psi. it was awesome but 8-10 was best. After 10psi I was getting trouble with detonation so I had to put lots of fuel in and retard the spark alot more.
  really appreciated


