|
|
|
Jan 11, 2021 21:12:02 GMT
|
Sorry I've not replied. It's all dabhand 's fault. I've been watching a few of the videos I was pointed at. (Thanks!) So... Airbrush. Good to know the idea works. I'm actually thinking of using it for things like this... 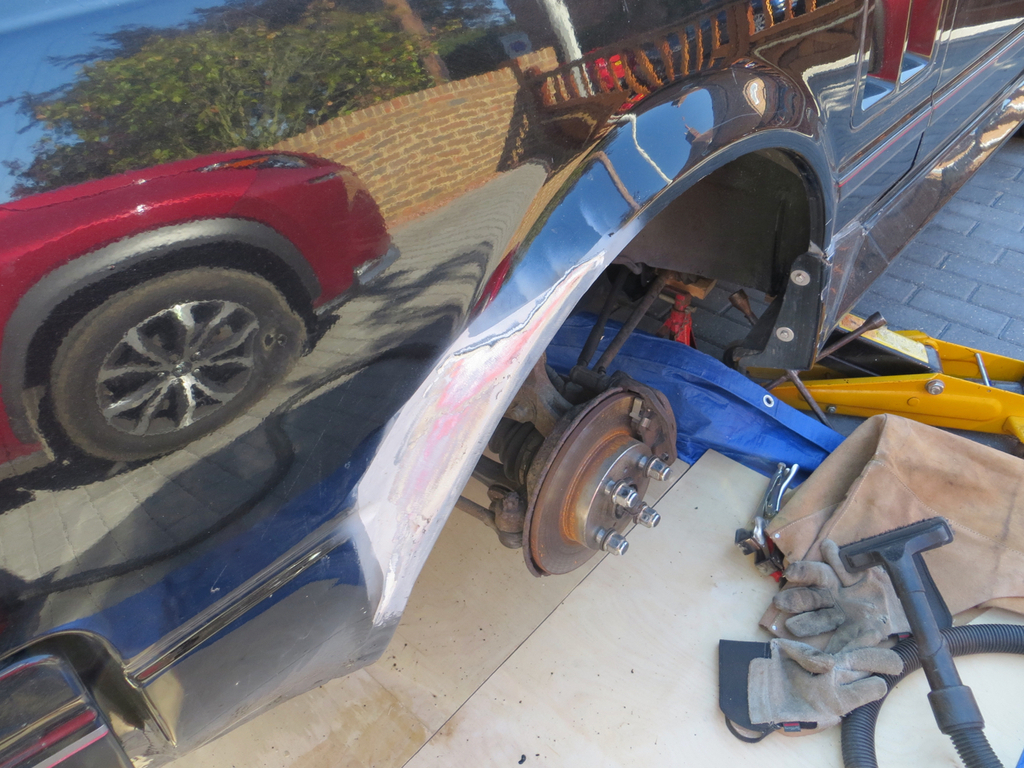 Which is a repair I did a while ago. At the moment it's just got POR15 on it and will be dulling down because it's not UV stable. So that needs taking off, filling (which I never did) priming and painting. One day I'll paint the whole wing. The other job for the airbrush is the new wing. Or bits of it. If I'm learning to paint I need to stack the odds in my favour a little. So the plan is to paint the wing off the car and then plug weld it on. The air brush would then be used to touch in the bits I welded which are all pretty much hidden behind trim anyway so no blending. Paint reactions... Interesting subject this. It also ties in with the filler over primer / filler on steel argument. Now given that I have no experience whatsoever this is what I'm thinking today. (Tomorrow I reserve the right to change my mind.) If I use a solvent primer then filler then another solvent paint there is an argument that the top solvent layer partly desolves the primer underneath, allowing the edge of the filler to lift. Effectively unsticking the edge of the filler so you can see it through the final paint. So the first thing I probably should avoid is filler over solvent paint. Now, as I understand it, the 2 pack primer I'm thinking about using should be fairly immune to paint reactions. And I have no idea what's on the car anyway so it's always going to be a punt. The UPOL clear is designed for SMART repairs. (Small & Medium Automotive Something Or Another, I'm Making This Up Now.) Basically the folks that come and blow in your bumper after somebody scuffed it in the car park. As such it's designed to not react with other paint (if you believe the blurb). Somewhere I've seen it written that it's ok over celly. And to prove the point, in one of the videos that dabhand pointed me at, the chap was using the UPOL clear over cellulose. So I think... Non-isocyanate 2 pack primer, followed by cellulose, followed by UPOL 2085 clear should be a win on a bare metal panel. So what about the rest of the car? Well the front wings will have had fair amount of repair work done. And this is still to do... 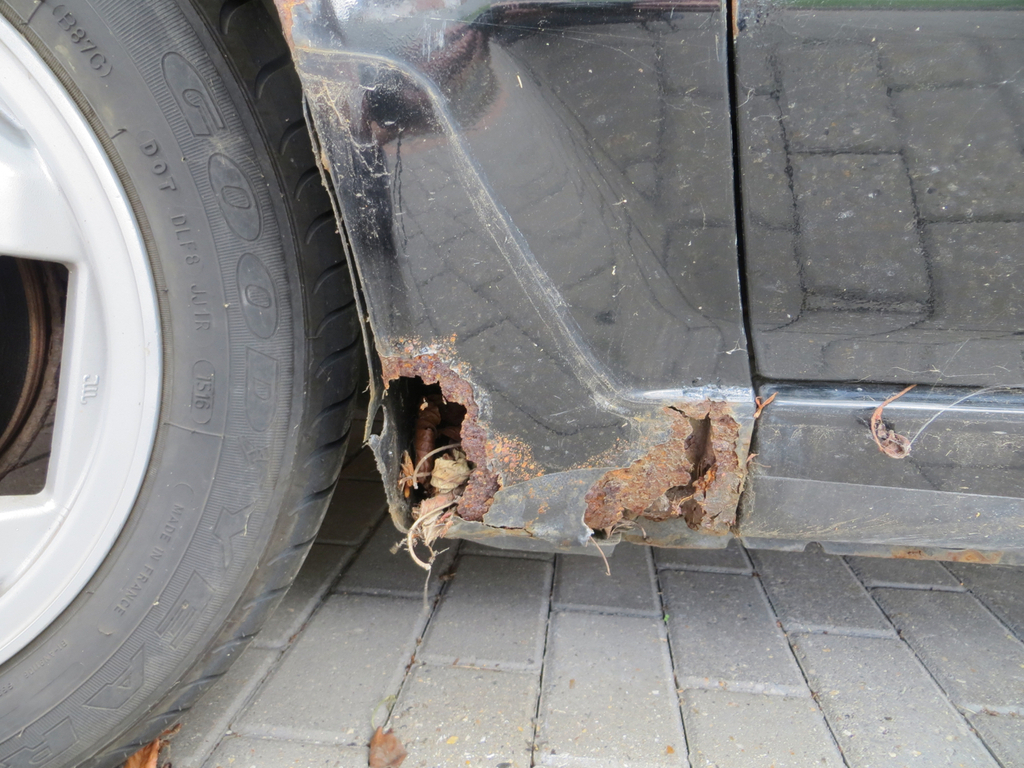 The wing bolts on so it'll probably get bolted off and have all the paint removed. Same could be true of the doors. So I may be able to avoid reactions on a lot of the car. The problem's are going to come when I tackle the windscreen surround and stuff like that. Wish me luck! James |
| |
|
|
|
|
|
|
|
|
|
|
If bare metalling the panel or even painting a panel already painted the method I would use is the following:
Sand - finish p180 for high build primer, p320 for 2k/ direct gloss, P600 for basecoat
Degrease/ clean with panel wipe
Prime- epoxy primer first always ( dries waterproof & "seals" panel) either let go tacky and put on highbuild primer. Or alternatively let epoxy fry and sand, then apply highbuild
Flat highbuild using guidecoat (cheap black aerosol misted over primer) in desired grit depending on finish
Degrease with panel wipe
Paint - either basecoat (paint + thinner mixed 1:1. Requires clearcoat) or 2k/direct gloss (usually paint + hardner + 10 or 20% thinners mixed 3:2:10-20%)
Clearcoat/lacquer - a 2k product mixed 2:1:10-20% paint, hardner + percentage thinner.
Again my personal opinion: I wouldn't worry too much about isocyanates in your case. Relatively small panel and not a huge amount of over spray combined with a short exposure time. A good paint mask, gloves and goggles should be ok. I would stay as far away as possible from cellulose paints. Your asking for trouble esp mixing it.
Regarding the filler. Filler can be applied on bare metal but good practice is to epoxy prime first and do any repairs again and reprime the panel as above.
2k paints dry hard whereas cellulose is reactivated by thinners causing edge fry-ups and cracking.
Regards quantities: 300-400 ml of each should be suffice to paint one panel. Hardner comes in 1-5ltr tins
Paint in whichever quantity required
Clear coat again 0.5ltr to 5 ltr.
Can't go wrong with upol. It's cheap, cheerful and proven to do the job. I use it often and it gets the job done.
|
| |
|
|
|
|
|
Jan 12, 2021 17:34:47 GMT
|
|
Following with intrigue. I bought Jawel's non-iso 2k before reading all the issues so will see how it goes. Headlight lids, rear panel and front wings to be done in the garage. Door and rear quarter bottoms in the summer, should such a thing arrive.
I've used their non-iso clear on blasted aluminium pieces and it seems to have cured OK - one done in the summer and one a couple of weeks ago, sneakily brought into the house to cure. Feeling apprehensive about their direct to gloss but you don't know if you don't try, and worst comes to worst I'll have bad paint on a few panels, so same position I'm in now.
|
| |
Project Diary1975 Viva / 1988 T25 Camper / 1989 Mini / 1991 MX5 / 1992 Mini / 1994 Saab 9000 / 1997 Saab 9000 / 2008 Saab 9-5
|
|
|
|
|
Jan 20, 2021 22:11:37 GMT
|
Following with intrigue. I bought Jawel's non-iso 2k before reading all the issues so will see how it goes. Headlight lids, rear panel and front wings to be done in the garage. Door and rear quarter bottoms in the summer, should such a thing arrive. I've used their non-iso clear on blasted aluminium pieces and it seems to have cured OK - one done in the summer and one a couple of weeks ago, sneakily brought into the house to cure. Feeling apprehensive about their direct to gloss but you don't know if you don't try, and worst comes to worst I'll have bad paint on a few panels, so same position I'm in now. Apparently Jawel have discontinued their non-iso 2k now, which is great  I've not looked into it in any great detail but Rawlins appear to sell HMG Nisocoat 2 and Cromadex 800 non-iso paint systems. |
| |
Project Diary1975 Viva / 1988 T25 Camper / 1989 Mini / 1991 MX5 / 1992 Mini / 1994 Saab 9000 / 1997 Saab 9000 / 2008 Saab 9-5
|
|
|
|
|
|
|
Sorry I've not replied. It's all dabhand 's fault. I've been watching a few of the videos I was pointed at. (Thanks!) No problem, He's now using airbrushes and showing the differences between them and mini guns with the same size tips. |
| |
1993 Rover 220 Coupe
1972 MG Midget
|
|
|
|
|
|
|
No problem, He's now using airbrushes and showing the differences between them and mini guns with the same size tips. Yeah, so I see. And it's given me an idea which is always a dangerous thing. |
| |
|
|
|
|
|
|
|
Probably safer than having your own, though..  |
| |
|
|
|
|
|
|
|
Mini guns are great for small touch ups and getting into all the little nooks and crannies. I usually use one to get the hard to get to places before I use a regular gravity gun to lay down a solid coat when painting a whole car. Keep up the good work. 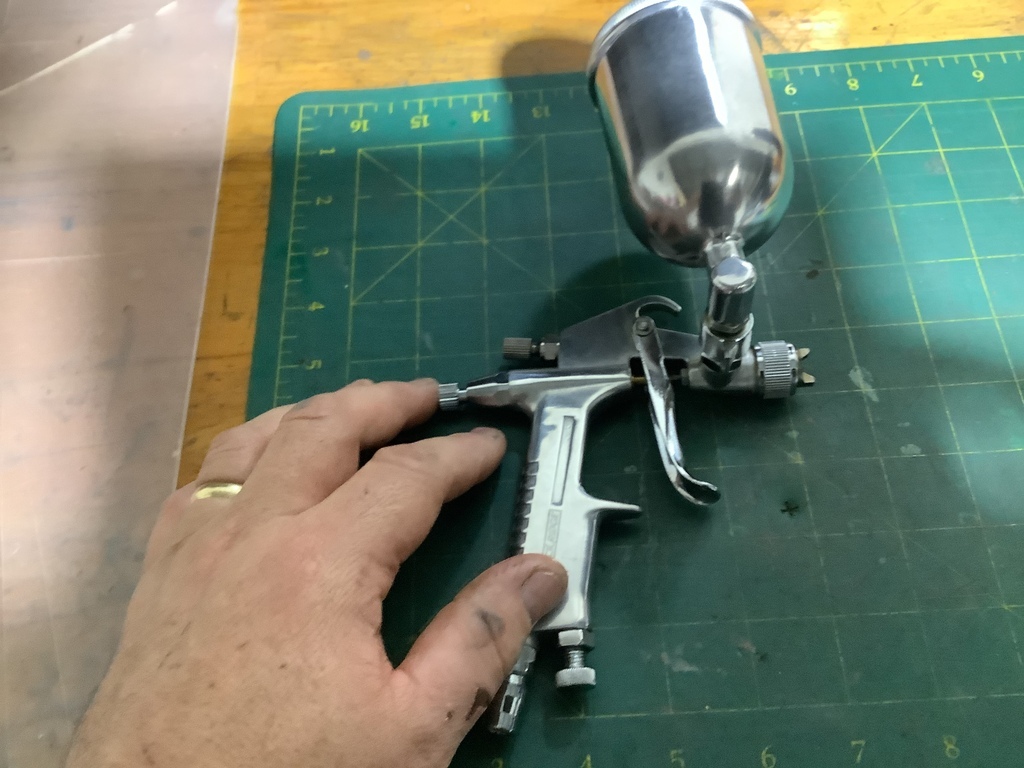 |
| |
|
|
|
|
|
Jun 28, 2021 20:42:50 GMT
|
OM actual G! Sweetpea’s posting in the MR2 thread! Is it a mistake? Probably… No, my friends. No mistake. I’ve actually done stuff. Not much I’ll admit, but ’stuff’ none the less. Let’s just say I’m slowly awaking my underlying need work on the MR2. Actually I really want to drive it again and that’s awkward as it’s missing a significant part of the back end. So what stuff have I actually achieved? Well this is the trim from the windows.  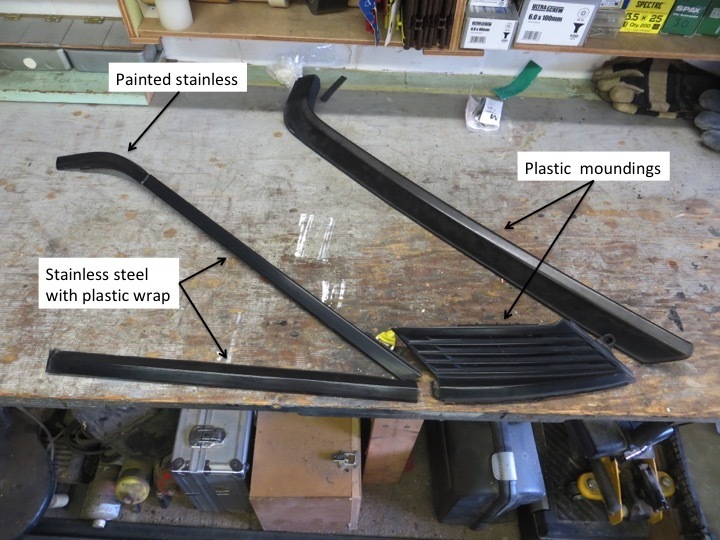 Interestingly Toyota made these parts in just about every way they could think of. Some are injection moulded plastic. As far as I can see they aren’t painted. Some are stainless steel with a plastic wrap, something like vinyl but it has a profile so it must have been extruded. (Photo in a moment.) And on the corners it was just painted stainless. So the big question is… How did they get the three different finishes to look the same. Well, however they did it, they don’t look the same 30 some years later. The injection moulded stuff looks mottled or, on one part, as if the paint has worn away. (Bearing in mind I can’t see any evidence that it was painted…)  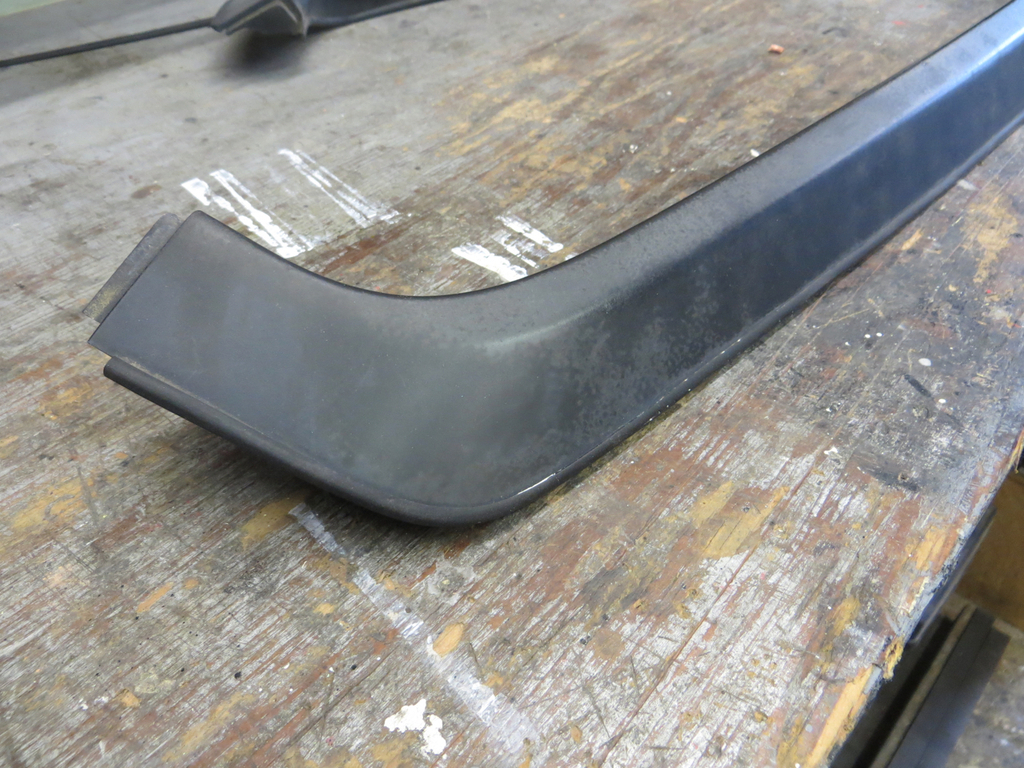  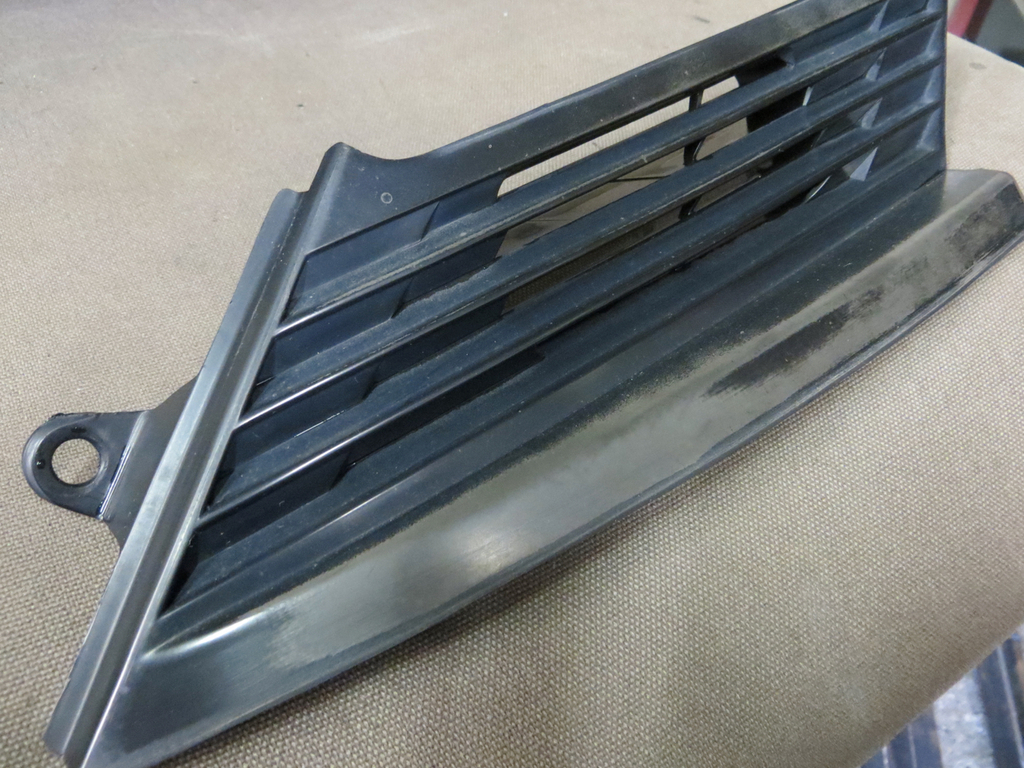 I’m guessing this isn’t a paint finish and it’s sun damaged plastic which tends to go a white colour. But who knows? One piece of trim broke when it came off the car and has been repaired. So I’m forced to paint the injection moulded bits regardless of how they left the factory. The plastic covered stainless is interesting because it has a profile.  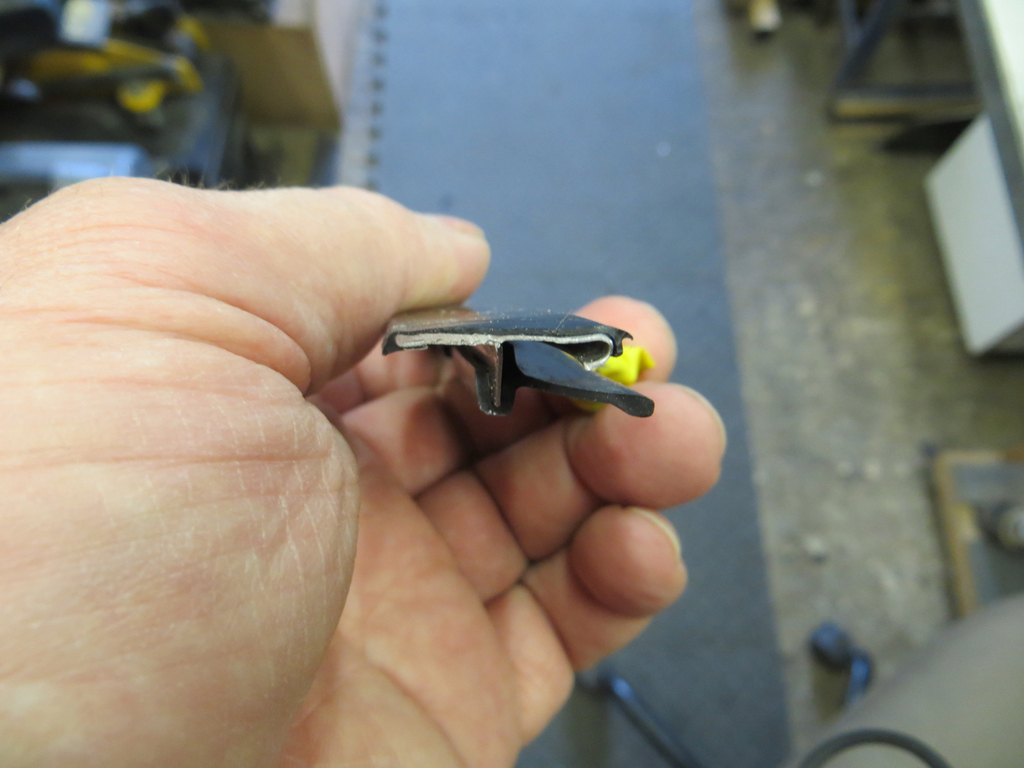 It’s not just vinyl wrapped. Anyway, it has lost it’s lustre and it refused to polish up. Hmmph. And lastly the corners that were originally painted stainless had the paint worn off them. So they needed painting too. The real problem is that no paint I could apply looked anything like the dull plastic wrapped stainless. So I’m going to take a risk and paint the lot. That’ll be exciting! First though the vents that live at the bottom of the C pillars should actually have a rubber flap valve in them so that air can exit the car but shouldn’t be able to get in.  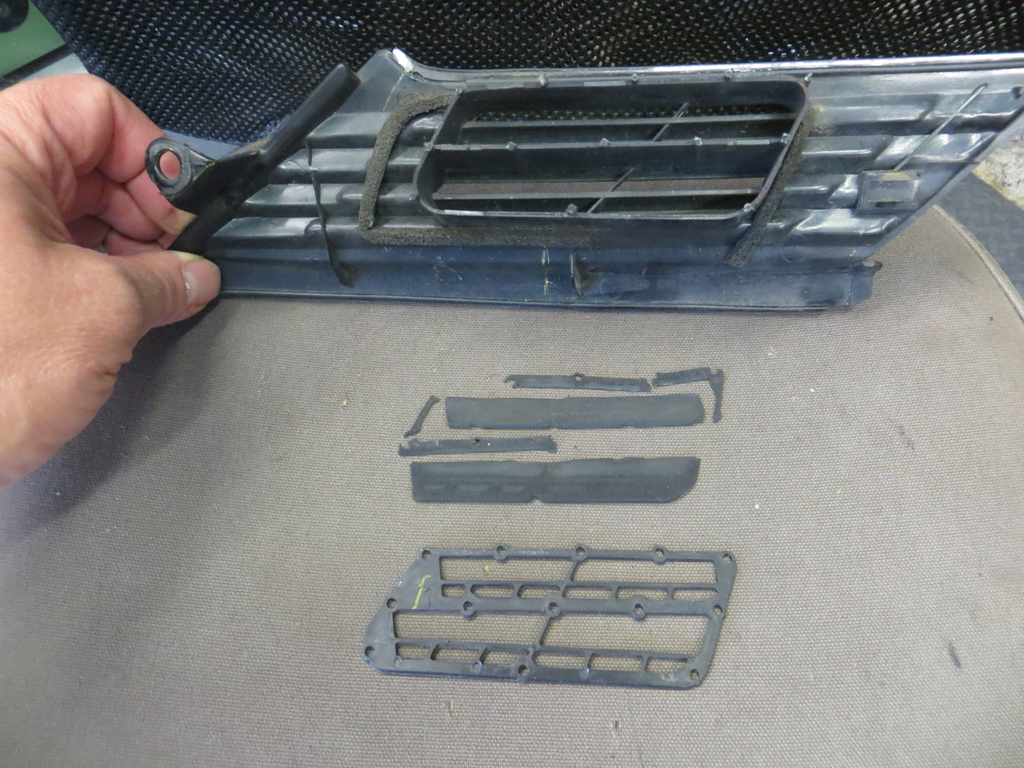 But thirty some years has worn the newness off them. In fact they were a collection of bits. Now this probably doesn’t matter much in the scheme of things but I’m an enterprising chap and I’m sure I can do something about it if I put my mind to it. What we need is…. Thin pond liner. And, because I never throw anything away, I have some.  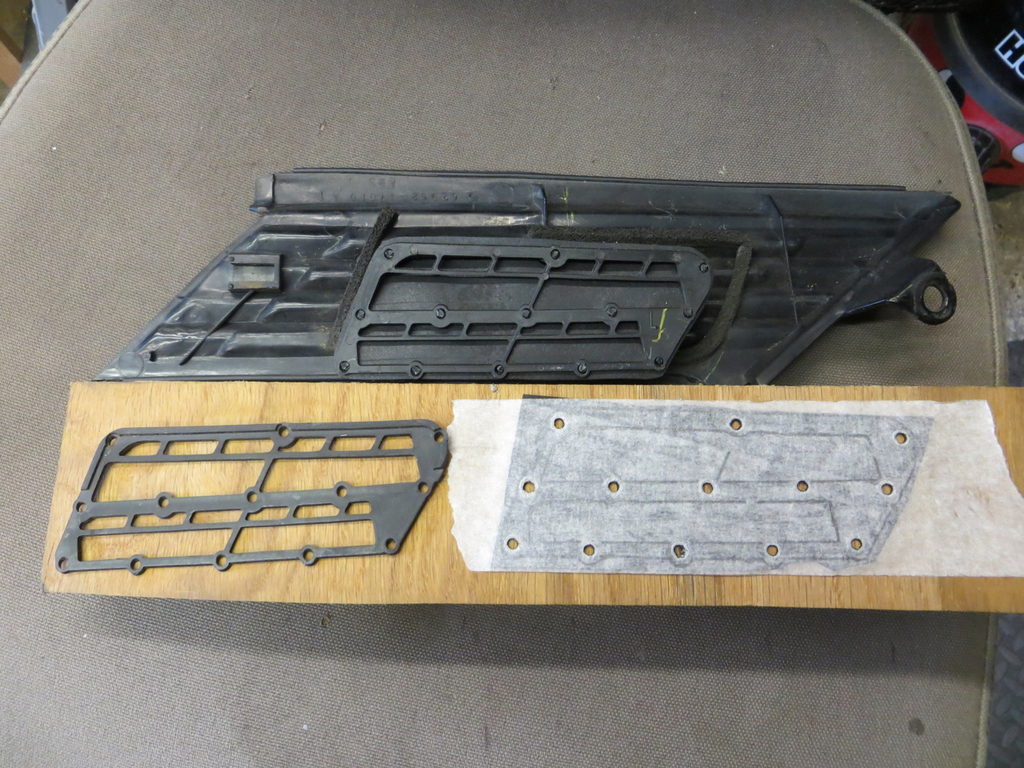 There you go. One fixed, the other being made. I’ll lightly glue the backing cover thing onto the pillars after they are painted. So, yesterday, I did try painting some bits. First of all a light coat of adhesion promoter which turns out to be like spraying milk and expecting it not to run. It runs like Usain Bolt on a quick day with his trousers on fire after a terrible accident lighting his fa… Where was I? Oh yes, and then a coat of gloss black. Now we have the problem of glossyness. These bits should be a sort of satin I’d guess. But gloss from a can is pretty satin so I figured that’d be ok… Maybe… Yesterday was a bit cold and damp. You could almost see the mist across the garage. The gloss that I wanted to be satin actually looks matt. So it’ll all need another coat. But…  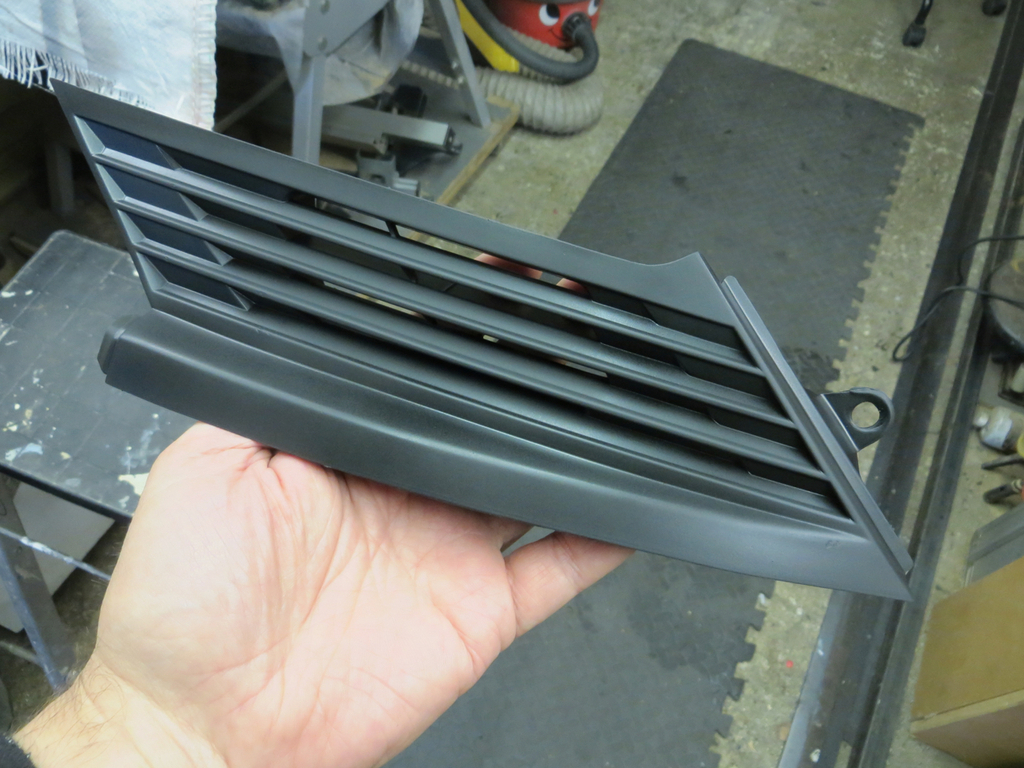 It does look good. Matt - but good. James |
| |
|
|
mk2cossie
Club Retro Rides Member
Posts: 3,054  Club RR Member Number: 77
|
|
Jun 28, 2021 21:47:09 GMT
|
Yay! MR2 postings from sweetpea  Nice repurposing of the pond liner tho  |
| |
Last Edit: Jun 28, 2021 21:47:40 GMT by mk2cossie
|
|
vulgalour
Club Retro Rides Member
Posts: 7,271
Club RR Member Number: 146
|
|
Jun 28, 2021 22:24:44 GMT
|
Halfords do a very good satin black that's ideal for these sorts of trims. It doesn't tend to fade and has a less-than-perfect finish if you spray it a bit heavy that's not a million miles away from the original 80s plastics look. Spray it lighter and in multiple coats and it's more like the painted stainless pieces. Pretty durable too. I've done quite a few black trim bits on several cars and never had an issue with it. Providing you use the right sort of primer for whatever you're painting, it seems to go on just about any surface you care to try it on. Here it is on the C-pillars of my Princess. I did this at least 4 years ago, the car sits out in all weathers, and it still looks exactly the same brightness of black and texture now as it did then. Unlike some other satin paints, it doesn't mottle in the rain or stain with bird poop. 10/10 highly recommend. 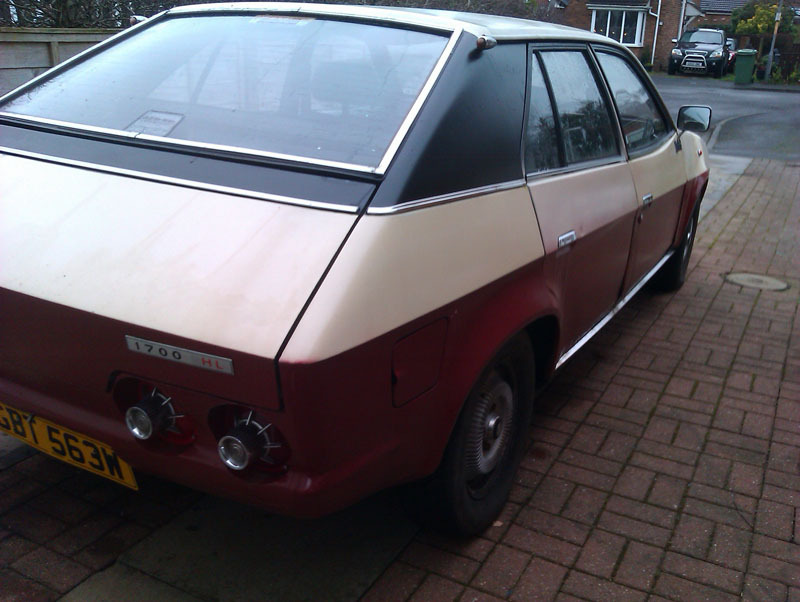 Couple of other things I've used it on are the door frames on my old BX, and the rear bumper on the current Maestro. 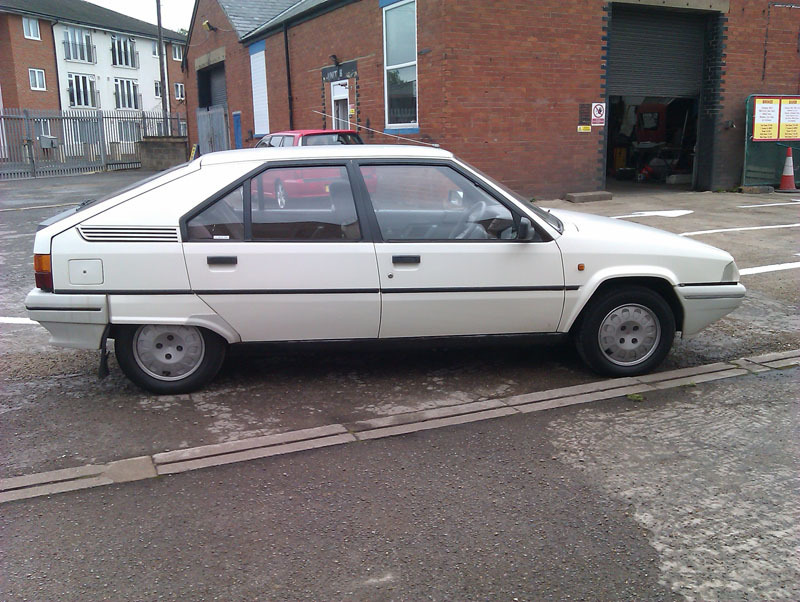 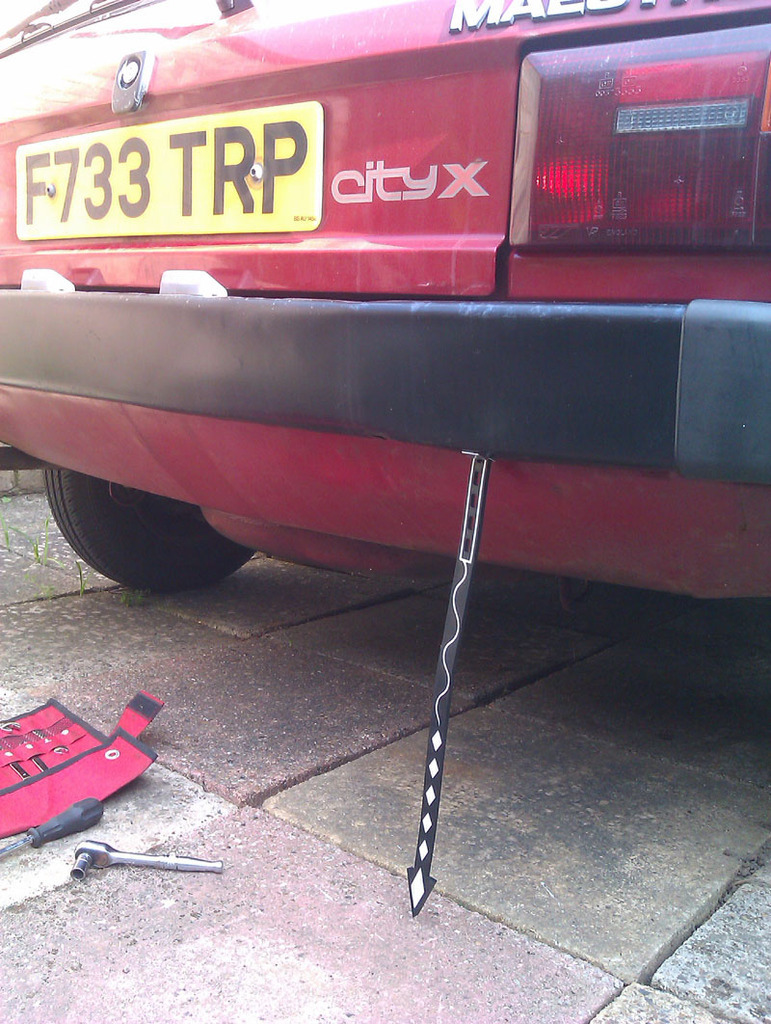 Rustoleum do a satin black as well, it's a heavier texture if that's what you're after, and similarly as robust as the Halfords' offering. |
| |
|
|
|
|
|
Jun 30, 2021 19:07:39 GMT
|
I'm a bit discombobulated. Late Monday afternoon the team leader for Tuesday went off sick. So they were asking if I could go in and cover. It's been so long since I've been in that I couldn't remember where London actually was. I think this was only the 4th time since lockdown. A colleague and I were discussing which one of us should go in. Can't say either of us was very interested so we both went in and started on a load of work we've been unable to do 'cos we are both stuck at home. It was nice to get back into the office and see a few people again. Could have done with more warning though. All a bit of a rush. Oh and a 12 hour shift plus traveling is a long old day. I'd forgotten! I'm booked for another day next month. Apparently it's to cover a chap who is a massive football fan and wants to watch the final if England are in it. If England drop out he may cancel it and I can stay at home. I'm probably the only bloke in the country that'd be happy if they return to form and lose!  Yay! MR2 postings from sweetpea  Nice repurposing of the pond liner tho  More legitimate than my previous use which was... 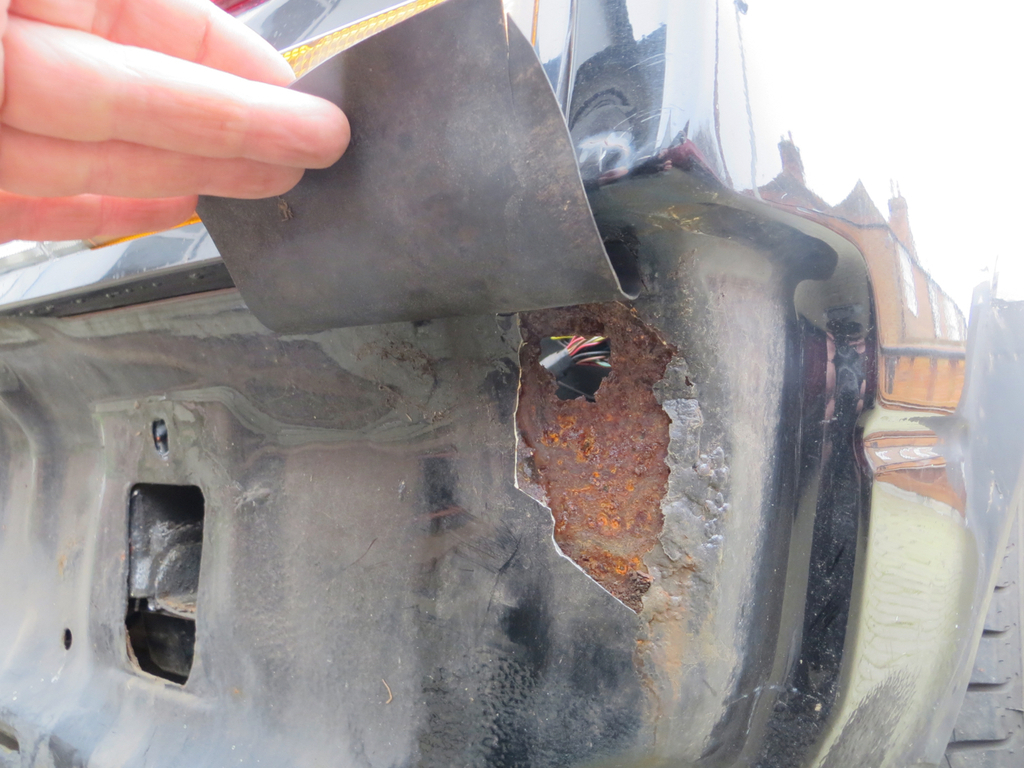 ...to cover the rust hole and stop water getting in the boot!  Warts and all baby... Warts and all. Might have to weld that in one day. Weld a bit of steel in that is. I'm guessing the pond liner might be difficult to weld onto. Wouldn't rust again though so there are advantages if it would work. Mr vulgalour , thanks for the pointer to the Halfords satin black. Do you have a link or a photo of the can so I can look for the right stuff? This one? linky link link.
James |
| |
|
|
|
|
|
|
|
|
The problem with your pond liner is now if any water DOES get in, say through another rusty hole, you'll get frogs.
No one wants a boot full of frogs.
|
| |
|
|
vulgalour
Club Retro Rides Member
Posts: 7,271
Club RR Member Number: 146
|
|
|
|
Sweetpea that's the one, it's the only one they do in big size.
|
| |
|
|
|
|
|
|
|
The problem with your pond liner is now if any water DOES get in, say through another rusty hole, you'll get frogs. No one wants a boot full of frogs. "Project Portia - Mad as a boot full of frogs!" The spoiler causes a low point in the car cover which fills with water so there is a nice pond for them to live in. They'll be very comfortable. Poor car. Deserves a better owner than me! Sweetpea that's the one, it's the only one they do in big size. Thanks Mr V. |
| |
|
|
|
|
|
|
|
I have become increasingly worried about the boot filling with water and becoming a habitat for frogs. I probably need to fill this hole up.  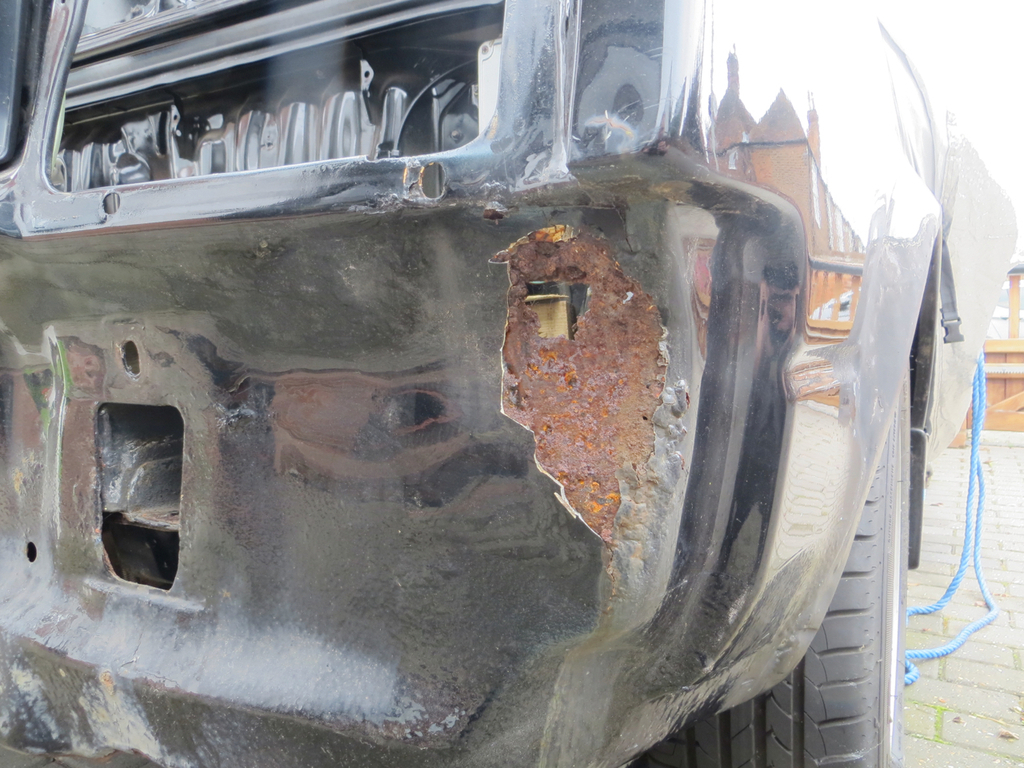 Originally I wasn’t too worried and just covered it in a bit of pond liner to keep the water out. My thinking was that there was only a hole on the outside of the car. But when I looked more closely I discovered that there was a corresponding hole on the inside too.  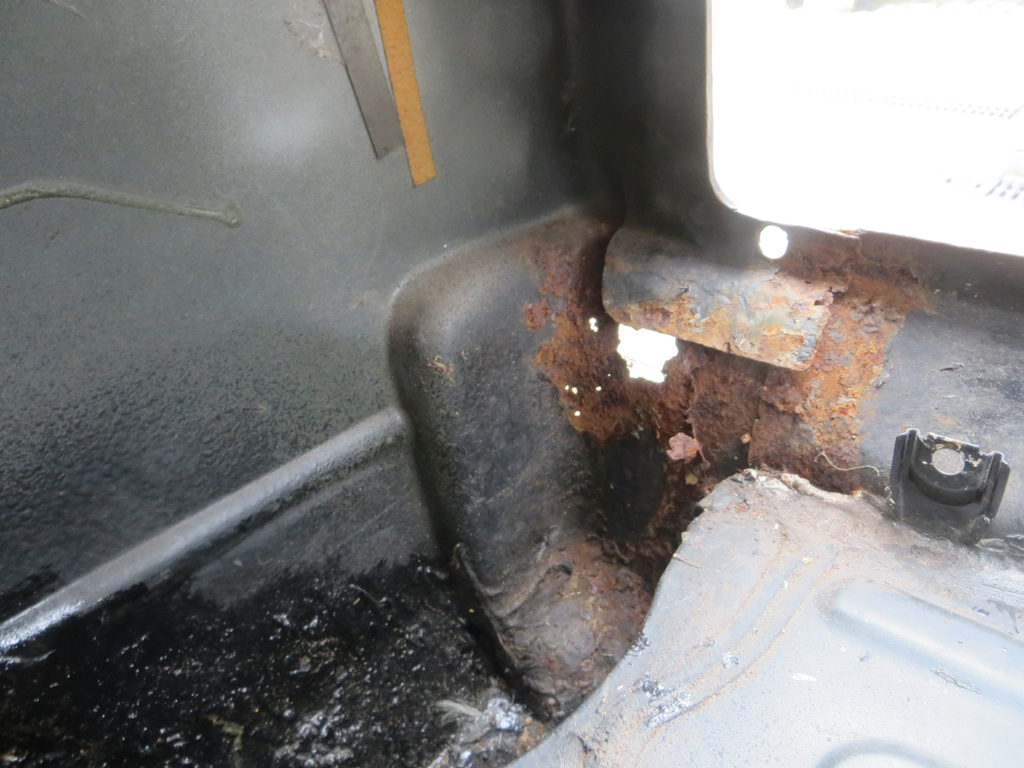 This was very disappointing but it turns out that it’s a property of holes… They happen on both sides of the panel. Who knew? Right, lets take the paint off and see what lies beneath.  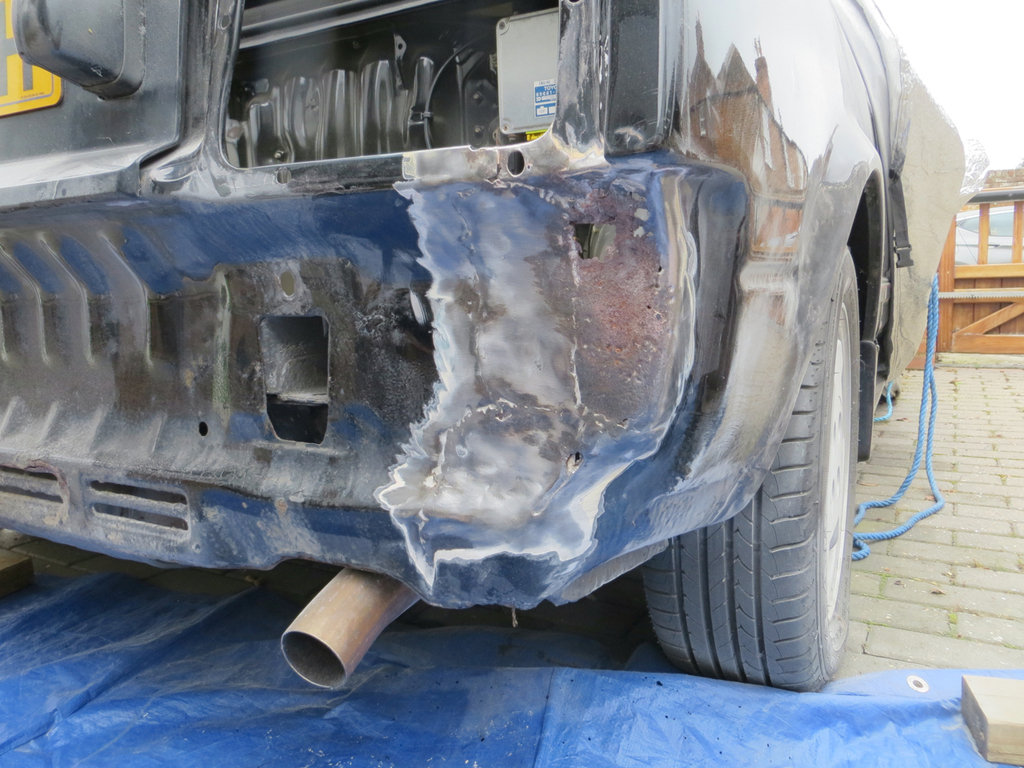 Not surprisingly it’s had some work done. There was an overlapping seam here where the wing and rear panel met. I think the light block lets water in which rots the seam. The bit that has rusted away this time is a part of the original wing. I’m wondering if the filler from the previous repair delaminated and trapped water against the panel. But what to do about the patchwork? It’s a solid enough repair but looks like it was bashed out with a claw hammer on a bit of wood. Also hidden behind there is the connection to the boot floor which feels a little crusty. So I’ll cut the bulk of it out and see if I can do a better job. For a start I’m not going to replicate the original seam. Don’t need it, don’t need it rusting again.  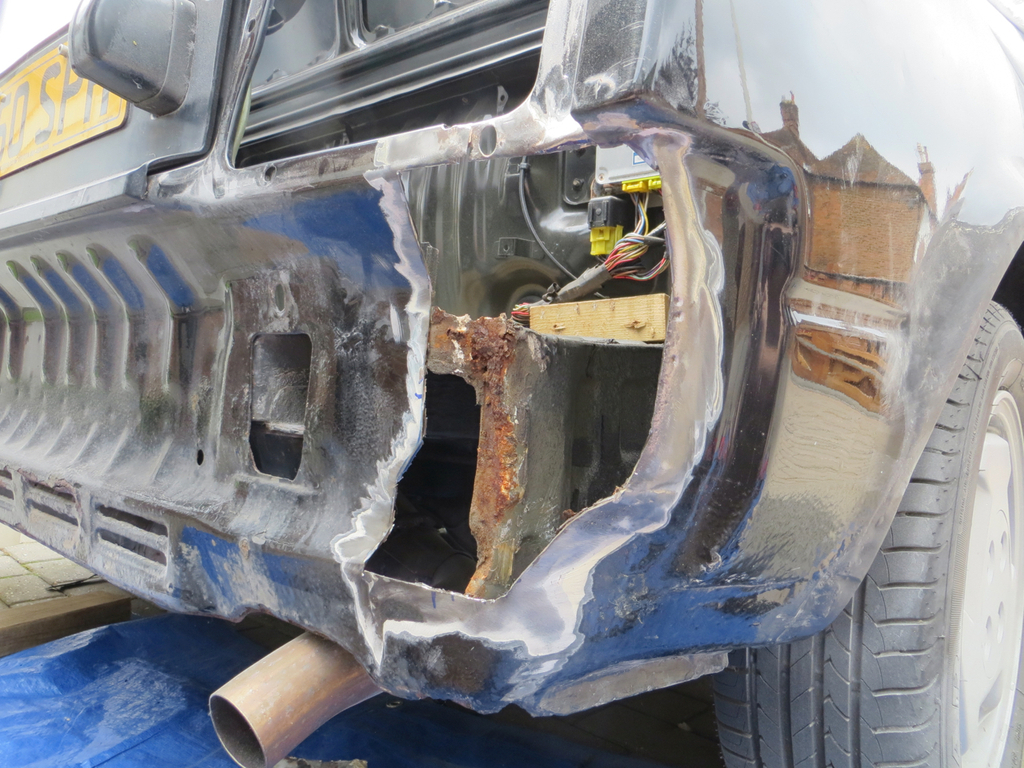 I’ve left the valance. It’s not original but it’s nice and solid and I wanted it to hold the spacing. I’ve also left the bit where the rear light bolts on, also to hold the spacing. There is a small rust problem with it but I’ll sort that out later. The back edge of the boot floor looks terrible but it was mostly seam sealer with rust from the outer panel. Once cleaned up it’s reasonably good. Lovely. Let’s start with the usual cardboard template.  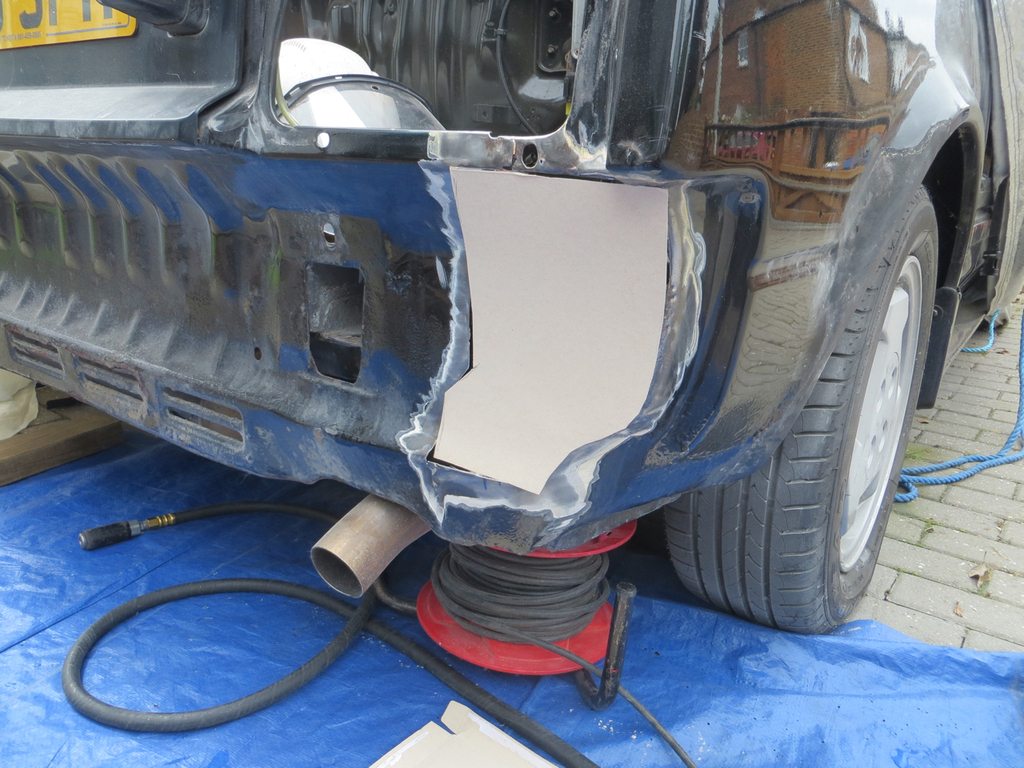 I used to make these templates really accurately but, increasingly, I’m not being so picky and then trimming the panel to fit. This is the repair panel trimmed to fit at the left side and with the main bends put in.  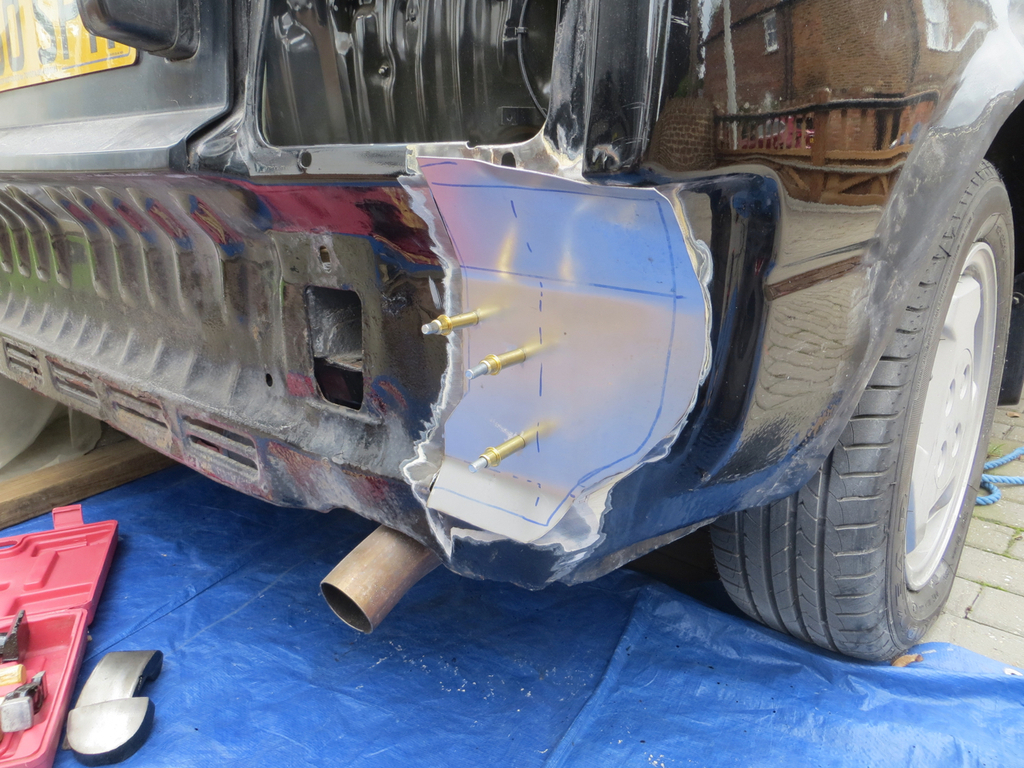 Next I wanted the right half of the panel to gently curve forwards a little. So I tried that in my home made English wheel which worked a little but not well. By rolling it with downwards pressure I got a little curve but the design of my machine makes that difficult. Might have to redesign it… Now the hard bit. The right edge has to bend sharply forwards to meet the wing. And as soon as I try and do that it’ll pull the bends out that I’ve lovingly put in and twist the panel. Oh well. So I started pulling the bends in with pliers.  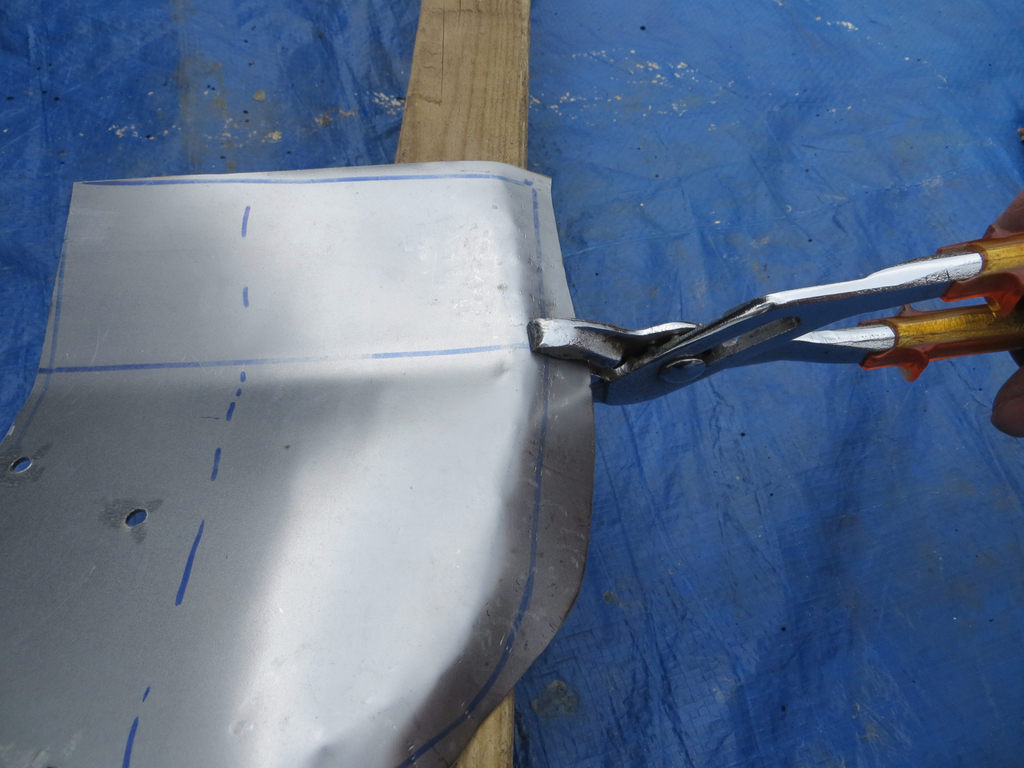 Which did distort the panel. But I have a stretcher to correct things. It was tricky because of the various curves, but it worked.  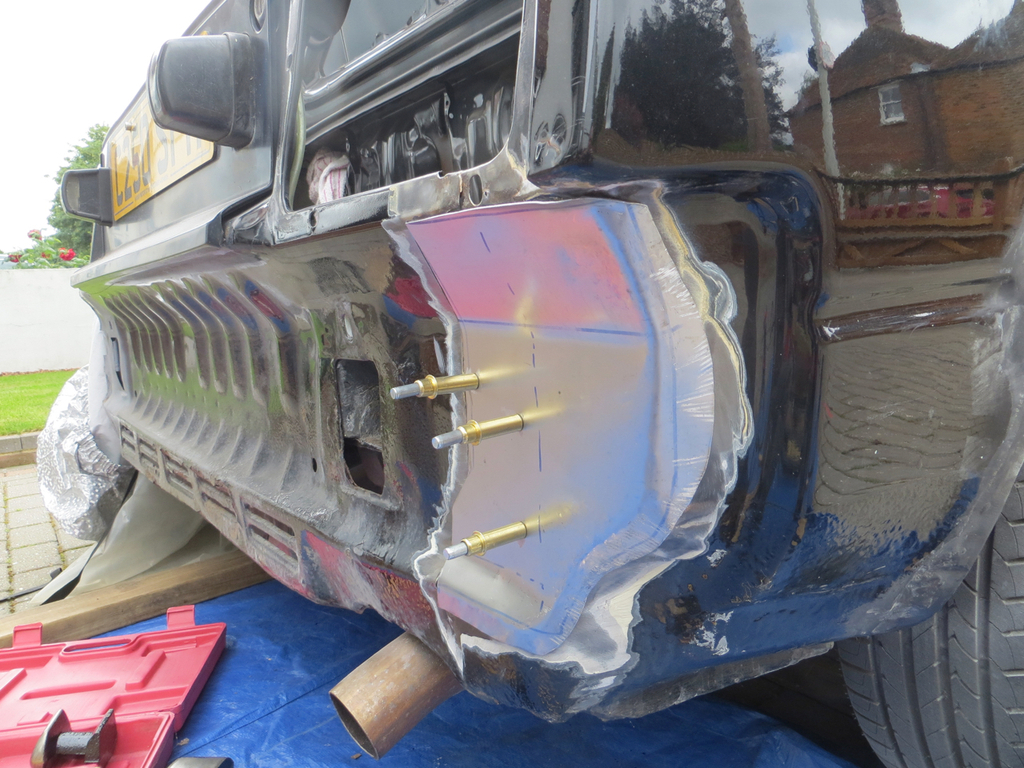 There we go. Not too shabby.  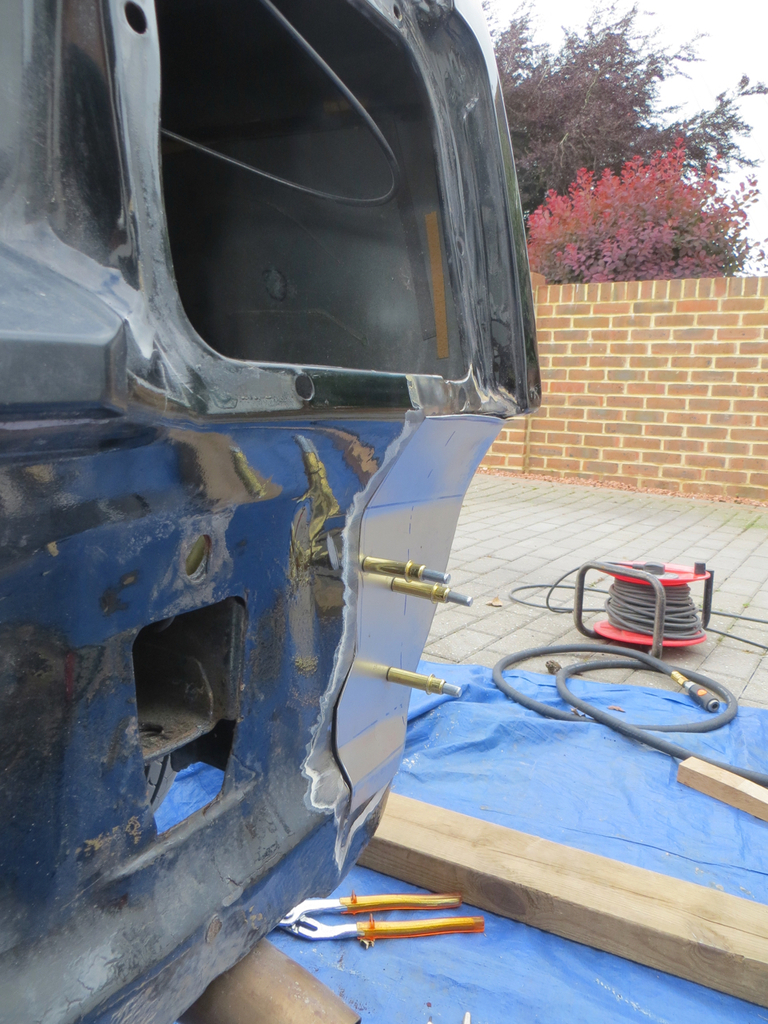 At the moment it’s sitting on top of the old panels in places. The next job is to trim it in and finally adjust it to fit. And then I’ll run out welding gas. James |
| |
|
|
jamesd1972
Club Retro Rides Member
Posts: 2,917  Club RR Member Number: 40
|
|
|
|
|
You must have been good to be allowed out to play. Nice panel there.
Will the welder still work after all this time ?
James
|
| |
|
|
|
|
|
|
|
|
I'm sure the welder will still work. The question is...
Will the operator remember how to weld? Maybe it's like riding a bike. Although I've not been on a bike recently either so maybe I've forgotten how to do that as well.
Some epoxy primer turned up today and I have a bigger tip coming for Devilbiss. Looks like I'll be learning to paint soon. Knowledge that will undoubtedly push anything I knew about welding out of my ears.
James - The other James, making no comment on relative ages.
|
| |
|
|
|
|
|
|
|
|
I rode a bike for the first time in twenty years and rode into a wall.
Please don't ride your welder into a wall.
|
| |
|
|
|
|
|
Jul 10, 2021 21:16:10 GMT
|
In order to get to the hole in the boot I had to remove the bumper. The back bumper… Obvs… To be fair I’d only put it on the car as somewhere to store it. Way back before I got the car somebody had backed it into a post (other ways of bending a car exist so that may not be exactly what happened). They bent the bumper reenforcing bar and cracked the back edge of the spoiler. Both are now fixed although I’m not sure if the curve of the reenforcing bar is correct. The bump also put a wrinkle in my rubber cover. Probably because it was forced to be too flat by the bent reenforcing bar.  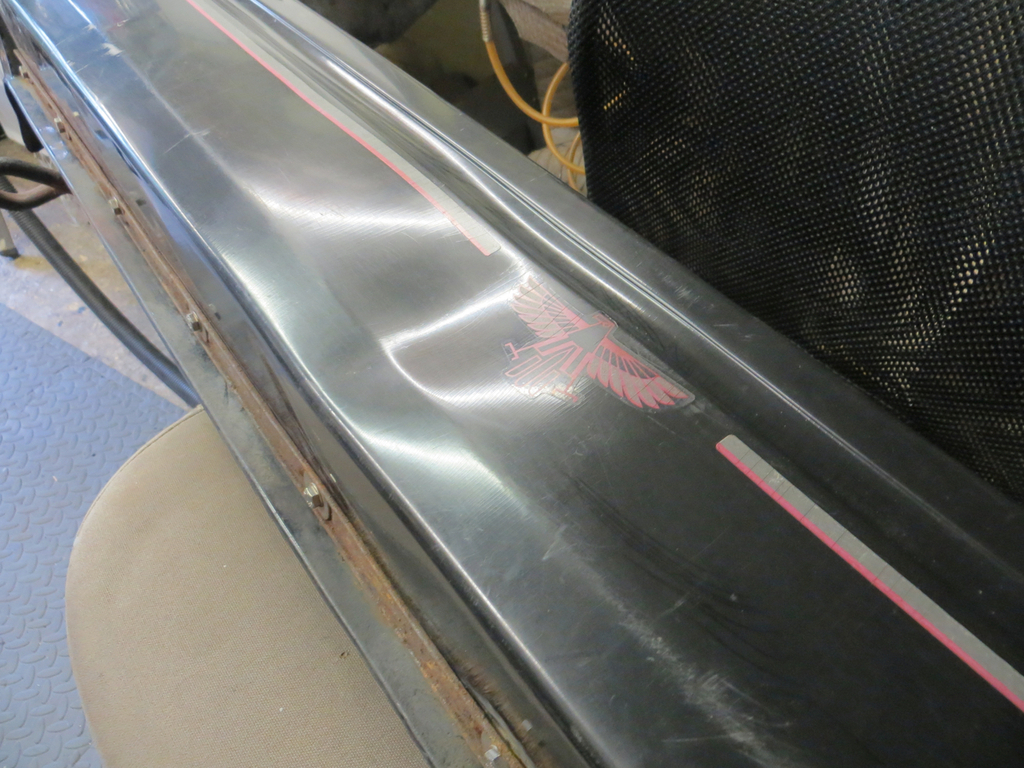 Other bits of the bumper cover that had been bent out of shape came back with a bit of warmth from a hot air gun. I tried that on this area and got it looking reasonable if not perfect. But a few months later and it’s popped back into the wrong shape. Bumhats. So I need to find a new bumper cover. Nah! I don’t think so! That’s not the Project Portia way. We need to try and fix this one… But how? I have a piece of aluminium that I can put a bend in to match the shape of the bumper.  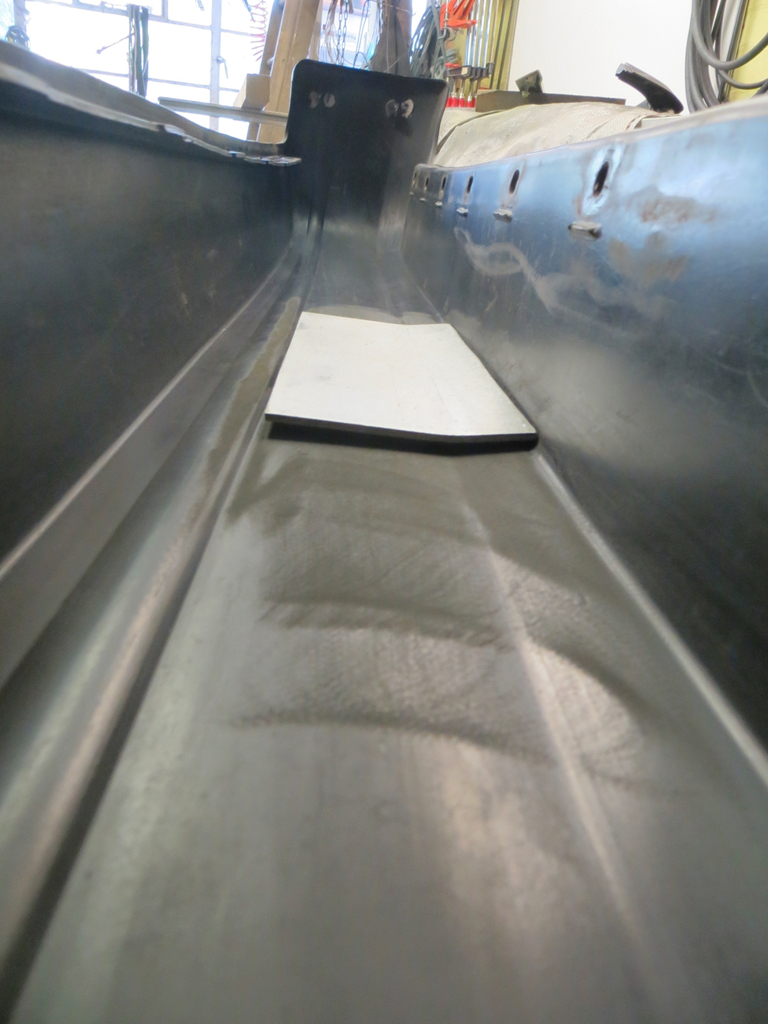 Next I need to epoxy this into the back of the bumper after roughing up the bits first.  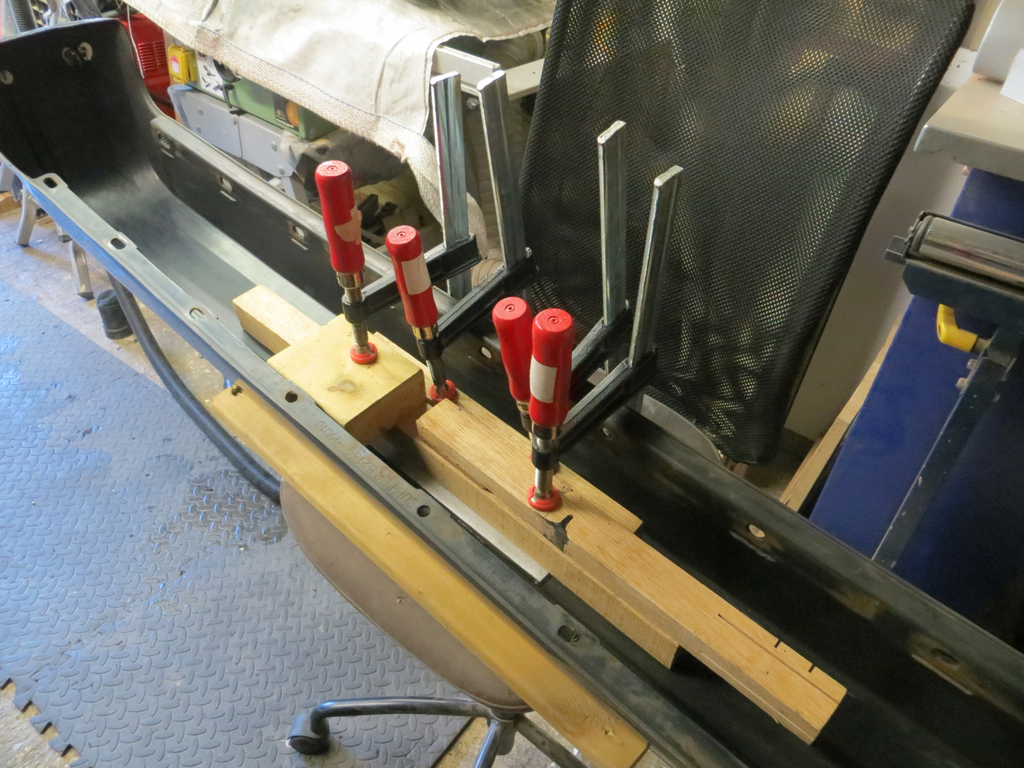 Perfect. So I left it a week while the epoxy went off. I used the slow stuff ‘cos it bonds better than the fast version. Or so I’m lead to believe. I mean it goes off in 24 hours but it’s not like I needed it on the car so I left it. A week later… It’s well stuck which is good news.  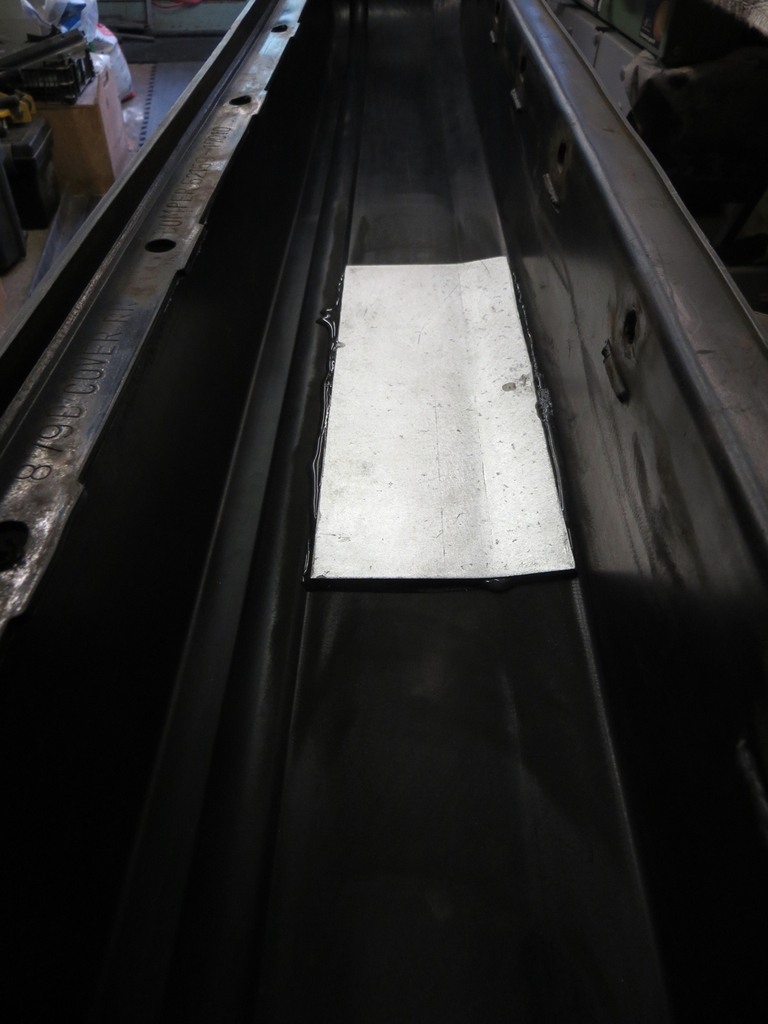 And the face side? Have I actually fixed it?  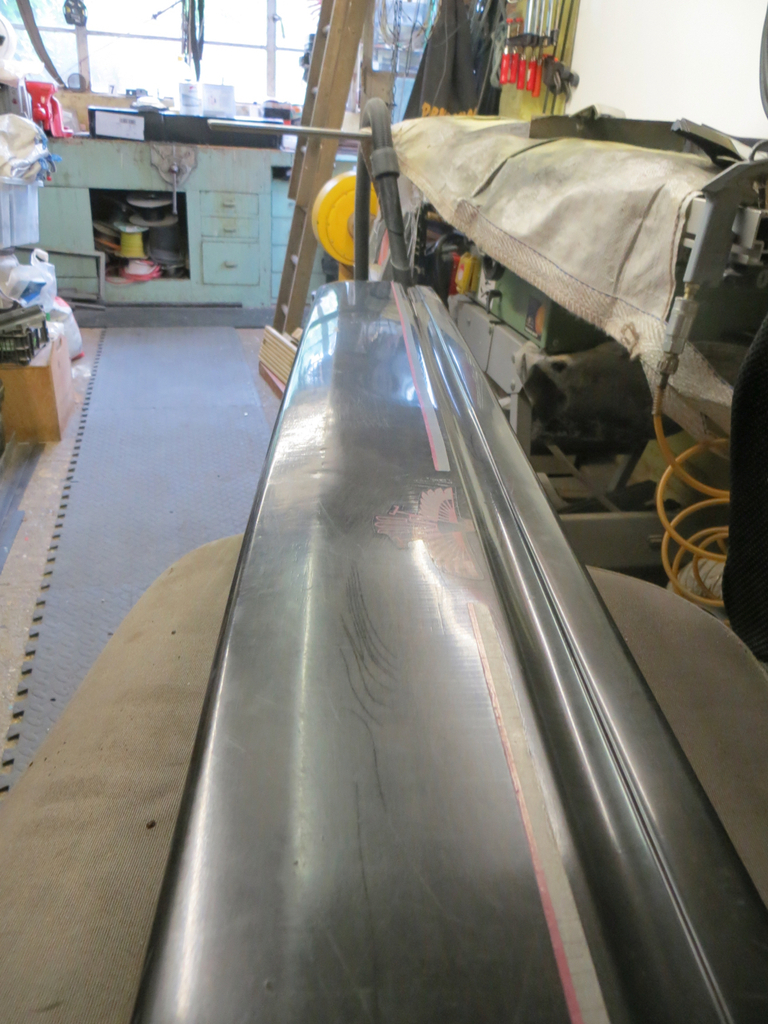 Well it’s not bad. A couple of marks on the crease line from the wood that was clamped against the face side. And the bit of wood against the lower face was oak and, would you believe it, I’ve now got oak grain imprinted in the bumper! Anyway, I’ll leave it alone for a while to see if any if the marks come out. And if not, It’ll be alright when it’s painted. James |
| |
|
|


 I've not looked into it in any great detail but Rawlins appear to sell HMG Nisocoat 2 and Cromadex 800 non-iso paint systems.


