|
|
|
Oct 20, 2020 20:06:48 GMT
|
|
Wire brush in the grinder makes short work of it. But wear all the PPE you can get your mitts on!
I'd pay £140 for panels that actually fit. Fitting this wing has been a relative pleasure.
Who am I kidding? I wouldn't pay £140 but that's 'cos I'm tight and stupid. You are clearly a man of great common sense.
|
| |
|
|
|
|
|
|
|
Oct 20, 2020 20:09:24 GMT
|
This weekend I ‘as mostly been not doing the car. This weekend ‘as mostly been a pain in the botty to be honest. It started off with a plan to work in London on Friday, MOT the ‘posh’ car on Saturday, and have Monday off. Then somebody at work swapped their days round which meant I couldn’t work due to social distancing. That meant Friday was cancelled and now the posh car was booked for the MOT on an inconvenient day. And then the boiler in the East Wing sprung a leak. And and and… The posh car passed but with an advisory for having rusty ferrules on the brake hoses. Having what!? I was being a good citizen and wearing my mask at the time I was told, but I fear the look in my eyes was enough to ask the young MOT chappy “Are totally mad!?” I looked at the ferules on the hoses and they are rusty. But the car is 6 years old and I’d expect them to be rusty. They aren’t in any danger of failing though so I’m not sure why it needed an advisory. I’m a bit concerned about taking the MR2 there if they are that trigger happy with the buttons on their computer. I mean, if it needs to fail I’m happy that it fails. But I could do with a bit of common sense. Anyhoo… The next annoyance. I was sanding the high build primer on part of the skirt and found another crack that was unstable. Damn it Jonathan! I may have misquoted that. Here it is.  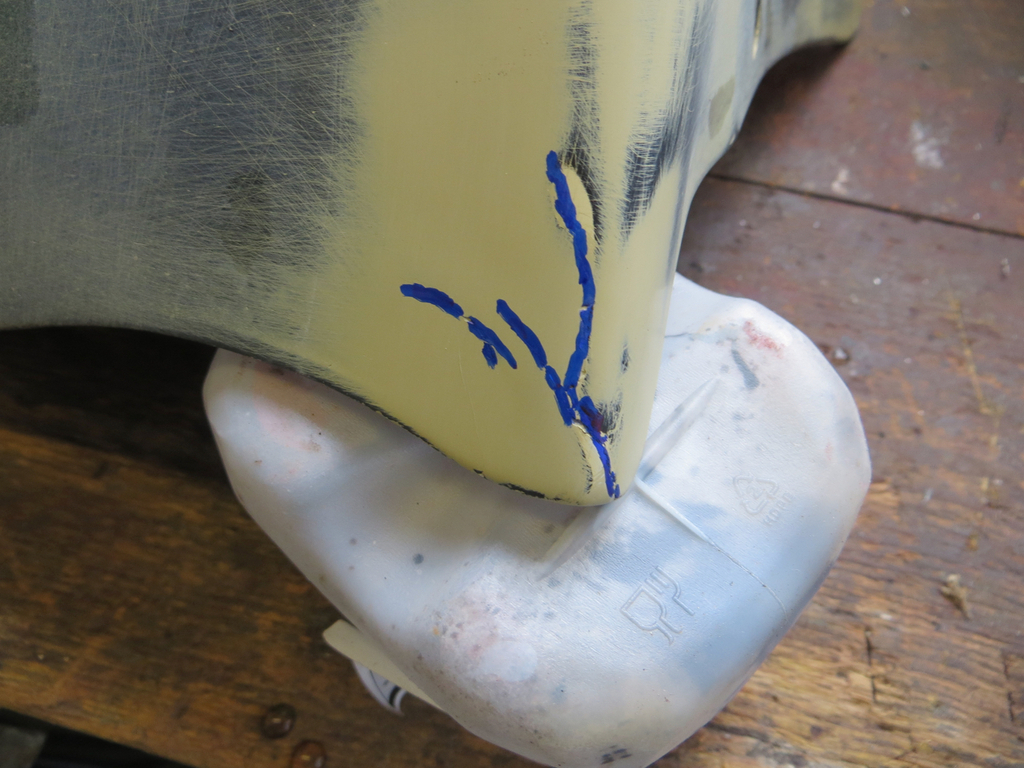 So I did what is now my usual method. Ground out the crack with the cut off tool…  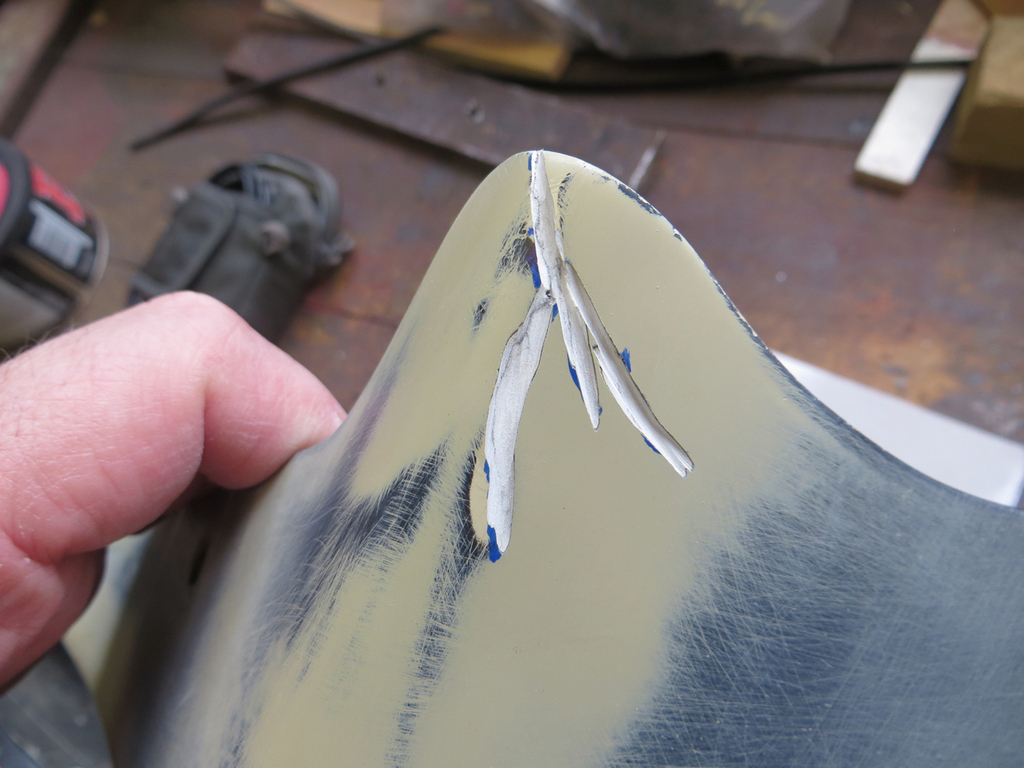 Sanded the back side to clean and key it…  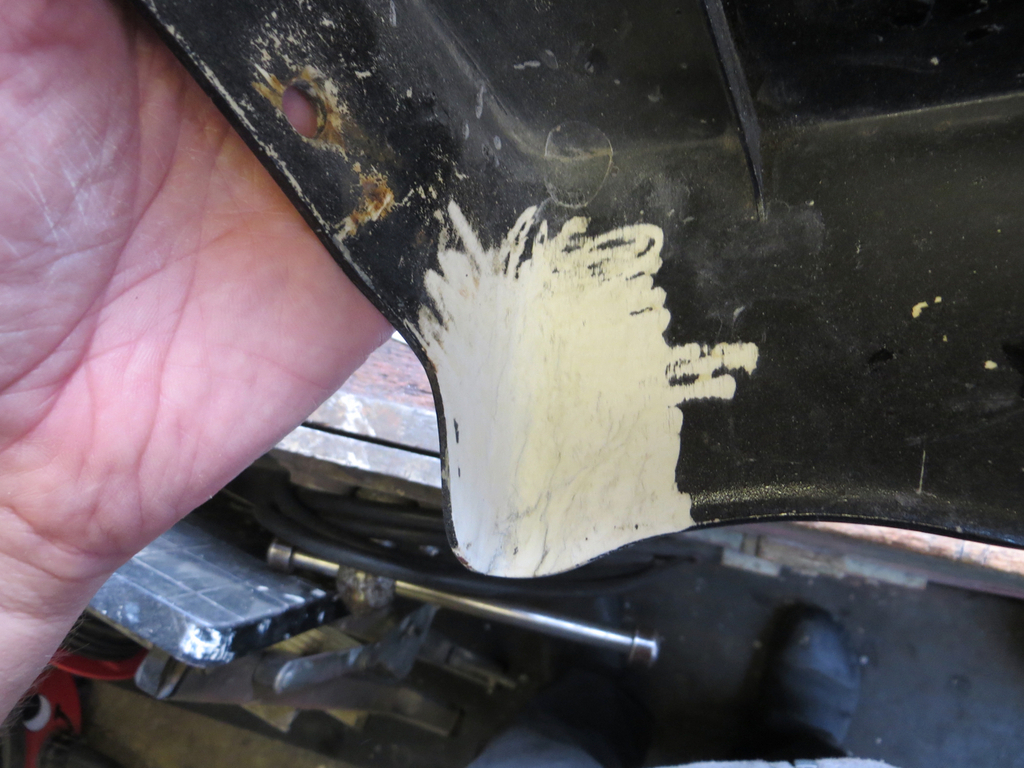 And then ran some resin into the cracks and fibreglassed the back side.  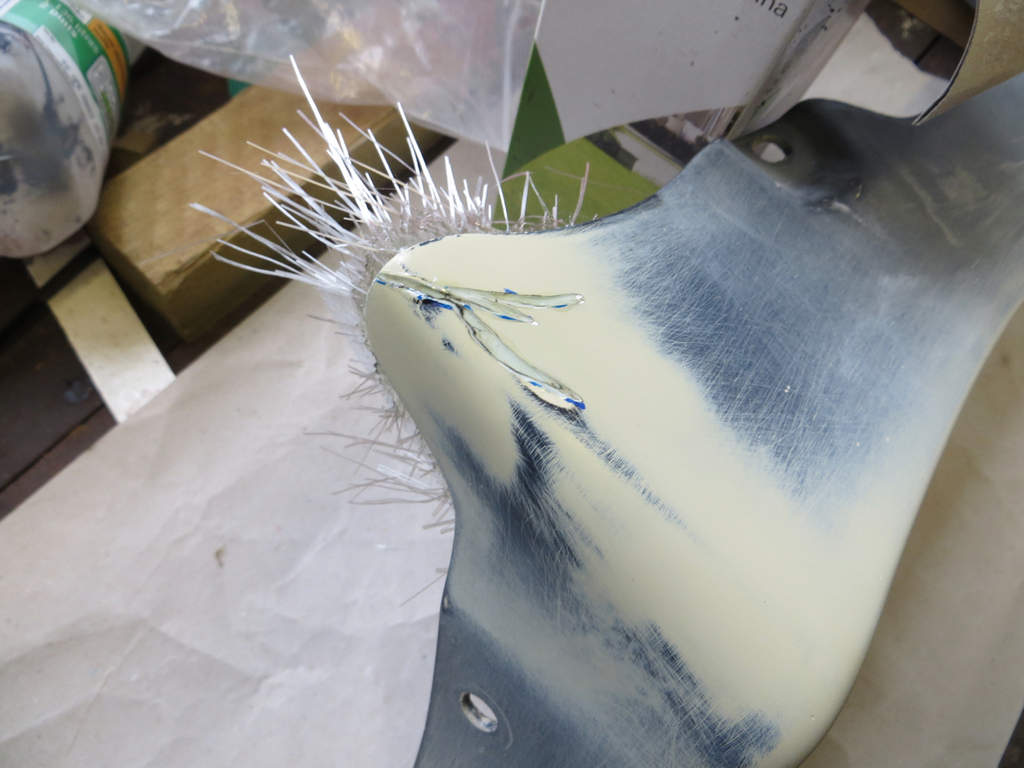 Now… The new wing is off a MK1b car and there are some detail differences between it and my MK1a car. I’d removed some unnecessary brackets but there was a wiring clip on my car that was missing from the MK1b wing. Well frankly, who cares? Not me. So I wasn’t going to bother. But… Well… Oh… I can’t bring myself to not do it properly. Damn it Susan! (Not sure that’s right either.) So I dug the old bit out of the scrap pile, cut the wiring clip off, and welded it to the new wing.  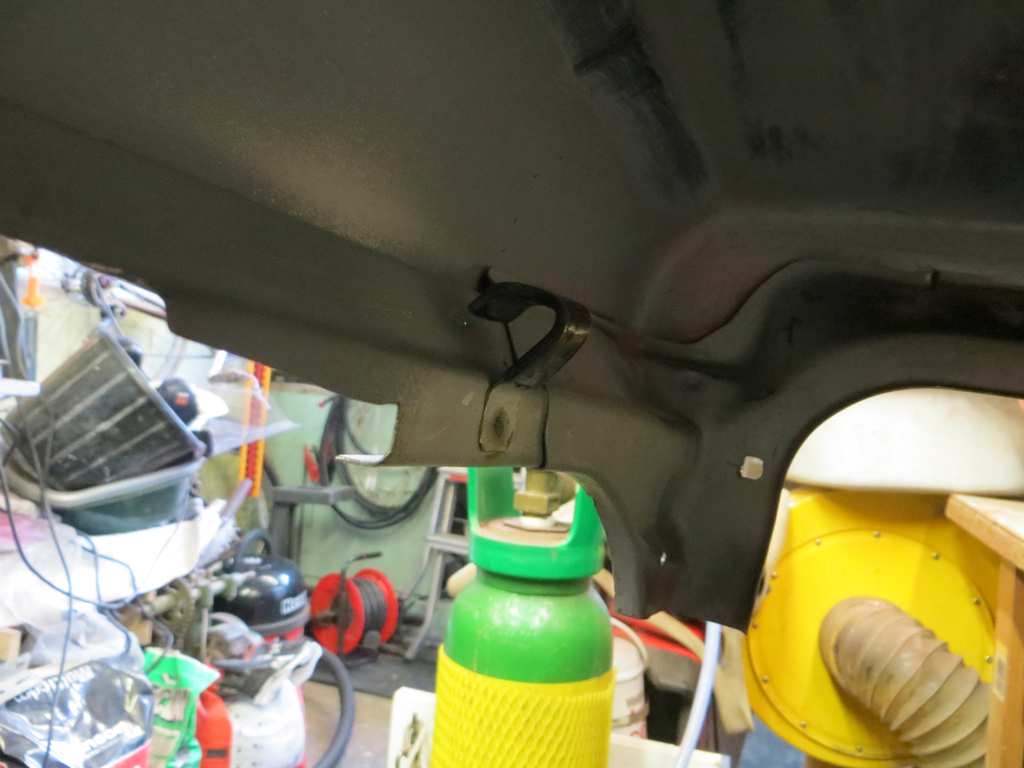 Sorry about the dark photo from underneath the wing. I couldn’t be bothered… Hnnngghh. |
| |
Last Edit: Oct 20, 2020 20:10:33 GMT by Sweetpea
|
|
|
|
|
Oct 23, 2020 13:31:25 GMT
|
|
Is 'damn you Lou' an alternative to Janet?
|
| |
|
|
|
|
|
Oct 23, 2020 19:24:41 GMT
|
Is 'damn you Lou' an alternative to Janet? Damn it Esmeralda! I'd sort of forgotten but now we could go on with all sorts of names forever... |
| |
|
|
|
|
|
Oct 23, 2020 19:45:13 GMT
|
So, Siobhan, what else could I amuse myself with during my mangled weekend? When the previous owner parked the rear wing in a lamp post (or whatever inanimate object they decided to wallop it on) they broke the tail light. I had a shiny new one waiting to go on the car. Except… It wasn’t new or shiny. It was 30 years old and quite dull.  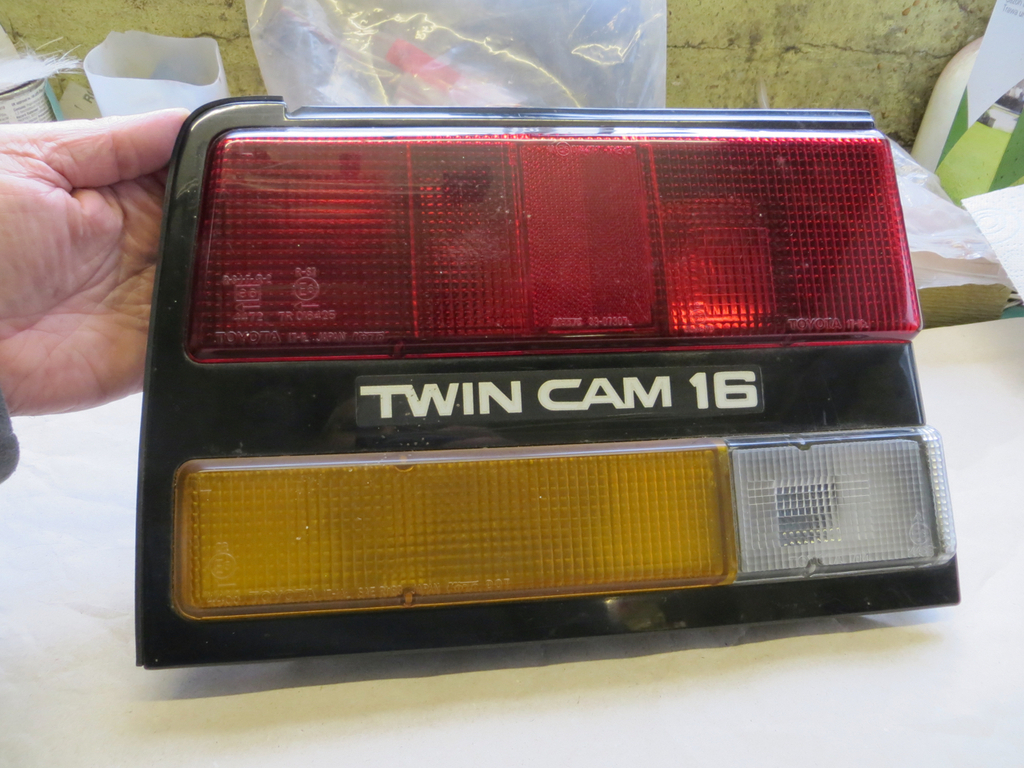 So I polished it. Just by hand. Nothing special.  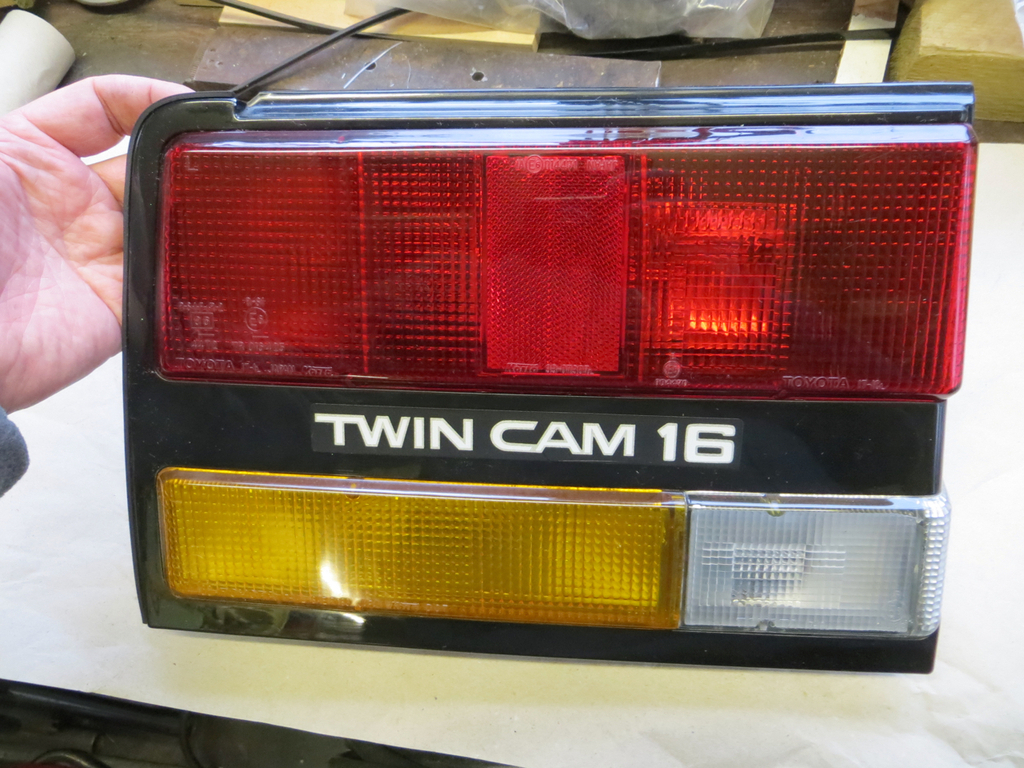 Better! To be honest I did the other side a while back and it has gone a bit dull again. But I’ll keep polishing them and they’ll slowly get better. Then I thought I’d get some filler on the wing in the places I’d repaired.  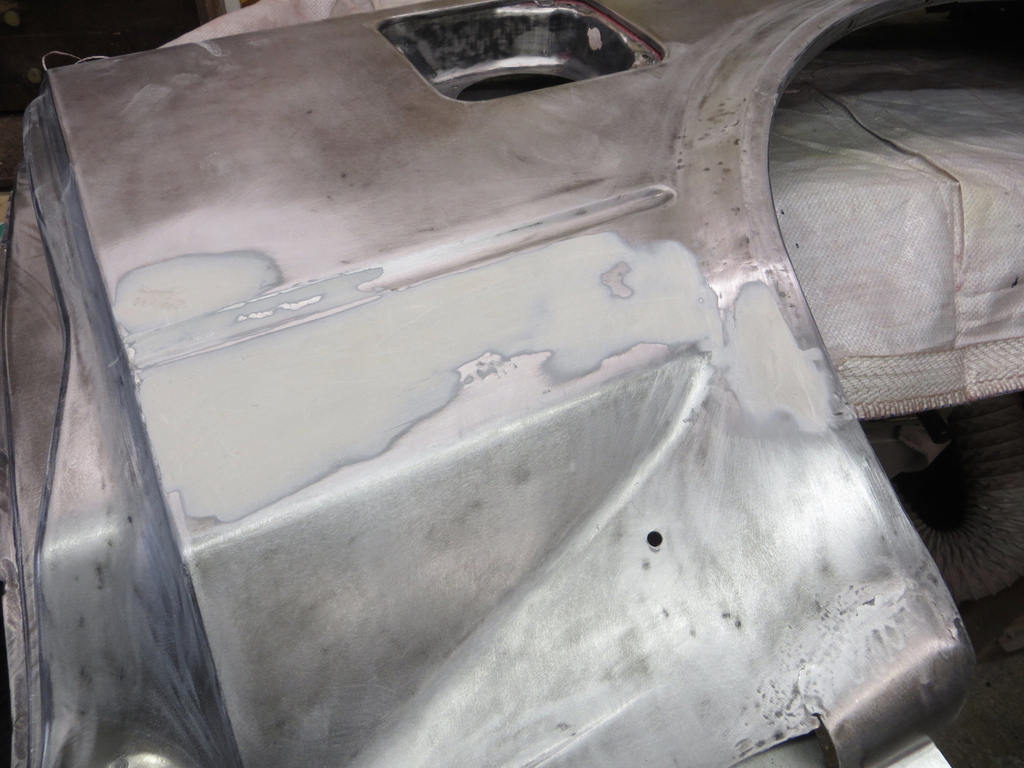 I know everybody recommends that you use filler directly on the metal. Everybody except the people who recommend using filler over primer. I’ve always used filler over primer. Not because I believe it to be better but just because I’ve invariably bunged some paint on the repair to protect it. So this is new territory for me. I had also planned to do this when the wing was on the car but the practicalities are that I’m working outside so it will need painting pretty quick after it goes on. So it’s better that I sort the filler now. In fact I was wondering about painting it off the car and then touching up the weld areas which are mostly hidden anyway. The other thing is that in ‘proper places’ you’d put a skim of filler over the whole panel and then block it off. Well I’m not doing that either because it’s not how it would have been made originally. I want it to look honest, not perfect. Perfect!? Fat chance! Anyhow. Another skim on other parts of the wing… 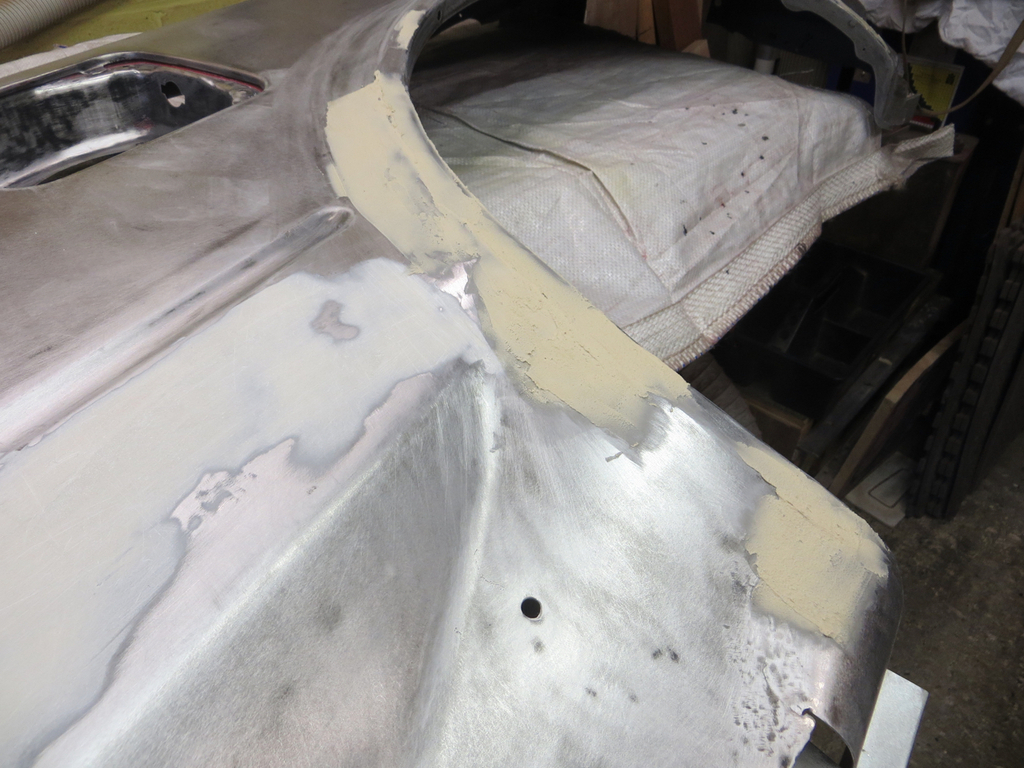 It’s going to take quite a few thin skims before I get it to the point I’m happy with it. Britney |
| |
|
|
|
|
|
Oct 23, 2020 20:10:20 GMT
|
|
if you paint it with epoxy primer before you fit it and touch up the welds it will be waterproof, If you don't have spray equipment it can be rollered or brushed on with a bit of thinning.
|
| |
|
|
|
|
|
Oct 23, 2020 21:09:30 GMT
|
if you paint it with epoxy primer before you fit it and touch up the welds it will be waterproof, If you don't have spray equipment it can be rollered or brushed on with a bit of thinning. Oh... Why'd you have to say that? I have questions. What sort of finish do you get if you roller or brush it? How much sanding would I have to do before top coat? How easy is it to work compared to, say, high build primers? Here's what I'm thinking in the long term. The car needs painting. I want to do it myself because that's the whole ethos of Project Portia. I can't get the car in the garage. I can barely get me in the garage. So I'll have to do it outdoors. So 2K paint is out, both for safety and because I need it to flash off really quick or it'll be full of flies. So it'll be cellulose, which is likely what it was painted with originally. Maybe? Equipment... I have a compressor and a cheap spray gun. But I wouldn't want to paint the car with it. Apart from anything else I'd need to make significant investment into water traps and so on. Probably a bigger compressor too. So I'm thinking of getting an HVLP turbine rig. And a tent to work in. But all this is for the future when I'm ready to actually paint the damn thing. Which leaves me with a wing and a front bumper that need something to tide them over until proper painting is on the cards. The plan is to fill it, prime it, and paint it with rattle cans. Good enough to make it passable for a couple of years. I know epoxy would be the sensible primer - especially as it's not getting a 2K top coat. But blowing it over with etch is easier... Hmmm. You may be changing my plans. |
| |
|
|
Rich
Club Retro Rides Member
Posts: 6,327  Club RR Member Number: 160
|
|
Oct 23, 2020 21:40:35 GMT
|
if you paint it with epoxy primer before you fit it and touch up the welds it will be waterproof, If you don't have spray equipment it can be rollered or brushed on with a bit of thinning. Oh... Why'd you have to say that? I have questions. What sort of finish do you get if you roller or brush it? How much sanding would I have to do before top coat? How easy is it to work compared to, say, high build primers? Here's what I'm thinking in the long term. The car needs painting. I want to do it myself because that's the whole ethos of Project Portia. I can't get the car in the garage. I can barely get me in the garage. So I'll have to do it outdoors. So 2K paint is out, both for safety and because I need it to flash off really quick or it'll be full of flies. So it'll be cellulose, which is likely what it was painted with originally. Maybe? Equipment... I have a compressor and a cheap spray gun. But I wouldn't want to paint the car with it. Apart from anything else I'd need to make significant investment into water traps and so on. Probably a bigger compressor too. So I'm thinking of getting an HVLP turbine rig. And a tent to work in. But all this is for the future when I'm ready to actually paint the damn thing. Which leaves me with a wing and a front bumper that need something to tide them over until proper painting is on the cards. The plan is to fill it, prime it, and paint it with rattle cans. Good enough to make it passable for a couple of years. I know epoxy would be the sensible primer - especially as it's not getting a 2K top coat. But blowing it over with etch is easier... Hmmm. You may be changing my plans. You can spray epoxy thinners with a cheap model airbrush. Quiet, very low overspray and very little cleaning. (Paint doesn’t pass through anything complicated or mechanical like a regular gun so cleanup is a few minutes with gun wash) you could definitely get away with doing it outside on an airline or even in the garage well ventilated as the overspray is near none. I’ve been using a little plastic ‘badger’ brand one to spot prime my Mazda, works a lot better than I was expecting. Food for thought. |
| |
Last Edit: Oct 23, 2020 21:41:50 GMT by Rich
|
|
|
|
|
Oct 23, 2020 21:47:22 GMT
|
Does this help? filler over bare metal(it had a wheelarch panel fitted, badly), and roughed out: ![]()  Lechler Green Ti filler primer, 2 coats applied with a roller:  blocked, grey aerosol primer over the stopper, masked and ready to paint:  2 coats of direct gloss 2k Henley blue:  Painted with a £25 HVLP touchup gun off a tired 50l compressor. That was taken just after I put the gun down, the finish flowed out so it was no worse than the original 25 year old paint. I struggled for ages with cellulose paints, switching to 2-pack was like somebody else who knew what they were doing had done the work. |
| |
|
|
teaboy
Posted a lot
   Make tea, not war.
Posts: 2,122
|
|
|
|
|
I don’t know for sure but I’m going to say that it’s highly unlikely that Toyota were using cellulose paint when your car was built.
|
| |
|
|
|
|
|
Oct 24, 2020 17:26:50 GMT
|
Rich I've got an airbrush and wondered about using it to do touch up work. But spray cans have always been more convenient. nickwheeler , thanks for posting that. It certainly gives me something to think about. With respect to the roller anyway... I'm just not comfortable with the idea of spraying 2K on the drive! teaboy , the idea that it may have been celly comes from a conversation with the painter who fixed my mid 80's Corolla when I stuffed it in about 1990. I'm sure he said "spraying metallics used to be a skilled job but with these new cellulose paints any idiot can do it. The only skill is getting the clear coat on nicely." Now that's, er, loads of years ago so I could have remembered it wrong. Or it may be that they used celly for repairs but not in the factory. If I'm honest, the whole subject of car paint confuses the hell out of me. I keep thinking it must be simple, go and research it and get even more confused. James
|
| |
|
|
|
|
|
Oct 24, 2020 17:40:18 GMT
|
In the mean time, have some more rust... Raquel pointed out that there was a nasty rust spot in the back of the boot floor. This one.  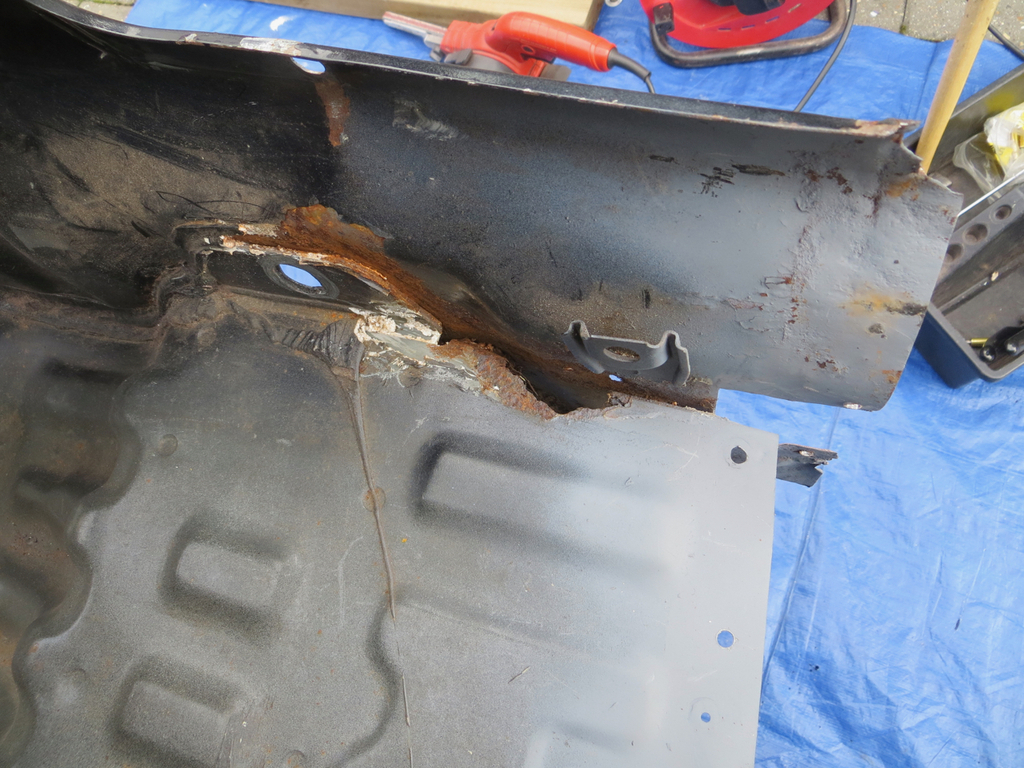 And Abigail said that it’d be easier to repair it before I buzzed the wing on. So I made a patch.  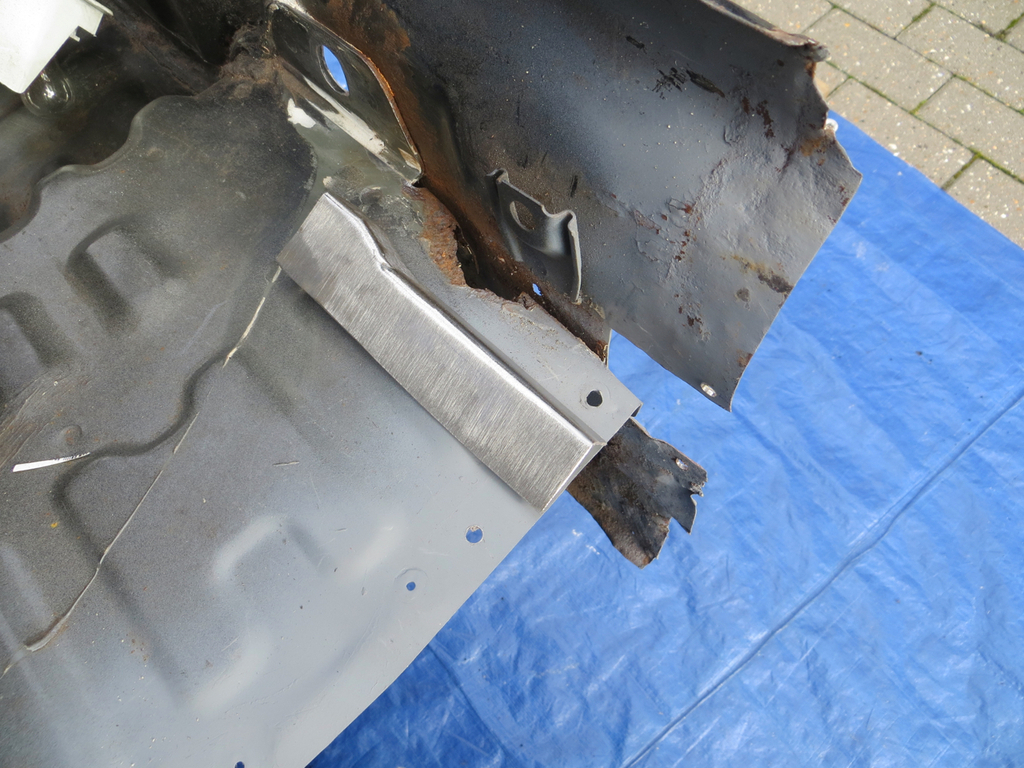 The back panel I’ll do from the outside later so I can match it with the wing.  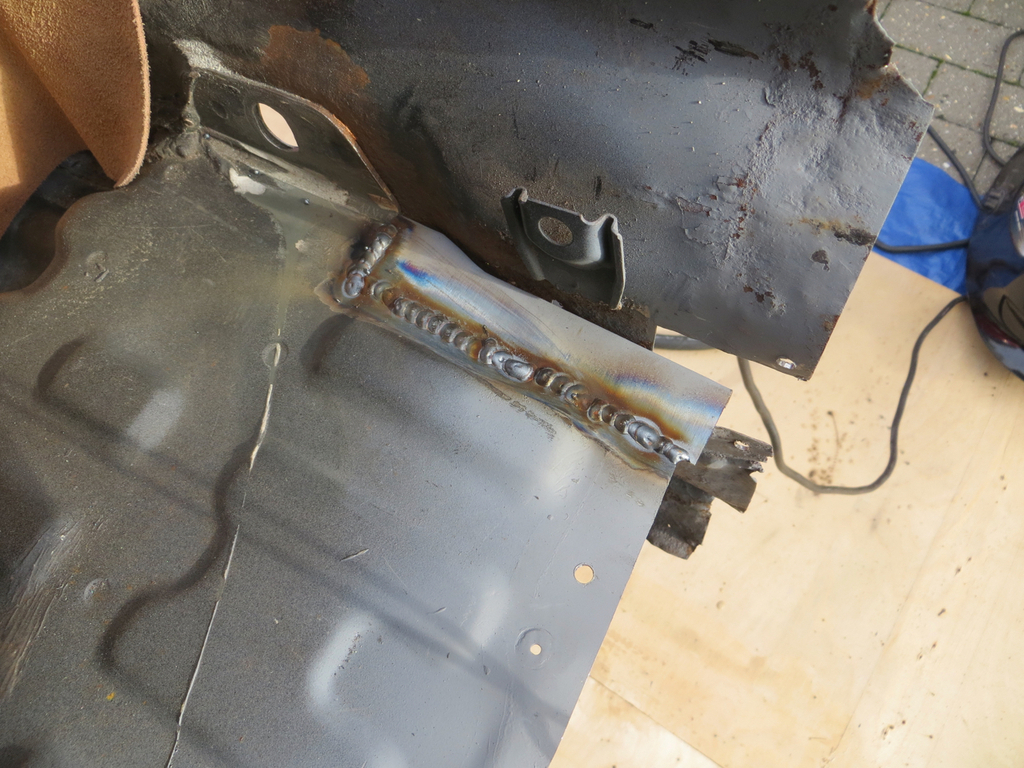 I think I’m finally getting the hang of this welding malarkey. Delilah was almost complimentary about that bit.  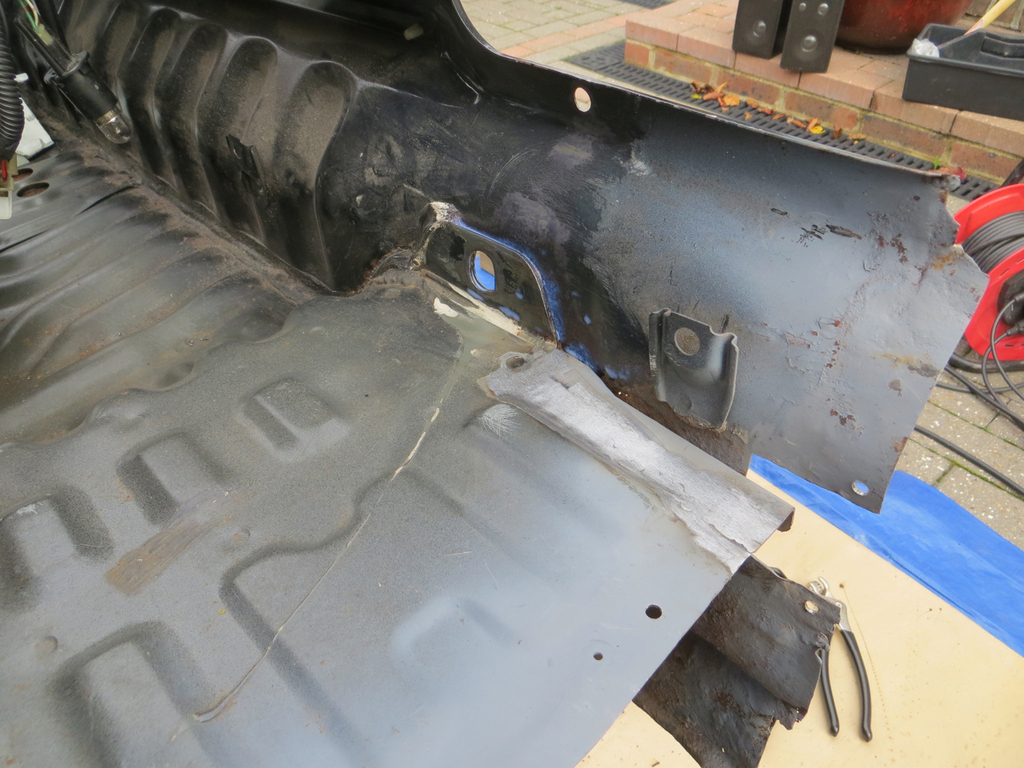 So I did the only sensible thing and hid it. Even though I’ll probably cut a fair bit of the back panel out and replace it I’ve bunged some Hydrate 80 on it just to kill the rust. It looked horrid around that bumper mounting hole but it’s cleaned up nicely. First time in history I’ve attacked some rust and it turned out better than it looked. Blew some primer on it.  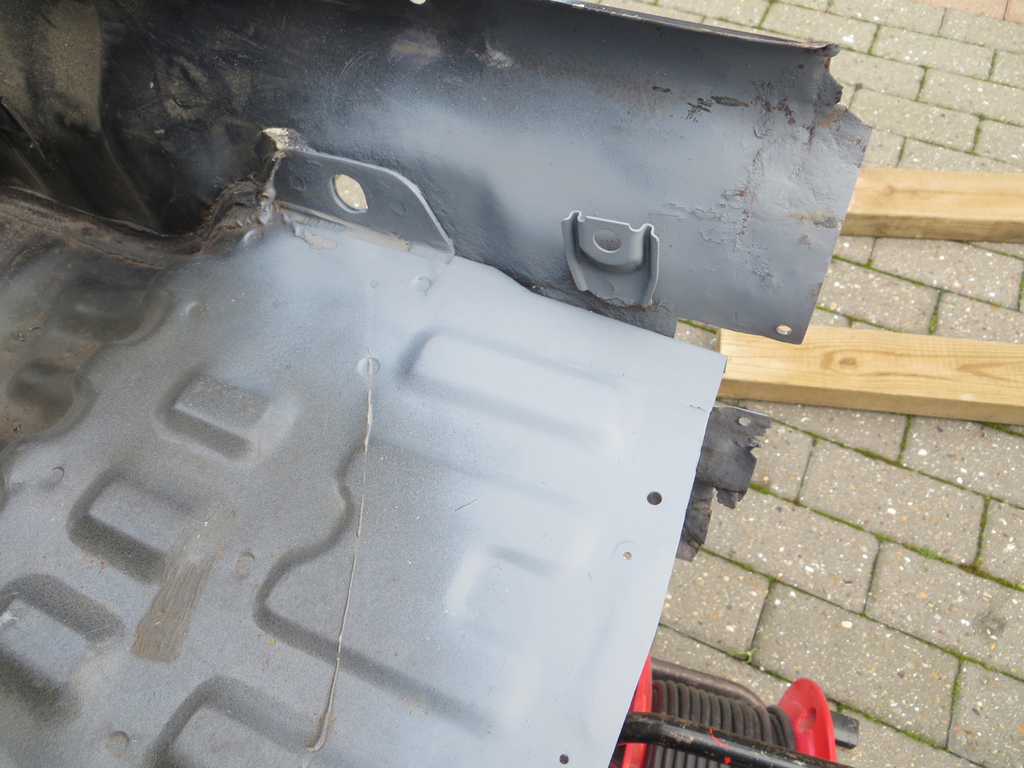 So, Felicity, can I weld this wing on now? |
| |
|
|
|
|
|
Oct 24, 2020 18:09:31 GMT
|
|
Ref epoxy primer, use about 30% thinner and work quickly, I used gloss rollers and the finish was a slight orange peel, it is pretty hard once it has cured for a couple of weeks but does sand back to a nice smooth surface which is impervious to water and doesen't sink. If you have a compressor and gun I would wait for a dry day and spray it in the garden.
|
| |
Last Edit: Oct 24, 2020 19:26:34 GMT by kevins
|
|
e30ben
Part of things
 
Posts: 71
|
|
Oct 24, 2020 19:19:26 GMT
|
|
Ref the filler on bare metal, when I worked in a Bodyshop I was told if you prime then fill prep prime and paint you would see the ring mark where the repair was made. That was 20 years ago so maybe totally different know....
2 pack paint can be used with something called rocket hardener..,, you have to be damn quick to go to the job and at least strip the Spray gun and chuck in a bucket of gun wash but it is close to touch dry VERY quickly... may help keep the flies off wet paint if it’s already skimmed off. Before they land on it...,, one job I did didn’t have rocket used and a spider danced across it, left dimples in the paint but Wet flatted out just..
|
| |
|
|
|
|
|
Oct 25, 2020 12:40:55 GMT
|
Thanks chaps! I'm just not comfortable (speaking and a total numpty) spraying 2K paint. Maybe I should look into non-isocyanate paints and confuse myself even more. I'm not sure how nasty they are compared to cellulose. Ref the filler on bare metal, when I worked in a Bodyshop I was told if you prime then fill prep prime and paint you would see the ring mark where the repair was made. That was 20 years ago so maybe totally different know.... Interesting. A mate at work pointed me at this chap... www.youtube.com/channel/UCB8HF8Pqug-Pc7DFqX9lf_g/videosHe's quite watchable and knows more than I do so I've been watching... Anyway, he was talking about the shrinkage that happens with fillers and repairs that show through. He was suggesting that a lot of that is down to people having to work quickly (especially in commercial work). But if you but the filler on and wait before sanding it, it will have done the shrinkage before the paint goes on and then not show through. (He also says to get rid of all the curse word old paint before starting with filler.) But I do remember exactly those problems when I was a kid. I always put it down to not knowing what I was doing. Speaking of filler... I'm getting really annoyed with the P38 I'm using. It's curing really quickly is isn't giving me any work time. I'm not sure if it's gone off (it could be a couple of years old) or if it's just curse word. It's about 30 years since I seriously played with body filler and that was just to bung up rust holes. What I'm trying to do now is in a different league to what I did then. James |
| |
|
|
|
|
|
Oct 25, 2020 16:10:35 GMT
|
Can I buzz the wing on then? No. No I can’t. More little jobs to do. When I peeled the replacement wing apart (which is off a MK1b) I found a piece of strengthening that isn’t fitted to my earlier car. Since I’ve got it, well I’ve got a significant length of it, I might as well weld it on my car. It’s this black bit.  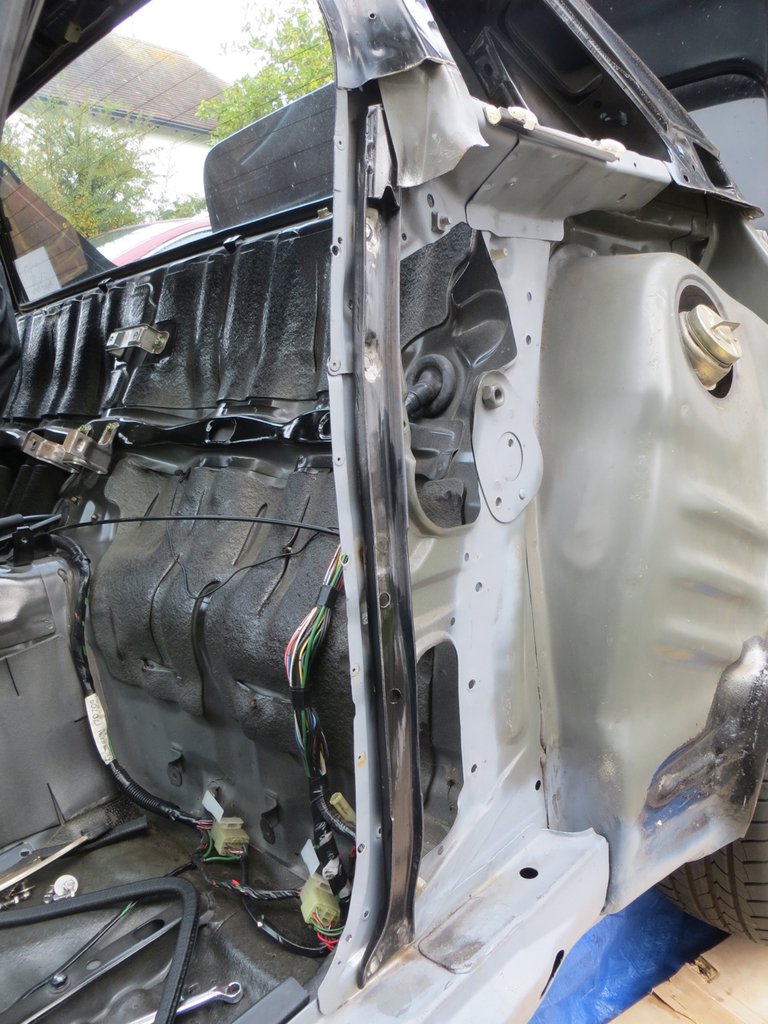 Originally it would have run right up the B pillar to the roof. But even the bottom part of it does add a fair but of strength to the bottom half of the pillar. I don’t mind admitting that I mucked up initially. From the factory it was spot welded to the car so I plug welded it. Then I gave it a good tug and it fell off the car! Somehow I’d managed to fill all four plug holes without penetrating into the cars metal work at all. I doubt if I could do that again if I was trying to. My error was that I still had the welder on a low power. So I drilled the holes out and did it again. Oops. Lesson learned. Well, until I forget and do it again. So then I painted it black so it looks pretty.  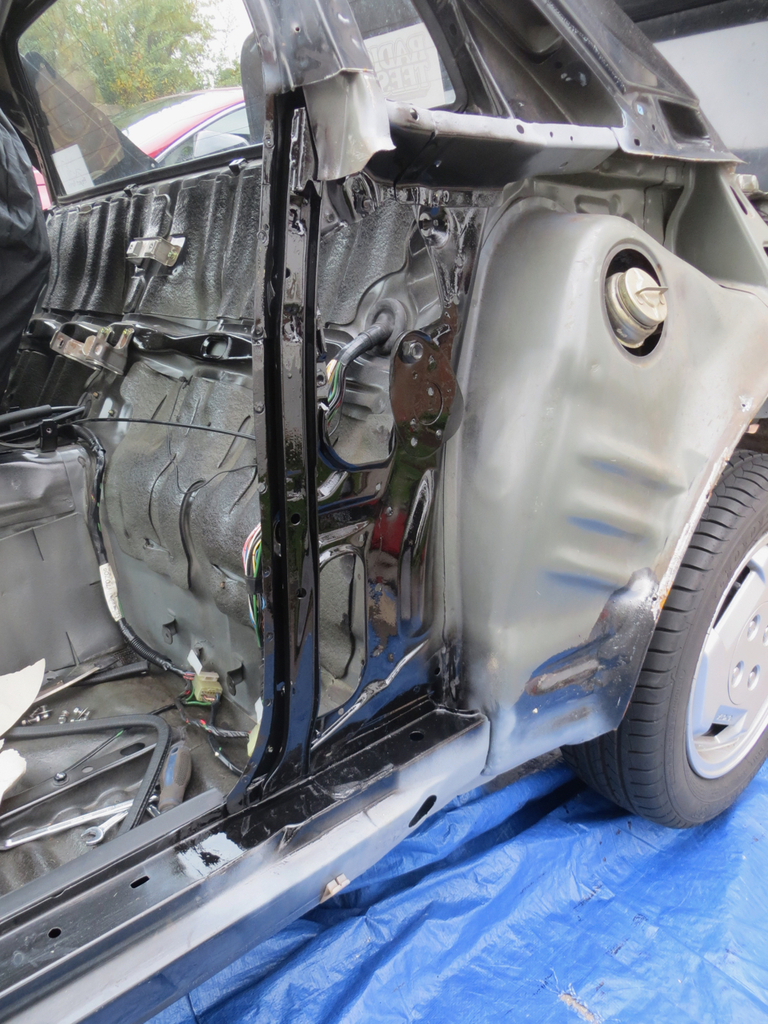 It’s important that it looks pretty even though it’ll never be seen. Then I bolted the remains of the B pillar back in so I could shut the door. I was sitting looking at it and I had an epiphany. A moment if great clarity. A moment of realisation. You see… The MR2 suffers recurrent rust in the lower leading edge of the rear wing. So clearly water is getting in and not getting out. Chief suspect would be the rear sun roof drains.  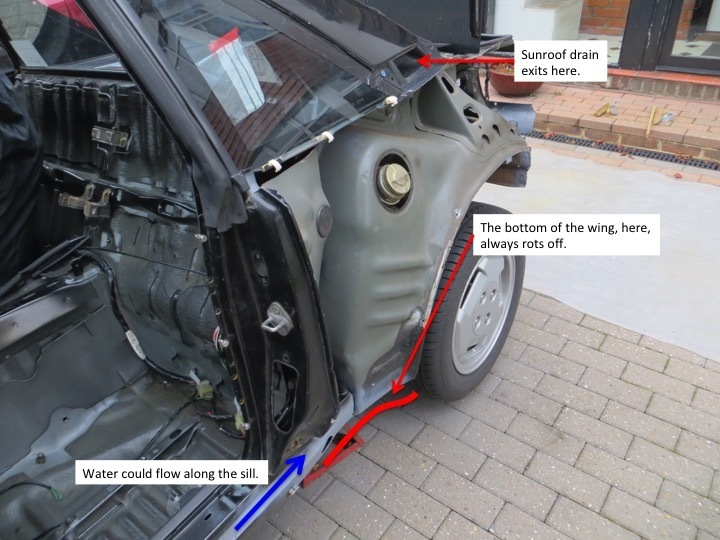 But the rear sunroof drains exit higher up through a vent at the bottom of the C pillars. I have to admit that annoys me because it leaves water marks down the wing. So where does the water get in? Well the only other possibility is that it runs down the length of the sill. But in significant quantities!? Well, this is what I realised.  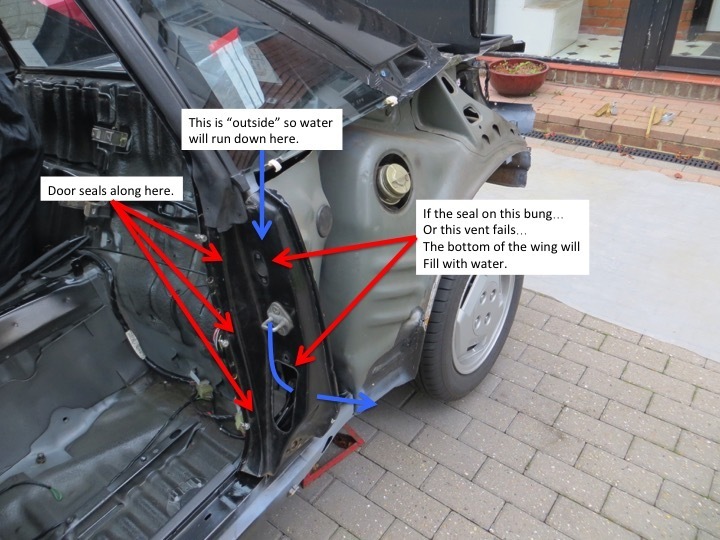 The door seal is on the inside edge of the door shut. The latch area is ‘outside’ the car and water can, and will, run through that area. There is a bung in the top of the door shut and a huge vent in the bottom. If either of those seals fail water will drop right into that rear wing area. In fact when I initially MOTd the car I had a problem where there was rust around the double skinned area by the door latch. Which rather suggested that water was running past that area down the inside of the B pillar. So… I’ll be making sure that the seals on both those holes are in good nick. And I’ll need a drain hole in the bottom of the wing. James |
| |
|
|
|
|
|
Oct 26, 2020 19:09:18 GMT
|
I know how you like it when I do something completely potty. Here’s another one of those moments. Let’s call this episode “Sweetpea and the English Sproket - One mans fight with a dumb idea”. That piece I made for the bottom of the wing…  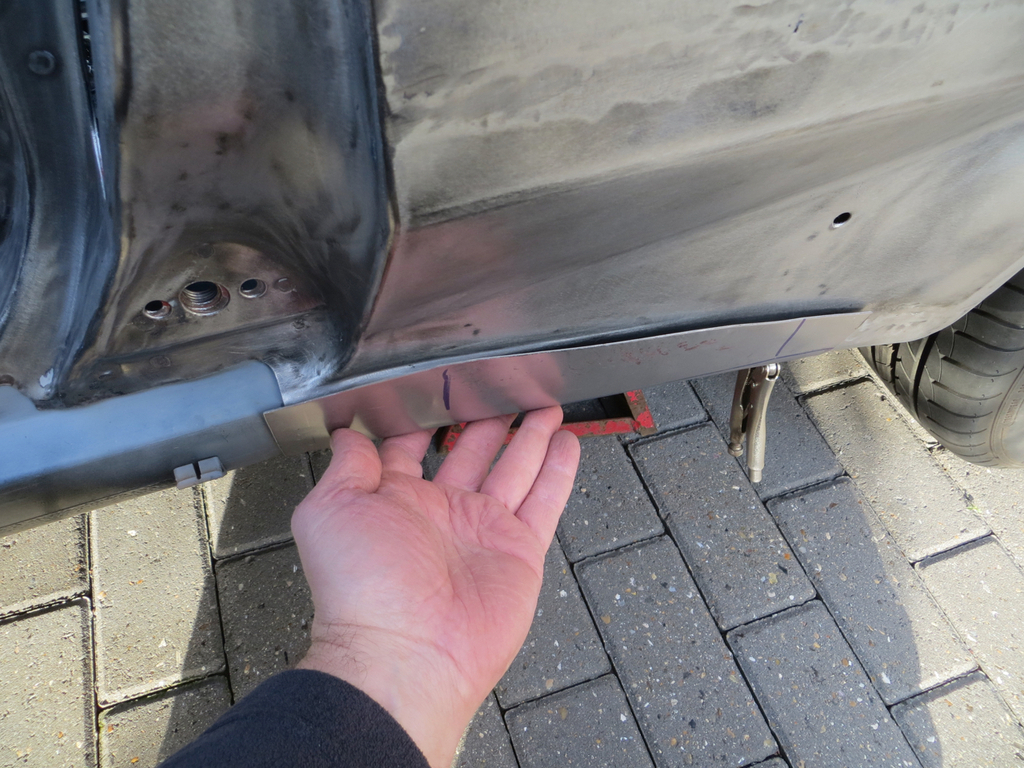 See that top edge where it meets the wing? Looks good doesn’t it? Well I cut it to fit the hole and that edge was miles out. Too far out from the wing. Ok. Just tap the edge down until the gap closes up. There’s an interesting thing I’ve learned with metal shaping. Sometimes you give your patch a couple of thumps with the first hammer that comes to hand over the first bit of grotty wood you find on the bench and it just works. It just moves the way you want it to move. And sometimes it doesn’t do that. Sometimes the simplest things become a total fight and you eventually run out of tools, patience, or ideas. Or, more frequently, all three. This was one of those times. No matter how much I hit it, pushed it, bent it, cajoled it, and swore hit it I couldn’t get the gap to close up. All I was achieving was to fill the patch with hammer marks and dents. In fact I was so busy getting frustrated with it that I didn’t even take any photos. What I needed was to roll it through an English Wheel. I have no idea why I thought that. It was just a feeling. I mean, I’ve never even used an English Wheel so I don’t know what I could do with one. If I’m being factually accurate I’ve never even seen one in real life. But it felt like a good idea. Anyway, it was out of the question. I don’t have one, can’t afford one, and have nowhere to put one. You know how it goes when you are shopping on the internet? You want 4 little casters with hard plastic wheels. You see a nice picture. You buy them and get one flippin’ great big one. You know how it is when you can’t throw anything away? You turn two broken wheely bags into one working wheely bag and wind up with a spare hard rubber wheel lying around the garage. Oh, hang on. One hard wheel with a convex surface and one smaller rubber wheel to press against it… That’s a bit like… An English Wheel… I know they don’t normally have a rubber wheel but it is a configuration that’s used on them. Could I build one? Try it out? See what happens? It’s only going to take a couple of hours. And it’s raining outside. What have I got to lose? Apart from my dignity and any respect you lot may have for me… So apart from dignity and respect, what have I got to lose? Right…  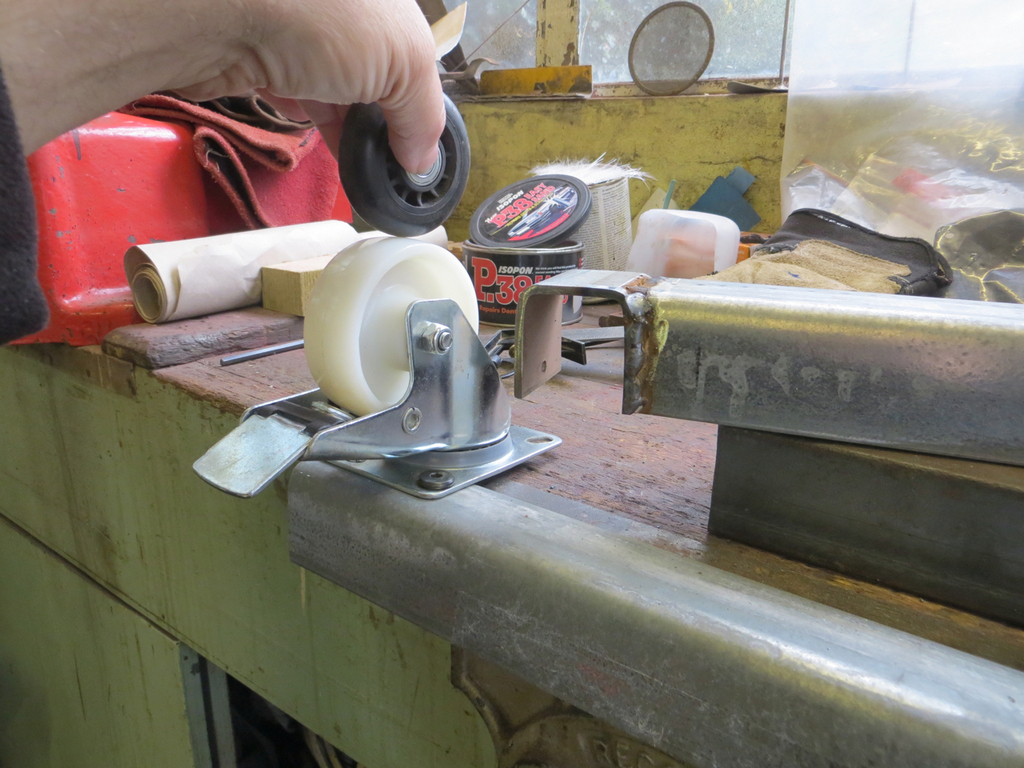 See what I’m thinking? A couple of hours later…  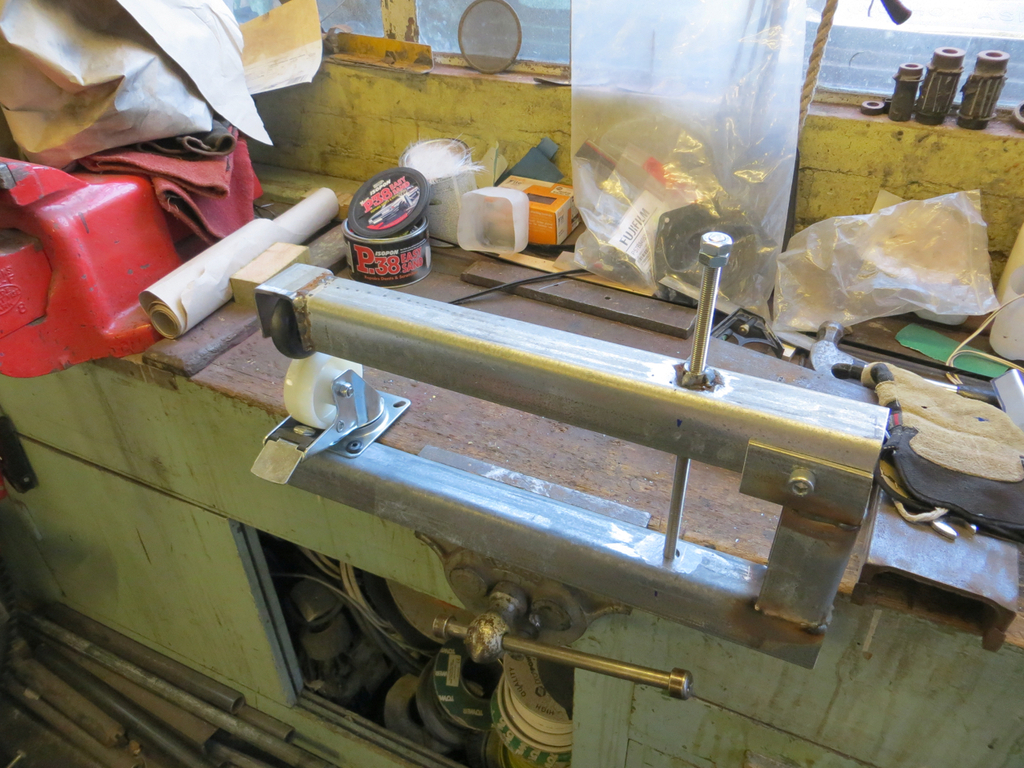 Can’t really suggest it’s an English Wheel ‘cos it’s clearly rubbish. Let’s call it an “English Sprocket”. The top rail is hinged at the right hand end. I used two bits of channel at the hinge and left the bottom one fairly long to try and stop them twisting. The threaded rod is tightened to create a clamping force. Yeah, it’s a bit flexible but not as bad as you’d think. You can get a surprising amount of pinching pressure at the wheels. The work piece goes, well, where you’d expect it to go.  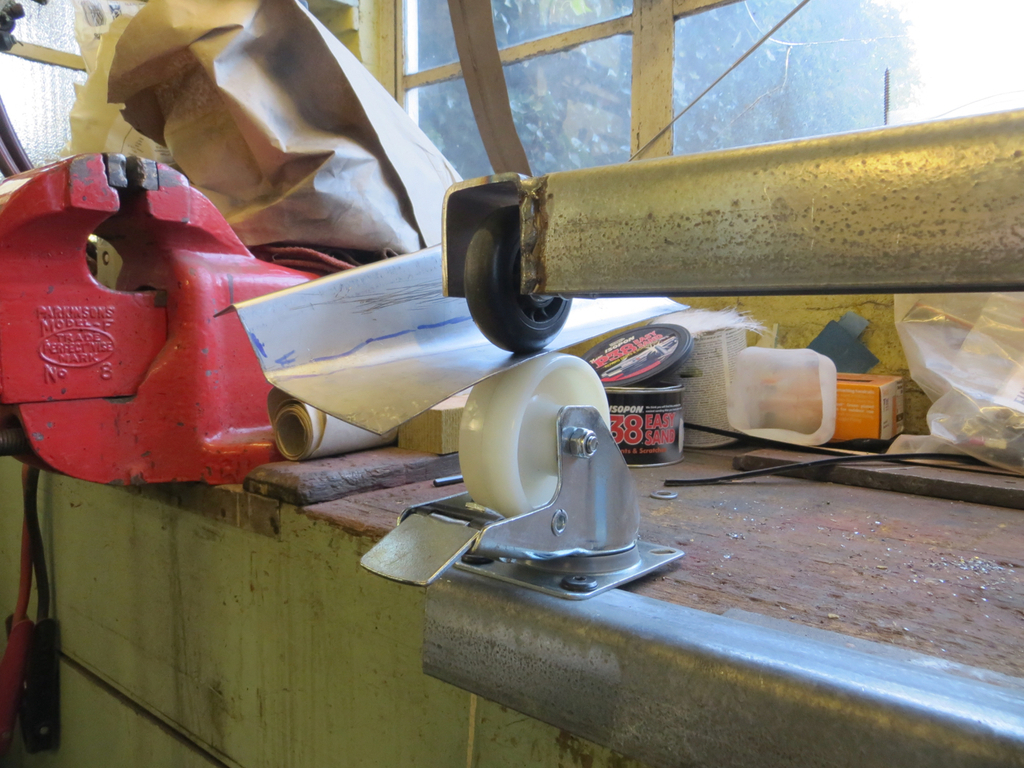 The question is… Does it actually work? The answer is… Maybe. (Which, when you think about it, is a good deal better than a flat “no”.) It didn’t do what I wanted it to do. But then I was probably being overly optimistic thinking it would solve all my problems. It is definitely capable of moving metal around though. It can put curves into things and a bit of wheeling did remove some of the hammer dents I’d put in the patch. It smoothed this out quite nicely.  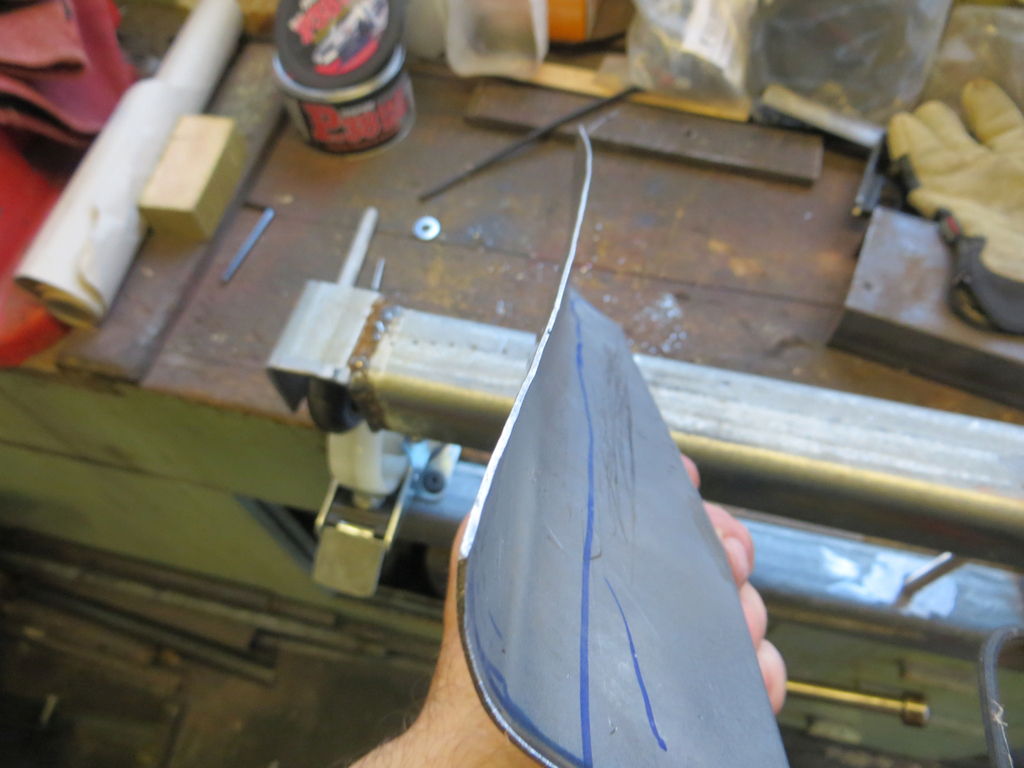 However, an English Wheel is used to create compound curves by thinning and stretching the metal in the centre of a panel and I’m not sure if it’s capable of doing that. I think it might work better if I flatten the face of the top rubber wheel or use something a bit broader. I think it would push the work over the CROWN in the caster a little more making it more effective. Or possibly not. Who can tell? So, on balance, it was a stupid idea that didn’t do what I wanted it to do. But it’s definitely not in the scrap pile, I think it might turn out to be a useful tool. The jury has most definitely not returned with a verdict yet… James |
| |
|
|
|
|
|
Oct 26, 2020 19:28:10 GMT
|
|
A few years ago I read an article (can’t remember where) about a guy restoring a car with a dented roof (can’t remember what car). He made a device very similar to yours to get the dents out of the roof. He did use proper dies though and it worked a treat. I do remember he was a pilot for some reason (though I may have imagined that bit).
|
| |
|
|
|
|
|
Oct 27, 2020 14:10:14 GMT
|
|
Wow this got serious pretty quick - panels off and MR2 skeletons on show ready for the 31st!
Talking of skeletons and possibly closets, who are all these ladies helping you? You got a WI meeting going off in your garage?
I've often wondered about the order of filler and primer too. I've always put filler direct to metal but I too often wondered if, done properly, you could apply it on top of well applied primer.
I guess the bad experiences i've had have been when i've sprayed any old primer on, and it has gone over a bigger area than the smaller area I had cleaned. The filler then sticks to the primer, which isn't stuck as well to the metal as etch primer would be, plus i've probably applied filler to dirty areas whilst not remembering the primered area wasn't a guide to the size of the cleaned area in the first place.
I too have used model airbrushes to do smart repairs after i watched a Chips Away man. Get a rattle can, spray into the lid, and pour that into the airbrush. I also wouldn't have any problem using a small gun and a small compressor to do a panel. Maybe not a whole car but a panel is more than possible. Again watching a Chips Away man.
I watched next door paint his Escort on the driveway. He used Cellulose and it looked good but for some reason he wasn't happy. He then used 2k rightly or wrongly. The difference was amazing. The deep shine and gloss made the colour pop way more than the cellulose. It smelt, and it made our shed shiny, but it polished up so well. Any marks or flies buffed out with a mop, as the paint was harder so there wasn't as much danger of burning through.
You could get a good mask and an old gazebo and give it ago. I know 2k has a bit of a bad health image, but people like Eastwood now sell 2k rattle cans where you pull a plunger in the base of the can to mix the paint before spraying. If 2k was that bad and was going to be outlawed that much, they wouldn't produce that can.
I agree though, paint and all the terminology is mind boggling. I got so confused just painting under my car, and it took alot of working out.
|
| |
Last Edit: Oct 27, 2020 14:12:02 GMT by toast00
|
|
briang
Part of things
 
Posts: 83 
|
|
Oct 27, 2020 21:53:41 GMT
|
|
When I peeled the replacement wing apart (which is off a MK1b) I found a piece of strengthening that isn’t fitted to my earlier car. Since I’ve got it, well I’ve got a significant length of it, I might as well weld it on my car.
Did the replacement wing come off a T-Bar? Perhaps the extra metal was to strengthen the car after MrT cut off the roof. As you say , might as well use it..
|
| |
|
|


