bstardchild
Club Retro Rides Member
Posts: 14,965
Club RR Member Number: 71
|
|
Sept 21, 2020 22:18:00 GMT
|
I continuously welded into the panel and then plug welded the lower seam where it was originally spot welded. His interpretation was that the seam should be continuous He was wrong when you mentioned it at the time and it is still wrong now. I'd just about gotten over being annoyed about it and you've gone and brought it up again! I agree Replace whole panel in it's complete form and you can replicate the original weld method Replace a section of a panel and all of it needs to be continuously welded wherever it's attached |
| |
|
|
|
|
mk2cossie
Club Retro Rides Member
Posts: 3,058  Club RR Member Number: 77
|
|
Sept 21, 2020 22:22:17 GMT
|
He was wrong when you mentioned it at the time and it is still wrong now. I'd just about gotten over being annoyed about it and you've gone and brought it up again! I agree Replace whole panel in it's complete form and you can replicate the original weld method Replace a section of a panel and all of it needs to be continuously welded wherever it's attached Yup, thats the one. Even says so in the manual I believe. Certainly told that was acceptable back when us testers used to go on refresher courses! |
| |
|
|
|
|
|
Sept 22, 2020 19:44:59 GMT
|
Yeah, well this was exactly the problem. "Replace a section of a panel and all of it needs to be continuously welded wherever it's attached"So when I replaced a the lower part of the wing it has to be "continuously welded wherever it's attached". It doesn't say "except where it was spot welded originally" so, following the rules to the letter, I have to weld across the bottom of the spot weld seam. When I put the wing back on I'll plug weld it because I'm replacing a whole panel. Ohh except... I need to replace the bottom section in front of the arch. So if I plug weld the wing on and then do the repair I'd have to weld across the spot weld seam. However if I repair the panel first and then weld it to the car I don't need to weld across the spot weld seam??? If anybody asks I did the latter!  Yeah it's a nonsense. But actually I trust the bloke who MOTs it. He's good and fair and has an interest in the car. He'll let me know if he spots something that's not directly related to the MOT. So I'll take this on the chin and let it slip. More over he only spotted the repairs originally because I'd left them obvious. I'll finish the job in future so he won't see them so easily! James |
| |
|
|
|
|
|
Sept 23, 2020 19:19:25 GMT
|
Looks like fate has solved my problem there. The MOT business I used has gone. I'm guessing COVID made it untenable. Shame really. And now I need to find another MOT place in town.  |
| |
|
|
|
|
|
Sept 23, 2020 19:21:11 GMT
|
A little niggle now. In the last post I said that there was a large piece of internal structure that appears to be part of the wing. I went on to remove it. The niggle is this… That piece of structure runs right up the inside of the B pillar and I’ve cut it off. Here it is, marked out in red.  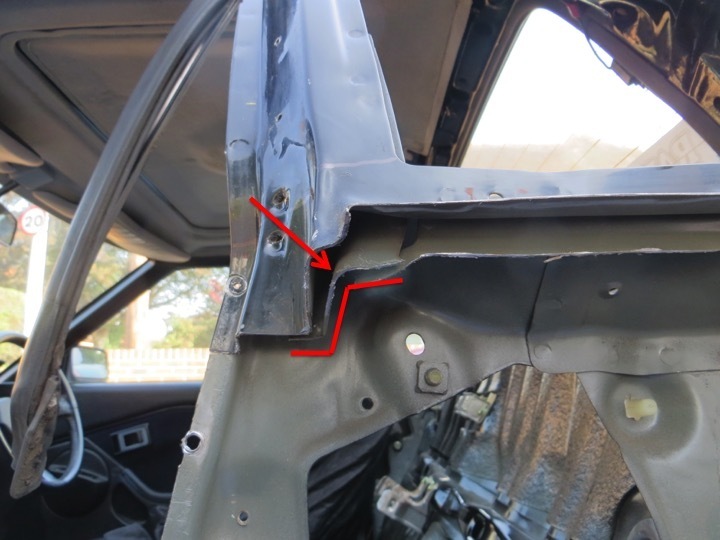 Now if I was an unscrupulous person of reduced moral fibre I’d tack the outer part of the panel together and ignore the hidden strengthener that nobody will ever see. But if I then get killed in an accident because I didn’t do the job properly I’d go to heaven all grumpy and miserable. So we’ll be doing it properly. I need access to weld it together.  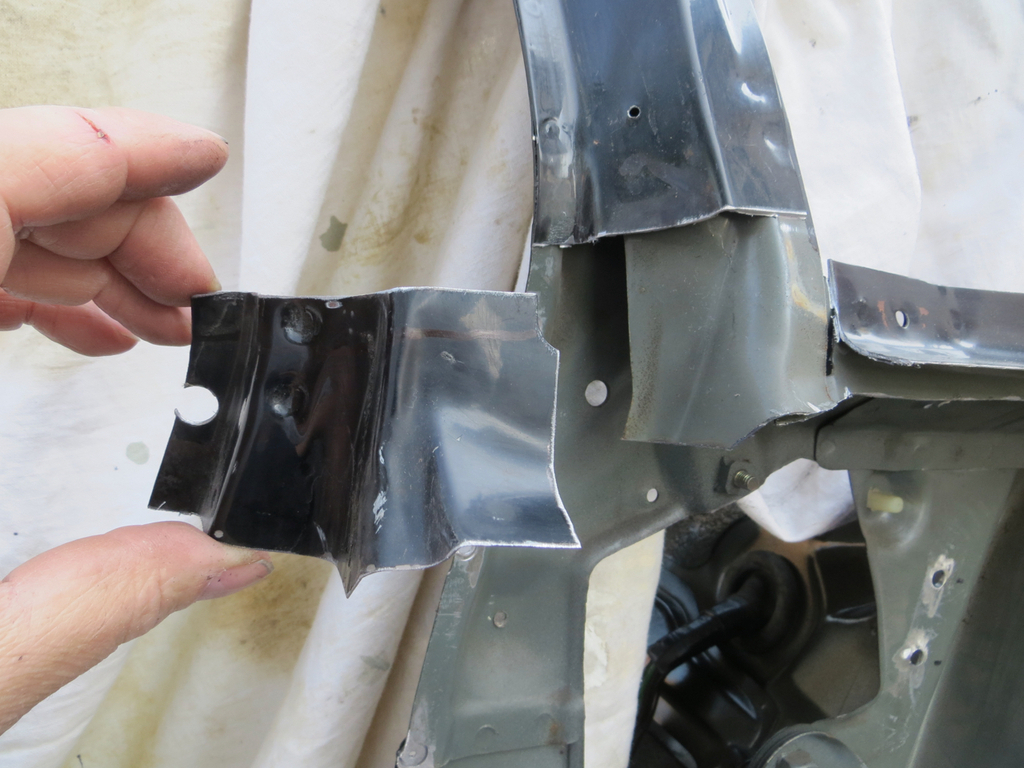 So I’ve taken this section off the car. It’ll allow me to rejoin the strengthener and then it gets welded back in, seamlessly blending the car to the new panel. Hopefully. And if it doesn’t quite work ‘seamlessly’ it’s all behind the door and window rubbers anyway. Next I needed to clean up the seam at the bottom of the side window.  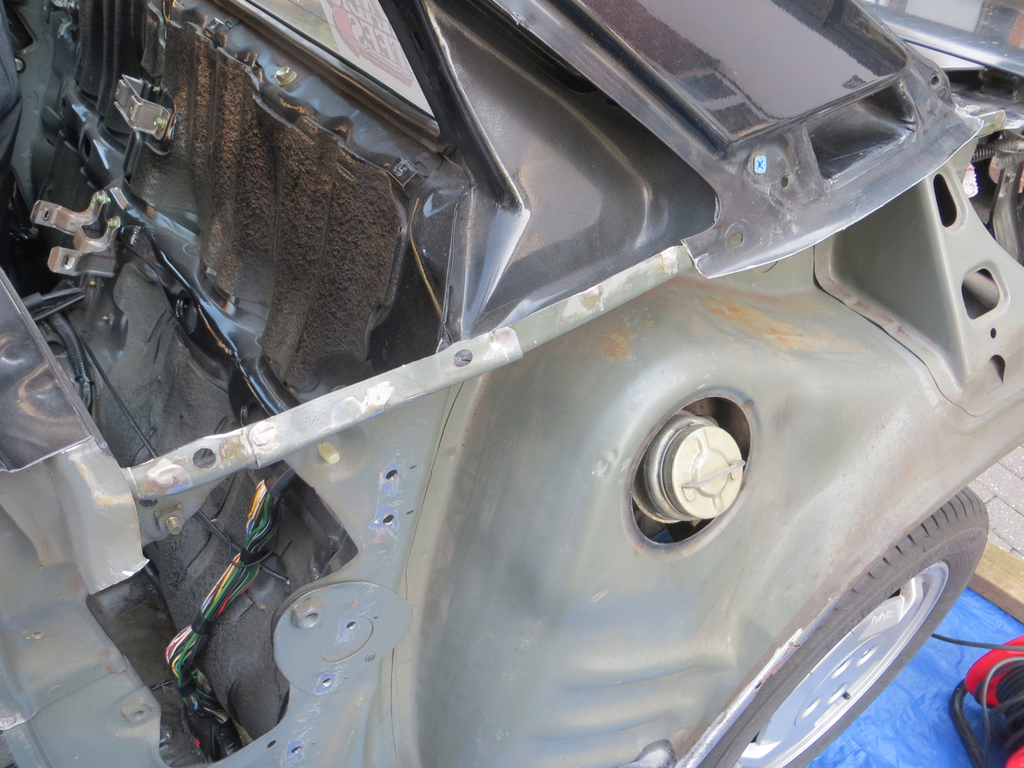 The only bit I’ve left on the car is where the new wing will join to the C pilar. That will need to be trimmed when I get the wing hung and fettled into the right place. So the question is… Does the replacement wing look like it’ll come anywhere close to fitting?  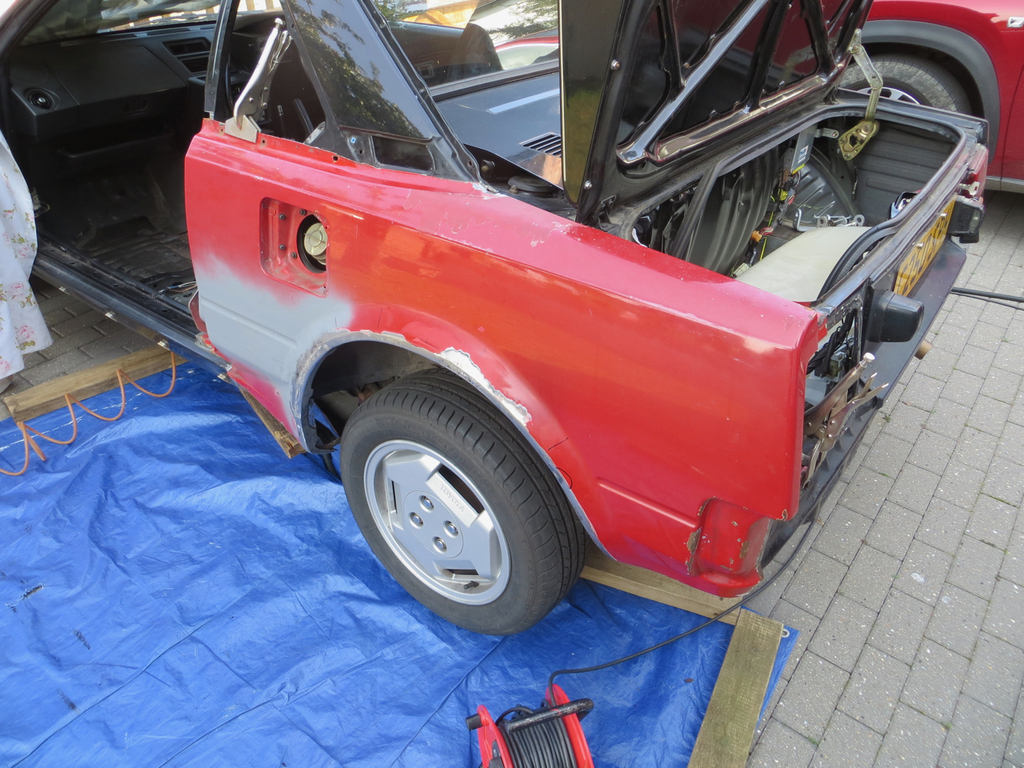 Er, well yes. Yes it does. Thank &%@$. |
| |
|
|
mk2cossie
Club Retro Rides Member
Posts: 3,058  Club RR Member Number: 77
|
|
Sept 23, 2020 19:53:04 GMT
|
Not exactly near by, but I've heard rumours there is an MOT test station at the bottom of Charing Hill that do honest testing  Lovely bit of panel work going on, quite surprising how little rust there is behind the panels too! |
| |
|
|
|
|
|
Sept 23, 2020 21:09:35 GMT
|
|
I'll probably try one of the others in town but they aren't as convenient as my favourite one. Thanks for the tip though. I'll bear it in mind if the locals ones don't pass muster. (IE - fail my pride and joy!)
A chap called Ian (not of this parish) and I did a good survey before I took the car on. We concluded that although it looked like a total basket case the important structural bits were actually better than some other MR2s I read about. It looked terrible but was reasonably sound behind the scenes.
I have to admit that it's really pleasing to see so much of the green E-coat still in good condition though.
Rust wise any Toyota built before about 1980 ish would almost fizz in the rain. After about 1980 they were notably better.
|
| |
|
|
|
|
|
Sept 25, 2020 6:36:04 GMT
|
|
It's pretty obvious that that wing is a replacement.
I mean, it's not even the same colour...
Good to see solid progress!
Car looks nice and clean underneath.
Luckily our climate has kept my pre80s Toyota relatively rust free.
|
| |
|
|
|
|
|
Sept 26, 2020 21:57:05 GMT
|
I was thinking I'd save myself the bother of painting it... 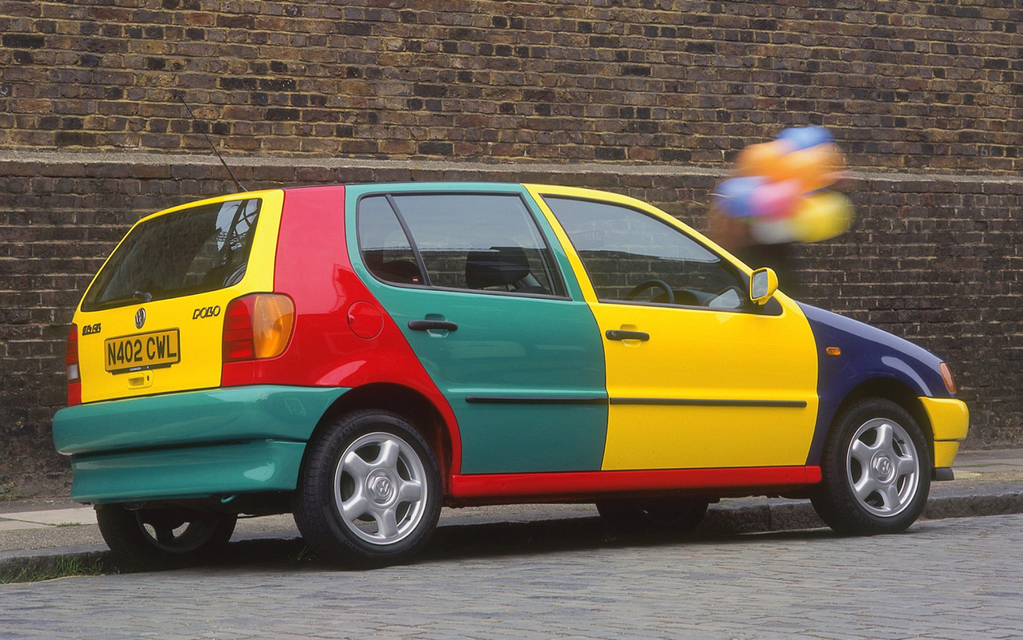 No??? |
| |
|
|
|
|
|
Sept 27, 2020 9:41:31 GMT
|
|
No...
|
| |
14 Audi A3 Sportback - Easy driver
05 Audi TT MK1 3.2 DSG - Damn quick
73 Triumph 2000 - Needs work
03 Range Rover 4.4 V8 petrol. Had to get it out of my system.
|
|
|
|
|
Sept 27, 2020 15:31:40 GMT
|
So having said that he wing seemed to fit reasonably well there was a problem.  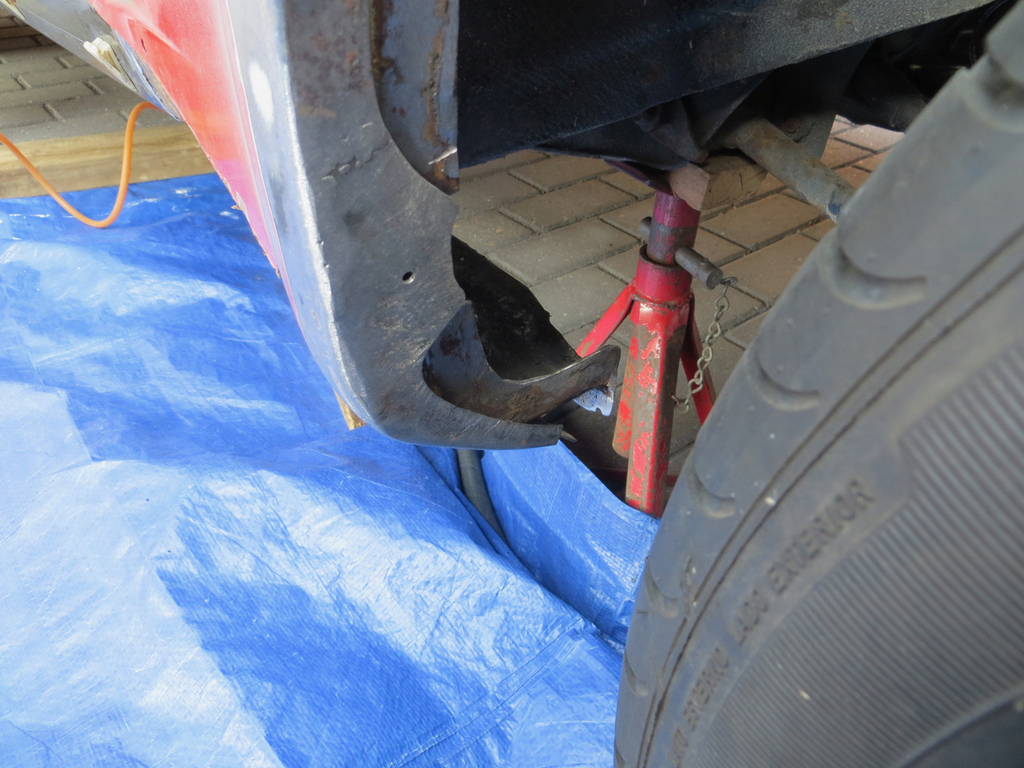 Just ahead of the wheel the inner wing is a totally different shape to the replacement outer wing. Now this isn’t a massive surprise. Firstly I’d had to repair the bottom edge of the replacement wing. And secondly, a few years ago, I’d had to repair the entire of the inner wing and the old outer wing. There wasn’t a lot left of it to copy so I made it as close to the original as I could. But then the original wasn’t even original there is no telling what shape any of it should be. I cut the bottom corner off the inner wing off to get the replacement panel to fit. I’ll recreate it later. My best guess is that the replacement wing is the right shape (or closest to it). As a test I offered the side skirt against it and it looks good. Although when I replaced the mounting flanges for the skirt I appeared to have got the top one a little high. So wondering if the bolt hole in the skirt had ever been messed about with and I compared the left and right side skirts. Spot the difference…  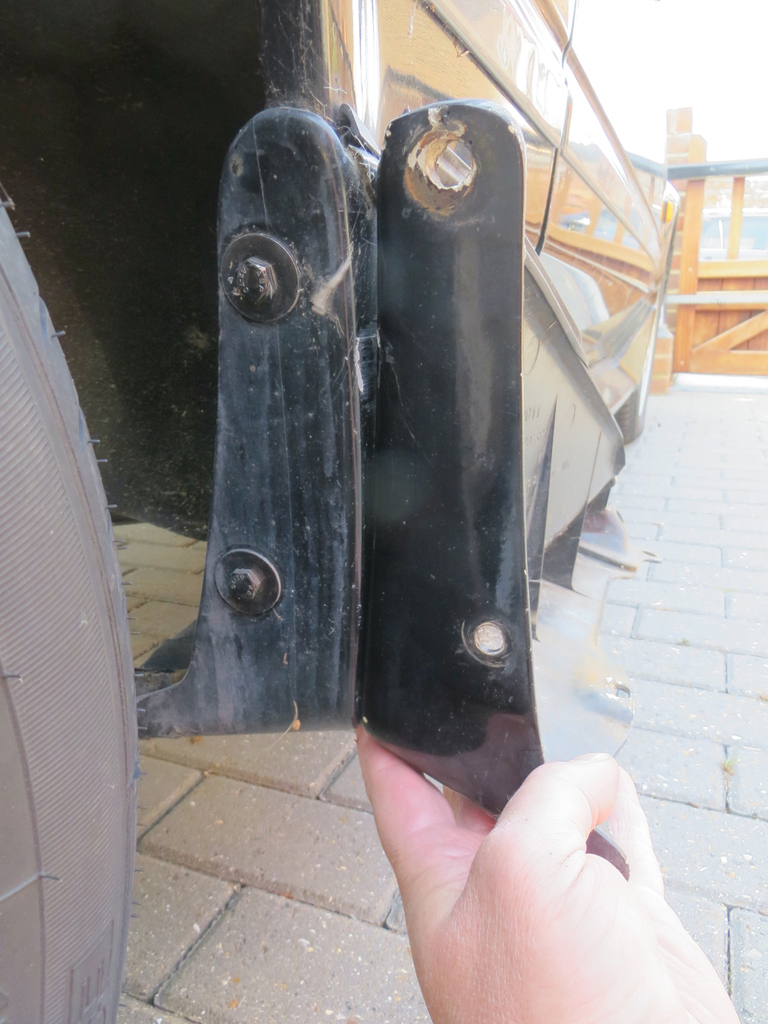 The bottom hole is actually in the same place on both. There is a photographic illusion going on there. But the top hole is definitely much higher on the left side of the car. Really? Somebody has moved one of the bolt holes? Well if they did it wasn’t the left side one ‘cos it doesn’t look like it’s been messed with. Enter a trawl of the internet to see where the bolt hole should be. Look at this. This is a JDM Black Limited version of a MK1a. Right side…  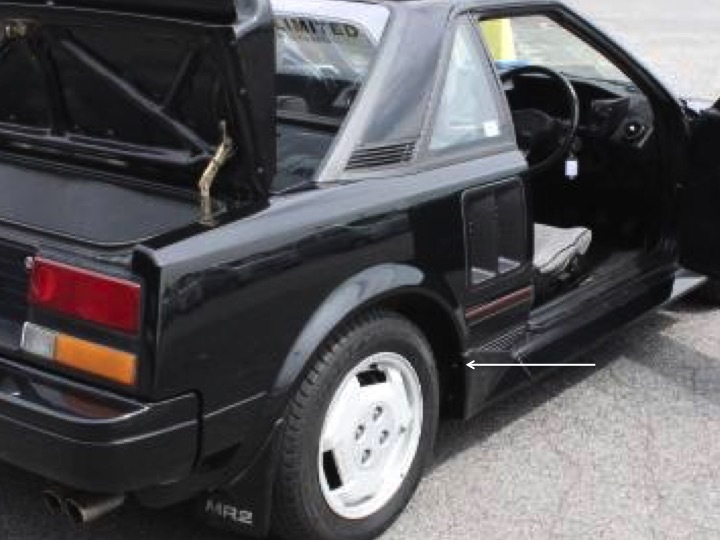 The top fixing screw appears to be set lower on the skirt. Left side…  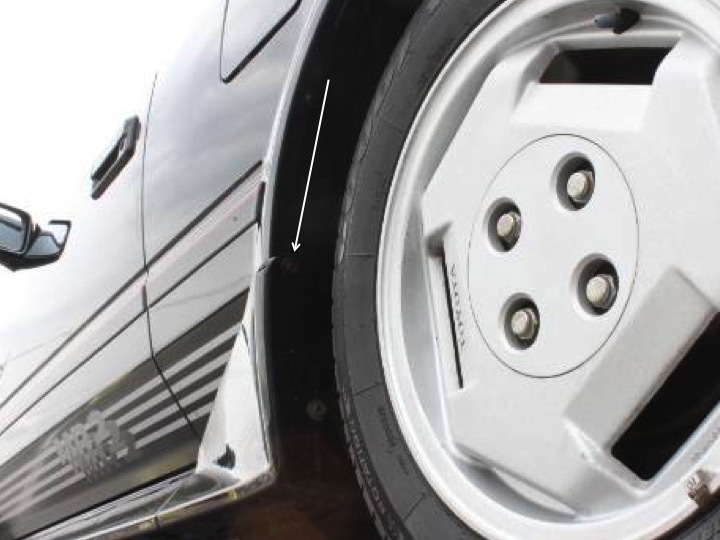 Right at the top. It’s not very clear but I found a couple of examples which appear to show the same thing. The top screw is in a different position on each side of the car. Anybody able to confirm that for me? It was interesting seeing photos of that, apparently well sorted, black MK1. It really is a good looking car in black. In my opinion - but I’m probably biased. Another oddity that I’ve found… When the MK1b came out Toyota offered a T bar version with removable glass roof panels. That took some strength out of the roof so they added more strength into the sill with extra metal. My car has an inner and outer sill, the later cars have a middle sill panel. What I’ve never seen before is that they added metal into the B pillar too.  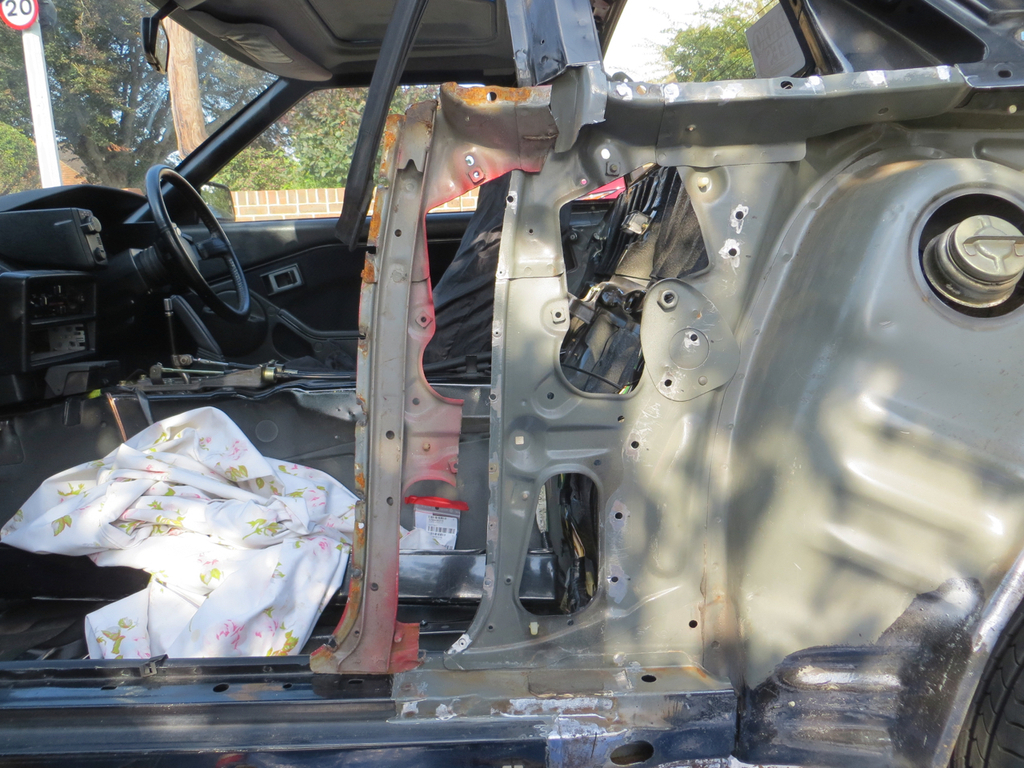 See the extra vertical strengthener running up the red panel that’s missing from mine? It would continue as a box section right up the B pillar to the roof on a real car. This one has been cut off. So I’ll keep this and put it on my car. It won’t run right up the B pillar. I probably could create that but I’m not opening it all up so I’ll live with what I have. At worst it’ll just add weight, at best it might add a little protection if somebody hits the side of the car. James |
| |
|
|
jimi
Club Retro Rides Member
Posts: 2,200 
|
|
Sept 27, 2020 15:50:47 GMT
|
James, mine is the same (88 T-bar) Passengers side 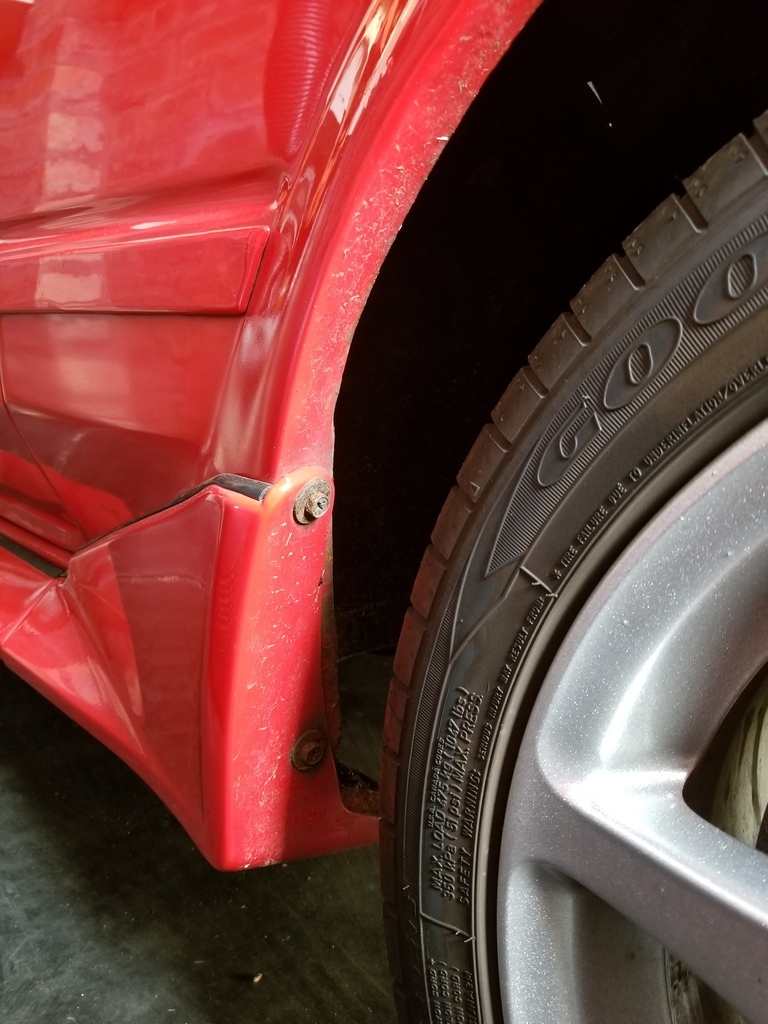 Drivers side 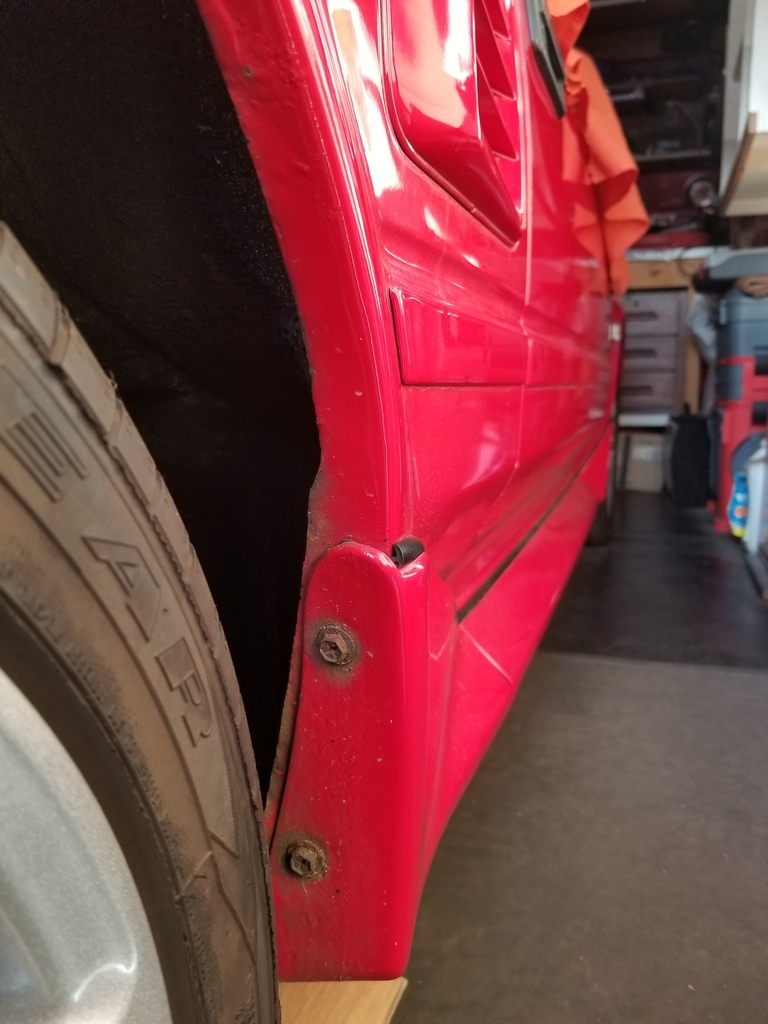 |
| |
Last Edit: Sept 27, 2020 16:00:54 GMT by jimi
Black is not a colour ! .... Its the absence of colour
|
|
|
|
|
Sept 27, 2020 15:55:56 GMT
|
Thanks jimi. Interesting though. I wonder what caused them to do that? I think the very early MK1a cars with out skirts has a plastic 'spat' fitted there. I wonder if it was a throw back to those days. But that just begs the question 'Why did they do it on those cars?' |
| |
|
|
jimi
Club Retro Rides Member
Posts: 2,200 
|
|
Sept 27, 2020 16:15:12 GMT
|
|
They did, it was very similar in shape to the back section of the skirts, I might have an early 1a picture to check, I'll have a look when I get time, your observation has intrigued me.
|
| |
Black is not a colour ! .... Its the absence of colour
|
|
|
|
|
Sept 27, 2020 17:21:44 GMT
|
|
And by extension the SV-3 prototype car looked like it had a production shell - apart from the glass roof. I wonder what they did on that? I can't find any photos that are clear enough to tell.
Anyway, I had a thought.
The left side has a plastic arch liner to protect the fuel filler pipe. Does the top mount for the skirt also form the bottom mount for the liner? If so they could have moved the fixing up to make use of it but not bothered to do the same to the right side.
My car is in bits and half of it is in the loft so I can't easily check.
James
|
| |
|
|
|
|
|
Sept 27, 2020 18:26:57 GMT
|
Right. Sorry everybody, I’m going full fat, high sugar, bad for your health nerd now. Allow me to introduce you all to the Toyota SV-3. 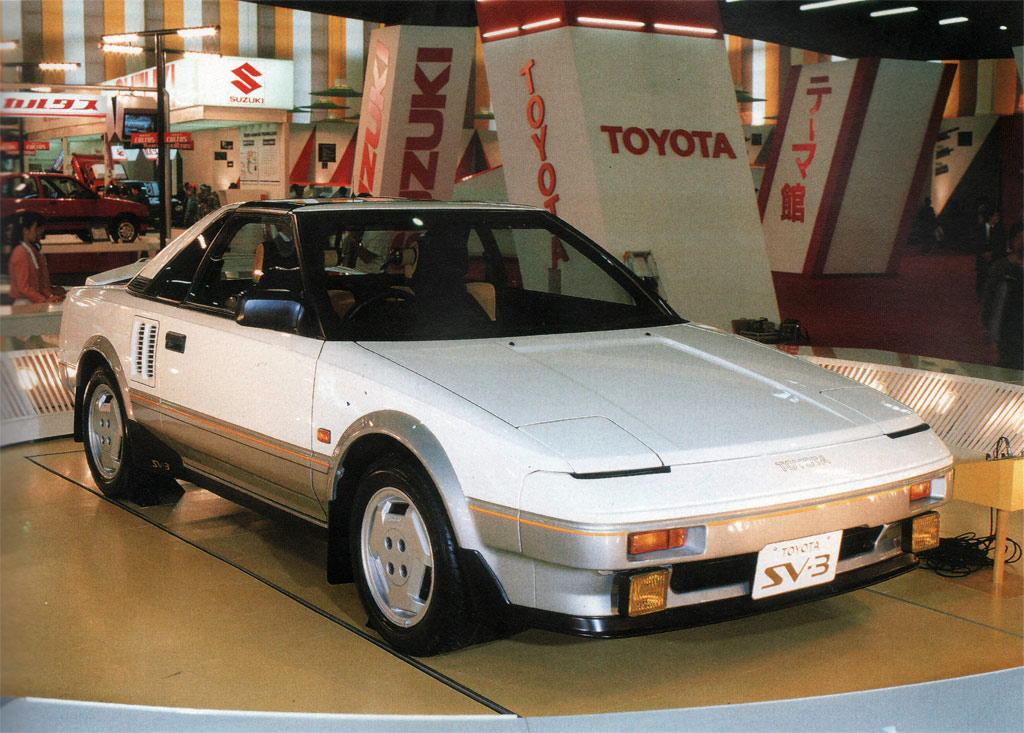  It appeared at the ’83 Tokyo Motor Show. It’s an MR2 in all but name. But there are some subtle differences. It has a glass roof similar to the later T bar cars. The aerial is in a different place. It has a different spoiler. It’s missing the plastic roof spoiler with Toyota written on it. And a few other things. But I’m struggling to tell the difference between the body shell of this and a production MR2. I reckon It was built with the production presses but was probably hand built. They were probably busy working out how to run the assembly line and doing final tweaks and design changes. On the other side - and pertinent to Jimi and myself is this photo which I’ve zoomed into.  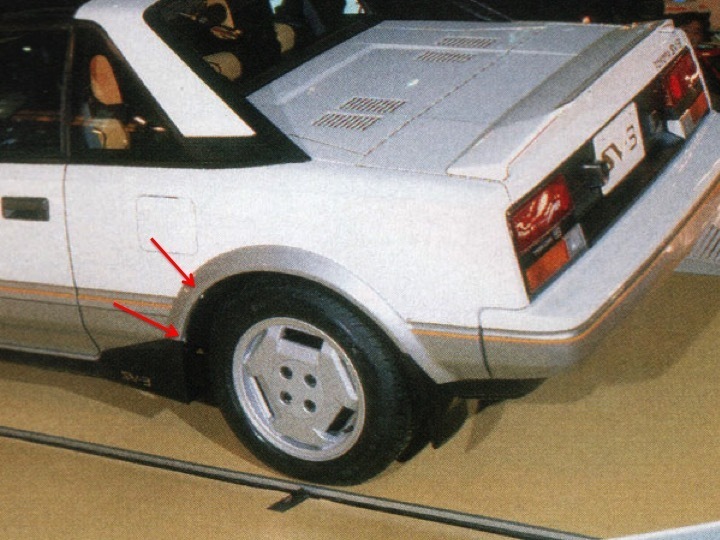 There are two mountings in the left wheel arch. I’m pretty sure they are for the plastic liner that protects the fuel filler pipe. I can’t prove that because my car in in pieces. It also appears that the black spat isn’t fastened to these mountings. I can’t tell how it is fastened to the car. So I’m now pretty sure that when Toyota added skirts to the car they borrowed a fixing they already had on the left side. Hence the high fixing point. Now I’m getting very interested in how the spats on the early MK1a cars were fitted and if there was a lower fixing point that was used on the right side. James |
| |
|
|
jimi
Club Retro Rides Member
Posts: 2,200 
|
|
Sept 27, 2020 19:17:12 GMT
|
|
|
| |
Black is not a colour ! .... Its the absence of colour
|
|
|
|
|
Sept 29, 2020 20:46:53 GMT
|
Right… This bolt hole thing… I’ve come to a conclusion. It’s probably wrong but it’s the best I can do. Here’s another shot of the SV-3 prototype car that was at the Tokyo Motor Show in ’83.  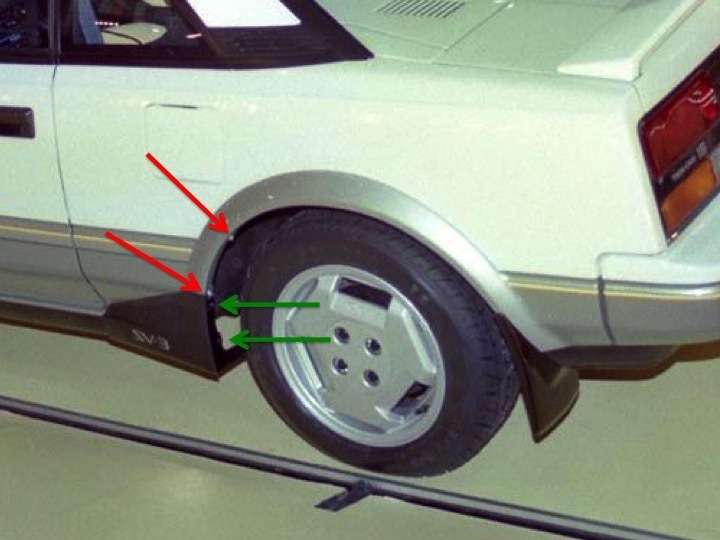 The red arrows are two fixings that hold the plastic arch liner to the car. The liner only protects the fuel filler pipe and isn’t fitted to the right side of the car so the fixings don’t exist either. The green arrows are the fixings for the black plastic spat. The top one just below the liner fixing. I don’t have a photo but I’d imagine the other side was in the same place. Can’t see why it wouldn’t be. Next a production, early MK1a before the full skirt was fitted.  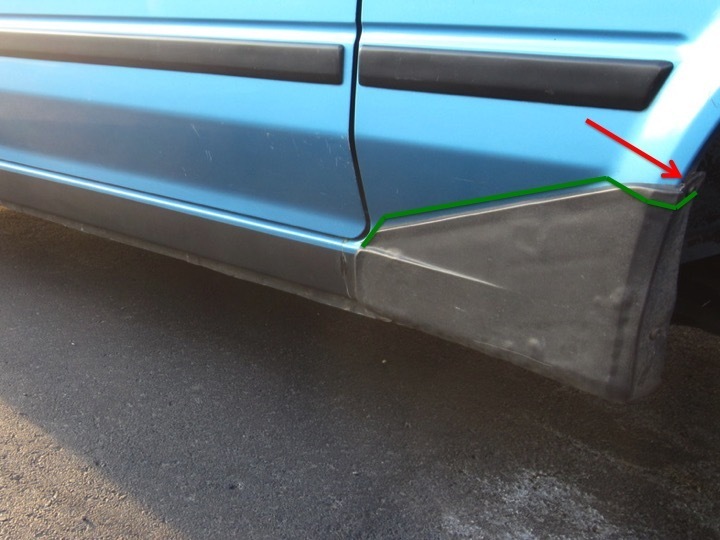 The red arrow is pointing to the single higher fixing point for the spat and the arch liner. The spat appears to have been redesigned slightly since the SV-3. Not just the lack of the SV-3 sticker either. The SV-3 version looks slightly taller at the corner of the door. The top edge appears to come round the wheel arch further before it turns down to the corner of the door. And, crucially, I reckon the MR2 version runs a little further up the arch. I’ve marked in green where I think the SV-3 spat would be compared with the MR2 version. If the MR2 spat really does go further up the wheel arch then suddenly they can use the same fixing point and save themselves a bolt. In fact they’d have no choice but to do that because the MR2 spat covered the fixing point for the arch liner. There was no point in redesigning the right side of the car just to put them in the same place so the fixing was left in the same place as on the SV-3 prototype.  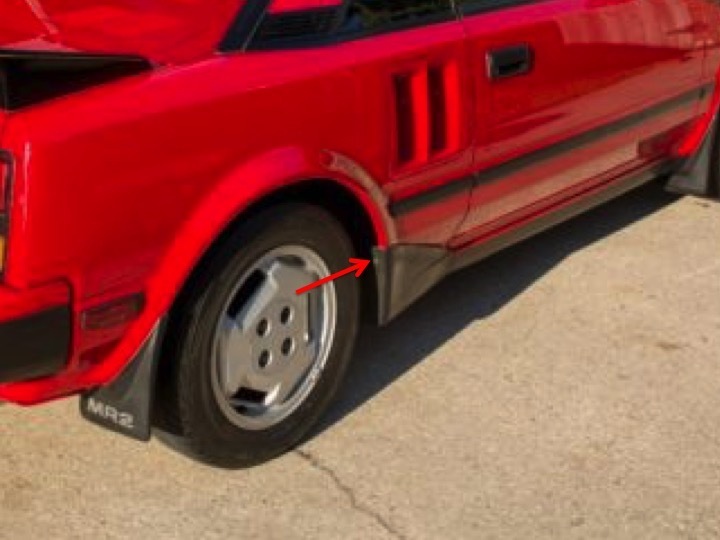 Moving it would have meant new pressings for the wing and that’s expensive. I mean, what sort of person would ever notice? Apart from me. So when they put full side skirts on the MK1a they were stuck with those fixing points, and that carried over to the MK1b. Boom! There’s an explanation. Might not be right but I believe it. Now I can get on with the car. James |
| |
|
|
|
|
|
Sept 29, 2020 21:53:23 GMT
|
|
Thanks for clearing that up........
|
| |
14 Audi A3 Sportback - Easy driver
05 Audi TT MK1 3.2 DSG - Damn quick
73 Triumph 2000 - Needs work
03 Range Rover 4.4 V8 petrol. Had to get it out of my system.
|
|
|
|
|
Sept 30, 2020 3:27:30 GMT
|
|
Thank god. The whole country has been on lock down while that wa- oh wait, that's covid. We're still stuck inside.
|
| |
|
|


