|
|
|
Oct 20, 2012 19:22:16 GMT
|
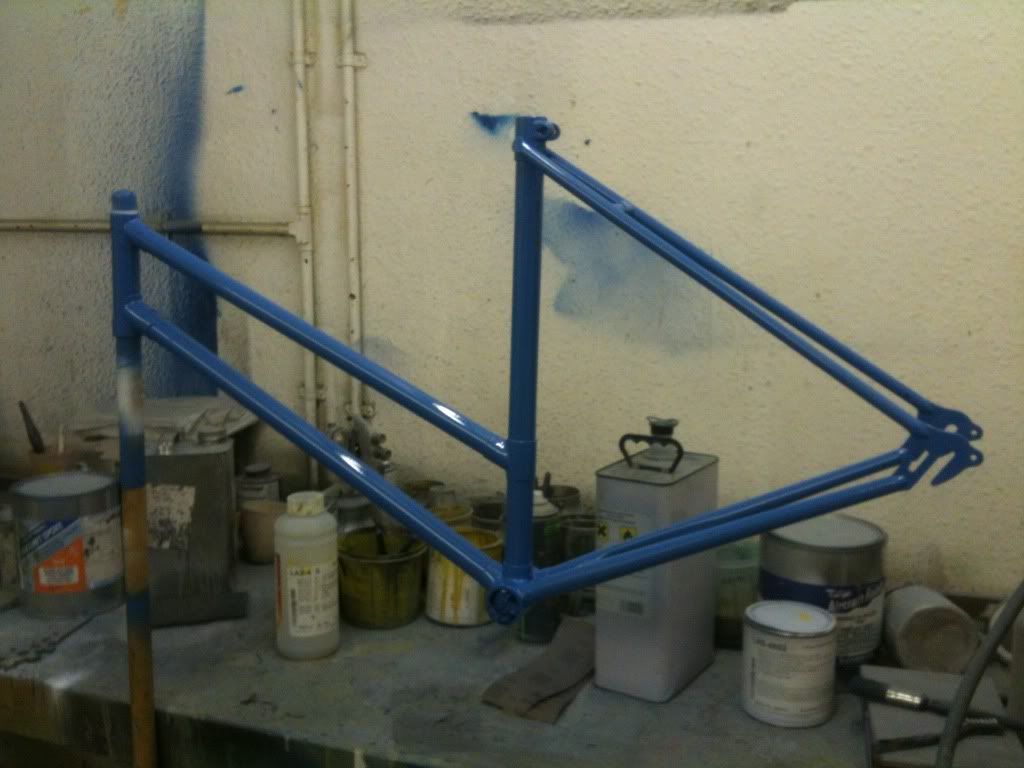
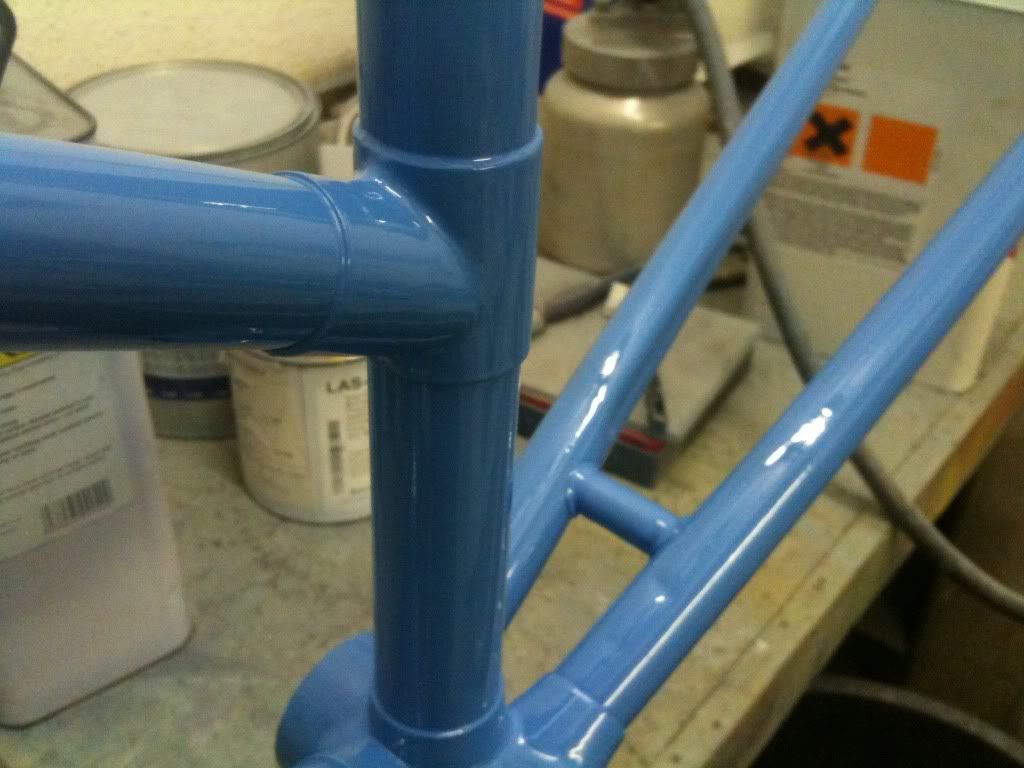
So my girlfriend's birthday is coming up and I wanted to do something a bit special for her this year. Perfume and clothes is all very well (and I hate shopping for them) but they're not the kind of gifts that you cherish for years to come. We happen to live very close to the Pashley Bicycle Company and there is place in Stratford where you can hire/buy them from. After having gone in and nearly dropped down dead at the cost of a new bicycle, instead of having to sell a kidney, a plan was hatched!!  The first job was to source a bike that I could rebuild into something that most importantly would be fun to ride but also beautiful to look at. After surfing for few weeks through Fleabay and Bumtree I happened across a likely candidate that was just up the road from work. A rendezvous was arranged, moneys changed hands and before I knew it I was the proud owner of a very dirty old bicycle.  She had been left in the back of a shed for god knows how long, the seller came across it after he had moved in and started to clear the garden out. The chrome work was pretty rusty and the tyres were obviously perished and flat. The brake cabled were seized solid as well as the gear shifter, on the plus side the 3 speed hub still still worked and the headstock and lower bracket were still nice and smooth. 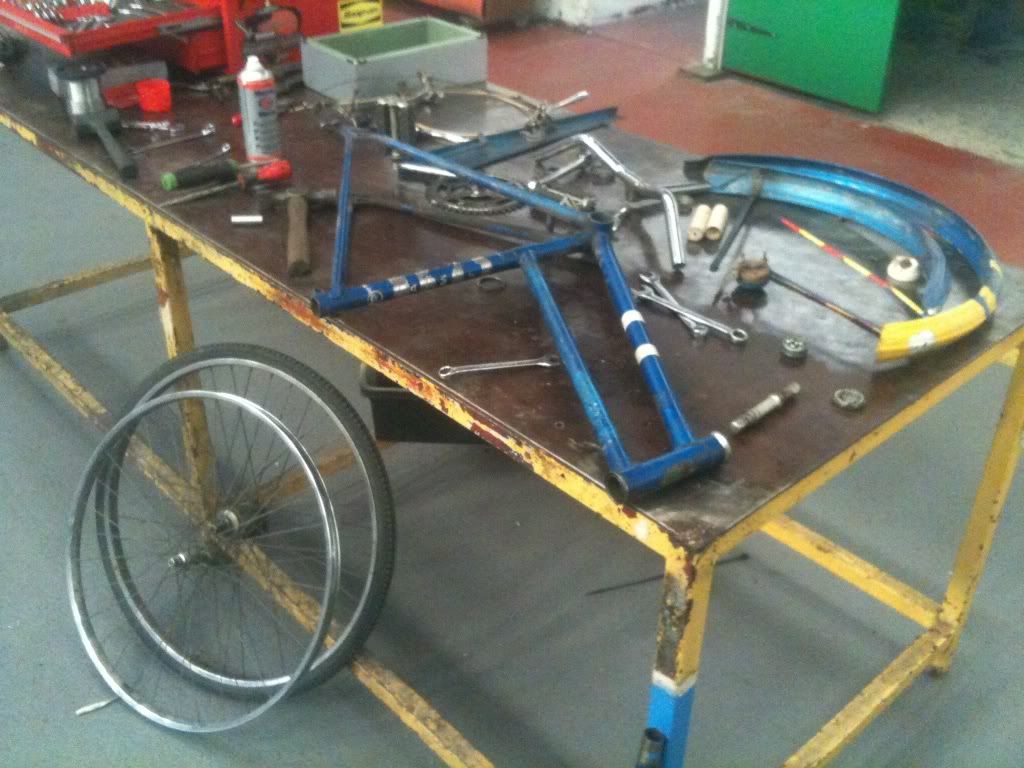 Having got her back to the workshop and stripped her down it was apparent that she hadn't done many miles, it was neglected rather than worn out. Which was a definite bonus because it meant I could reuse most of the original major components. Bonus! ;D Once the parts were all laid out it was time to see just how much was destined for the bin and what could be potentially cleaned and saved. 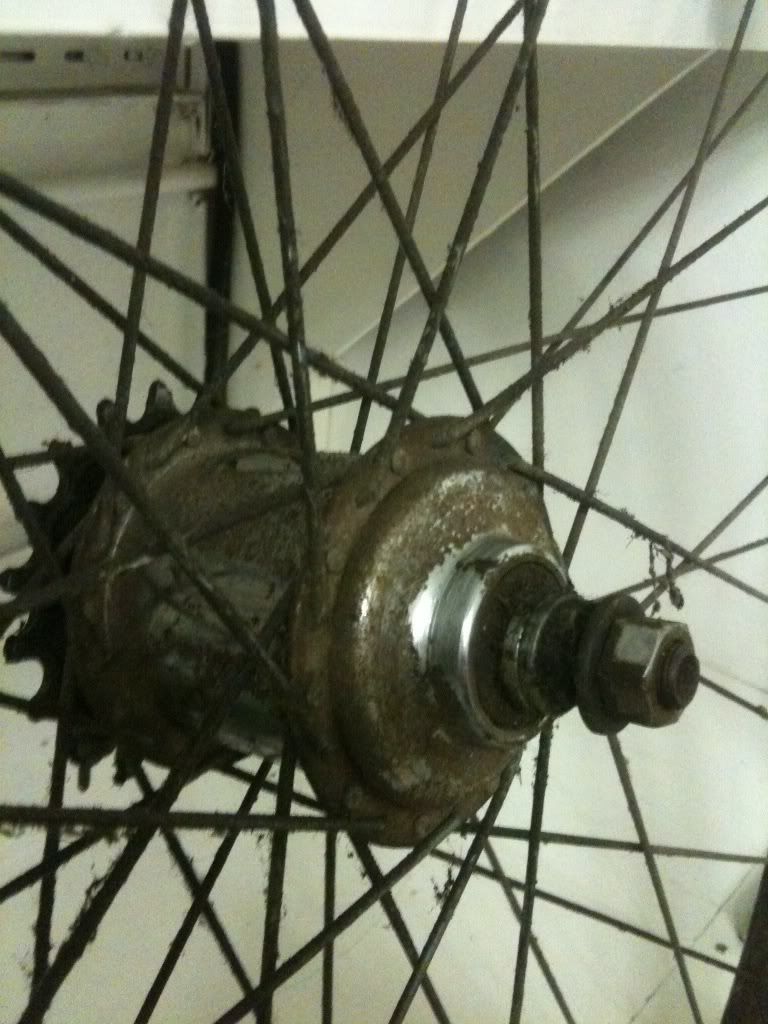 A before shot of the rear hub. 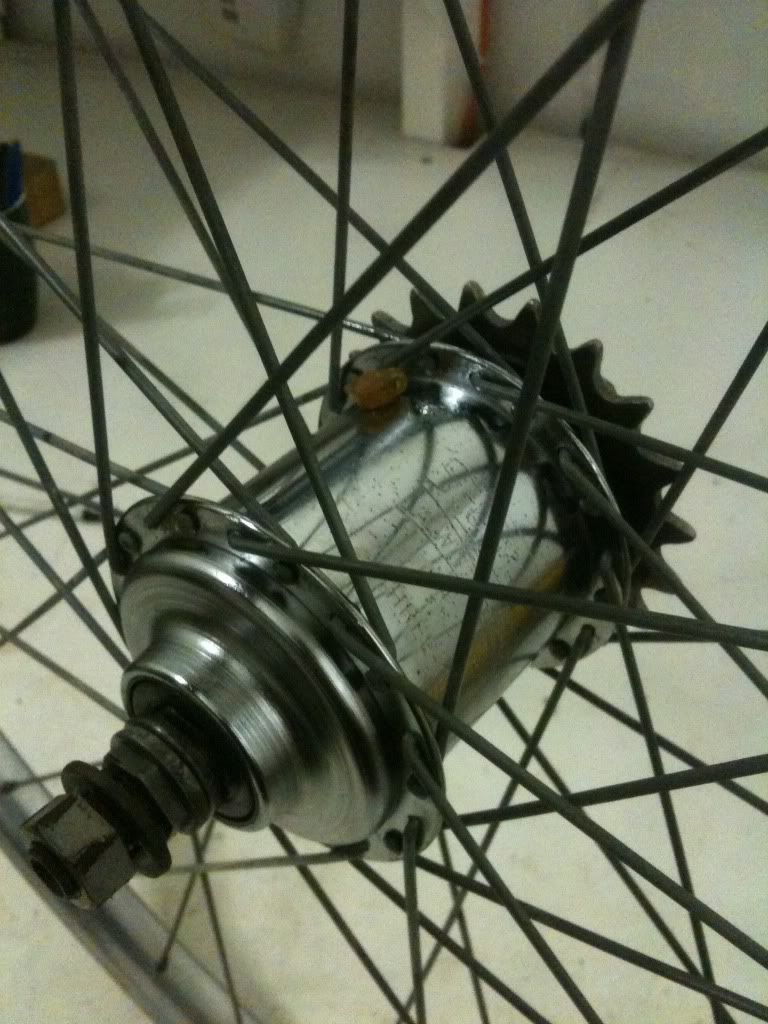 And after (many hours). In retrospect it would have probably been easier to disassemble the wheel and hub completely to clean it up. But having never rebuilt a bike wheel, and with time against me, I decided to do it the hard way and bust out the Brasso and tooth brushes  Underneath all the muck was a 3 speed Sturmy Archer which also revealed the date of the bike as being March 1964 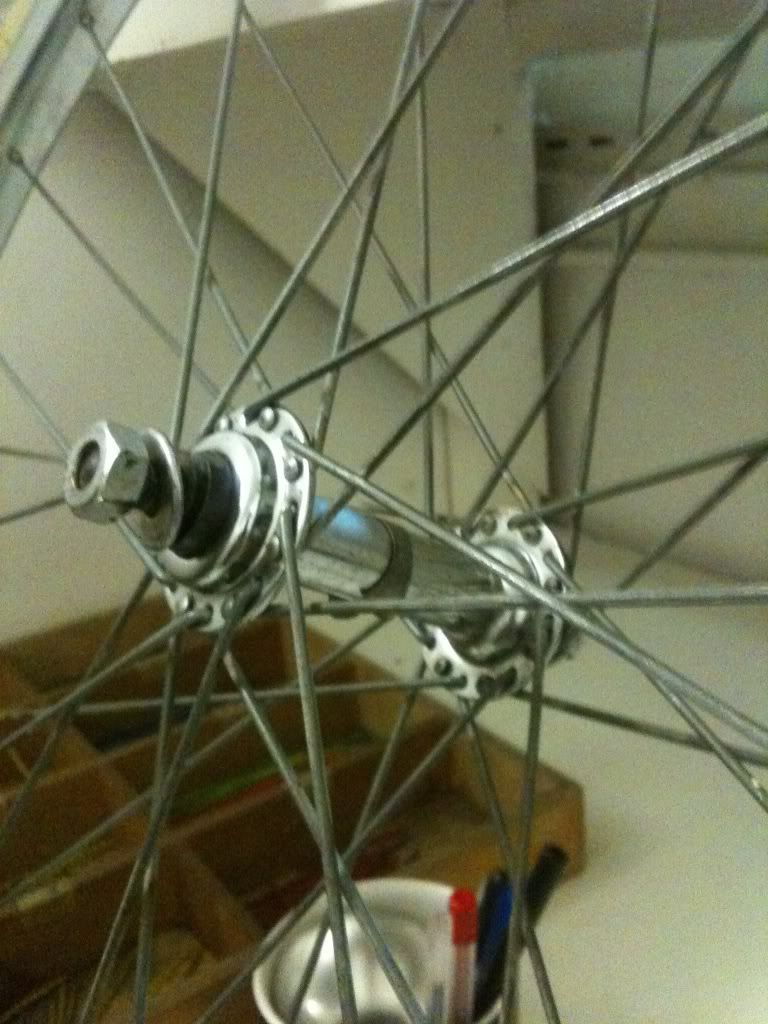 The front polished up a treat! 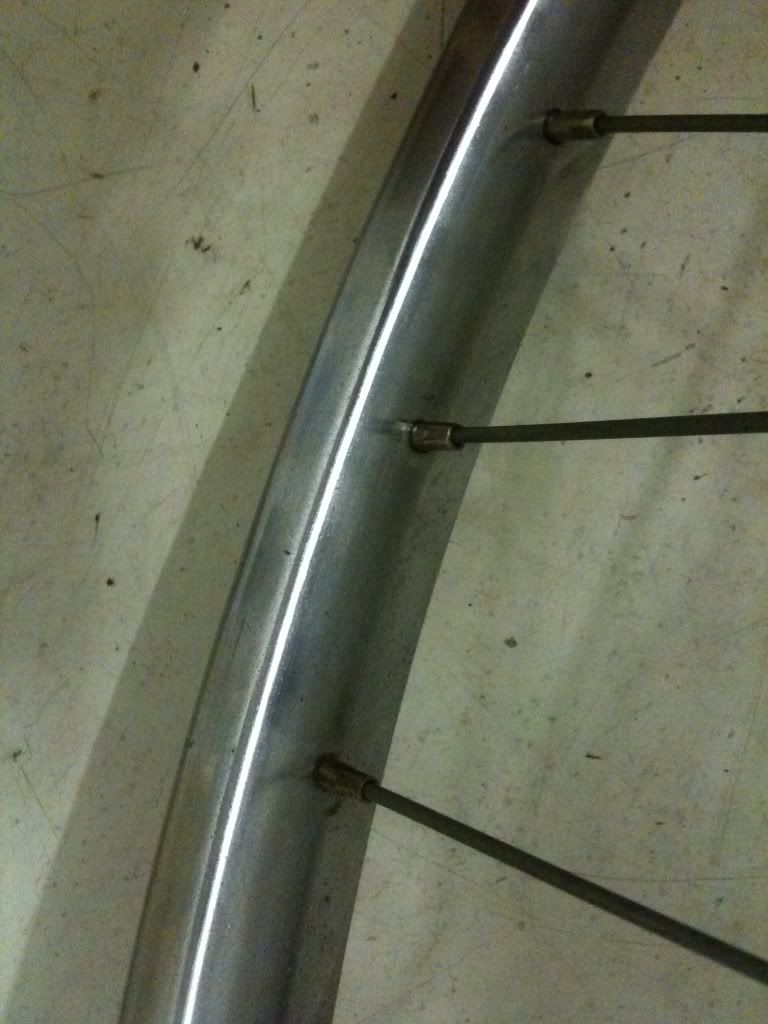 There is a little pitting in the rims but considering how bad they looked originally, I'm chuffed to bits with how well the chrome cleaner has worked. 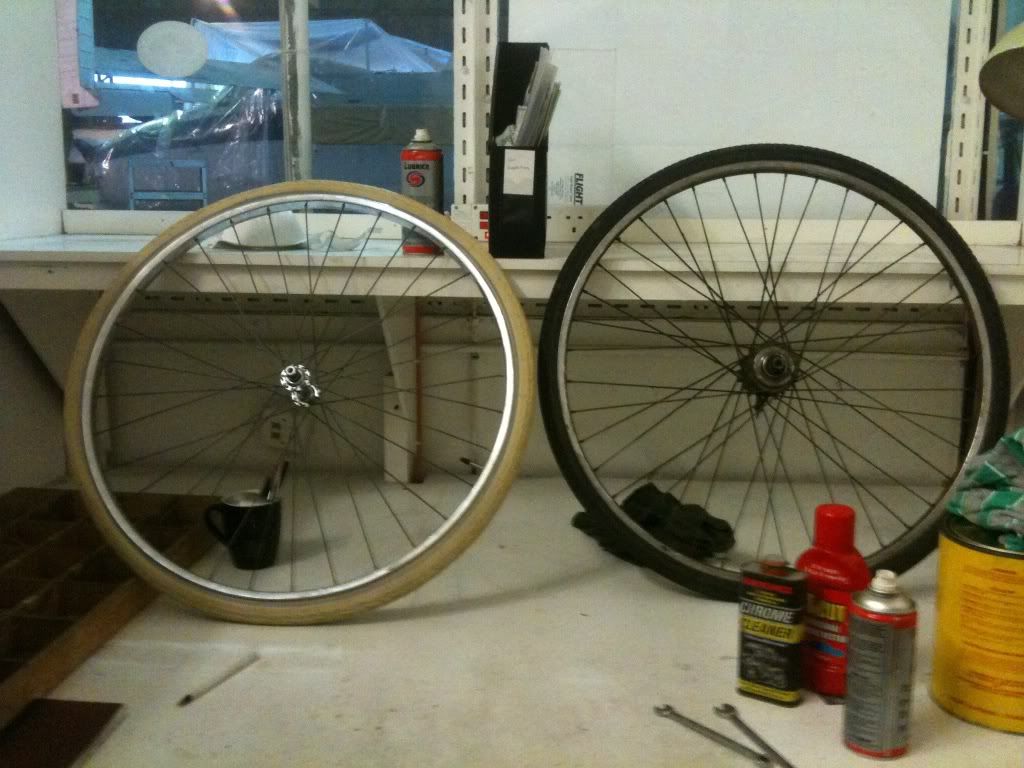 A shot of the front wheel finished with the new cream tyres next to rear wheel before it had been cleaned. The tyres are 26" by 1 3/8" Schwalbe Delta Cruisers. According to the internetz they are almost puncture proof and came in the right colour so were an easy choice. 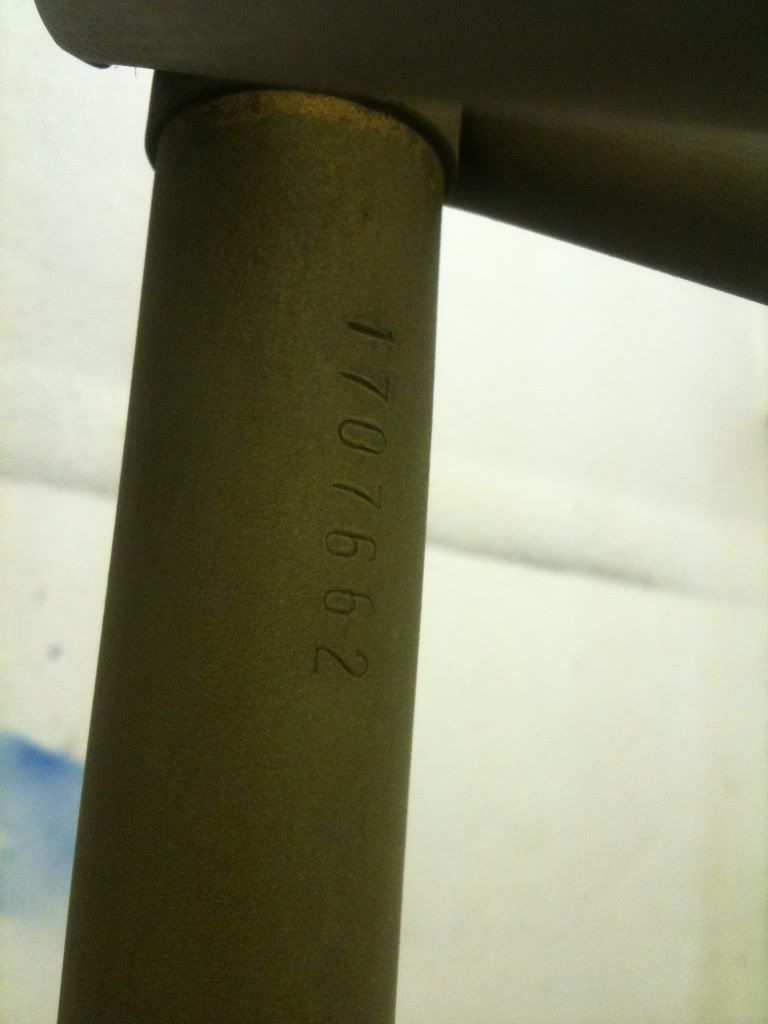 I took the frame to a local powder coater (A.S.A.P Powder Coat) in Coventry to be cleaned up. I knew I wanted to paint it myself so they only sand blasted it for me but they will blast and powder coat a frame and forks for just £40  The guy I dealt with was really good and had the frame, forks and mud guards stripped and ready within 24 hours of me dropping them off. I will definitely be going back with more work for them in the future  I then gave everything a good clean and acid etched them (sorry no other pics) ready for the rest of the paint. Found the serial number in the process hiding under the seat post.  Then it was time to lay down some high build primer. I'd not painted a bicycle frame before but the best advice I could give someone else doing it would be to paint the under side of all the tubes first and then flip it over to do the top of the tubes. This way there's no chance of you missing any parts and it also means you are able to get the gun in all of the nooks and crannies.  Again the best way to paint the forks and mud guards is to paint the parts you can't normally see first and then flip them over to do the parts that would be on show. After a day the paint was hard enough to sand. This was done with 600 grit wet and dry (used dry because the primer absorbs water) to get the surface ready for the top coat. Again it pays to take your time at this stage as all the lumps and bumps you miss will stand out like a sore thumb in your shiny finish. Pay special attention to the surfaces that are seen the most, for example the headstock/top tube ect. |
| |
1994 Rover Metro
1994 Peugeot 405 Estate
1991 Rover Metro Gti 16v
2001 Fiat Seicento Sporting
1999 Fiat Punto 1.2
1994 Peugeot 106 Xnd (x3)
1991 Westfield 7
2004 Landrover 110 SW
2003 Seat Ibiza 1.9Tdi Sport
1959 Ford 107e Prefect
1992 Suzuki Vitara
2008 Skoda Fabia
|
|
|
|
|
|
|
Oct 20, 2012 19:38:54 GMT
|
|
|
| |
1994 Rover Metro
1994 Peugeot 405 Estate
1991 Rover Metro Gti 16v
2001 Fiat Seicento Sporting
1999 Fiat Punto 1.2
1994 Peugeot 106 Xnd (x3)
1991 Westfield 7
2004 Landrover 110 SW
2003 Seat Ibiza 1.9Tdi Sport
1959 Ford 107e Prefect
1992 Suzuki Vitara
2008 Skoda Fabia
|
|
|
|
|
Oct 20, 2012 20:44:28 GMT
|
very nice  ill be watching this |
| |
|
|
lae
Posted a lot

Posts: 1,045
|
|
|
|
Looks like a really top-quality job there. One thing I did to my girlfriend's bike (not dissimilar from yours, but pastel green instead of powder blue) was to paint the headtube white and go round the lugs in a contrasting colour (only where the blue meets the white, not on the whole frame). Like so:  The best upgrade to these bikes is alloy rims - the bike'll be lighter, accelerate quicker and brake faster. Archie Wilkinson sells the correct-size 26 x 1 3/8 rims in silver - not on the website but if you phone them up. I've never used ASAP Powdercoating - dya reckon they're any good? I've used Coventry Powdercoating on Humber Road - they were cheap but could only do a couple of colours (ended up taking my girlfriend's bike to York (!) to get it done when visiting friends). |
| |
Currently:
Mk1 Focus blandmobile
Formerly:
1969 MG Midget
1972 Avenger GT
1981 Datsun Cherry
1989 Corolla
1979 Mercedes W123 200D
1995 Ford Falcon
1996 Ford Telstar (bet you had to google that one)
|
|
|
|
|
|
|
|
thats a good job youve done on a classic roadster bike.
I use brillo pads in hot soapy water, to scrub up spokes. just rub hard on the spoke. I ussualy start at the hub and rub along to the crossing of the spokes, on the outside of the wheel. then put the brillo pad thru the spokes to get the hub shell and the inside side of the other spokes. They can come up nice and shiny. tho sometimes the dark colour or corrosion is too much for the brillo pads. It doesnt have to be proper brillo pads. I use Tescos ones that are under 50p a pack.
Ive built alloy rims onto my Raleigh Travellers hubs. Its a 1979 bike. So has 36 spoke hubs. Not the old school 32/40 spoke hubs. I got the new 26 X 1 3/8" rims from ebay. Think they were under £10.
|
| |
|
|
|
|
|
Oct 21, 2012 17:33:46 GMT
|
I was thinking about upgrading the wheels to alloy rims. I've a set on my bicycle and they do pull up well in the wet. If the bike gets enough use to warrant a major service then I'll consider rebuilding the wheels then. I'd like to get the spokes chromed as well as a few other pieces of hardware at some point, so we'll see A.S.A.P. Powder coat said they can do almost any RAL colour you like as well as metallics (although I believe there was a surcharge for this ). I like the contrasting head stock idea, I bought a Uni-ball extra fine paint marker to pin stripe the lugs with already. Great minds think alike! |
| |
1994 Rover Metro
1994 Peugeot 405 Estate
1991 Rover Metro Gti 16v
2001 Fiat Seicento Sporting
1999 Fiat Punto 1.2
1994 Peugeot 106 Xnd (x3)
1991 Westfield 7
2004 Landrover 110 SW
2003 Seat Ibiza 1.9Tdi Sport
1959 Ford 107e Prefect
1992 Suzuki Vitara
2008 Skoda Fabia
|
|
|
|
|
Oct 21, 2012 18:52:00 GMT
|
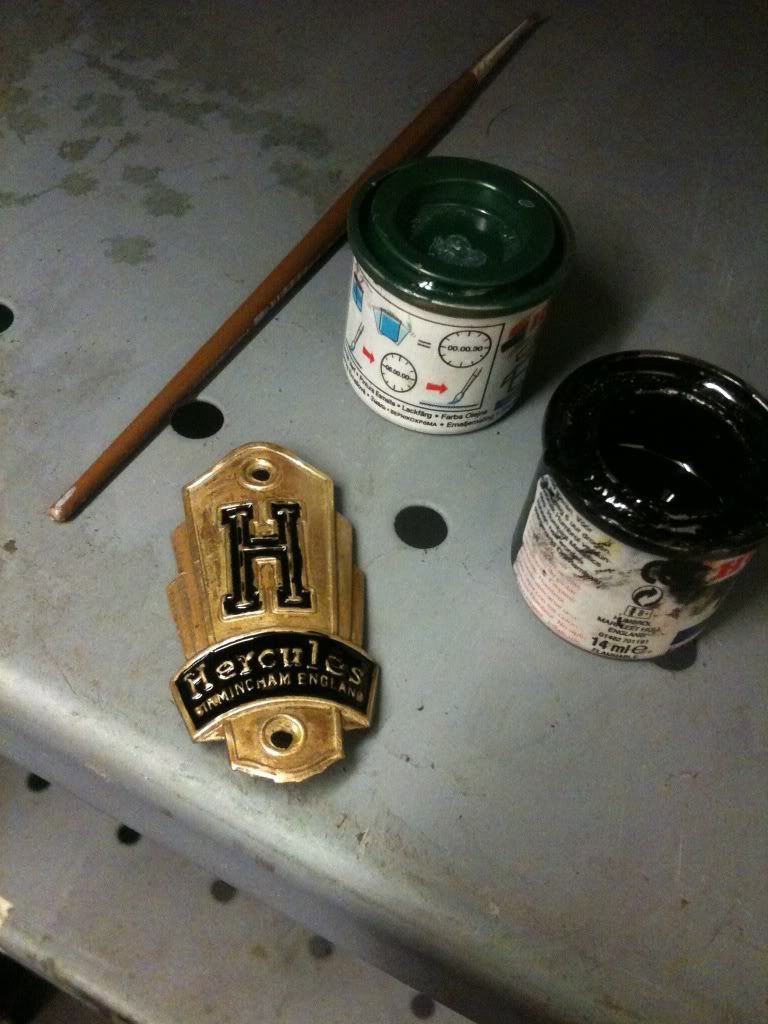
So I managed to get back into the workshop today and my buddy Big Al came by to give me a hand. The paint went on Friday evening and I had left a heater on to increase the chances of it fully curing. Lady luck was with me and the paint had set a treat! I had bought a Uni-ball fine line paint marker to go around the lugs with and decided that it would be easier to do before the rest of the gubbins were bolted on.  If you do decide to go down this route my advice would be keep a little thinners to hand to dip the tip of the pen into to stop it drying out. It also took about 3 passes before I had a really consistent white line. Other than that they are a brilliant invention that make you look like you've got mad pin striping skillz. ;D  I greased all of the lower bracket and assembled the loose ball bearings into the cups. Count every one in because it's so easy to drop one or forget to put enough in.  The bearings don't need too much preload, it's something you have to do by feel. You just enough so that there is no slack in the pedals. Then do the lock ring right up nice and tight to stop them coming loose when you're pedaling. 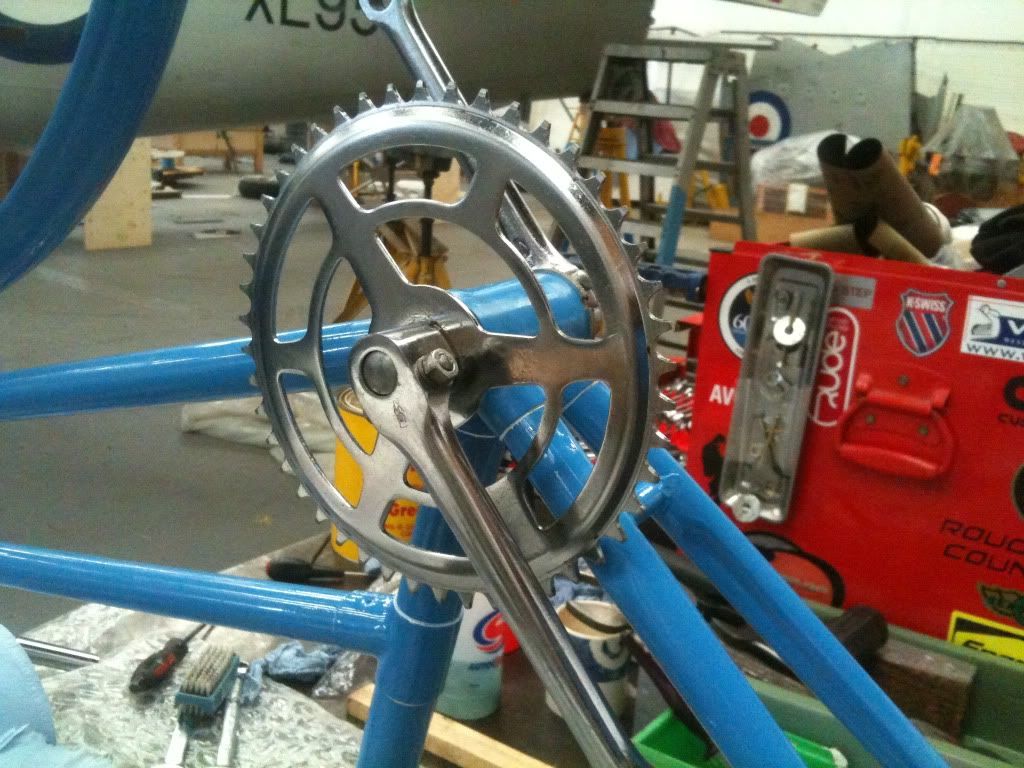 Cotter pins in and nice and tight. 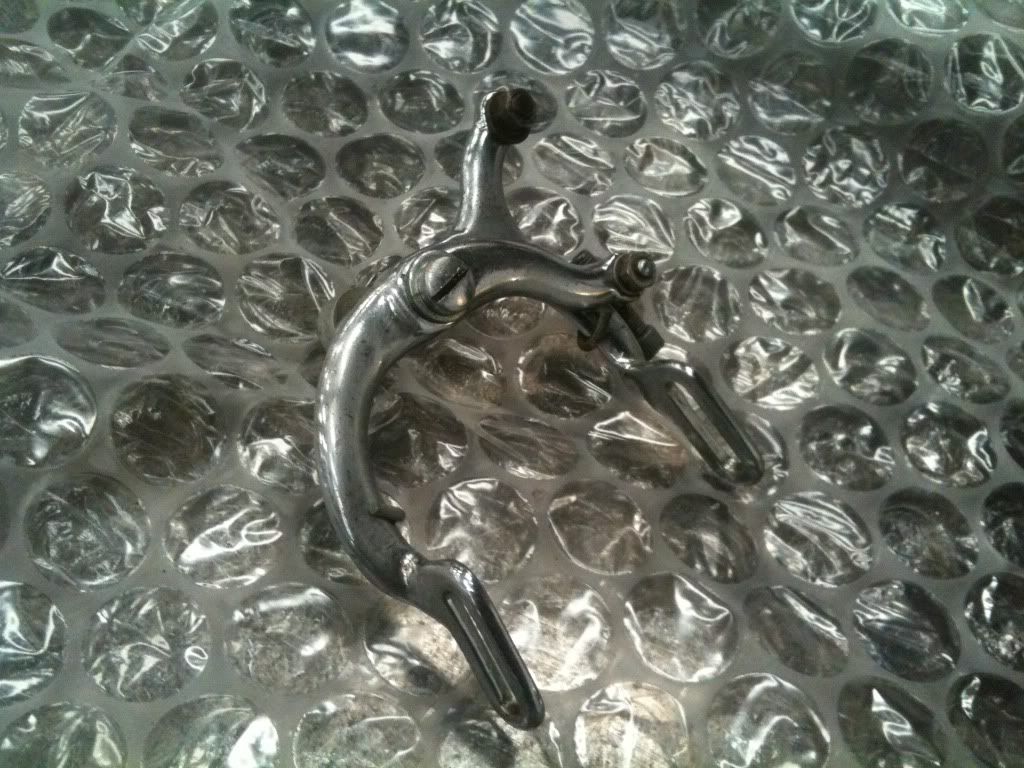 I forgot to take any pictures of fitting the headstock bearings. It was just a case of lining them up and pressing them in with a few pieces of wood and a vice. It's best to set the preload on the headstock once the bike is assembled by holding the front wheel with the brake and rocking it back and forth. You then tighten the bearing up just enough so that you no longer feel any play when braking. 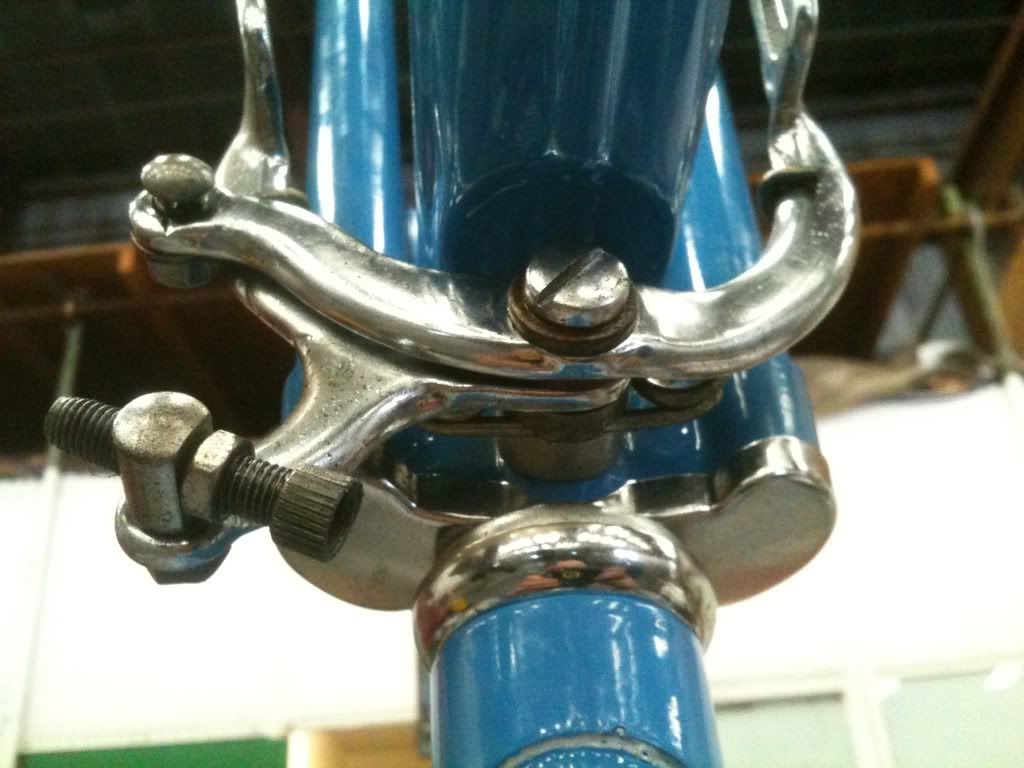 Front caliper fitted. 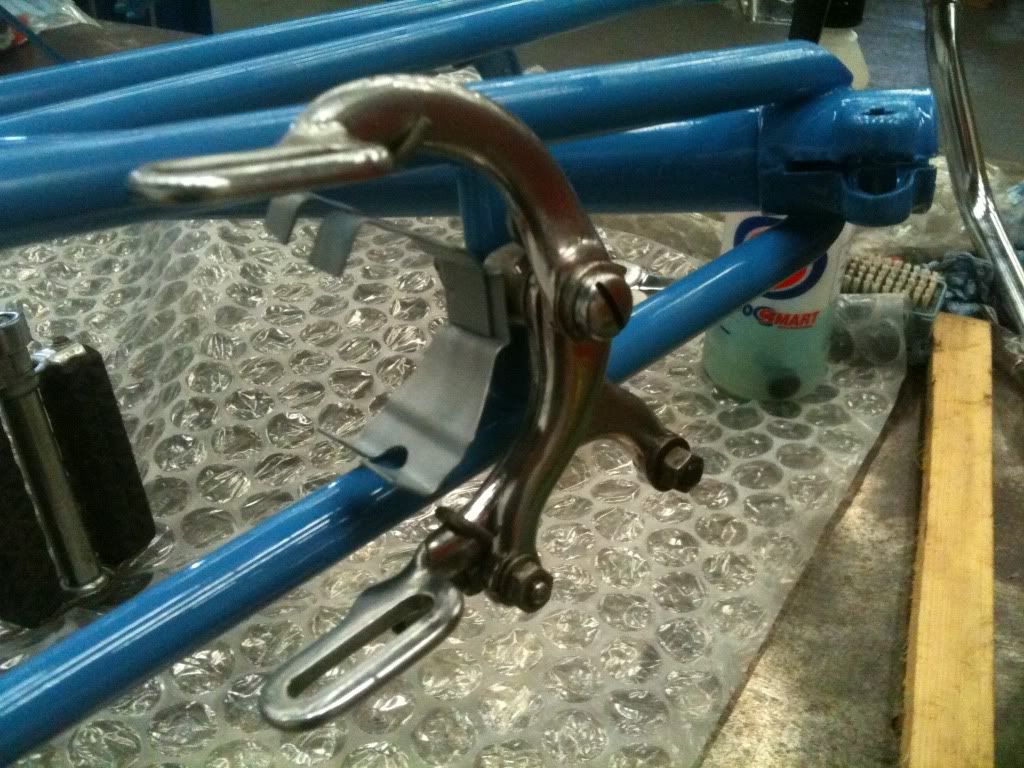 And the rear.  Mud guards next. 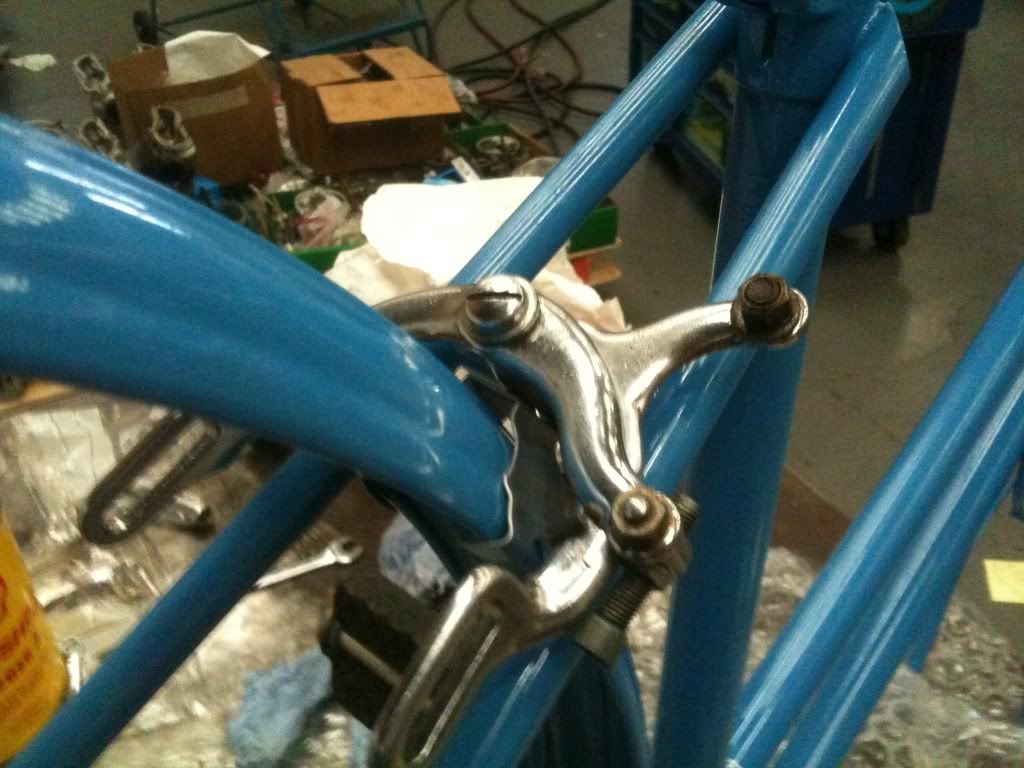 Same on the back.  Bolting the stays to the frame. You can see in this pic I only use aircraft approved grease on my bicycles  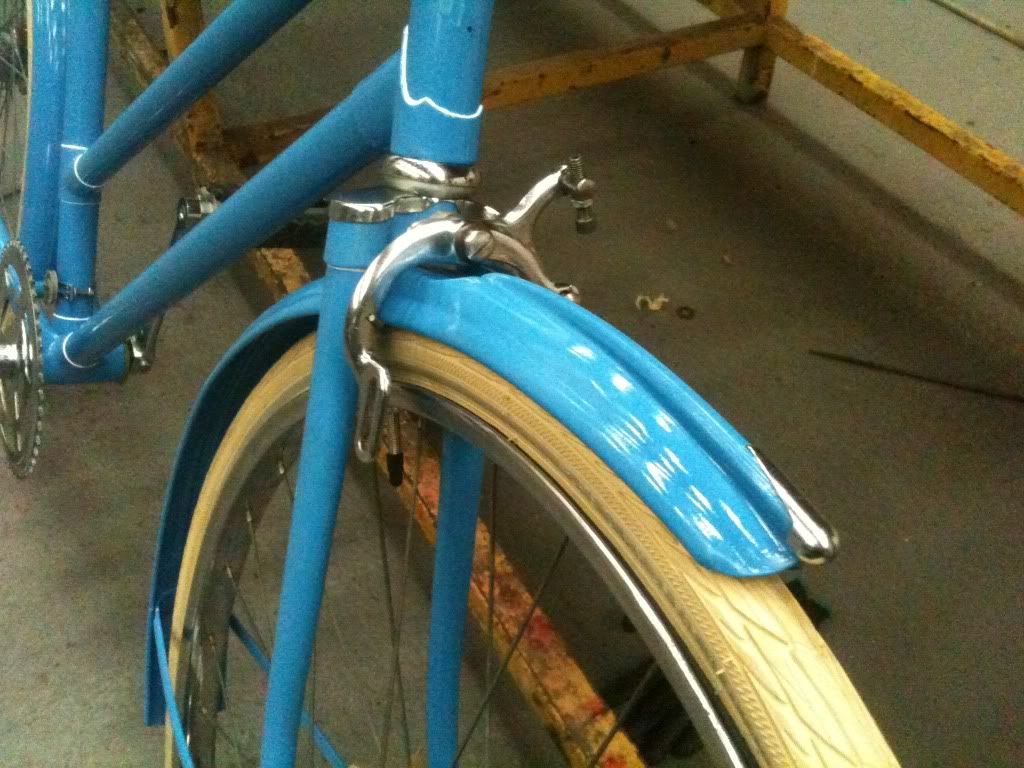 And then on with the wheels ;D ;D ;D 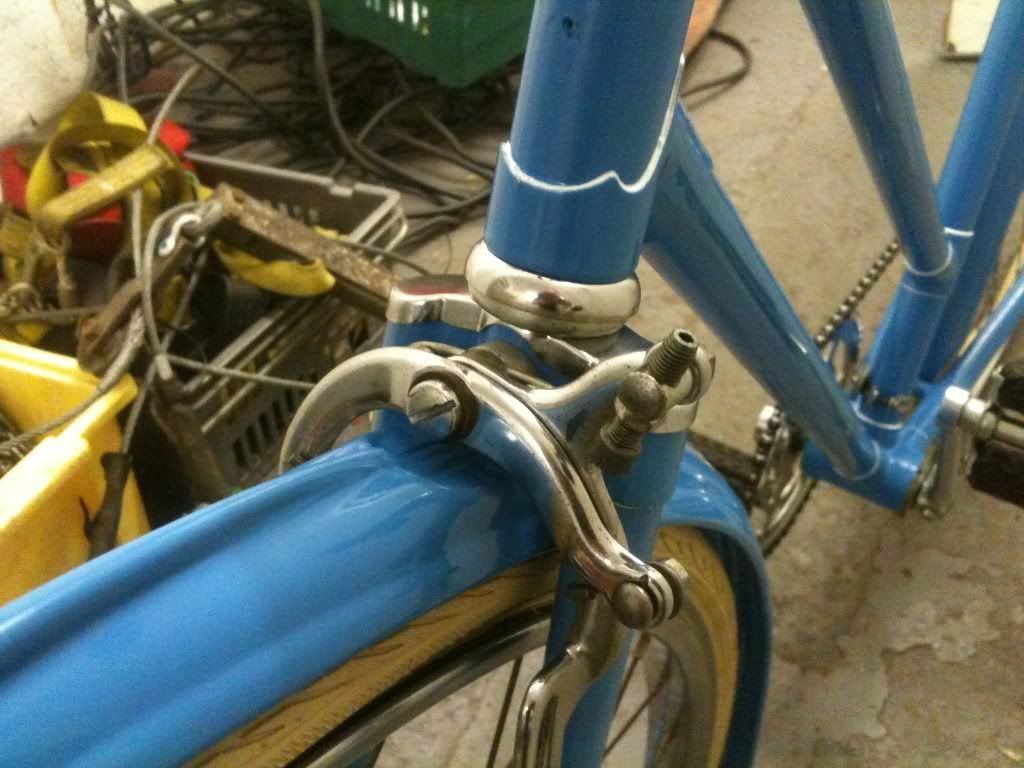 SO HAPPY with how this looks  In all the excitement I may have made a slightly stupid mistake  and fitted the back wheel the wrong way around. 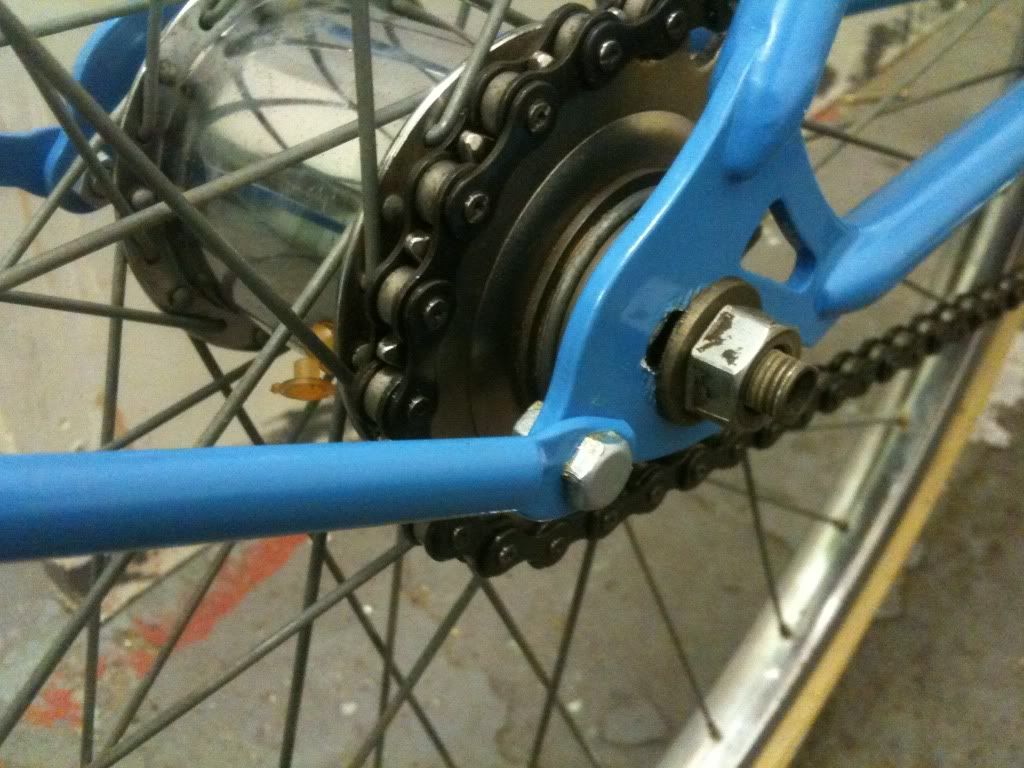 That's better ;D 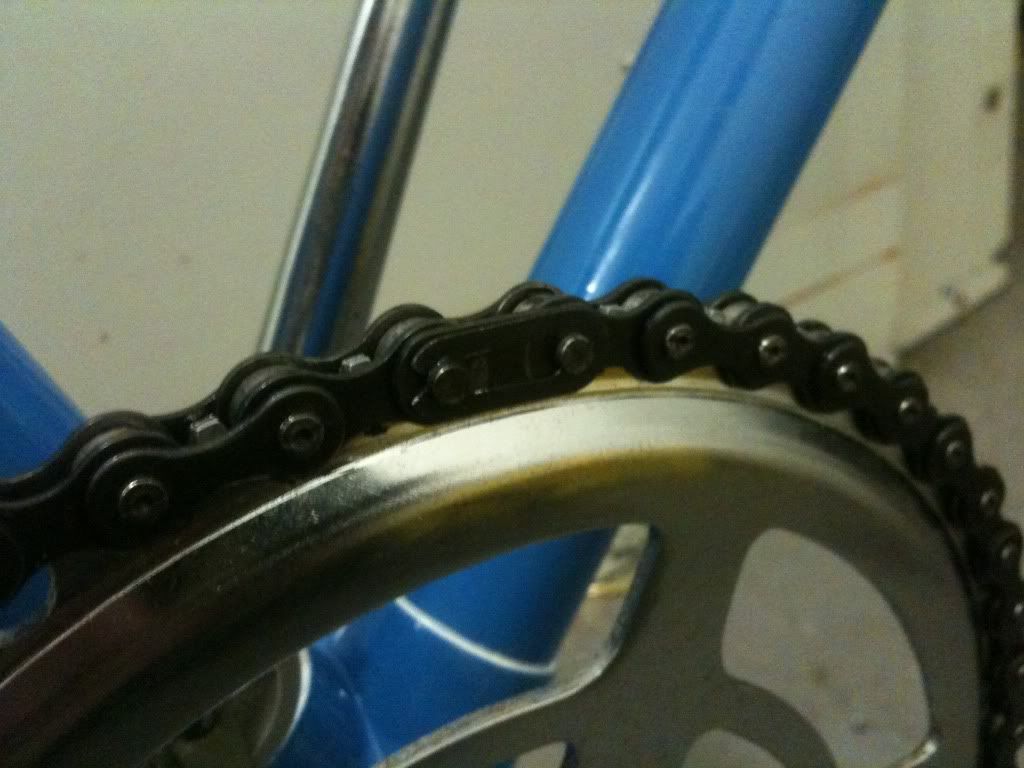 The chain was next on the list so I could set the correct tension and tighten up the rear wheel nuts. The nice thing about old English bikes in you only really need a set of whitworth spanners to work on them, I didn't need any special tools to get the chain off and on again. It has a broken link which you just slip the clip off and pull out. Dead easy I measured the chain for any stretch (it was ok) and then left it in a tin of diesel for a few days to get the last of the wibblepoo off it. Gave it a wipe over and then soaked it in light oil ready to be fitted. 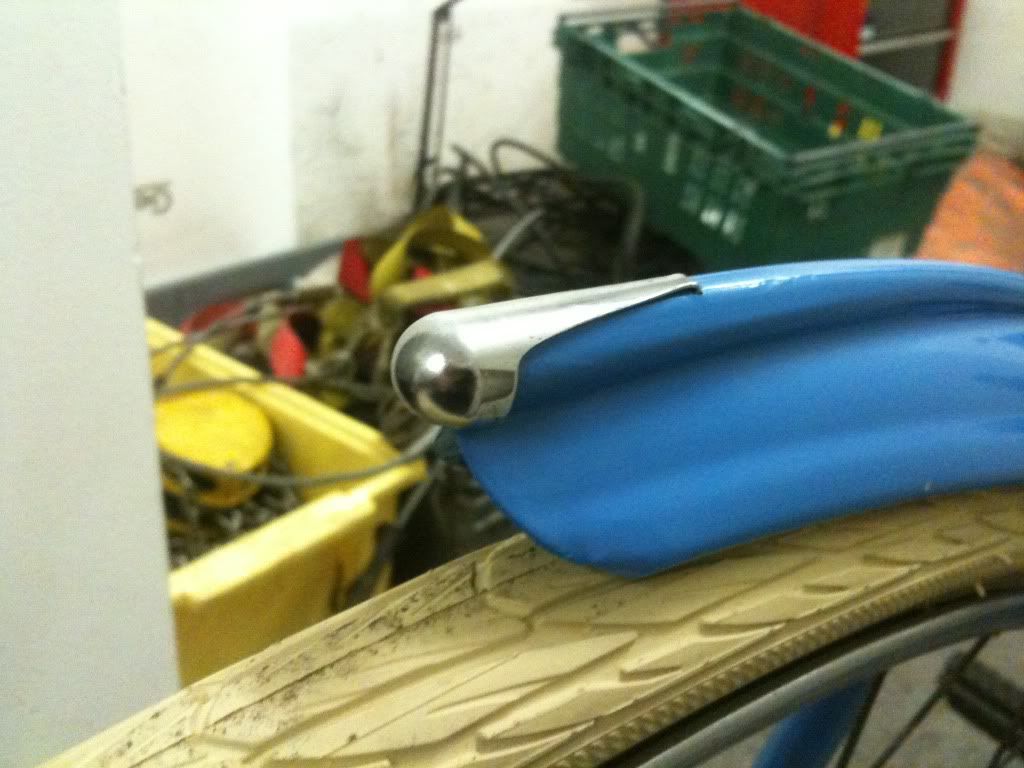 Clipped on the bullet for the front guard, again it cleaned up really well. 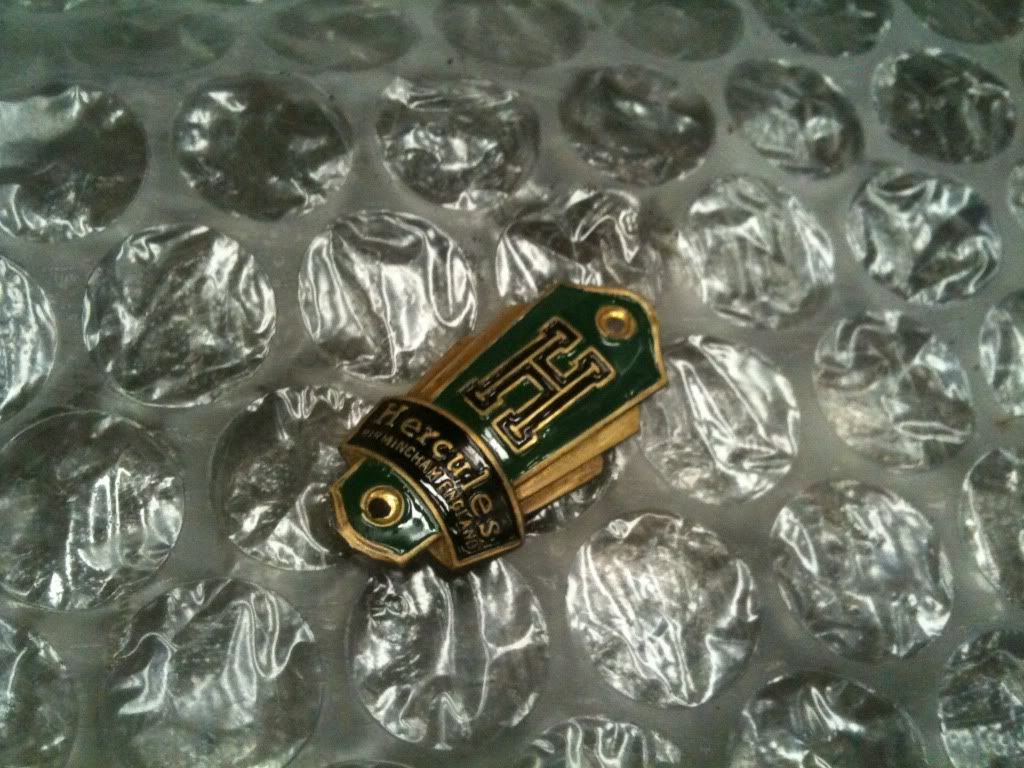 Finished sanding the badge off ready for riveting on. 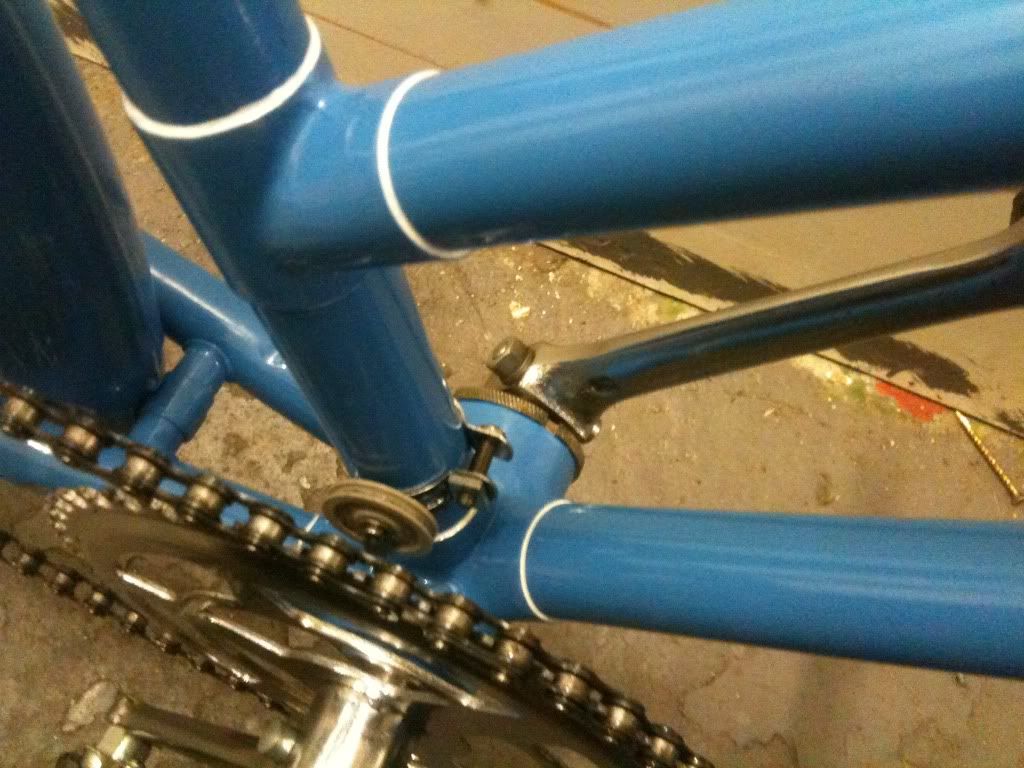 Fitted the roller for the gear change cable. This will probably have to be tweaked so was only installed finger tight. 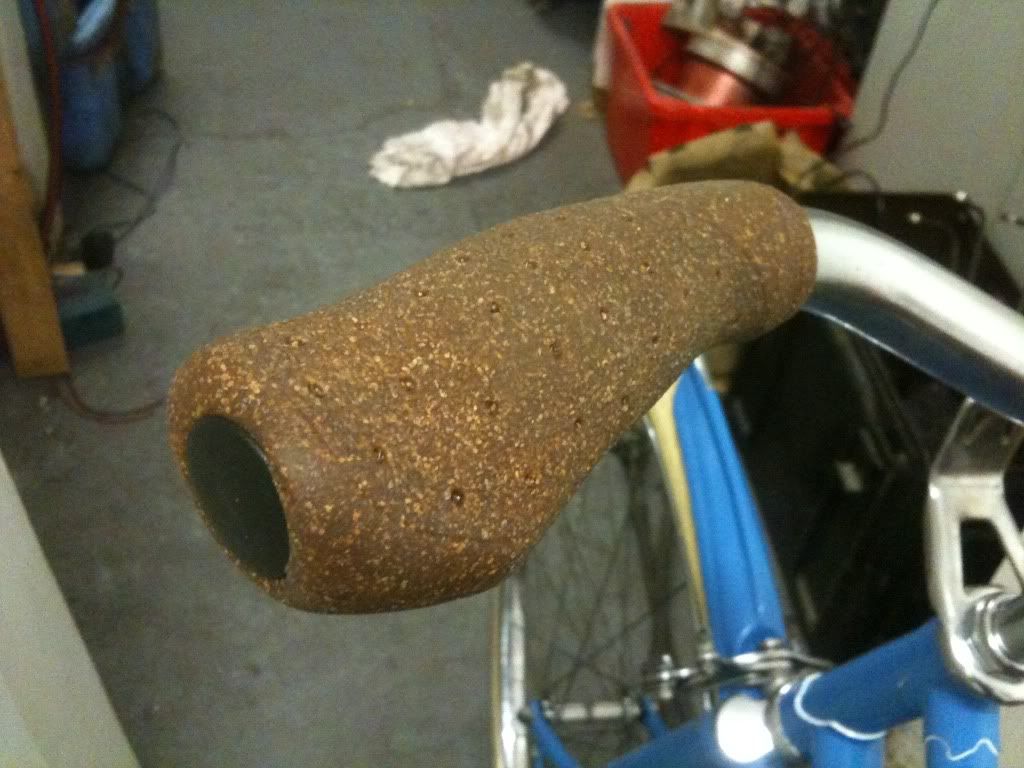 Cork grips going on. They took some serious wrestling to get them to slide over the bars, the worst part is they might have to come off again to be trimmed down!!  At the moment they push the brake levers onto the bend in the handles bars which gives rise to a very weird angle relative to the grips.  Stem and pinch bolt going on. 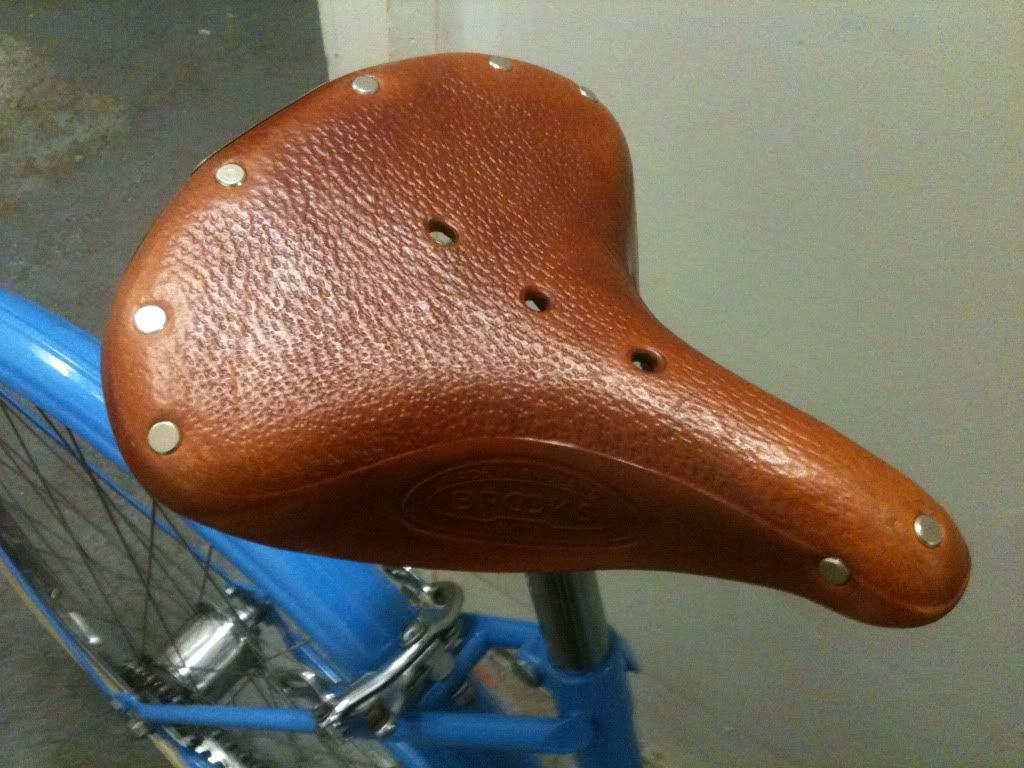 And the icing on the cake. An ex shop display Brooks B67S that was bought for an absolute steal. So chuffed so have found one of these, it really finishes it of I think All comments good and bad welcome. I hope you''re all enjoying this mini restoration. The nice thing about doing a bike instead of a car (or an aircraft) is that because they're so small you can be finished in under a week. Its almost instant gratification for your hard work |
| |
1994 Rover Metro
1994 Peugeot 405 Estate
1991 Rover Metro Gti 16v
2001 Fiat Seicento Sporting
1999 Fiat Punto 1.2
1994 Peugeot 106 Xnd (x3)
1991 Westfield 7
2004 Landrover 110 SW
2003 Seat Ibiza 1.9Tdi Sport
1959 Ford 107e Prefect
1992 Suzuki Vitara
2008 Skoda Fabia
|
|
awoo
Posted a lot
Posts: 1,506
|
|
Oct 21, 2012 21:46:40 GMT
|
youve done a really nice job on this. I'm surprised you didnt need to add anything about wrestling cotter pins, freeing off stuck seat posts, rubbing off inches of rust from the rims with brillo pads, etc. you must have got a minter |
| |
|
|
|
|
|
|
|
Good point! The cotter pins I couldn't shift with a punch and hammer. I ended up putting a deep socket over the one end and then clamping it in a vice. Only after soaking it in penetrating oil did it come free with a bang! I was only able to remove the one side of the bottom bracket bearing, it was so tight the only that would have removed it was a hacksaw (and I didn't want to have to replace it when the bearing surfaces were fine). Most other parts came off with out too much of a fight, and the parts that did fight... well I fought harder |
| |
1994 Rover Metro
1994 Peugeot 405 Estate
1991 Rover Metro Gti 16v
2001 Fiat Seicento Sporting
1999 Fiat Punto 1.2
1994 Peugeot 106 Xnd (x3)
1991 Westfield 7
2004 Landrover 110 SW
2003 Seat Ibiza 1.9Tdi Sport
1959 Ford 107e Prefect
1992 Suzuki Vitara
2008 Skoda Fabia
|
|
lae
Posted a lot
Posts: 1,045
|
|
Oct 22, 2012 14:18:43 GMT
|
|
Looks great. Have you got a picture of the whole thing?
|
| |
Currently:
Mk1 Focus blandmobile
Formerly:
1969 MG Midget
1972 Avenger GT
1981 Datsun Cherry
1989 Corolla
1979 Mercedes W123 200D
1995 Ford Falcon
1996 Ford Telstar (bet you had to google that one)
|
|
|
|
|
|
|
Oct 22, 2012 16:45:52 GMT
|
Looks great. Not many people go as far as picking out the lugs with pinstriping and re-doing the had badge. Nice work |
| |
|
|
|
|
|
Oct 22, 2012 21:55:27 GMT
|
|
Superb stuff, half heartedly attempting to do up a 1970's Puch racer, if it only looks a tenth as good as your efforts when it's done I'll be happy.
|
| |
Corsa Apology Champion 2014.
|
|
|
|
|
|
|
Thanks guys. I should be finished this evening and then I'll take some good (non iPhone) pictures. Like all these things it's just a case of being methodical, if I'm honest I've probably gone a bit further with this than I normally would because it's a gift and I'd hope it'll last another 40 years now. |
| |
1994 Rover Metro
1994 Peugeot 405 Estate
1991 Rover Metro Gti 16v
2001 Fiat Seicento Sporting
1999 Fiat Punto 1.2
1994 Peugeot 106 Xnd (x3)
1991 Westfield 7
2004 Landrover 110 SW
2003 Seat Ibiza 1.9Tdi Sport
1959 Ford 107e Prefect
1992 Suzuki Vitara
2008 Skoda Fabia
|
|
|
|
|
Oct 23, 2012 20:27:09 GMT
|
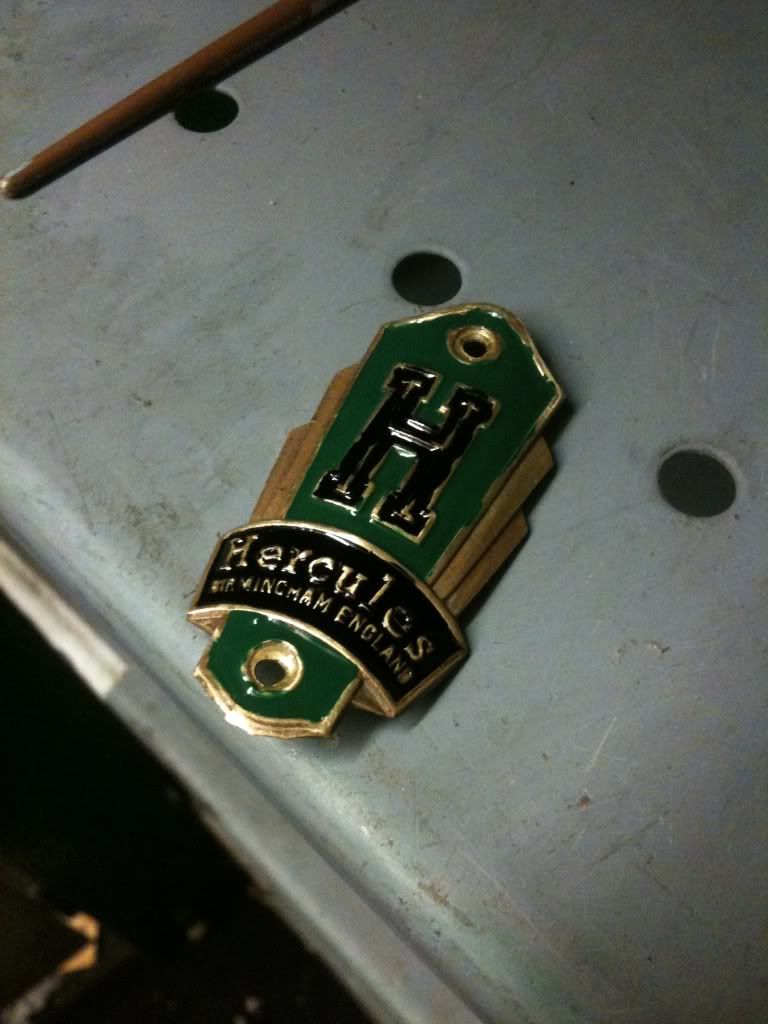
TADAAAA 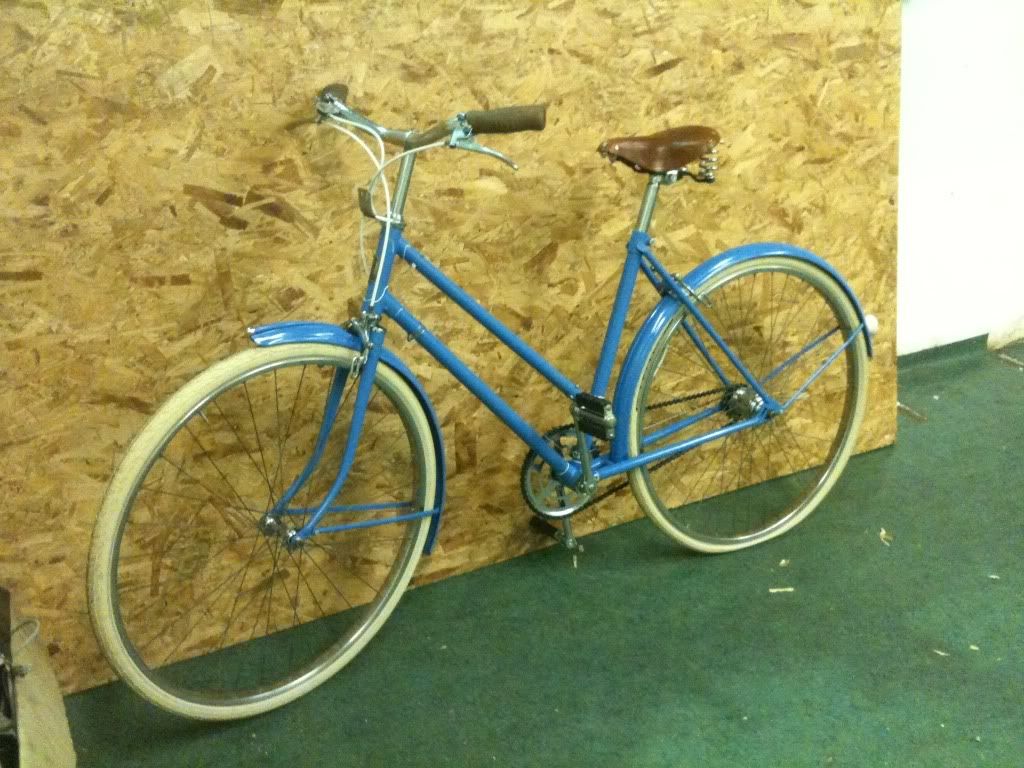 This evening was supposed to be finishing off the final details... but there was to be a minor set back! The eagle eyed of you might have spotted that the rear tyre is still flat. Whilst filling the tyres up my bicycle pump got stuck on one of the valves and without thinking, I gave it a tug! :oPsssssssssssssssssssssssssssssssst and one tyre valve comes off in my hand. curse word! So it's a new tube for the rear wheel. The tubes fitted had the prestolite valve but I'm going to go over to a regular schrader valve for easy filling with a compressor. 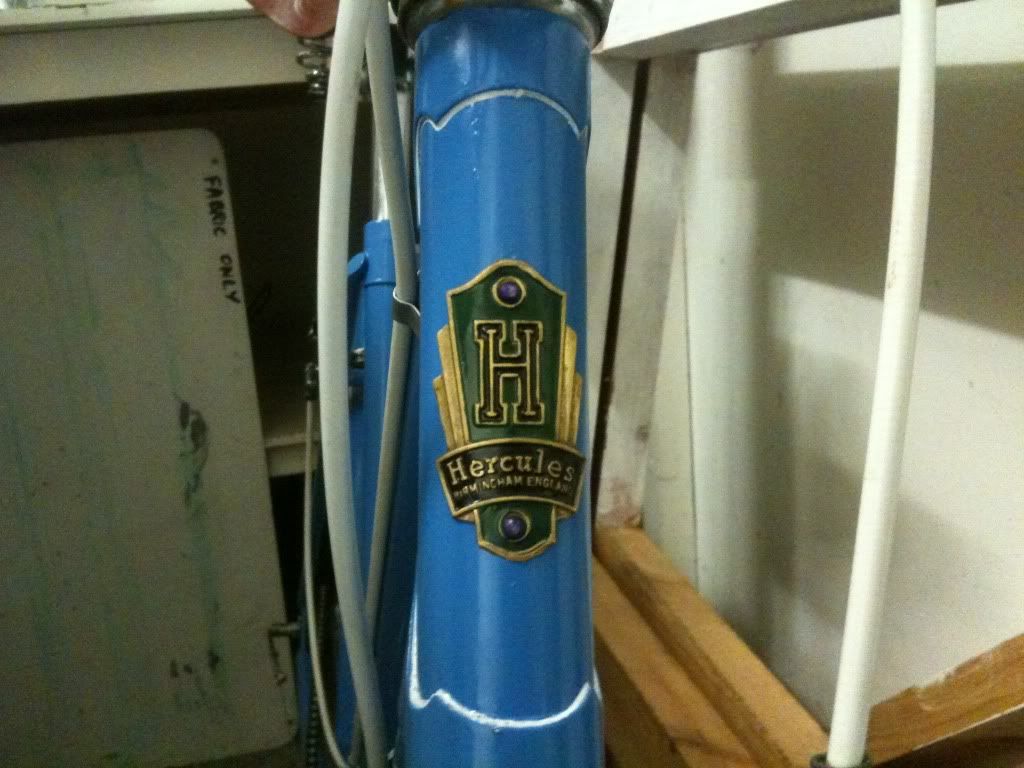 I got the head badge riveted back on as well, i though it might have chipped the paint when peening the rivets but I got away with it (this time). The only things left now are to pull the wheels again to change the inner tubes. Fit the brake shoes and adjust up the brakes and gear change cables. Oh yeah, and fit the chain guard, all in probably less than an hours work ;D ;D ;D All in I think I've about 20-25 hours in this bike. I don't really know if thats high or not. Hopefully the better half will like it. I'm itching to restore/rebuild another. |
| |
1994 Rover Metro
1994 Peugeot 405 Estate
1991 Rover Metro Gti 16v
2001 Fiat Seicento Sporting
1999 Fiat Punto 1.2
1994 Peugeot 106 Xnd (x3)
1991 Westfield 7
2004 Landrover 110 SW
2003 Seat Ibiza 1.9Tdi Sport
1959 Ford 107e Prefect
1992 Suzuki Vitara
2008 Skoda Fabia
|
|
awoo
Posted a lot
Posts: 1,506
|
|
Oct 23, 2012 21:58:38 GMT
|
That looks awesome, well done! 25 hours to get it to that standard is pretty good. I'm doing this sort of thing, although not to this extent, pretty much every day at the moment to scratch the pennies together. I would spend less time than that but not get as far as you have. I spent 11 hours over 3 days trying to move a single cotter pin a few weeks back. not good work flow. |
| |
Last Edit: Oct 23, 2012 21:59:13 GMT by awoo
|
|
|
|
|
|
|
If the cotter pins had given me that much agro I would have broken out the blow torch and failing that the drill! I'm lucky that where work I'm taking old stuff to pieces all the time so have plenty of ideas when it comes to shifting stuck hardware. How did you get the pin out in the end? |
| |
1994 Rover Metro
1994 Peugeot 405 Estate
1991 Rover Metro Gti 16v
2001 Fiat Seicento Sporting
1999 Fiat Punto 1.2
1994 Peugeot 106 Xnd (x3)
1991 Westfield 7
2004 Landrover 110 SW
2003 Seat Ibiza 1.9Tdi Sport
1959 Ford 107e Prefect
1992 Suzuki Vitara
2008 Skoda Fabia
|
|
lae
Posted a lot
Posts: 1,045
|
|
Oct 25, 2012 10:45:14 GMT
|
|
Excellent work, that's a really handsome and practical bike at a fraction of the cost of a Pashley.
Strangely I've never had a problem with cotter pins, even on my 1940s Claud Butler. I did mean to upgrade the steel cranks on my girlfriend's bike to lighter aluminium ones when they wore out... that was four years ago and even with daily use and bi-annual chain cleaning, it's still on the original cranks. Those old 1/8 steel chainrings really are tough.
|
| |
Currently:
Mk1 Focus blandmobile
Formerly:
1969 MG Midget
1972 Avenger GT
1981 Datsun Cherry
1989 Corolla
1979 Mercedes W123 200D
1995 Ford Falcon
1996 Ford Telstar (bet you had to google that one)
|
|
awoo
Posted a lot
Posts: 1,506
|
|
Oct 25, 2012 21:33:02 GMT
|
well heat was the final option, oxy acetylene was the next step after all else failed, melt the sod out. I got half the pin out but it just stopped half way. so I drilled it but couldnt get the angle on it, only got some of it out. tried the vice press trick - broke the vice! its was only a small record type copy but even so about 10kg worth of vice went bang before the pin pushed out some how. tried lots of things. eventually asked my dad who is an old skool engineer. he said knock it back the way it came, something I was reluctant to do, and just keep whacking it back and forth till it comes out. had it out in 5 mins... I have to learn to ask for help more readily I think. lesson learnt! this was the offender, the new cotter pin can be seen in the pic, the difficult one was on the drive side, the other side was fine, super easy.  |
| |
Last Edit: Oct 25, 2012 21:41:22 GMT by awoo
|
|
|
|
|
|
|
|
Use hairspray on the grips. Makes installation/removal a piece of proverbial!
|
| |
|
|
|
|
|
|
|
|
In the end I lubed up the bars with a drop of fuel, made the rubber slippery until the fuel dried, and then it turned to superglue! Today's the day it gets delivered home and hidden ready for the big reveal. Finally gave it a spin and adjusted all the brakes and gear change. The three speed is nice but it takes a little finess to change, you just need to relax pressure on the pedals as you shift.
|
| |
1994 Rover Metro
1994 Peugeot 405 Estate
1991 Rover Metro Gti 16v
2001 Fiat Seicento Sporting
1999 Fiat Punto 1.2
1994 Peugeot 106 Xnd (x3)
1991 Westfield 7
2004 Landrover 110 SW
2003 Seat Ibiza 1.9Tdi Sport
1959 Ford 107e Prefect
1992 Suzuki Vitara
2008 Skoda Fabia
|
|
|
|


 Underneath all the muck was a 3 speed Sturmy Archer which also revealed the date of the bike as being March 1964
 The guy I dealt with was really good and had the frame, forks and mud guards stripped and ready within 24 hours of me dropping them off. I will definitely be going back with more work for them in the future
  I then gave everything a good clean and acid etched them (sorry no other pics) ready for the rest of the paint. Found the serial number in the process hiding under the seat post.


 ill be watching this
 At the moment they push the brake levers onto the bend in the handles bars which gives rise to a very weird angle relative to the grips.