eurogranada
Europe
To tinker or not to tinker, that is the question...
Posts: 2,543
|
|
|
|
Oh blimey! I need to have a proper read of your post and I'm not sure I have the brain power at the moment. Give me a day or three and I will. James No problem! And if there's no (easy) solution also no problem! Worst case I now just make it all work and figure out how to adapt later. But it looks like this coming weekend has a pretty full calendar already so I might not get to do as much as I'd like anyway. But next week is a short week due to bank holidays! Yeey... |
| |
|
|
|
|
spot
Part of things

Posts: 105
|
|
May 18, 2023 18:12:57 GMT
|
Alex, I think that I too have not fully understood what you've added that is 'new', or that which is now broken...  On the Lanbo LB-405 C/L unit you've shown: Is there a 'dip' switch (or setting procedure on the fob) that allows changing the pulse timer? I saw it mentioned somewhere that the unit can be set to allow a short spike (electric actuators), or a longer spike (pneumatic). I did wonder 'if' yours had this feature could that have been a reason why you observed a 'weak' outcome when you connected the mirrors into the circuit - Would the long spike allow the mirrors enough time to fully extend/retract?? I had some random ideas on fitting an override switch but nothing that I wish to air in case of public humiliation Plus, I am still unsure why the switch is required as you can lock the doors with the fob whilst in or out of the car, or have I misunderstood?. One more random thought with that device: Could you feed the mirror circuit with any of the unused Window/Boot/Horn outputs? I think I saw that the window closure operates a negative output in the region of 14 seconds (You may want to test this theory though!). That could possibly be useful to drive the mirror closure circuit (if you are ever walking away from the car and had forgot to use the inside folding button), I worry less about auto-opening - only because I cannot fathom its usefulness when you have a button to push  Humour me whilst I guess your button pin arangement I 'think' 12v goes to the top right; illumination feed to top left. Bottom left/right goes to motors and middle two are both ground... ...my other goto idea would be to take a BFH (gently) to one of the grubbiest switches you have and look inside! |
| |
|
|
|
|
|
May 21, 2023 21:12:17 GMT
|
Alex, First of all, apologies for not replying. Things are a bit chaotic at Sweetpea Towers. I want to get my car back in one piece and hopefully on the road this summer but I have a pile of other stuff I need to get out of the way first. I've been working hard during the day and collapsing in a flabby heap in the evening! Anyway, like spot said, I'm also a bit lost as to what the current situation is and which bit let the magic smoke out. Clearly something isn't working as expected if blew up. To make any progress I could do with the wiring diagram for the mirrors and the manual for the central locking controller. That way I can see what we are working with. It's clearly going to fight us and not play ball. I would also say that adding buttons to a controller that isn't expecting them could be tricky. Ideally you'd want the buttons to input to the processor and have it operate the door locks (possibly difficult) rather than poking the relays directly which could leave the processor a bit confused as to what state the door locks are in. That said you could probably do It by spoofing the door motor switch on the 5 wire motor. That would probably be safer. I'll draw you a picture if that sentence didn't make sense. I'm going to make a suggestion which you can completely ignore. Let's face it, loads of people make great suggestions to me that I pay no attention to. I think you should get the car going and enjoy it with whatever you have working now. But leave your options open with regard to having another go at this problem later. I would also suggest you get some bits and rig this up on a bench. Once you prove it's working you can transfer it tidily to the car. Doing all the development work on the car is going to be hard work if it's going to fight. James |
| |
|
|
thomfr
Part of things
Trying to assemble the Duett again..
Posts: 663
|
|
|
|
|
How about manual Mirrors and drive it? ;-)
Thom
|
| |
73' Alfa Giulia Super
64' Volvo Duett
65' Volvo Duett
67' Volvo Amazon 123GT
09' Ford Focus 1.8
20' VW ID4
71' Benelli Motorella
65' Cyrus Speciaal
The difference between men and boys is the price of their toys
|
|
eurogranada
Europe
To tinker or not to tinker, that is the question...
Posts: 2,543
|
|
May 22, 2023 12:01:58 GMT
|
How about manual Mirrors and drive it? ;-) Thom Haha you don't know me well eough I gather, lol. But I hear ya! |
| |
|
|
eurogranada
Europe
To tinker or not to tinker, that is the question...
Posts: 2,543
|
|
May 22, 2023 13:27:14 GMT
|
sweetpea and spot, you're probably right. It can get confusing... But I guess I did a little of what both of you said and moved on...or prepped for a revisit. So as a little update: The mirrors are in and working fine. But using the OLD CL controller I found it needed the door lock motor to function properly. I found I could get it to work as I liked by adding a switch. Only instead of a single push button momentary switch, I had to resort to a toggle switch. So I used a window up/down switch. It gets a common earth and then the signal wires for open and close to each side of the switch. And that works fine and I found that perfectly acceptable as it almost mimics the behavior of the daily transit. The one remaining thing I couldn't figure out just yet is getting the light in the switch working. I started taking one spare apart, to measure through, but I now also have a diagram of the switch so hope I can still get that fixed as well. To anticipate but not let it slow me down I wired in two extra points to take the light signal from so when I switch on the car lights the switches can in the future join in the fun. Well to clarify somewhat: I had bought two new CL modules. One old style working from the lock(motors) on turning the key. The other with a remote. They should have been able to work together. But when hooking them up in the only way that worked the old style unit’s push button feature lost “force” and didn’t operate the system well enough. At the same time the remote unit also fed the motors so it got the same instructions from two controllers. I had the systems separated again and just tested the old style CL unit, but it gave up the ghost pretty quickly. So with that I resorted to suing the remote one. But that did not have a switch input, which I would have liked. And I agree here with you gents, the ideal situation you’d trigger the processor not the relays but I felt if I could do at least that, it would warrant adding the button for it and keeping a symmetry in the controls. But I measured it all and just couldn’t make sense of the amount of 12v’s I was seeing but from separate inputs. As I didn’t want to ruin this controller I didn’t dare test further, even though the other one did during its normal operating/wired up state. So I wired in the remote unit and had to accept I could now lock and unlock my car from a bit of a distance, I could see the state of locking/unlocking from the indicators and will even be able to add a feed for a trunk release motor. The only thing missing was this much desired manual control, but as the unit doesn’t care if the car is running or not you can always lock the car from the remote. I left preparation for if one of my followers did manage to find a solution. So there’s a 12v source, 12v light source (hence the two referred to before) and an earth available if need be. I also kept that module nice and easily accessibly tucked away. Next up was anything center console related. So the wiring for switches, for lighters/12v accessory feeds and the rear seat charging points. I had previously run a wire back there but never finished as I never made the cubbies to fill the space. So this time around I brought the wires back to both sides of the seat base, added earths to complete the circuits etc. I even ran a wire for lighting these items as well. No half work here lol. With that all done, next up was the audio and phone kit installation. I ran all wiring for that in the original way with the original components. I did obviously update the way it was incorporated into the car. One channel on the speakers would frequently cut out before s I had to check the signal wires which were conveniently hidden behind the side bolsters of the rear seat back before going into that deep boot. I found a bit of damage insulation that must have been present from the mustang that this set was in before as there was nothing in the area that the wires could have chafed/rubbed upon. I fixed that bit too. Now I’ll see if I can or can’t live with the Bluetooth sound quality. I found it a bit bland before, a bit flat. In case I think this again, I’ll find a unit that has a good reputation on sound quality and uses cinch outputs or a phone jack. Before I also had the problem that the phone kit was susceptible to interference from the running car/alternator. I hope taking care of quality earthing has solved this, if not I’ll add another earth as it proved to be the solution in the old setup. But really there shouldn’t be an issue. I didn’t get to test the audio yet as I wanted to move on working toward building the interior back up. So I chose to fit the side trims that cover the inner sill to carpet join and the (originally one small) wiring to the back. Now there are so many wires under them that fitting them is a challenge. This meant the rear seat base could be put back in place and bolted up. Next I could position the center console again. I would still like to find another and have it wrapped in vinyl/leather better than my first attempt as the glue didn’t stick well enough and creases formed, but also because with my current eye for detail I see to much wrong with it lol. Anyway, I got that in place as well. Managed to finally for the first time in 18 years fit the armrest to it in a decent way. I was frustrated to know I took a little lock tab plate for it from another spare but too far gone to rescue console but obviously couldn’t find it to fit it. Next I had wired in and placed an original ford lighted cigarette lighter, but it didn’t light when the lights were turned on. The multimeter confirmed it was the bulb so another one to swap for an led solution. With the console and sill plates in, the seats could be bolted back as well. So they were and things were starting to look better. I neatened and wrapped all wiring in the dash so it should be safe from chafing etc. felt good to finally be able to do that as all wires were run. I had to overcome a small challenge as I had earlier just put the earth wires through a hole without protection, as my step drill was missing. A 5 euro Lidl set to the rescue I could now do that properly and fit a bung for the wires to go through. Thankfully in hindsight I opted for a big bung. As I found later while doing the audio wiring I had a few big ones to accommodate and they didn’t fit the 12v hole anymore so had to reside to putting them through with those earths. It was tricky but I found myself pretty clever in the way I managed to get it all in. Anyway, with all systems now present, accounted for and working, the only thing left was the dash. This needs four led’s remade and this time with a connector between them and the dash for ease of future removal. And don’t forget the now additional lighter light led conversion. Unfortunately play time was definitely over by then… all of the above took me three full afternoons of work. It just always doesn’t seem to amount to much until you get underway. There’s always another little side project (like the armrest on the console or the lighter) that eats time. But I enjoyed getting closer. Now all I need to finish is those led’s and I can put the dash fascia, dash binnacle and binnacle cover back on. I verified that all this can be done with all of the other stuff in the car. So if I ever need to access the ecu again I should be able to take out just the dash. I’m not yet perfectly happy with how the wiring is coming into the car. The well wrapped loom is too stiff to conform to the dash shape. And I would really like to make a lower cover, these are something my car never had but should be present between lower dash metal plate and the firewall. This would also remove an eyesore as the loom would then be invisible again. Being this far I expect to finish and test the car later this week. I already fear a coolant leak in the v from either the under head hose or the in valley coolant pipe o-ring as when jacked up I had a stream of coolant from a corner of the valley which can't really be explained away any other way. But I’ll see first how bad it is. Worst case I’ll have to remove the intake once more but I’m proficient at that by now. Oh and I need to drive it long enough to see if the hego/lambda error comes back and more so on which side of the engine according to the ecu. This should tell me if I have a sensor or a wiring problem there. I do now also feel like I should use 3d printing to make the cubbies for the rear seat base filler and for the wheel hub adapters so I can fit a hub cover and finally I’d like to design a cover for the new fuse boxes. But I only know one UK RR forum member (also with a lovely Ford) that may be able to help with this so if this all is viable we’ll have to see. I’ll pen my design ideas and see what comes of it all. Finally I am so sick of this engine leaking oil like a sieve that I’ll also try and build a “new” refreshed bob with new timing chains, guides, tensioners, gaskets and all it needs. But this might be anywhere from 2 to 4k in cost so is not an easy thing to do. Also do I then go LPG injection or stay petrol. Another cost and also if done by myself a chellenge to get certified. Petrol is going to go through the roof as a deterrent to keep driving fossil fuel cars in the next years but LPG is not so widely available anymore… Well, is that an update or what? Pictures to follow.
|
| |
|
|
eurogranada
Europe
To tinker or not to tinker, that is the question...
Posts: 2,543
|
|
May 22, 2023 13:45:29 GMT
|
Alex, I think that I too have not fully understood what you've added that is 'new', or that which is now broken... On the Lanbo LB-405 C/L unit you've shown: Is there a 'dip' switch (or setting procedure on the fob) that allows changing the pulse timer? I saw it mentioned somewhere that the unit can be set to allow a short spike (electric actuators), or a longer spike (pneumatic). I did wonder 'if' yours had this feature could that have been a reason why you observed a 'weak' outcome when you connected the mirrors into the circuit - Would the long spike allow the mirrors enough time to fully extend/retract?? I had some random ideas on fitting an override switch but nothing that I wish to air in case of public humiliation Plus, I am still unsure why the switch is required as you can lock the doors with the fob whilst in or out of the car, or have I misunderstood?. One more random thought with that device: Could you feed the mirror circuit with any of the unused Window/Boot/Horn outputs? I think I saw that the window closure operates a negative output in the region of 14 seconds (You may want to test this theory though!). That could possibly be useful to drive the mirror closure circuit (if you are ever walking away from the car and had forgot to use the inside folding button), I worry less about auto-opening - only because I cannot fathom its usefulness when you have a button to push Humour me whilst I guess your button pin arangement I 'think' 12v goes to the top right; illumination feed to top left. Bottom left/right goes to motors and middle two are both ground... ...my other goto idea would be to take a BFH (gently) to one of the grubbiest switches you have and look inside! Hey pal, First off... a message has been in the making for weeks so expect that this week! Secondly, I'll try not to offend, chastise or humiliate you, ok? The unit I have does have that dipswitch, but it had no effect on the problem. Also the problem already existed just from hooking the non remote CL module together with the remote CL unit, which it was advertised to be able to. Hooking the two units together that should have worked just wouldn't properly. And using diodes I got it working well again, but the diodes only lived one cycle. Hey all I can say is I have some understanding of electrickery but not enough! No you understood right, the remote fob works always so in and out of the car with or without it running. The button is just a convenience. It's more of a hassle to grab a swinging remote and find the right button than to just press a push button switch in a fixed center console location. You saw right and maybe, just maybe the window trigger could be used to trigger the mirror close. But I was now very hesitant to have these two units act together. It would be interesting to test, but I don't think I dare. But remote closing if forgetting is a convenient option. haha, the pin arrangement from ford I just found yesterday so I'll have to see, but I'm currently having two 12v signals and putting one at a time to earth (from one pin) triggers each motion. Thanks also for the other options you showed via mail. I felt those were out of my abilities given the time frame. Same for programming an arduino to do all this which would have been cool but just no time for. |
| |
|
|
eurogranada
Europe
To tinker or not to tinker, that is the question...
Posts: 2,543
|
|
May 22, 2023 13:46:31 GMT
|
Alex, First of all, apologies for not replying. Things are a bit chaotic at Sweetpea Towers. I want to get my car back in one piece and hopefully on the road this summer but I have a pile of other stuff I need to get out of the way first. I've been working hard during the day and collapsing in a flabby heap in the evening! Anyway, like spot said, I'm also a bit lost as to what the current situation is and which bit let the magic smoke out. Clearly something isn't working as expected if blew up. To make any progress I could do with the wiring diagram for the mirrors and the manual for the central locking controller. That way I can see what we are working with. It's clearly going to fight us and not play ball. I would also say that adding buttons to a controller that isn't expecting them could be tricky. Ideally you'd want the buttons to input to the processor and have it operate the door locks (possibly difficult) rather than poking the relays directly which could leave the processor a bit confused as to what state the door locks are in. That said you could probably do It by spoofing the door motor switch on the 5 wire motor. That would probably be safer. I'll draw you a picture if that sentence didn't make sense. I'm going to make a suggestion which you can completely ignore. Let's face it, loads of people make great suggestions to me that I pay no attention to. I think you should get the car going and enjoy it with whatever you have working now. But leave your options open with regard to having another go at this problem later. I would also suggest you get some bits and rig this up on a bench. Once you prove it's working you can transfer it tidily to the car. Doing all the development work on the car is going to be hard work if it's going to fight. James James, don't appologize for being a busy man! No need in my book. You've shown your willingness to help plenty en continue to do so. I fully understand! |
| |
|
|
|
|
|
May 22, 2023 19:10:22 GMT
|
|
Alex,
If I'm reading this right there was a time when you had two door lock controllers connected to the door motors? And that one of them died in the struggle? If that's so then you probably didn't want to do that (obviously as it didn't work and one controller died).
It's quite possible that one, or both, of the controllers connects both sides of the door lock motors to ground when it's inactive. There are two reasons for doing this. Firstly it resists the motor moving (which isn't likely to be a problem on the locking motors as there is a lot of mechanical drag) but also it simplifies the design and operation of the circuit.
If I'm correct the second controller tries to switch 12V to a wire that the other controller is holding at ground. The result would be about 6 volts at the motors and a blown fuse or dead controller.
That's all an educated guess mind.
Here's a thought...
The 5 wire lock motors use 3 wires for a switch. The idea (I believe) is that when you use the key in the door you force the switch to the other position. That wakes the controller up and it drives all the door motors.
Now when I last played with this I think I had 5 wire motors on both front doors. IF that's correct (it's a big if) then you could parallel the interior button across the switch wires and it'd work. The controller wouldn't know the difference between the door motor changing position or the switch doing it.
A possibly safer way would be to disconnect the door motor switch and wire the interior switch in its place. That way they can't fight each other. It's possible that won't work if the controller is expecting to see the switch stay in position but my guess is it won't care. The other problem is that the key in the door won't trip trigger the central locking but if you are using a remote fob why would you use a key anyway? Apart from when the fob didn't work and I'd call that an emergency so it's acceptable to not unlock the other doors.
James
|
| |
|
|
eurogranada
Europe
To tinker or not to tinker, that is the question...
Posts: 2,543
|
|
May 23, 2023 12:56:04 GMT
|
Alex, If I'm reading this right there was a time when you had two door lock controllers connected to the door motors? And that one of them died in the struggle? If that's so then you probably didn't want to do that (obviously as it didn't work and one controller died). It's quite possible that one, or both, of the controllers connects both sides of the door lock motors to ground when it's inactive. There are two reasons for doing this. Firstly it resists the motor moving (which isn't likely to be a problem on the locking motors as there is a lot of mechanical drag) but also it simplifies the design and operation of the circuit. If I'm correct the second controller tries to switch 12V to a wire that the other controller is holding at ground. The result would be about 6 volts at the motors and a blown fuse or dead controller. That's all an educated guess mind. Here's a thought... The 5 wire lock motors use 3 wires for a switch. The idea (I believe) is that when you use the key in the door you force the switch to the other position. That wakes the controller up and it drives all the door motors. Now when I last played with this I think I had 5 wire motors on both front doors. IF that's correct (it's a big if) then you could parallel the interior button across the switch wires and it'd work. The controller wouldn't know the difference between the door motor changing position or the switch doing it. A possibly safer way would be to disconnect the door motor switch and wire the interior switch in its place. That way they can't fight each other. It's possible that won't work if the controller is expecting to see the switch stay in position but my guess is it won't care. The other problem is that the key in the door won't trip trigger the central locking but if you are using a remote fob why would you use a key anyway? Apart from when the fob didn't work and I'd call that an emergency so it's acceptable to not unlock the other doors. James Hey James, I don't think I fully follow. But for now it's ok as it all is. Yes, I had two controllers fitted to one set of motors. The thinking was, as claimed by the suppliers, your car either had CL already or was fitted with an aftermarket system. Hence controller one to enable the CL system of the car. This was the one with 5 wires and a switch option, and that was triggered by the key. With this in place the second controller was supposed to just add the remote capability. I do have two 5 wire motors, but although the old CL unit used all 5 wires, the new CL remote unit only uses two of the five. And the old CL unit now ended up controlling the mirrors. Now, the second unit however incorporated mostly the same system as the aftermarket CL unit I had fitted. So indeed both controllers triggered when the remote was added. But this meant that with just the motors in place, the second controller could by itself work these with a 2 wire system. So that is how I ended up fitting it. I used one CL controller for the mirrors and the second with remote for the door motors. Had I not wanted the remote more than the in cabin manual switch, I'd have used the 5 wire controller for the locks as well and all would be like you said, the switch would have worked. Your guess as to why the motor worked poorly on the switch when both units were linked may be right, I don't really know. My multimeter was too slow to show the thrue voltage when triggered as it was only a short trigger. Currently the motors are using 2 wires to work and the other three are just not connected. I'd have liked to be able to add a manual switch but after all the effort I'm currently fine with not having it. |
| |
|
|
spot
Part of things
Posts: 105
|
|
May 24, 2023 14:51:37 GMT
|
I think the voice of reason has spoken. The old way really wasn’t a problem… I knew something wasn't right > Since when have you ever agreed that I'd said something worth considering in all these years But then right on que you're next recounting how it all went pop - Glad to see you're feeling more yourself again!! "Did the 'remote C/L' you buy have two fobs?" Thinking that to negate the 'swinging fob' saga could you perhaps use the secondary fob and afix that into a static location (Center Console needs redoing so you say). Break out the switches and link them to buttons more of your choosing: Leave the fob acessible (inside arm-rest) so the battery can be replaced as required. |
| |
Last Edit: May 24, 2023 14:52:47 GMT by spot
|
|
|
|
|
May 24, 2023 20:15:56 GMT
|
|
Oh I see. So the central locking controller has no way to connect to the other 3 wires of the 5 wire controller? And currently the key in the door only opens the one door?
That might be really handy. Or it might not...
Could you post a link to the manual for the central locking module you have fitted? Or photograph it and message it to me. Or something.
James
|
| |
|
|
eurogranada
Europe
To tinker or not to tinker, that is the question...
Posts: 2,543
|
|
|
|
I think the voice of reason has spoken. The old way really wasn’t a problem… I knew something wasn't right > Since when have you ever agreed that I'd said something worth considering in all these years But then right on que you're next recounting how it all went pop - Glad to see you're feeling more yourself again!! "Did the 'remote C/L' you buy have two fobs?" Thinking that to negate the 'swinging fob' saga could you perhaps use the secondary fob and afix that into a static location (Center Console needs redoing so you say). Break out the switches and link them to buttons more of your choosing: Leave the fob acessible (inside arm-rest) so the battery can be replaced as required. Haha, well, you know I'm sick so anything I may have said may not have been with full consciousness…   Hm, that is some seriously out of the box thinking with the second remote thing. I guess it could work. One to keep in mind! But for now I’m just going to leave it and see how much I will really miss the functionality. |
| |
|
|
eurogranada
Europe
To tinker or not to tinker, that is the question...
Posts: 2,543
|
|
|
|
Oh I see. So the central locking controller has no way to connect to the other 3 wires of the 5 wire controller? And currently the key in the door only opens the one door? That might be really handy. Or it might not... Could you post a link to the manual for the central locking module you have fitted? Or photograph it and message it to me. Or something. James Jep, the Cl with remote needs only two of the five wires to operate the motors and yes, manual unlocking with the key only unlocks one door. I don't see that so much as a problem as 90% of the time I'm in the car alone. And obviously having a remote negates the use of the key 99.9% of the time. I could scan and send you the details of both kits, but I think for now you can spend your valuable time in much better ways. I'm going to see how I feel about the current functionality first. I think I've come pretty much to terms with it. I made it all so I can revisit at a later date if I want to. Thanks for all your thoughts and guidance etc. Really! |
| |
|
|
|
|
|
May 25, 2023 21:39:24 GMT
|
Spoil sport! Allow me to sneak this into the discussion. 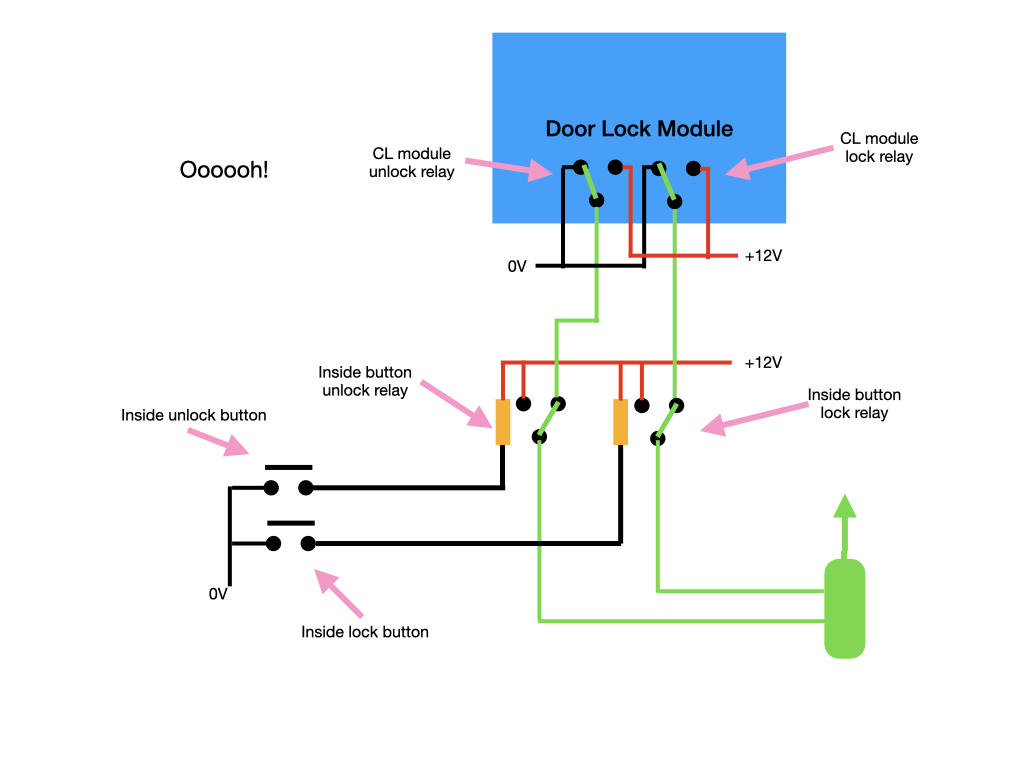 Because the switch in the 5 wire motor isn't connected to the controller then the controller doesn't know the position of the door motors. This means we can take control of the motors directly without annoying the controller. Assuming that I've guessed the wiring of the CL controller correctly then 2 relays would give you interior buttons. Just sayin'! If I'm right about the wiring of that controller then when it's doing nothing it is holding both lock motor wires at earth . That means that the other controller would have been trying to pull up a wire that was being held down. Probably why things blew up. James |
| |
Last Edit: May 25, 2023 21:52:38 GMT by Sweetpea
|
|
|
|
|
May 25, 2023 21:50:17 GMT
|
|
Oh fark me! If that ^^^ is right then I think we can make the mirrors work too.
Tell me if that's right!
|
| |
|
|
|
|
|
May 26, 2023 19:24:35 GMT
|
Ok, here's the idea... 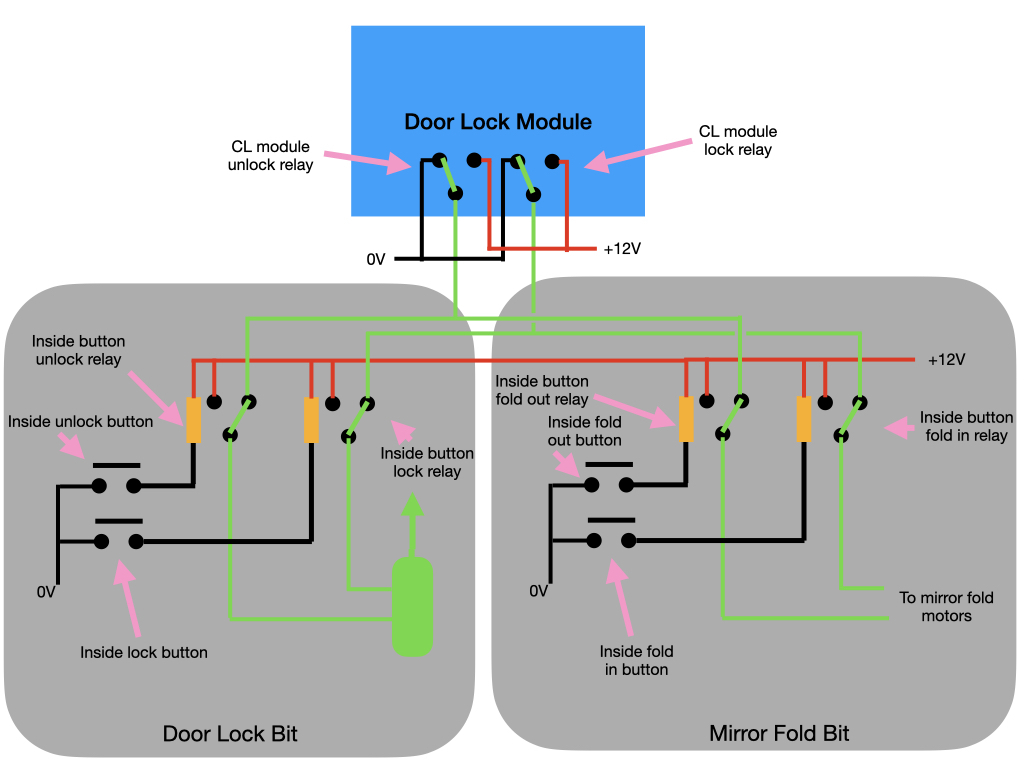 If the wireless central locking controller will drive the mirrors too (I can't imagine it won't, I believe the last one did) and if the CL controller grounds the motor wires as I think it does then this should work. The theory is this... If you press the wireless remote then it'll motor the mirrors and door locks. But if you press a button in the car it disconnects the wiring to the other motors when the relay swings across. The remote will always drive the door locks and mirrors, and the buttons in the car will always just do the mirrors or the door locks. Because we don't have the door switch to worry about we don't have a problem of trying to work out what triggered the motors to move. It's all a lot simpler. James |
| |
Last Edit: May 26, 2023 19:26:44 GMT by Sweetpea
|
|
eurogranada
Europe
To tinker or not to tinker, that is the question...
Posts: 2,543
|
|
May 30, 2023 10:01:32 GMT
|
First off a belated photodump... Cleaning my oil mess and replacing the felt. 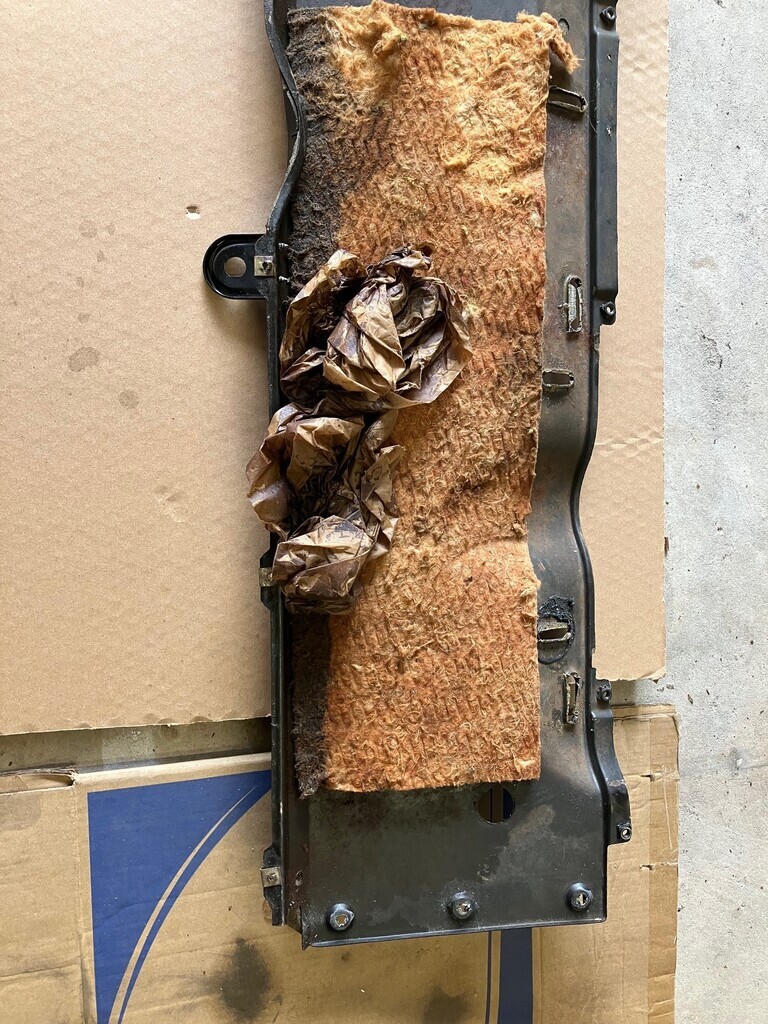 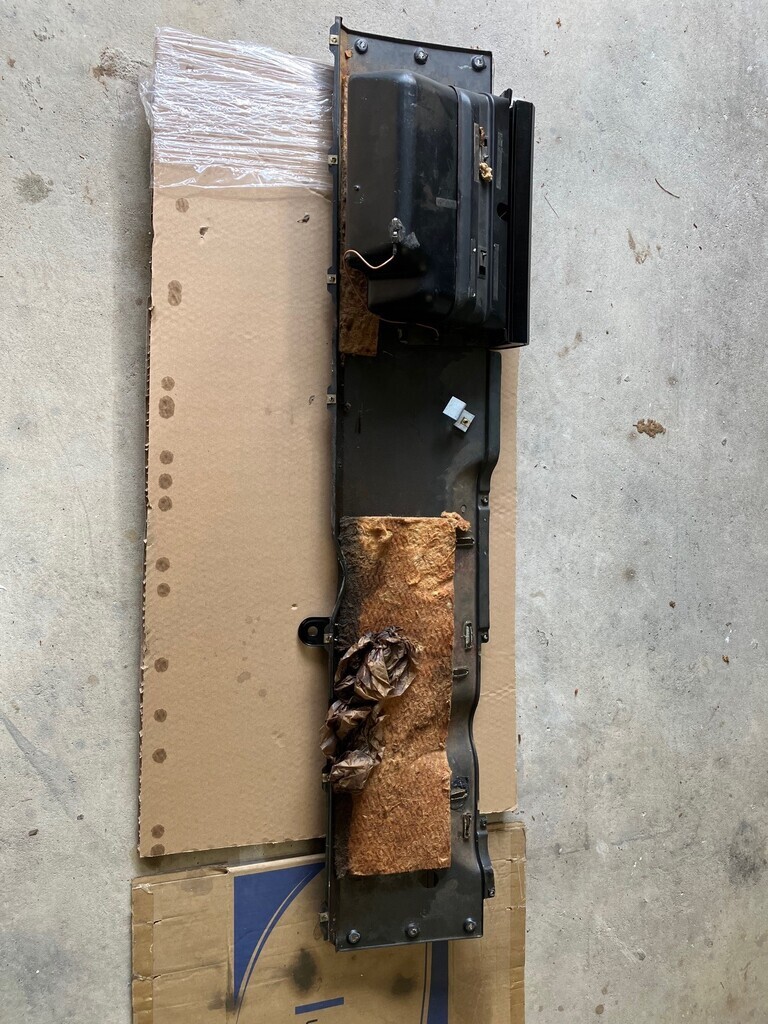 Car outside for working on the last bits.  Putting in protection for the earth wires now I had a new step drillbit. Turned out I needed the room in the bung for some more power wires later as the power side hole was packed!  Under rear seat wiring for the power outlets/phone charges to be incorporated in the cubbies to fill the sides.  Center console back in place and first of the inner sill to carpet covers back in place.  Dash wiring complete and all tied down.  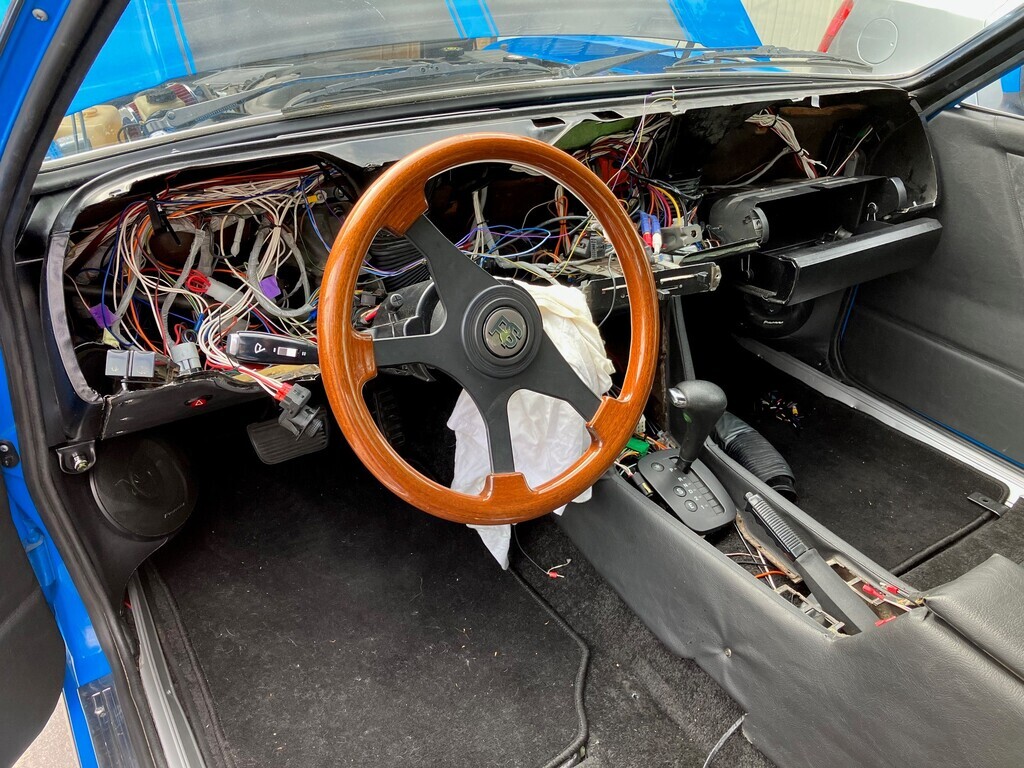 Second sill cover in (hiding loads of audio wires between head unit and amps) 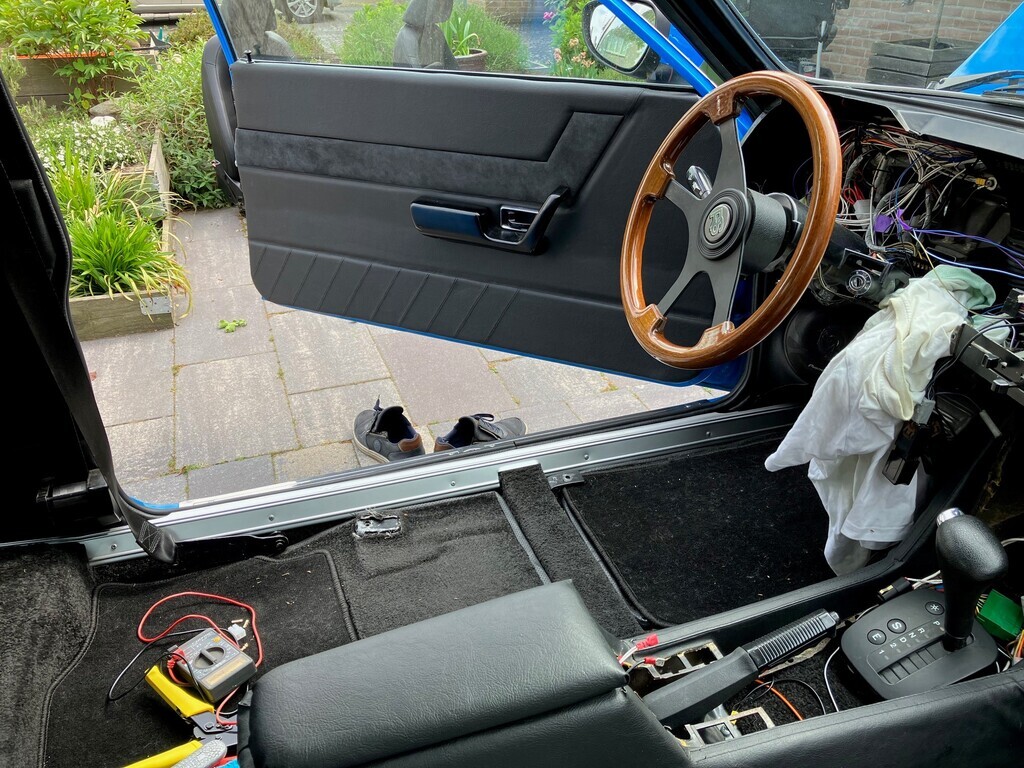 Overview with the interior taking shape 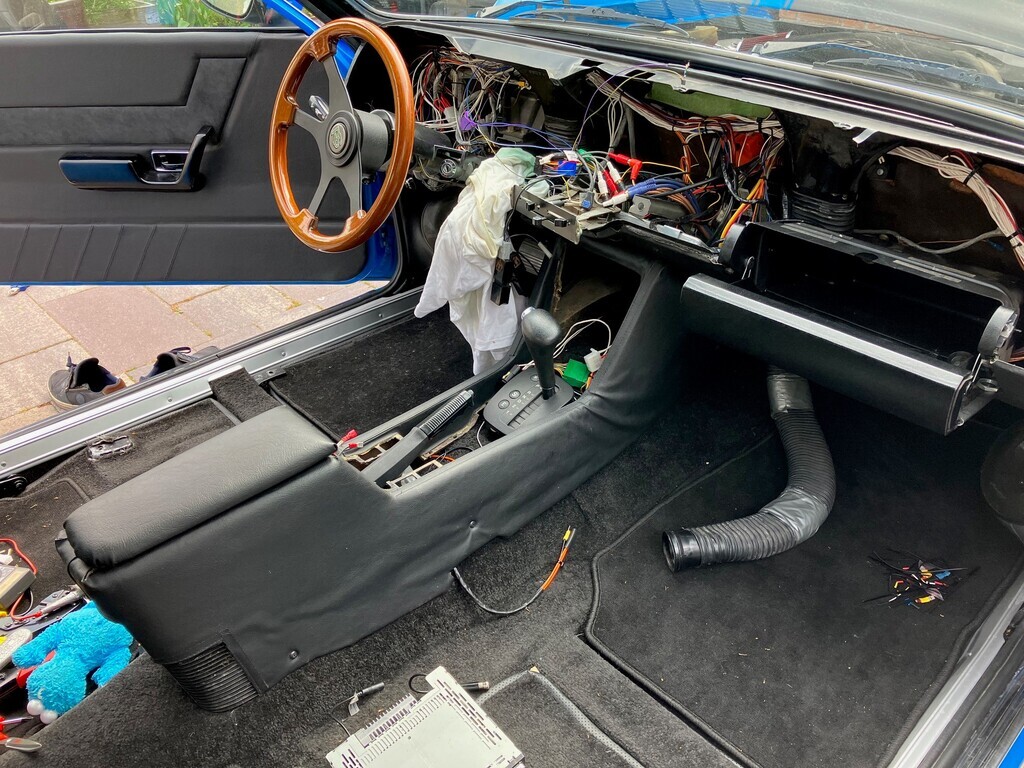 Audio wiring 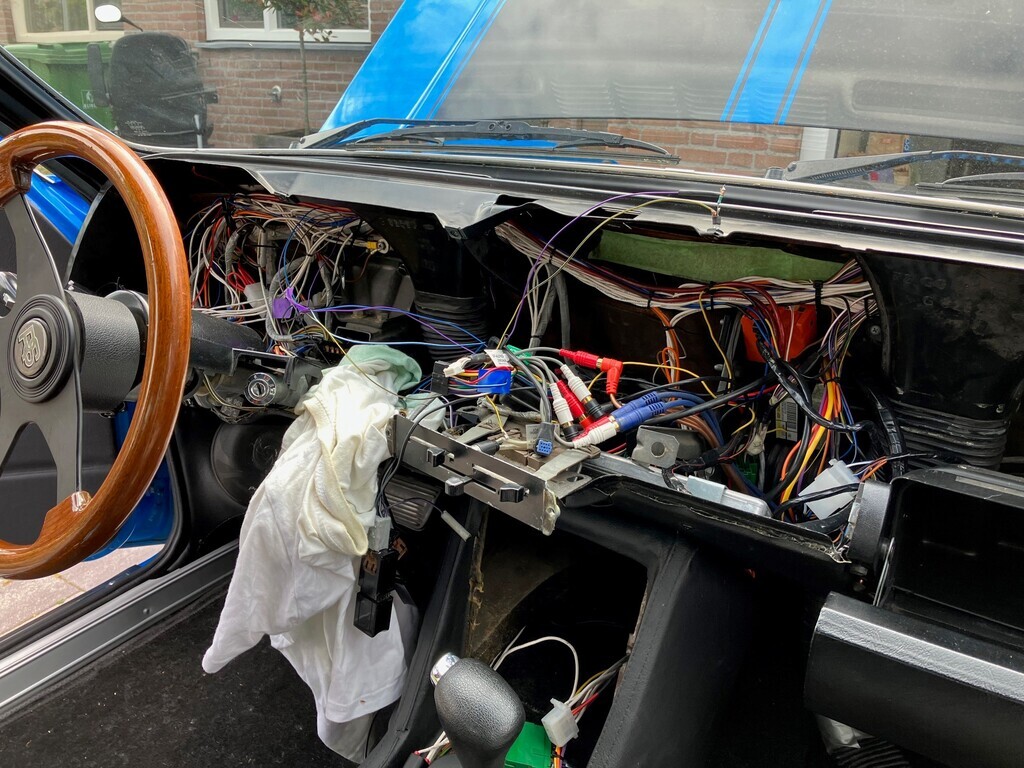 Plugs for easy disconnect of LED's associated with the BOB systems (CC, OD, OP, PATS) 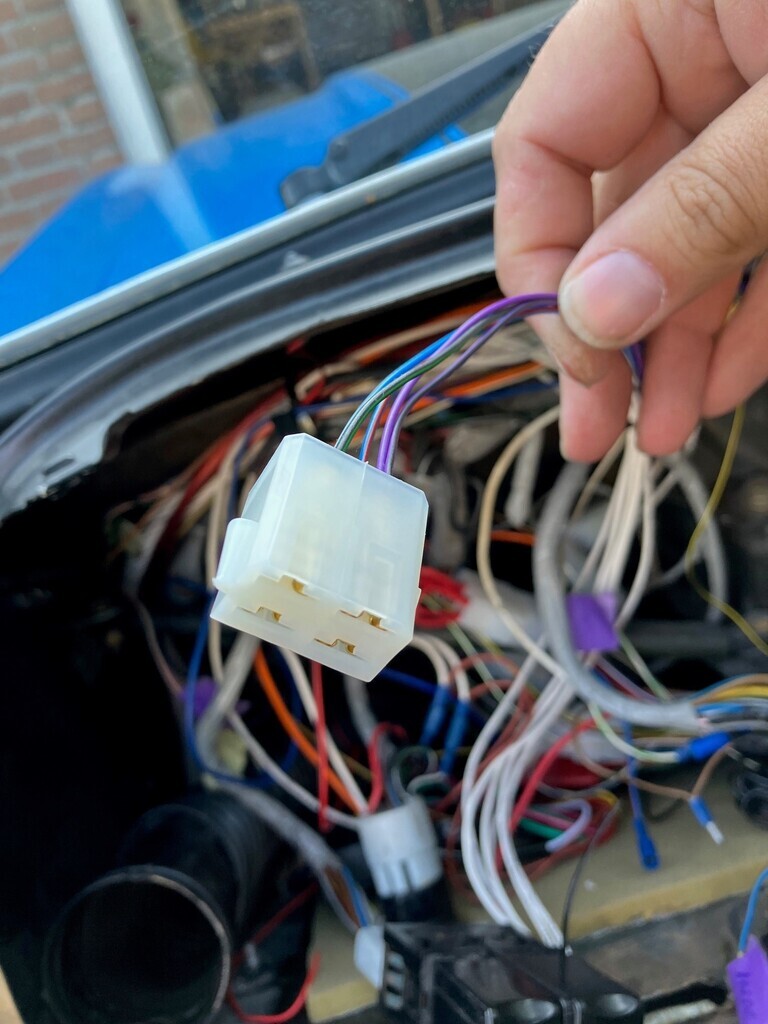 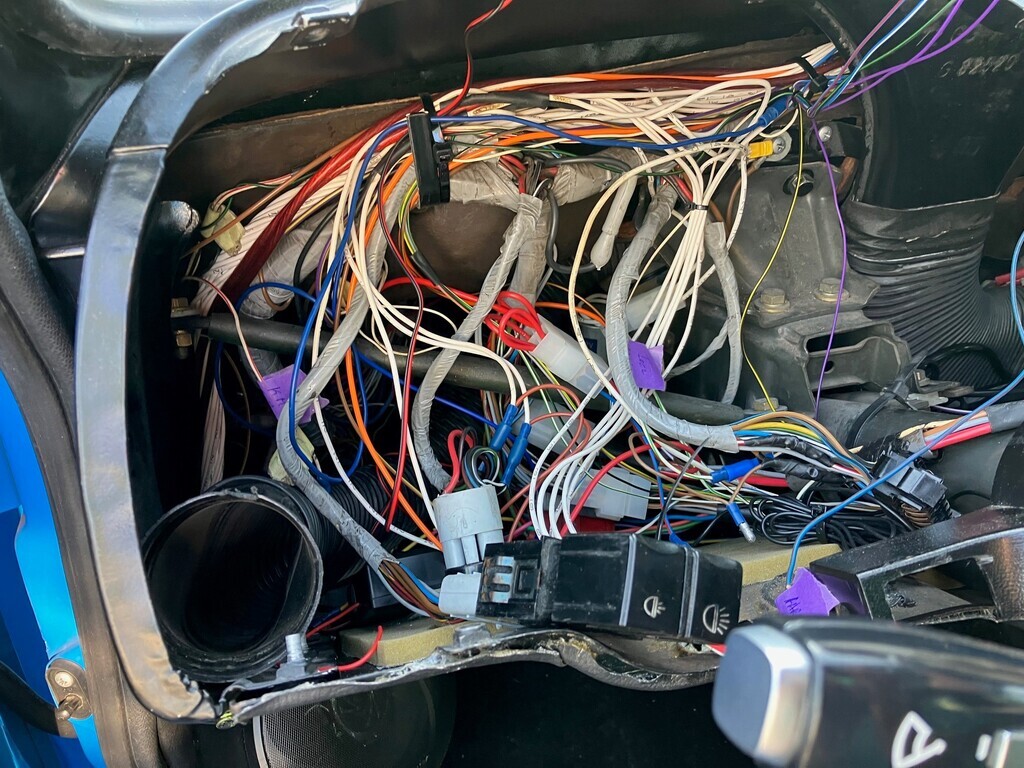 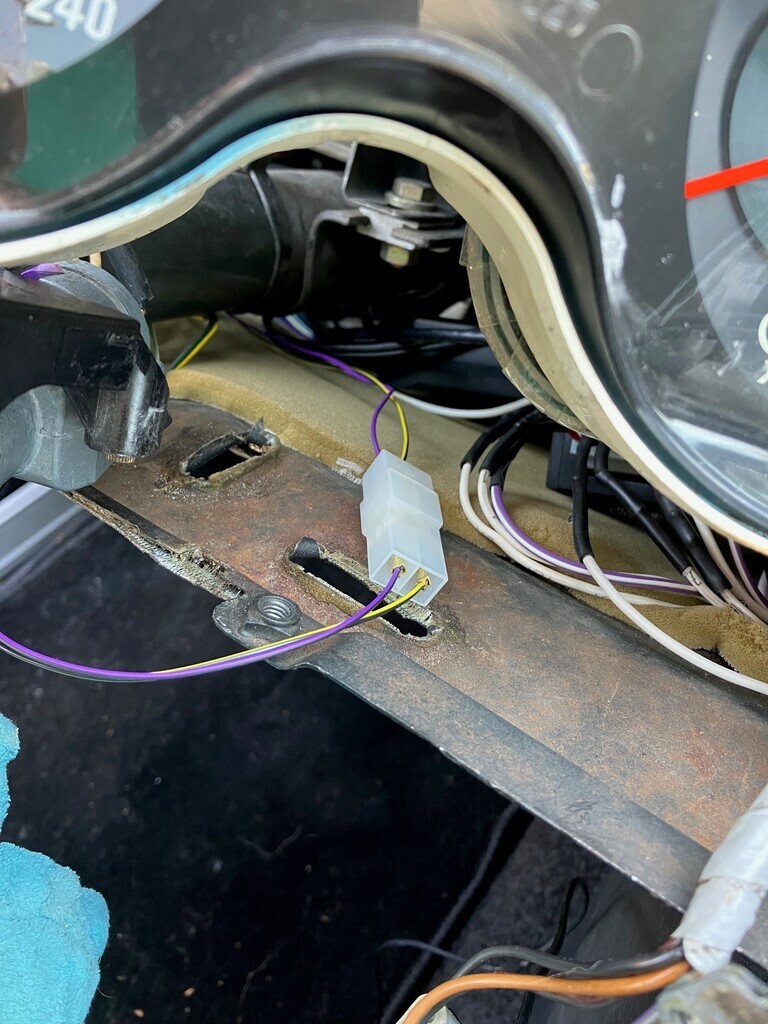 Seats and dash back in 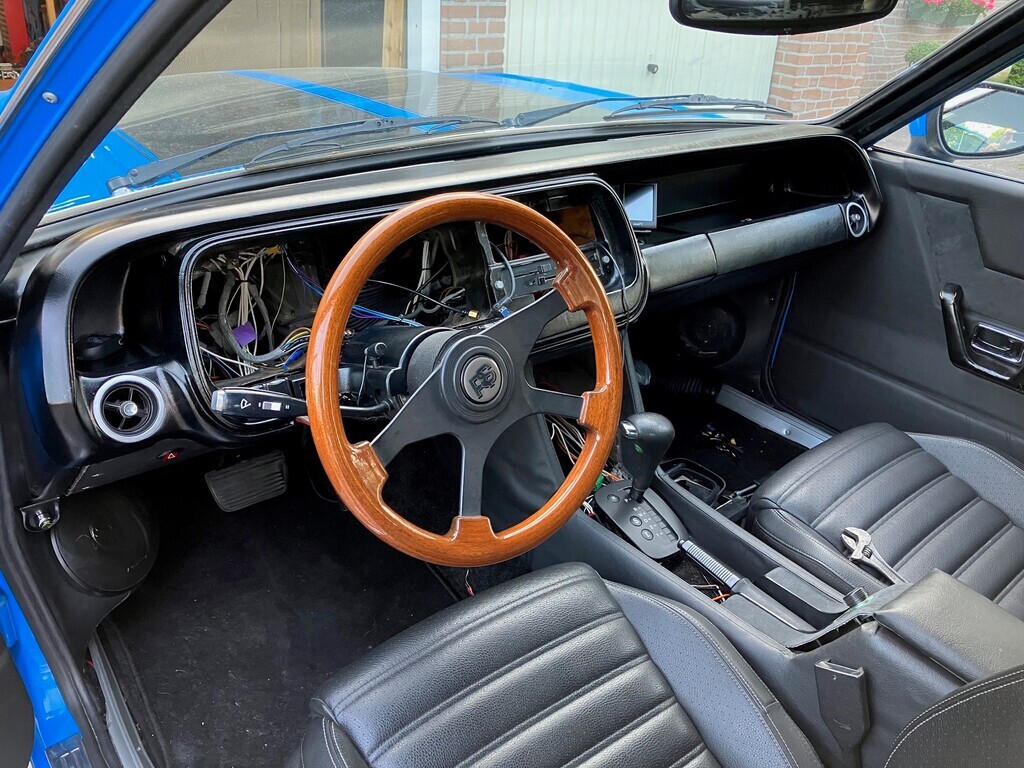 Binnacle back in and working 100% again, fasia on top, radio installed for testing 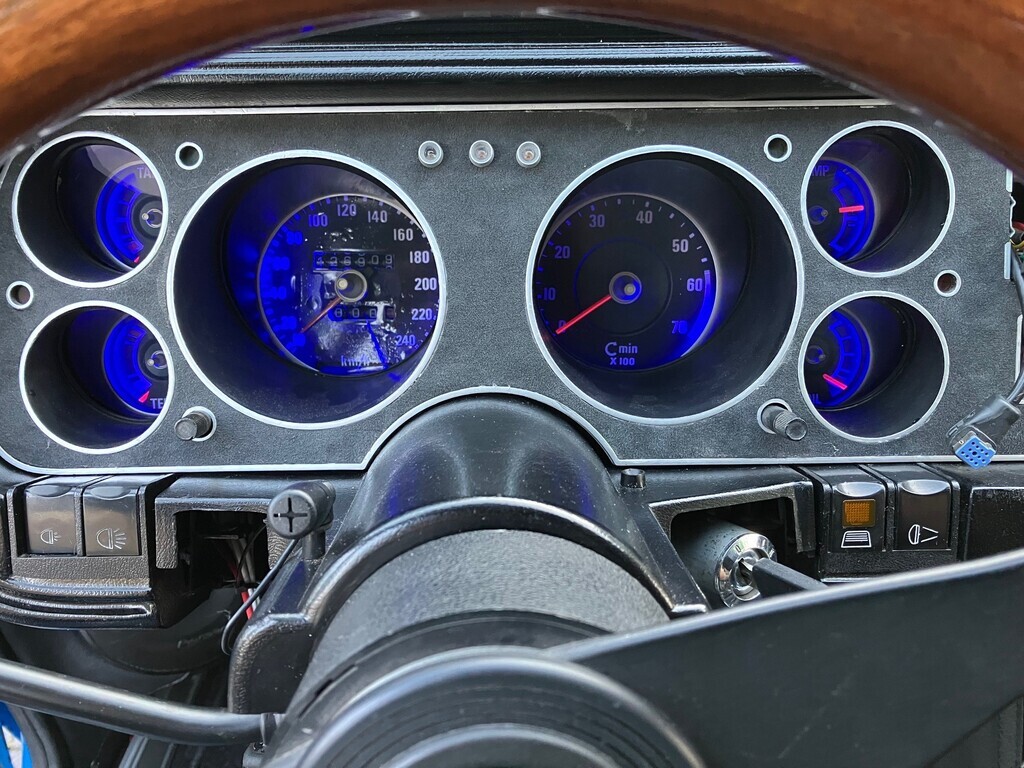 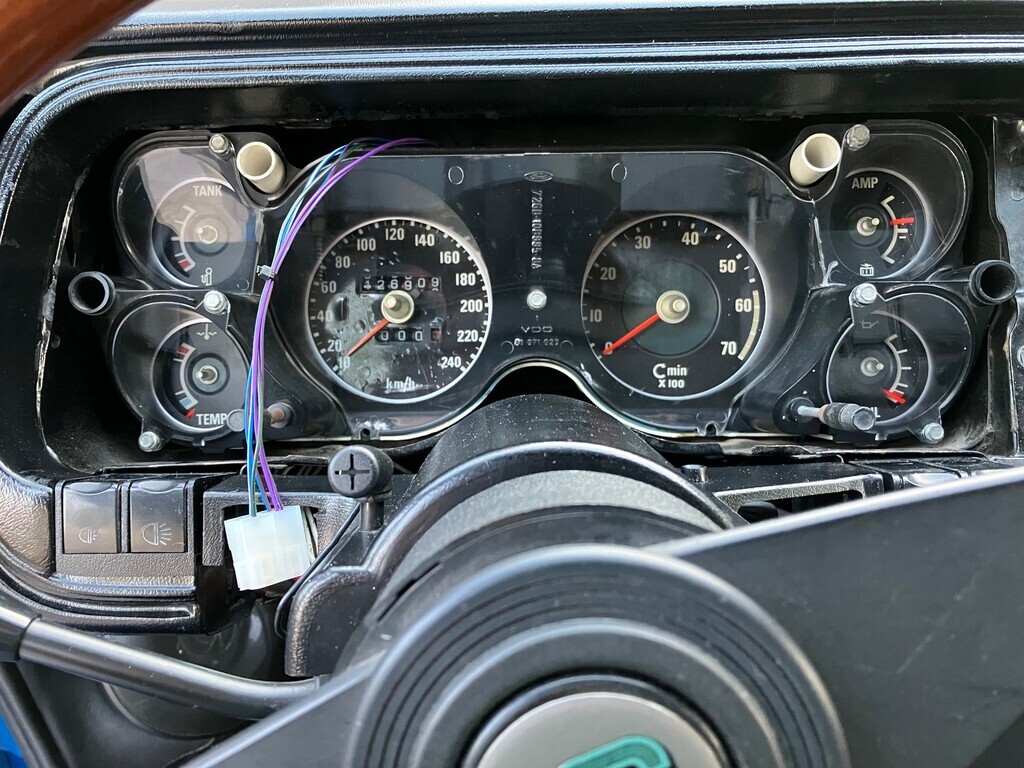 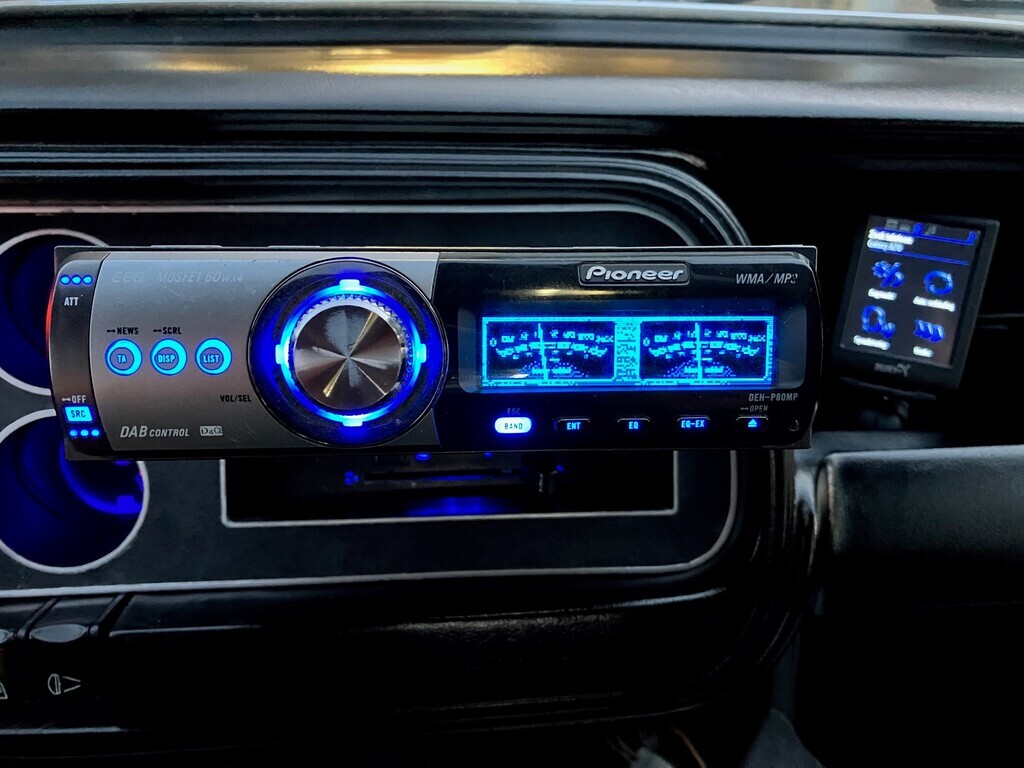 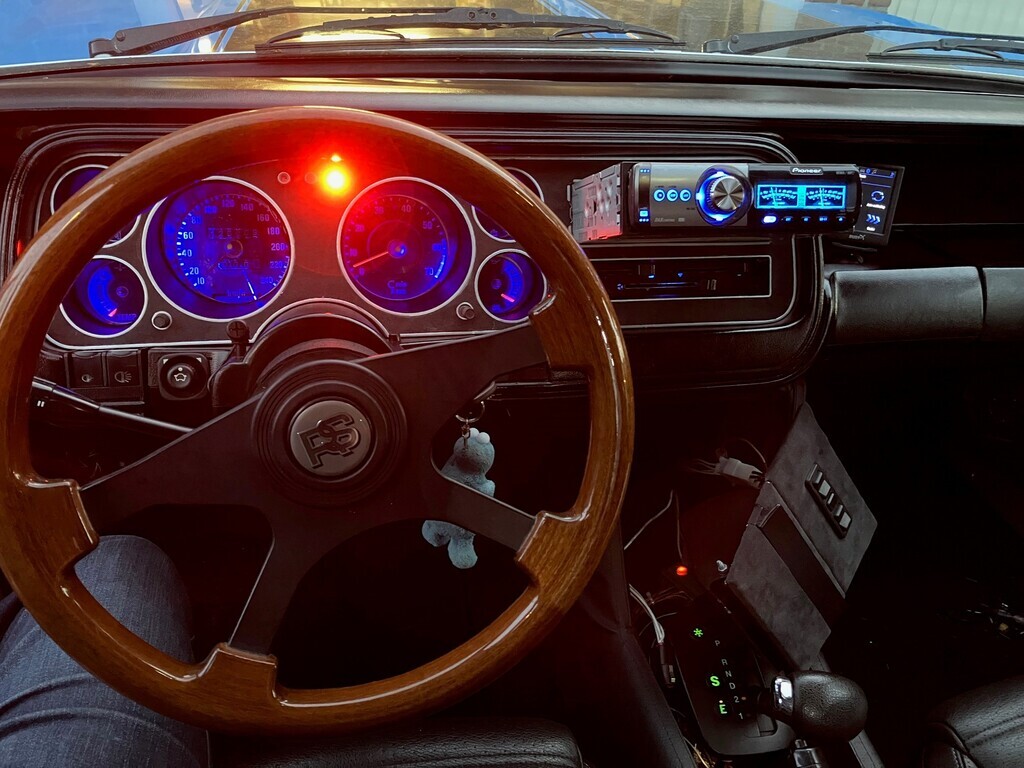 That brings us mostly up to date. |
| |
|
|
eurogranada
Europe
To tinker or not to tinker, that is the question...
Posts: 2,543
|
|
May 30, 2023 10:29:20 GMT
|
And..... She's done! Ok she's dirty from all the warm pollen riddled days of working on her on the drive, but even in her dirty state she's fantastic!        Took her for a drive after finshing the final bits. This included making a difficult hole for the new mirror switch in a panel I had reinforced with stainles steel plating. But it got done. Unfortunately it pulled the fabric a bit when inserting hence a less than perfect presentation on that despite the care taken. Radio was tested and found to have an issue with the Pioneer IP cable. Either the wire is damaged or the connector on the radio side is. Giving the plug a bit of a wiggle makes the difference between hearing all channels and some channels. The cable is 20+ years old and for most of the cars it has been in just a bit on the short side so I'm not too surpised or concerned. Something to address soon as audio is important to me. One speaker is dead as the feed has a bad signal wire. Changing the left for the right input proves the speaker is fine. This used to be an intermittant issue. So a new wire is on order. A quick swap and all will be fine. An improvement is that the phone bluetooth is no longer influenced by the alternator/engine running. It used to get a buzz or humm as soon as the engine was running, but sorting the earths carefully was probably enough to fix this. But more importantly the car drove fine. I took it straight to a fuel station to fill her up about half way. I wasn't going to get caught with no fuel again. I also had 5 liters spare just incase I couldn't make the fuel station, but I got there fine. The idle was ok. I wanted to check that as when driving in and out of the garage the past weeks since Sam and I figured out the fuel thing, it had always been a bit hunting while rolling it in and out of the garage. But in its defense it still hadn't completed a full cycle of running, just short 30 second or one minute bits. After filling it up I drove it for a spirited bit. It's just so much fun to hear that exhaust and intake roaring. But when I had to stop or wait it braked well, it idled nicely and just did what you'd expect. The audio providing a nice backdrop, although I still feel the bluetooth is slightly lacking in sound livelyness. Anyway, I brought the car home and left it to idle. I wanted to check the engine temp versus fan kick in on the dash gauge. The good news is, the fans came on. I was surprised how quickly the also turned off again, and I now know they kick in just below the top line separating the red block from the normal range. Good to know. I parked the car up thinking I had made a video of it running and showing it completed internally, but I later found I'd just taken two lousy pics. So after dinner and walking the dogs (I had considered taking the dogs out in the Granada) I took it out of the garage again and made a short video. It's not a great one, but when it is clean I'll try and make a proper one with the EOS instead of the phone. Anyway, here it is: I do think I have a bit of a coolant leak between the V of the heads. But I'm going to see how big of a problem it is. if only small, I'm going to run it for a bit before taking the intake back off. This because I really want to build e fresh BOB this year/winter. I might considere LPG-ing the car as well but that is not the no-brainer it used to be. Here's to hopefully enjoying it for a bit now! |
| |
|
|
eurogranada
Europe
To tinker or not to tinker, that is the question...
Posts: 2,543
|
|
May 30, 2023 11:22:59 GMT
|
Ok, here's the idea... If the wireless central locking controller will drive the mirrors too (I can't imagine it won't, I believe the last one did) and if the CL controller grounds the motor wires as I think it does then this should work. The theory is this... If you press the wireless remote then it'll motor the mirrors and door locks. But if you press a button in the car it disconnects the wiring to the other motors when the relay swings across. The remote will always drive the door locks and mirrors, and the buttons in the car will always just do the mirrors or the door locks. Because we don't have the door switch to worry about we don't have a problem of trying to work out what triggered the motors to move. It's all a lot simpler. James I'm ever so sorry, but in my pursuit to just get the car done finally, with a potential weekend meeting in close sight, I didn't manage to test this anymore. I might revisit this still. I need to find an easy solution to why I can't get the light in the mirror switch to work. There's an LED in there and it expects 12v on the pin I use as earth as the two feeds are 12v. Easiest is probably reversing the orientation on the led. But that will have to wait for a bit as well. I'm going to try and enjoy the car for a bit. |
| |
|
|


