PhoenixCapri
West Midlands
Posts: 2,685
Club RR Member Number: 91
|
1978 Mk2 Capri - new rimsPhoenixCapri
@phoenixescort
Club Retro Rides Member 91
|
|
|
Two updates in a week, miracles do happen! First up a simple but important job. Rear axle has now been serviced and is ready to go on the car. That involved a new pinion seal, an oil flush and a brake service - have a piccy of the new seal, though I have no idea why 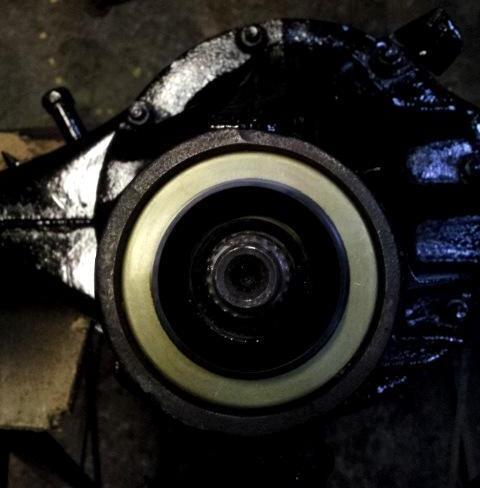 But the big news is that the power steering setup is nearly done! Not sure if I've gone into this much before, but my mate Nathan was short of a project so offered to help with fitting Corsa electric power steering. As the whole car is going to be set up to be usable daily, and as comfortable as possible (while still being a xflow engined Capri) we decided that power steering would be a nice idea. Having read up on a few other people's conversions, and looking at the space behind the dash, the integrated steering column/pedal box and the differences between the Corsa B and C setups I decided that with a bit of thought it'd be possible to get it all fitted so that it looked like it was meant to be there, using the standard mount points, cowling and steering wheel - I've used a Corsa C set-up, mostly as that's what I found in the breakers yard, though I think it's better for what we've done than the B. The gearbox/motor unit was cut out of the Corsa column, and the Capri column sectioned to allow the gearbox to fit in line - then the two steering shafts and columns were joined using a few adaptors/sleeves - actually not much harder than it sounds if you have a mate with a lathe. All that was trued and welded together, then the pedal box was cut to get the motor etc to fit in, and then a load of new metal put in to give it it's strength back, plus adding a couple of mounts for the gearbox mount points. After which all that was needed was to trail fit it in the car. 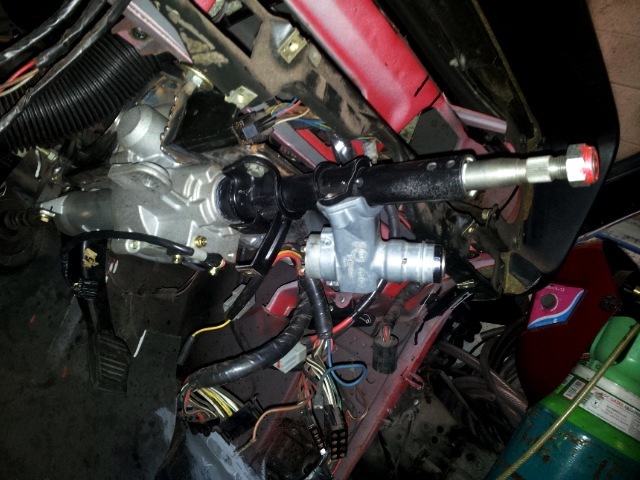 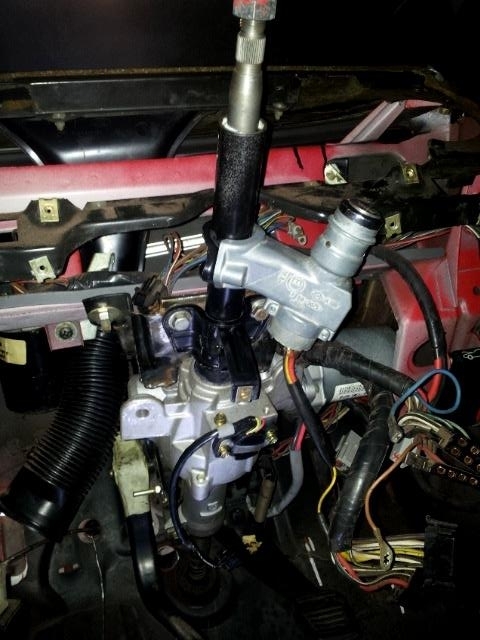 The good news is it went in like it was designed to, which I suppose it was and the standard heater routing etc is retained  So big thanks to Nathan for all his work on it. All that's left to do now is get the bulkhead end piece fitted and shimmed correctly, then get it wired up. Wiring wise I'm going to use the standard ECU setup, so will have inputs of engine speed (from the coil) and vehicle speed. To get the vehicle speed I've been lucky in getting a late Sierra Type-9 box with an electronic speed output, this will be fed through a little box of tricks - basically it applies a factor to the signal, meaning you can calibrate it. Normally these are used to retune electronic speedos when the diff ratio has been changed, but in this case I'll be using it to control when the steering gets fully assisted - i.e. on the Corsa the steering assist reduces as the speed increases and eventually there is no assist. By setting the signal to tell the ECU the car is going faster than it actually is, the amount of assist is reduced (so the steering won't feel nasty and light) or vise versa I could tell it the car is going slower than it is to get more assist. Some people have done this using a variable frequency signal generator, but that means a lot of faffing with a little dial. Keeping the standard input types means it's all nice and automatic, once it's set up that should be it. That's it for now.  |
| |
|
|
|
|
|
|
|
Mar 11, 2013 16:30:00 GMT
|
|
Hi Andy, looking good mate.
If you need a rustfree door i´ve got one here left over from my MK3 - all you have to do is pop over and collect it ;D
|
| |
|
|
PhoenixCapri
West Midlands
Posts: 2,685
Club RR Member Number: 91
|
1978 Mk2 Capri - new rimsPhoenixCapri
@phoenixescort
Club Retro Rides Member 91
|
Mar 18, 2013 21:12:30 GMT
|
Hi Andy, looking good mate. If you need a rustfree door i´ve got one here left over from my MK3 - all you have to do is pop over and collect it ;D Cheers Dave, managed to find a couple of doors a bit closer to home, Northern Germany is a bit of trek sadly!  Your Merc project is coming along really well. So another small update - it's amazing how long it takes to clean things up and get them painted! This time I got the propshaft and fuel tank (which was a right state!) done: 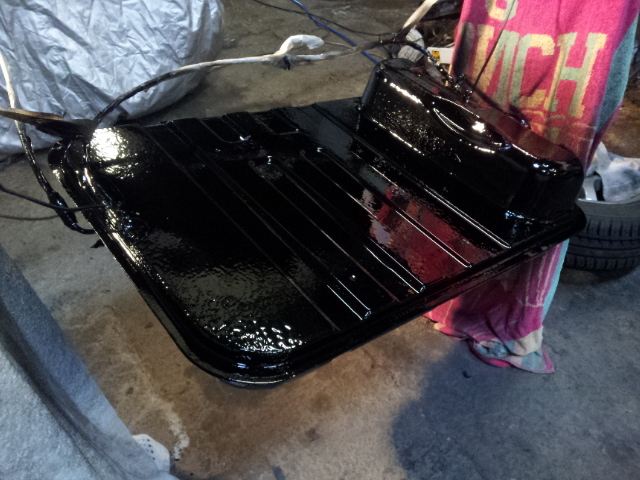 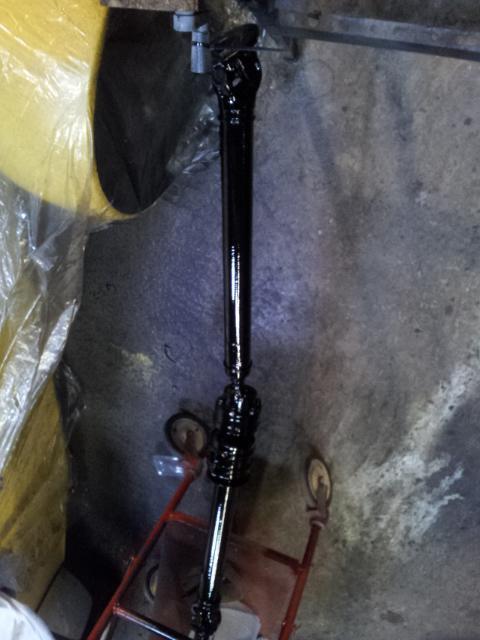 Came out pretty well. The tank has since had a coat of stone chip paint on the area's open to the wheel arches. Next up on the clean up list is the powertrain. I've taken a fair number of the ancillaries off for access, now just to clean it all up and paint the block/head red 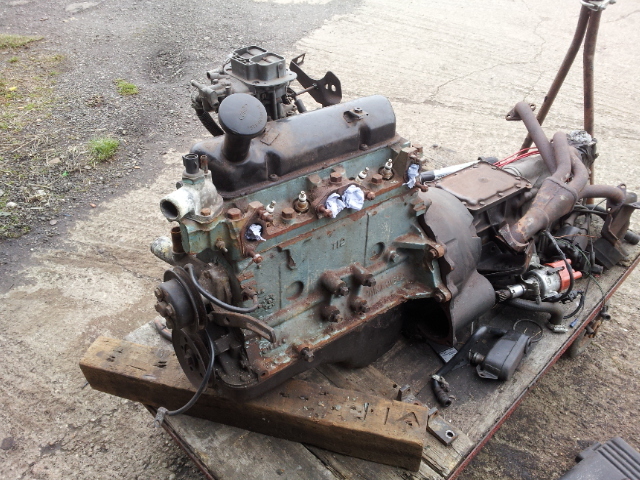 Will also give all the ally bits a good clean up and then paint stuff like the engine mounts up in black. With any luck I might be able to get a fair bit of the running gear back in the car this week, which will be nice! |
| |
|
|
|
|
|
Mar 18, 2013 23:16:07 GMT
|
|
Looking good, time for some new exhaust studs or just a good going over with a wire wheel?!?!
|
| |
|
|
|
|
Clement
Europe
ambitious but rubbish
Posts: 2,095
|
|
Mar 19, 2013 13:28:45 GMT
|
Nice work! Although: Ouch. Really loved that thing  |
| |
|
|
PhoenixCapri
West Midlands
Posts: 2,685
Club RR Member Number: 91
|
1978 Mk2 Capri - new rimsPhoenixCapri
@phoenixescort
Club Retro Rides Member 91
|
Mar 19, 2013 22:29:05 GMT
|
Really loved that thing  Cheers, I don't miss it much oddly so it was the right choice, plus it's helping us buy a house (with 2 large garages) so it opened a nice door  Back to the job at hand, the last couple of nights I've been doing yet more painting. The engine bay has had a final coat, and is now pretty much ready for the engine 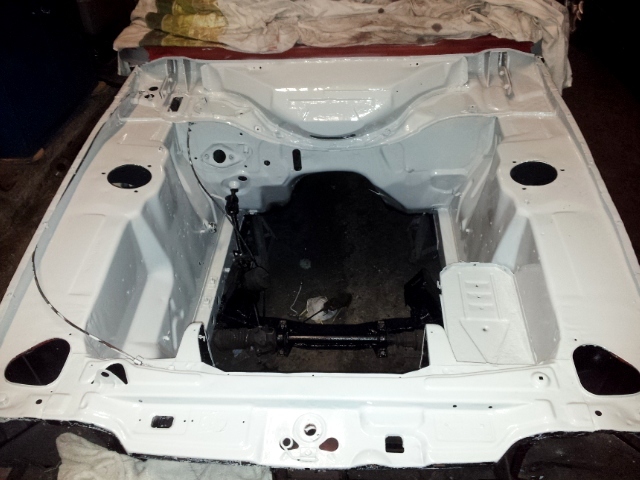 and the engine it's self is pretty much ready to go in, just need to clean up the ally bits and figure out what sort of rocker cover we're going to use 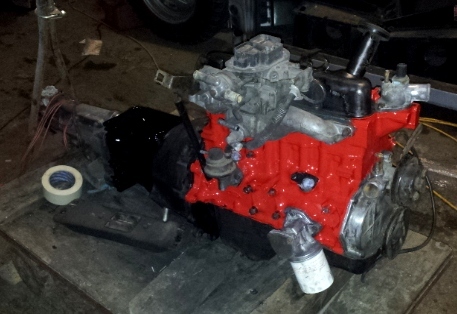 That's about it for now, given a fair wind I might get the engine in this weekend, maybe.... |
| |
|
|
ChasR
RR Helper
motivation
Posts: 10,309
Club RR Member Number: 170
|
1978 Mk2 Capri - new rimsChasR
@chasr
Club Retro Rides Member 170
|
Mar 19, 2013 22:58:01 GMT
|
|
Jesus, you don't hang about eh? Your determination to simply plod on (and completing the jobs to a good standard I must say) is admirable.
Not long then until this is on the road eh?
|
| |
|
|
PhoenixCapri
West Midlands
Posts: 2,685
Club RR Member Number: 91
|
1978 Mk2 Capri - new rimsPhoenixCapri
@phoenixescort
Club Retro Rides Member 91
|
Mar 20, 2013 19:22:36 GMT
|
Jesus, you don't hang about eh? Your determination to simply plod on (and completing the jobs to a good standard I must say) is admirable. Not long then until this is on the road eh? Thanks very much, but to be honest I'm way past the mental deadline I originally set! Hopefully it'll be on the road in summer, if the sun ever comes out again! |
| |
|
|
PhoenixCapri
West Midlands
Posts: 2,685
Club RR Member Number: 91
|
1978 Mk2 Capri - new rimsPhoenixCapri
@phoenixescort
Club Retro Rides Member 91
|
|
|
So after a weekend of recovering from the freezing cold in the Locost at Mallory (kit cars with screens are just a little daft in the snow....) and spending Easter being very lazy and getting fat on Chocolate (which I'm blaming Lauren for  ) it's time to get back on with finishing the Capri. Finally I'm actually putting things back together! First up was the rear axle and fuel tank - might not look exciting, but it was for me  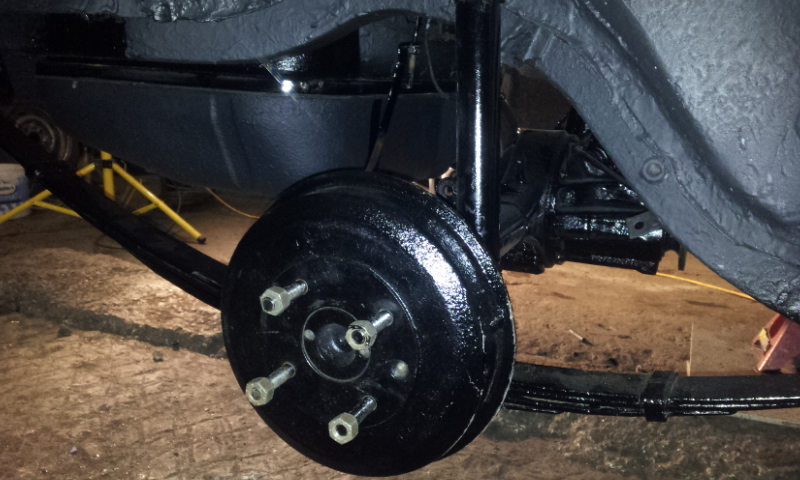 Following that I've also got the handbrake back together (took a bit of time due to it being a hybrid of Mk1 and Mk2 bits) and tonight I hope to dig out the front struts and get them in. Need to order a load of brake pipe etc in now and start getting all that plumbed up - which reminds me, I need to paint up the brake master cylinder...... one day there will be light at the end of the tunnel! |
| |
|
|
|
|
PhoenixCapri
West Midlands
Posts: 2,685
Club RR Member Number: 91
|
1978 Mk2 Capri - new rimsPhoenixCapri
@phoenixescort
Club Retro Rides Member 91
|
|
|
Another week, another ever so slight progress update! But we did spend yesterday buying useful bits, and I've booked next week off to tackle finishing the body.... if the weather holds that is. So front struts are on and tided up 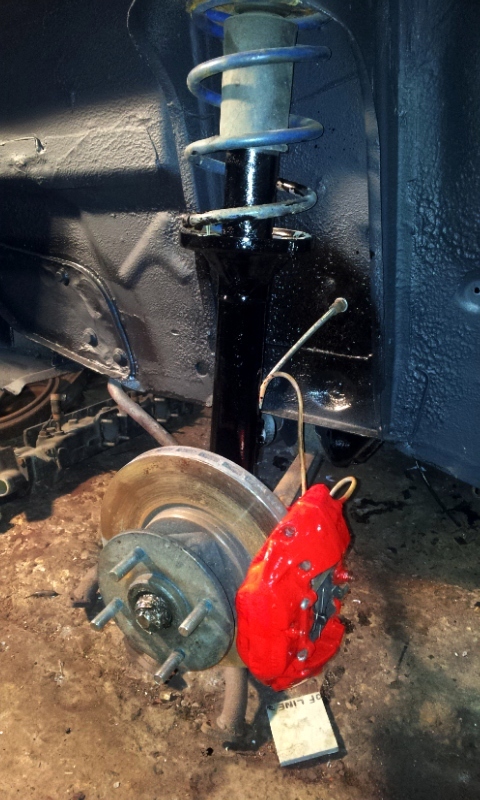 I've fitted some flame retardant absorption to the bulkhead. Why? Well by day I'm a refinement engineer, and since this is a road car, we've decided to try and make it a bit quieter inside than the usual Capri - I'm not a miricle worker, but we a few bits of additional trim, a well tuned exhaust, a bit of intake work and probably an acoustic engine cover, it should be a bit more refined  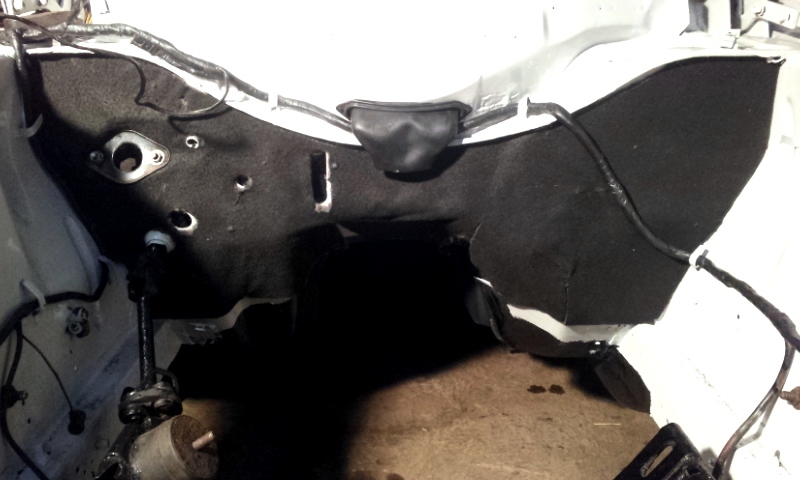 Tomorrow I'm going to try and get the engine in.......  |
| |
|
|
|
|
|
|
|
|
looks good to me!
Are you planning on adding anything under (or over) the wheel arches to reduce the road noise?? Should be interesting to see what you come up with regarding the engine cover...!
|
| |
|
|
PhoenixCapri
West Midlands
Posts: 2,685
Club RR Member Number: 91
|
1978 Mk2 Capri - new rimsPhoenixCapri
@phoenixescort
Club Retro Rides Member 91
|
|
|
Hey bud. Might get some wheel arch liners made eventually, probably get it all together first and then add stuff like that on - easiest thing to do would be to blank off the back of the wing area off with the sort of mud covers Ford had as an option in some markets, then back them with Thinsulate, be far easier to get it fitted robustly than full trims. Now for some good news 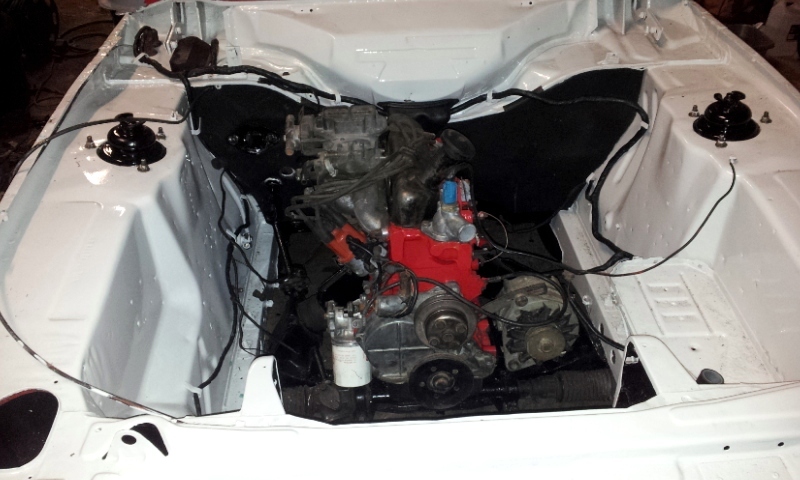 The engine is in ;D |
| |
|
|
luckygti
Posted a lot
   I need to try harder!
Posts: 4,912
|
|
|
|
Woo Hoo ;D Looking good mate and really like the sound of, well less sound if that makes sense? Will want to do the same sort of thing with the van, cos it's very noisy! Mind you, it didn't have any carpets at all last time I used it  |
| |
|
|
|
|
|
Apr 10, 2013 12:27:14 GMT
|
|
Woohoo!! I echo that statement!
Looks lovely, will be interesting to see how long the white engine bay stays white for..!!
|
| |
|
|
PhoenixCapri
West Midlands
Posts: 2,685
Club RR Member Number: 91
|
1978 Mk2 Capri - new rimsPhoenixCapri
@phoenixescort
Club Retro Rides Member 91
|
Apr 12, 2013 19:29:38 GMT
|
Another day, another small update. So today's list includes getting the prop in, sorting out a little bracket for the brake pipe flexi on the rear axle and starting figure out how heck to get the cooling system together. So some photos - 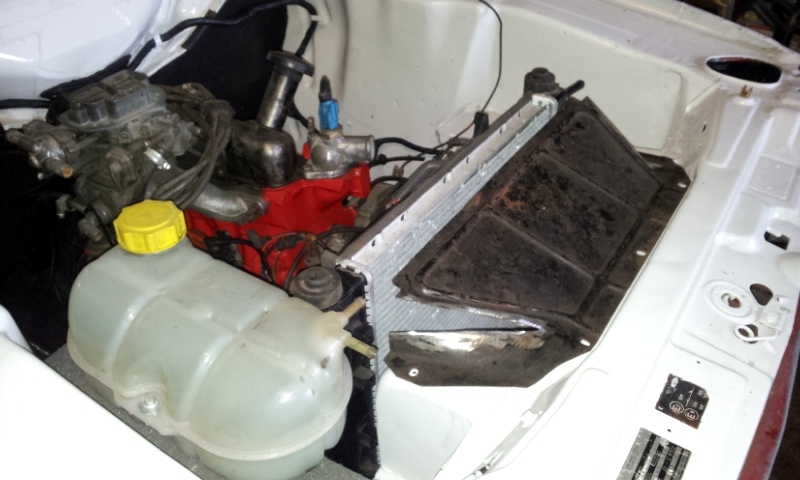 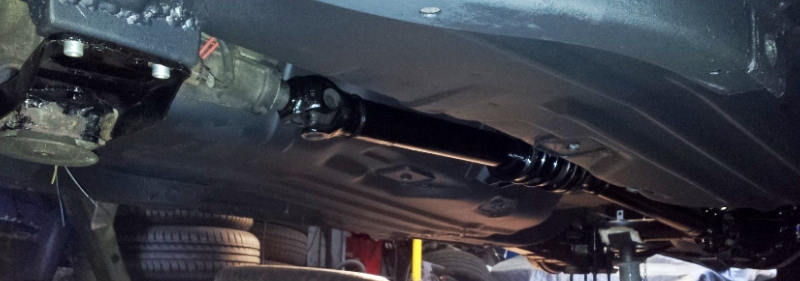 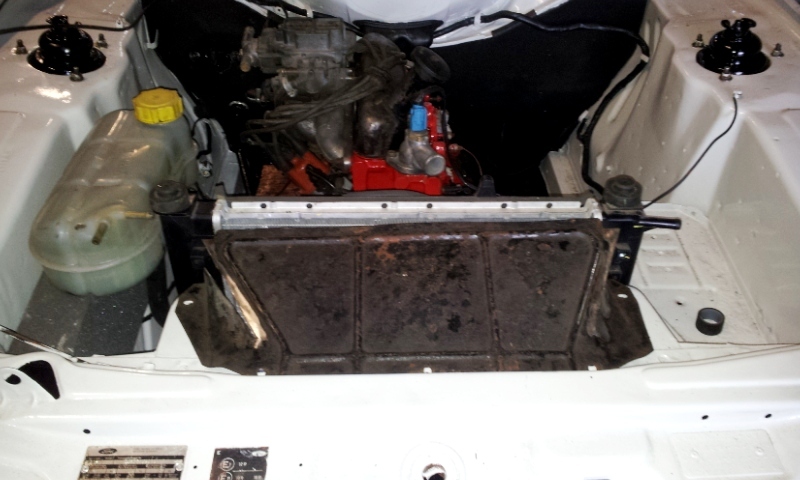 The rad is a bit big height wise, but to be honest I'm putting the whole system together out of near new stuff I have lying around sound I can't exactly get too picky! Plan is to change over to a more modern set up, so there's a header tank which will be partially flowed so it'll act a bit like a swirl pot setup to remove any air. The rad pack has an integral electric fan as well and I've fitted a Mk3 Fiesta thermostat housing which includes a fan switch to turn the fan on as needs be. So hopefully it'll never ever overheat, could probably double the power and it'd still be fine, and hen it's done it should all look pretty OEM  Plan is to get a good amount of time on the car this weekend, and if the weather is good next week I'll take some time off to look at getting some paint on! |
| |
|
|
PhoenixCapri
West Midlands
Posts: 2,685
Club RR Member Number: 91
|
1978 Mk2 Capri - new rimsPhoenixCapri
@phoenixescort
Club Retro Rides Member 91
|
Apr 14, 2013 20:54:52 GMT
|
So it's been a good weekend on the car  been cracking on with all kinds of bits and pieces getting ready for a few days off next week. So a some photos of the major bits. First up I've finished off the radiator cowling mods - so putting in some new metal where the angle has been increased, and putting a 90deg return on it which will be used to wedge foam between it and the rad pack. Spotted it all up to check it all out, then seamed it up and then tidied it all up, had a bit of filler and paint on it since then. Doesn't look too bad really and doesn't look too much like it's been modified. 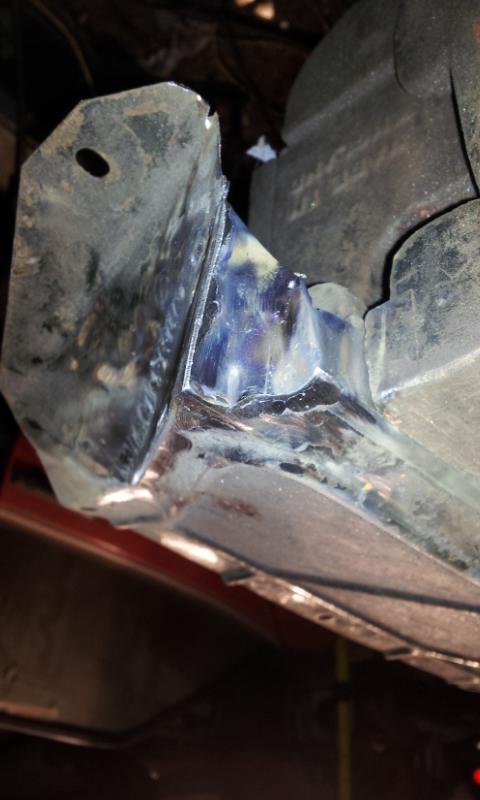 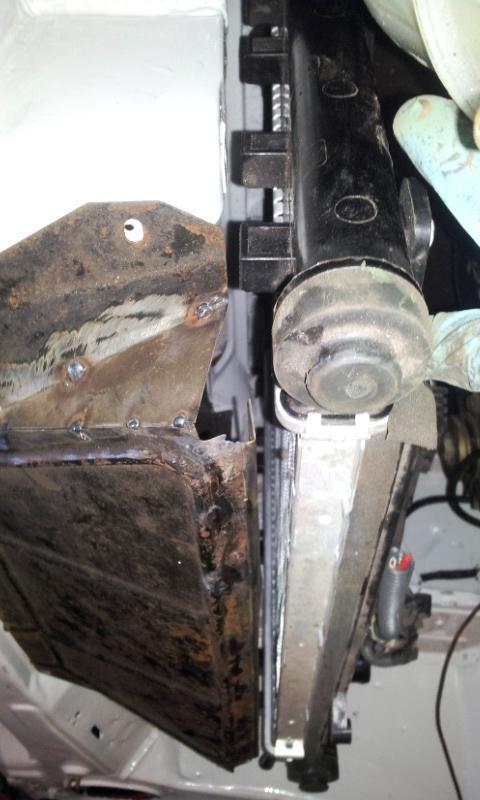 The big job was giving the interior a coat of paint to finish off all the repair work - looks pretty nice and shiny now and hides the repairs well 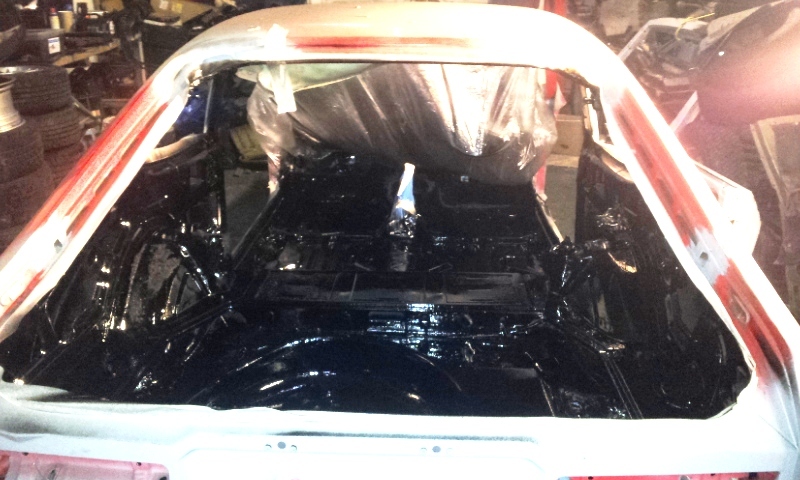 And now for something a bit different to the repair/restoration that has filled most of this thread so far! So far the look and style isn't something I've really talked about, so what's the plans? Well I suppose the overall look will be fairly euro/OEM+, so pretty much stock bodywork with a little lowering, some modern (but not too modern) wheels and a few detail changes. In terms of colour, well it'll get a coat of black to protect the body (next week I hope) and then the plan is to wrap it, which could be a bit of a steep learning curve! but it's the only way to get the matt metalic gunmetal grey we really think will suit the shape of the squarer Mk2. If you don't know what I'm on about, this is the finish we're going for.  Anyway, all that is to come, but a couple of the details are pretty much done. First up was smoothing all of the fittings on the bumpers - like so This 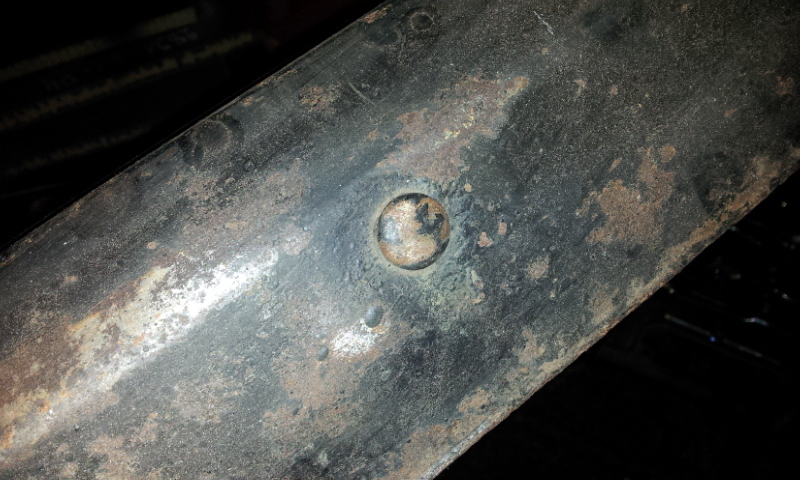 now = 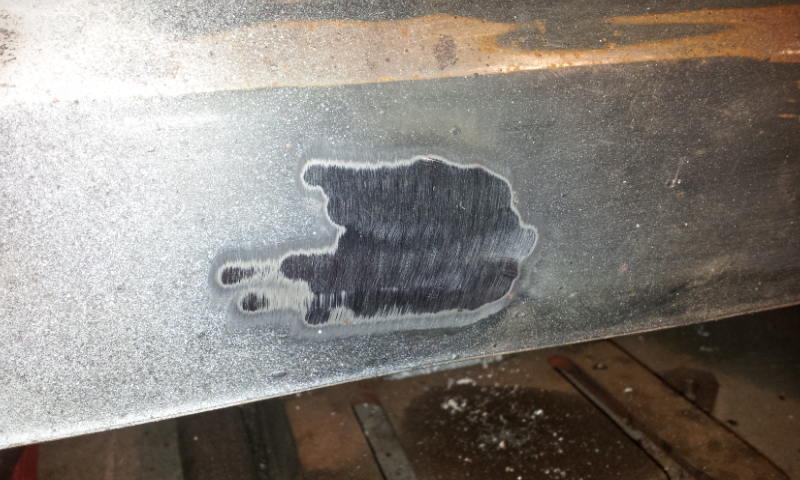 Much tidier and a touch more modern looking. Next came the exhaust (well the bit you can see anyway!). I've always been into classic fords, but I've never really been into doing thinks the same way as everyone else, not major differences as such, but the little things that set cars apart. I've never seen a Capri with a centre exit exhaust, so I thought 'what the hell' lets give it a go! Well the first thing you notice when thinking about how to achieve such a thing is that there's a reason people don't put the tailpipe in the middle! Basically the spare wheel well and fuel tank are all of 2-3 inches from the rear valance and so there isn't exactly a lot of space..... Anyway not to give up at the first hurdle I figured out I could get the exhaust system around the tank/wheel well by splitting it in front of the axle at the mid box and then taking 2 smaller diameter pipes around to the back - not a lightweight exhaust, but this isn't a racing car so I'm not going to worry. Plus it'll give me a chance to play around with things to get a bit of a different sound from the car, and yes I have taken into account the effect on back pressure  So then next question was to find a tailpipe finisher, queue ebay! What turned up was this, a Porsche Cayman S tailpipe finisher, which is nicely different, and looked like it might just about be slash cut at a useful angle 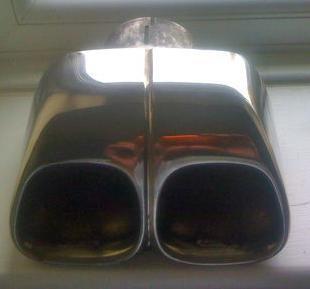 The big question was, would it fit?! Well after a lot of looking, standing back, ummmming and arrring I decided it would, but that it had to not just go through the valance but the bumper as well - in for a penny and all that..... So next came the cutting disc and the welder 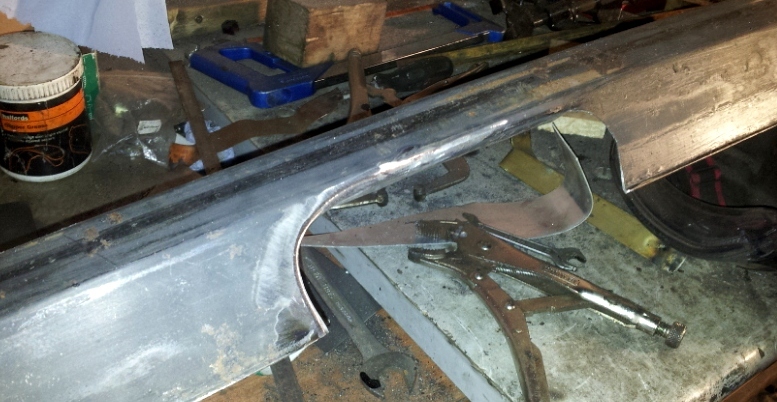 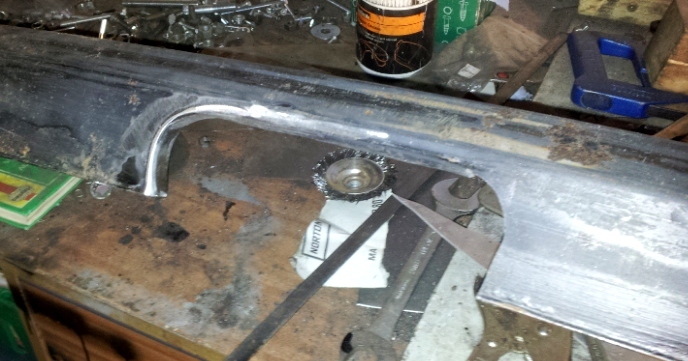 Basically I've cut out the shape of the finisher and then let in some new metal to make it look like it's meant to be like that (well that was the idea anyway) then all that was left was to cut a hole in the valance and see how it looked - et voila 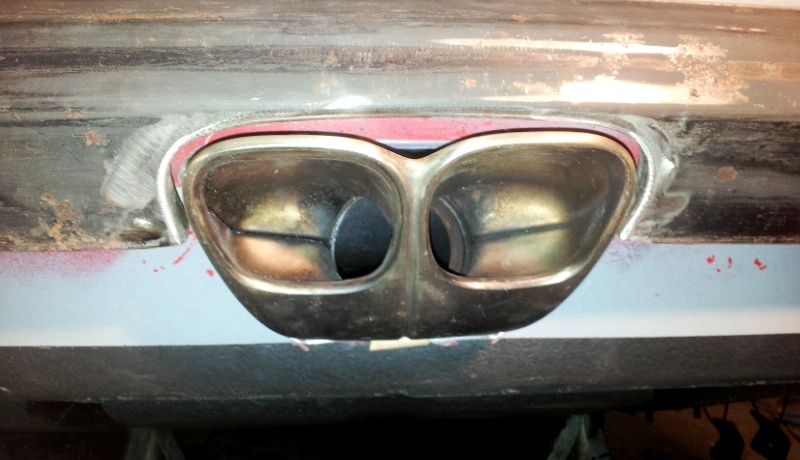 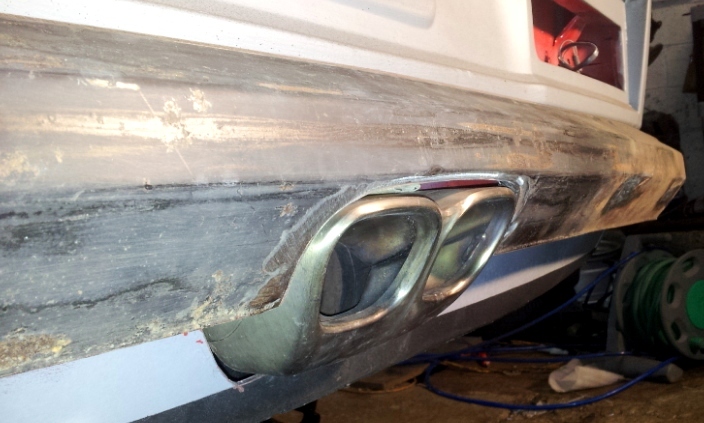 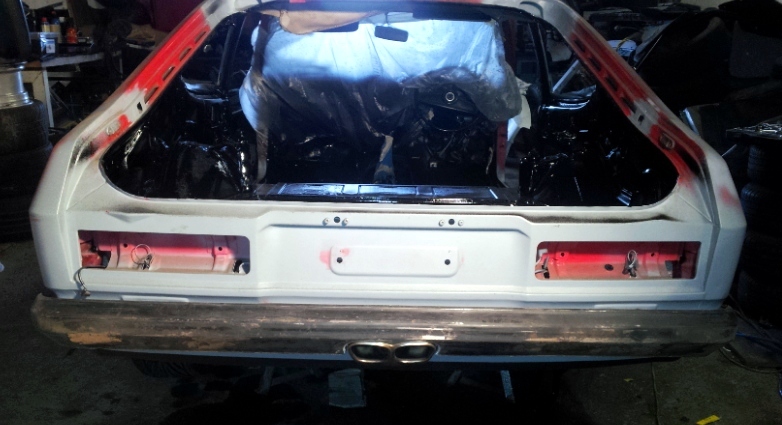 Doesn't look too bad I don't think, and the angle of the slash turned out to be pretty much spot on as well, which was a nice bonus  So what do you think - does it look fairly OEM? Roll on a few days off to crack on some more! |
| |
|
|
|
|
|
Apr 14, 2013 21:54:35 GMT
|
|
That looks absolutely spot on. Very nice indeed.
|
| |
|
|
|
|
|
Apr 15, 2013 12:04:28 GMT
|
|
Exhaust looks lovely and it will be interesting to see how it sounds but PLEASE DO NOT WRAP IT IN MATT GREY!!!
I totally don't get the matt effect thing, to me, every car I've seen in matt looks half finished, like it needs a good polish.. oh no, its just matt paint...
I know it is up to you and its not like I'll be seeing the car every day or whatever but my opinion is that matt paint is for cars that are a bit ratty that the owner doesn't really care about the appearance of..........
|
| |
|
|
|
|
|
Apr 15, 2013 17:25:03 GMT
|
Exhaust looks lovely and it will be interesting to see how it sounds but PLEASE DO NOT WRAP IT IN MATT GREY!!! I totally don't get the matt effect thing, to me, every car I've seen in matt looks half finished, like it needs a good polish.. oh no, its just matt paint... I know it is up to you and its not like I'll be seeing the car every day or whatever but my opinion is that matt paint is for cars that are a bit ratty that the owner doesn't really care about the appearance of.......... Or for people who spend their money on other bits and can't afford a good quality respray or have the facilities to do one themselves!  |
| |
|
|
|
|


 So big thanks to Nathan for all his work on it. All that's left to do now is get the bulkhead end piece fitted and shimmed correctly, then get it wired up.


 So big thanks to Nathan for all his work on it. All that's left to do now is get the bulkhead end piece fitted and shimmed correctly, then get it wired up.


 Your Merc project is coming along really well.


