Colin
Part of things
 
Posts: 239
|
|
Jan 29, 2013 16:47:54 GMT
|
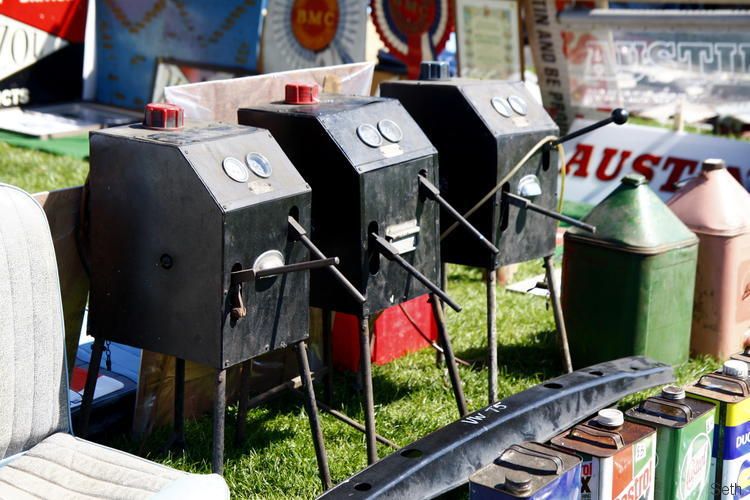
Yes they are simple to work, I used it on an mgf that had went down on one side! I went for the antifreeze mix and its still up 2 years after  Il get it brought down and let you know when its here! |
| |
|
|
|
|
|
|
|
Jan 29, 2013 18:33:14 GMT
|
|
I've got an all singing all dancing brand spanker on order from liquid levers (old one got nicked in a workshop burglary), welcome to use it when it arrives as I'm only a few miles away.
Trick I've used in the Metro's a few times is using Citreon fluid, slightly stiffer when filled.
|
| |
|
|
|
|
|
Jan 29, 2013 19:32:13 GMT
|
;D As said, even with the very low slung gearbox it looks as though it would't be incredibly difficult to have the Princess riding like the photoshop. Just enough to have the wheels sat in the perfect part of the radius in the arch should do the trick. This has all reminded me I still need to get round to visiting A52! |
| |
|
|
Seth
South East
MorrisOxford TriumphMirald HillmanMinx BorgwardIsabellaCombi
Posts: 15,542
|
|
Jan 29, 2013 19:55:57 GMT
|
DANGER TO TEH HYDRAGAS DALEKS!  |
| |

Follow your dreams or you might as well be a vegetable. |
|
|
|
|
Jan 29, 2013 20:02:15 GMT
|
DANGER TO TEH HYDRAGAS DALEKS! ;D |
| |
|
|
jonw
Part of things
  Can open a Mouse with a File
Posts: 768
|
|
|
|
|
The pumps are really easy to use. The issue can be corroded valves.
My mat and I did his hydroelastic mini. We borrowed the pump from a local garage. They also had some fluid.... it bright green!!!!
Lol at the daleks....
|
| |
Last Edit: Jan 30, 2013 8:04:48 GMT by jonw
Suzuki SV650R The good
Triumph T20 The Bad
BMW G650GS The Ugly
Matchless G12CSR The Smokey
Toyota Hybrid One pint or Two?
Ingredients of this post
Spam
Drunken Rambling of author
Bad spelling
Drunken ramblings of inner voices
Occasional pointless comments
Vile beef trimming they won't even use in stock cubes
|
|
|
|
|
Jan 30, 2013 15:39:50 GMT
|
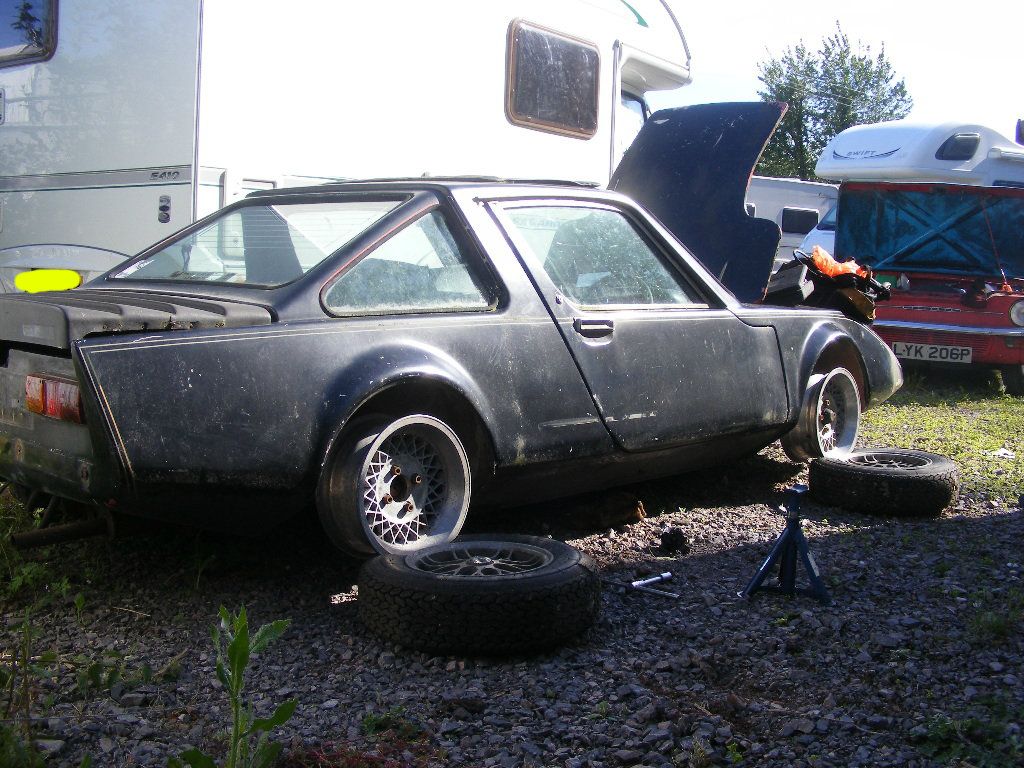
^ ;D ;D Got out in the brief spell between sideways rain showers and did some measuring.   Actual clearance at the moment is about 4 1/2" on the standard size tyres, it's a cold day so she sits a little bit lower than on a warm day. Standard everything, including ride height, would see me with about 6" of clearance, a smidge more on a hot day, but she is sitting about an inch lower than she should according to the book because the suspension ought to be pumped up. I think I'll explore lowering just to know how it's done, nobody seems to do anything with these cars and even fewer people did anything with them back in the day so there's not a lot to go on out there. I know any sort of lowering is going to compromise comfort, and comfort is a big attraction to this car for me so if I don't end up slamming it or whatever, that's why. |
| |
|
|
rysz
Club Retro Rides Member
Posts: 2,558
|
|
Jan 30, 2013 15:53:33 GMT
|
|
Check metro power for the how to on how to properly lower a car on hydroelastic suspension.
Rysz.
|
| |
|
|
|
|
|
Jan 30, 2013 17:39:36 GMT
|
|
What tyres are on it now and what tyres are going on it?
|
| |
|
|
|
|
|
Jan 30, 2013 18:08:53 GMT
|
|
It's on 185/70/14 and going down to a 205/60/14. 60 is a lower profile than is ideal but it looks pretty good, a higher profile is my preference but I'm going to get as much use as I can out of the 205/60s on the Lotus wheels first.
|
| |
|
|
|
|
|
Jan 30, 2013 18:25:34 GMT
|
You don't have to give in to the lowering brigade, it's ok to have a car that rides at the height that it left BL at - it's your car & your choice  |
| |
VW Passat GL5
VW Passat GL saloon
|
|
|
|
|
Jan 30, 2013 18:55:22 GMT
|
You don't have to give in to the lowering brigade  As an aside, I don't know if it's possible but could you make some kind of pump for the hyrdogas that enables you to raise or lower the car? When I had my Riley Elf I tried to design such a device, liquid compressor/pump with valves to change the amount of fluid in the spheres. Ghetto air ride? |
| |
|
|
|
|
|
Jan 30, 2013 19:20:20 GMT
|
Could a Tseries turbo be made to fit  |
| |
|
|
Mike
East Midlands
Posts: 3,387
|
|
Jan 31, 2013 16:43:42 GMT
|
It's on 185/70/14 and going down to a 205/60/14. 60 is a lower profile than is ideal but it looks pretty good, a higher profile is my preference but I'm going to get as much use as I can out of the 205/60s on the Lotus wheels first. The 205s only lose you 6.5mm of sidewall, that's barely enough to see a difference at a glance.  I think if you drop it about 40mm that should be enough to make it look "right", mind you, it'll still look fine at the height is now. |
| |
|
|
|
|
|
Jan 31, 2013 17:15:11 GMT
|
There was a break in the weather after I took the Princess out (on a private road) so I could get a feel of how she's driving post Maestro straightening. It might've only been a short run, and my driver's seat (replacement sourced) might be knackered but it reminded me just how much more civilised a place it is than the Maestro. With this in mind, I'm giving the Maestro a break while I put my time and money into the Princess. Out with some useful tools, including a slide hammer (the thing with the red handle) which is on loan from the neighbour. I've never used one of these before, but I did find they're both useful, and hard work.   I'm used to using a drift and dolly - improvised, whatever's to hand really - so pulling out dents rather than bashing them out is slightly different. I used the same approach, estimating the deepest point of the dent so that I could, in theory, pull it out evenly. First of all, a pilot hole is drilled into which a screw is screwed. I found the screw I started with in the pictures had too small a head and I had to change this for a larger headed screw to prevent the slide hammer jumping off. To operate, you hook the tines of the slide hammer under the head of the screw and pull on the red sliding handle which hits a nut at the end of it's run, thus giving a similar action to a hammer hitting the panel from underneath.  It's a fairly crude tool, really, but it's not bad at lessening the appearance of the sharper dents and will mean that less filler is required. Certainly, a bodyshop could do better. I found that because of how flexible the bonnet is I had to sit on it while using the slide hammer for the best result. Thankfully, there's not much to me so I didn't put more dents in the bonnet.   Once I'd gone as far as I could, I set to with the flapwheel to remove the loose paint and surface rust.  Then slap some primer on before the heavens opened once more and I can see it's better, if not perfect. Once I have more beige paint I'll blend this in pre-MoT just to keep things tidy, but I'll likely need to replace this bonnet if it cannot be repaired. I'd rather repair it as it's a very good bonnet bar the obvious dents.  I didn't expect the wing dents to pull out as well as the bonnet because of the strengthening crease there. But I'm planning to buy a new wing anyway for when I book the car into a bodyshop to get this repaired properly.  Bolted the trim and lights back on and made a start doing pre-MoT checks but the weather was really against me.  So far, I've discovered the following to address: > Drivers side sidelight not working > Passenger side wing repeater not working > Number plate light not working > Headlights require proper alignment > Small oil leak (have materials to resolve, I think) > Running a bit rich, visible emissions at start up Other MoT items I know are needed: > front number plate missing > Bottom of drivers side wing insecure (rotted out) > Rust in bulkhead/inner wing both sides. Caused by arch liners, funnily enough Other, non-MoT items I know are needed: > Tracking > Lotus wheel balancing > Jolly good clean Now, if we can just have some nice weather I'll be happy. |
| |
|
|
|
|
|
Jan 31, 2013 18:06:54 GMT
|
As usual, wonderful work on a wonderful car! You should be very proud of yourself indeed...  |
| |
***GARAGE CURRENTLY EMPTY***
|
|
|
|
|
Jan 31, 2013 23:49:59 GMT
|
|
I don't post much, just read. But I must say you are doing sterling work and this thread is a fantastic read. I really hope the car is up and running and exactly how want it very soon.
|
| |
|
|
10mpg
Club Retro Rides Member
Posts: 4,253
Club RR Member Number: 204
|
|
|
|
|
This thread makes me happy...
|
| |
The Internet, like all tools, if used improperly, can make a complete bo**cks of even the simplest jobs...
|
|
|
|
|
|
|
Thank you for the continued support. I doubt I'd've done all this without the support of the forums, to be honest. Decided that given the relative clemency of the weather today - ie: it's not raining sideways - I'd get myself some beige paint for the Princess to tart her up a bit. One trek over to my local Halfords to find they no longer stock Champagne Beige but have the similar Sandlewood Beige in and I'm all set to get on with it. I did mean to pick up a couple of bulbs and a numberplate, but I forgot the former, and didn't have ID to obtain the latter because I was over-excited about paint. I'm not doing a super-special paint job here, just a quick rattlecan tidy up. Still, it's worth wrapping various bits of trim with newspaper to save work later on.   New rattle can paint is rubbish and I really don't rate it. Far too easy to end up with runs everywhere and it's quite expensive to get a decent depth of paint, much more so than it used to be. This will all be coming off at a later date anyway, so as long as it was waterproof and tidy that's all I was fussed about. Paper off, some trim refixed and she's looking remarkably good all things considered.    Even that crumpled wing looks okay. There's no filler in any of this either, it's all bare bones stuff with paint stuck on top so I'm impressed at how well it turned out considering that.  The front end is still a bit bent. The bottom corner of the valance is squished back a bit and the wing rail is, I think, ever so slightly pulled down. By the looks of things, the bonnet isn't exactly straight anymore either, but it all looks tweakable by a pro, it's beyond the tools I have available now.  So I'm switching back to using the Princess as a daily once I've got a happy little MoT certificate. I'm hoping to book her in somewhere in a couple of weeks, I'd do it sooner but I need the road tax money before I can book her in anywhere. |
| |
|
|
Colin
Part of things
 
Posts: 239
|
|
|
|
|
Liking the progress on this. Is the bonnet fully closed in the pics?
I only ask as it should be able to get the outside edges down a bit by putting a block of wood in the centre (where the bonnet pin sits) and have one person on either side applying some pressure downwards until you get it somewhere close enough!
|
| |
|
|


