|
|
|
Sept 14, 2021 21:25:39 GMT
|
Slowly, very slowly, but surely there is progress with the new ECU, gradually getting the hang of it as well. Especially after some advice from the support team and looking at the figures correctly, for once. The idle control is now done by both the throttle and ignition timing. One of the problems was the fact that it was trying to maintain 10° before top dead centre, however, the ECU parameters were maximum of 50° and a minimum of 30°BTDC, so it’s never gonna idle properly.
There was a few things that were wrong and a few more that still are, when you look at it you realise that it’s just a computer. The computer is only as good as the information it’s got and the person pressing the keys.
Realistically ECU’s only;
Do what you tell them and no more.
Won’t do anything unless you tell them
They aren’t clever they just work or don’t.
Cant think for themselves.
If you tell them to do the wrong thing, they’ll just do it.
When it starts to go wrong they just carry on regardless, then just sit there making some odd noise, smoking and offer no help what so ever.
Very similar traits to the Army, when your unlucky enough to be forced to work with them.
One thing I have noticed though, is that it seemed to be pulling a lot of fuel out the map. Even though all the sensors and wires are the same on both ECUs. I did check the runtime logs, one that was done a day or so ago and one that was done early in the year. When the revs, AFR, MAP, TPS and ECT were all the same there’s a difference of 0.2 ms on the pulse width of the injectors.
Having said that, it seems to be running smoother with a better idle. I thought it’s either running lean now, or for the past four years been rich as fcuk. However, when the technician at “Link” looked at the datalog files they found there was only a negligible difference of 0.08ms in the effective pulse-width. So at least I hadn’t been a total novice/muppet, and somewhere at sometime, put some wrong number/value/parameter/input/output/symbol in a box or clicked yes/enable.
I’ve not had the chance to take the car out as I thought the handbrake cables was slightly catching on the prop. As there was metallic noise in-between the gearbox and prop bearing.
I took the prop off only to find the prop support bearing was making the noise, great.
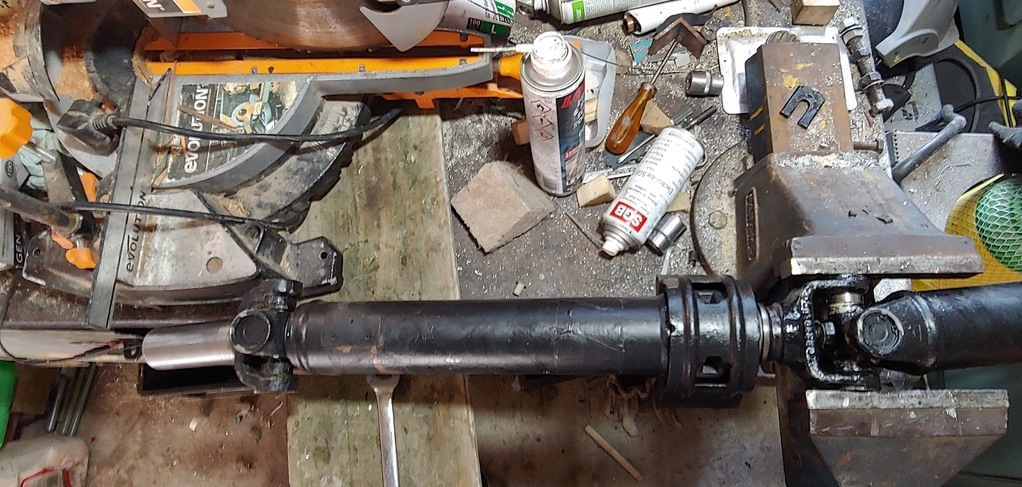 Turns out, hopefully, it isn’t as bad as I thought. There is a sort of a metal dust cover over the bearing which had come slightly loose and was rattling around. I tried to get the UJ’s off, to strip the prop shaft down but they didn’t want to come off. They were dug in like an Alabama tick. Turns out, hopefully, it isn’t as bad as I thought. There is a sort of a metal dust cover over the bearing which had come slightly loose and was rattling around. I tried to get the UJ’s off, to strip the prop shaft down but they didn’t want to come off. They were dug in like an Alabama tick.
Luckily though, there is a bolt that holds the two sections together, which was looser than I Anticipated. Undo this and with the use of a variable pressure adapter ( a hammer) the prop splits and the bearing could be put back in place.
Once again the car is in bits, waiting to get reassembled. There is a few more things that need to be done before I can get the prop back on. But there’s always that slightest of slight outside chances, that it could be in a condition to actually move, or even drive, out of the garage in a few days. Although I wouldn’t bet my house on it.
|
| |
“It Doesn’t Feel Pity, Or Remorse, Or Fear, And It Absolutely Will Not Stop, Ever, Until You Are Dead!”
|
|
|
|
|
|
|
Sept 9, 2021 20:07:05 GMT
|
Well I’m balls deep now into the new ECU, it is quit/very/extremely complicated, when you get your head around it, it gets a little bit easier. Where on the old ECU there is just one or two parameters/settings that adjusted things, this one’s got loads of different things that affect many, many, many other different things. 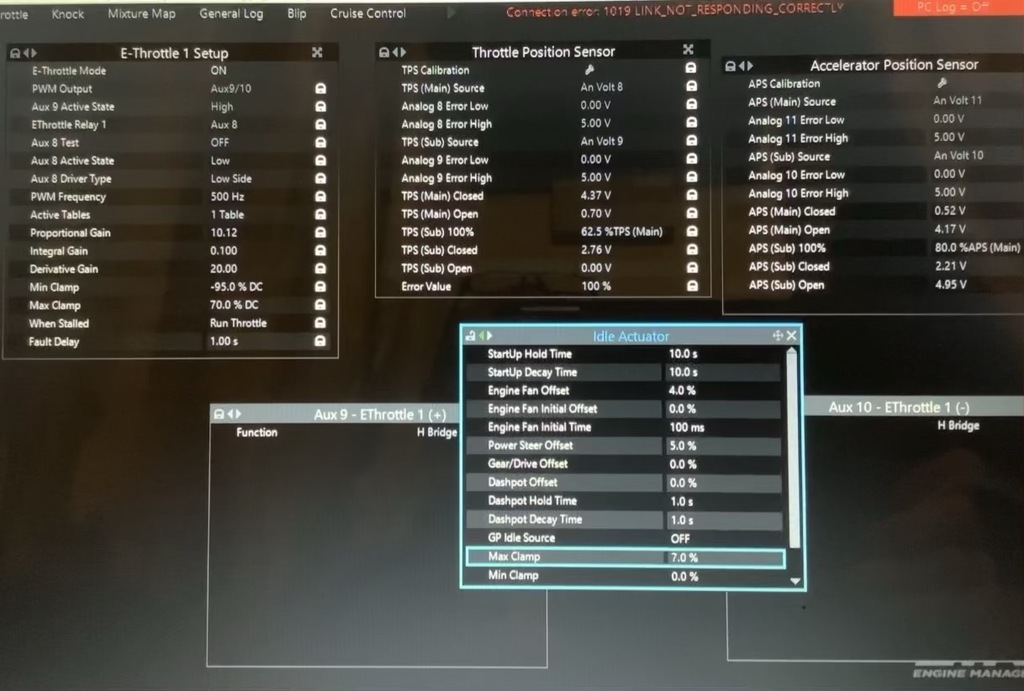 The Stag is now fly by wire, so to speak. So when you press the accelerator the ECU works out how much to open the throttle. That was a whole lot of fun to get the settings correct. As all the settings are just generic to start with, you have to work out which is which, luckily the link support team give expert advice. 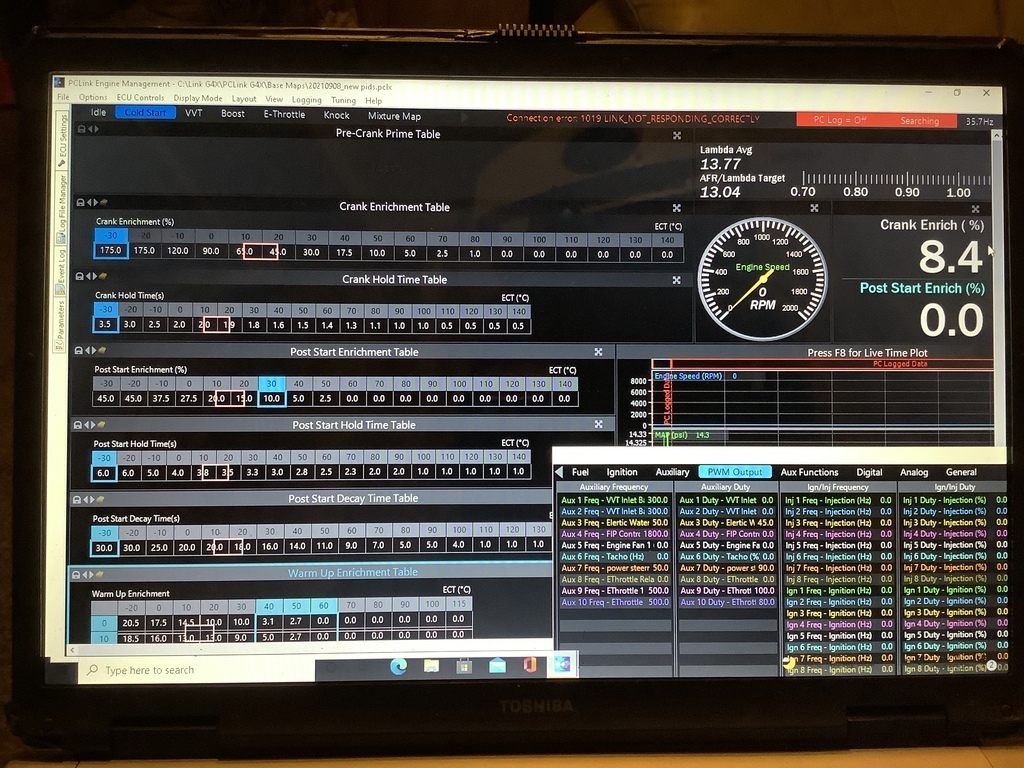 On the first go of starting the engine, with the ECU doing the throttle, it started and immediately ran to 4000 rpm. Again this was just down to the settings, the idle control could, and did, use up to 30% throttle. It has now been reined in and can only use a max of 11% throttle, for a good idle, when warm, only needs about 3.5% Today was spent altering all the settings and parameters to get a half decent tickover. It did have ignition idle control but this made the engine go all over the place, so this has now been deselected. Plus trying to sort out throttle position, fuelling while the engine was dancing all over the place as it was altering the timing was a bit too much. Maybe in a few days/weeks or months, I’m being realistic (hopefully not years), It will be in some sort of state to hand it over to somebody who knows what they’re doing, and won’t laugh their tits off too much after seeing what I’ve done. Then they can sort the engine/ECU and make it all work as it should. |
| |
Last Edit: Sept 10, 2021 8:07:57 GMT by Bullstarz
“It Doesn’t Feel Pity, Or Remorse, Or Fear, And It Absolutely Will Not Stop, Ever, Until You Are Dead!”
|
|
|
|
|
Sept 5, 2021 22:46:54 GMT
|
What ECU were you using before the fancy Link one? The old one is a Link G4 xtreme, I just have the new version. The old one is still awesome and very capable. The only reason I got the new one as I thought the old one had gone faulty, it still ran the car but the fueling was all over the place. So I sent to Link for a check up, they gave it a clean bill of health and said it was performing better than spec. It turns out it was just my wiring, I hadn’t connected the main power. Somehow it managed to find the power from somewhere to work. |
| |
“It Doesn’t Feel Pity, Or Remorse, Or Fear, And It Absolutely Will Not Stop, Ever, Until You Are Dead!”
|
|
|
|
|
Sept 5, 2021 22:34:13 GMT
|
''if it ain’t broke, take it to bits&find out why''
That's a great thread title, so apt. Well apt for me and I'm sure some others on here too.
Enjoy reading about your ups & downs and nice to hear you're making progress. Keep rocking! 
Yes its progress but I’m not sure in what direction, other than broke. |
| |
“It Doesn’t Feel Pity, Or Remorse, Or Fear, And It Absolutely Will Not Stop, Ever, Until You Are Dead!”
|
|
|
|
|
Sept 5, 2021 16:15:25 GMT
|
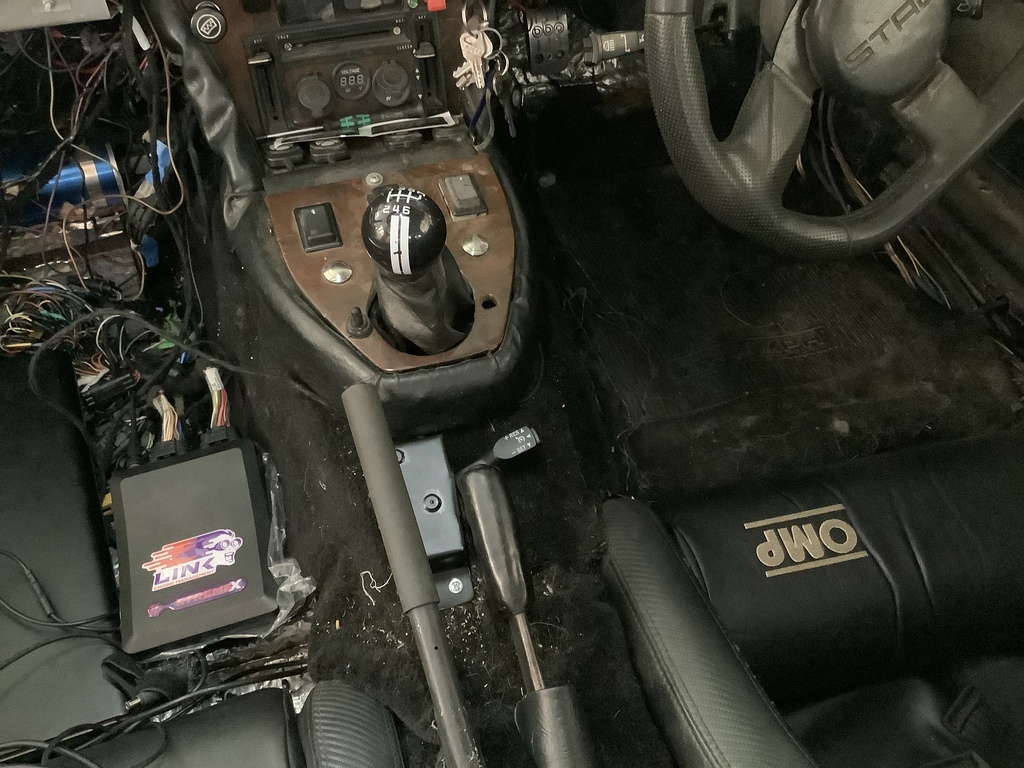
Been looking into the new ECU it more in-depth than the old one, I think I have only just scratched the surface to what it can do. I have only had the engine running a couple of times with it, it’s a lot easier to use and see what going on. Made the decision to go fly-by wire, so I’m having loads of fun sorting out the extra wires and configuring the ecu.
One of the reasons as it has the option of throttle Blip, which is sort of needed with my engine. As the engine can almost stall on a gear change. I think it’s down to the light flywheel, a complete lack of inertia.
The ECU can do cruise control, which I thought might be useful. So I got a cruise control stalk, but the only issue is they work with a change in resistance, where my ECU need change in voltage. So it was a case of using a 1k ohm resistor and by the voltage divider rule get a change in voltage, when moving the stalk.
I couldn’t find a place for it around the steering wheel, either it looked wrong or got in the way. So it’s going to live on the trans tunnel, under the handbrakes.
I know it’s going to be a nightmare sorting out the new ECU, to get it and the engine to work at it best. As there’s loads of different settings and calculations, more complex but better laid out once you get use to it. I want to get it to a decent stage before I hand it over to some one who knows what they are doing, to map it correctly.
|
| |
“It Doesn’t Feel Pity, Or Remorse, Or Fear, And It Absolutely Will Not Stop, Ever, Until You Are Dead!”
|
|
|
|
|
Sept 1, 2021 18:42:18 GMT
|
|
Slowly the car got put back together and a few more jobs got crossed off the to do list. Shortly afterwards even more jobs got put back on, so back up to a full 20 jobs to do, as I’ve only got 20 spaces on the list.
The brakes seem to be okay, in other words there’s been no leaks. Clutch on the other hand is a different matter, as far as I know it’s not leaking, there is no weeps or drips but it’s not always an identical pedal when you press it.
The loom to the ECU always needs tidying up, and a few connections were very loose. So decided to spend a bit of time, putting on new connectors and trying to make it that little bit more secure. The Connectors I’ve been using are the cheap Chinese ones, which are Chinese but they are cheap and I can see why. But compared to the decent ones there a fraction of the price. It did take a long while to get it all done, I think I’ve finally learnt how to crimp all the terminals now, so they won’t come off. I’ve also got a better idea of how the loom looks a bit more professional. That’s by using heat shrink, Which can hide a multitude of sins. Plus the wide band knock sensors needed to put into the loom, as well as the wiring for the throttle motor.
Electric power steering ( Which is hydraulic) was give me a few issues. I didn’t want to overload the pump, blow fuses which it was doing or overpressurised the system. I had altered the PMW down to about 60% which still gave a decent movement when the engine wasn’t running. But it kept on blowing fuses. Once again I was trying to find what the problem was, but I just couldn’t find it.
Then I realised what the issue was, although I was using 12v, the reduction was technically making it around 6v. Which doubles, due to the ohms law, the amperage.
amps = volts / ohms…… Something that I completely forgot about, what a muppet and waste most of a day trying to sort out.
Last Saturday I thought it was ready to go, as everything seems to be working fine, so I sat in the car, seat belt on, started the engine and all ready to go. But in typical classic car style it was not happy, the power steering wasn’t working. Turned the ignition off, back on again, PAS worked, start the engine, PAS stopped.
So I spent a few hours, and majority of Monday, checking all the connectors, all the wiring, voltages and the earths. There was a few dodgy connections, but even with these fixed it made no difference. The advice I was given, that it could be aback feed from an auxiliary input or output. But everything seems fine, so the next stage of attack would be to get the engine running, then one by one undo the connectors, until the problem was no more. It did happen, the engine round a bit better and PAS worked, however the plug undid was the ECU main power supply.
As I realised this could not be the problem, I put a volt meter onto the PAS output from the relay. And this showed some weird stuff, the voltage went up to about 14v, sort of normal alternator voltage, then momentarily It would drop, only to jump back up. So i altered the PAS PWM to 90%, the problem went. For some reason the ECU didn’t like the voltage being applied at 95% with the alternator running, but it was happy as Larry at battery voltage.
I didn’t realise but it was over 18 months ago that I got my new G4X ECU. Which I still haven’t fitted, just never had the time or the motivation. So decided it was time to fit it. I transferred all the data over from my old ECU, so everything should be okay. Of course with the new one in, not everything was working how it should’ve done. To make matters worse the engine just wouldn’t run.
However thanks to the technical team at Link ECU’s they pointed me in the right direction. And all it was, was a timing issue where the old ECU doesn’t have the same amount of features as the new one. The new ECU caters more for my engine so you don’t need so many corrections to make it run. Basically the old information, off of my map, was making the time in at 230° out. Now I just need to sort out and learn more stuff to take advantage of the link G4X xtreme new features
|
| |
“It Doesn’t Feel Pity, Or Remorse, Or Fear, And It Absolutely Will Not Stop, Ever, Until You Are Dead!”
|
|
|
|
|
Aug 23, 2021 20:21:55 GMT
|
The car is slowly going back together or two little issues, I went to move it out the garage and the clutch wasn’t that good. I noticed that the line from the master cylinder he started to weep even though it was nipped up, well FT if I’m being honest. So I had to replace that one and this time put some PTFE tape round the outside just to make sure. That was a few days ago so hopefully that’s cure that. However I had to go through the epic of bleeding again, which also ment undo in the pushrod from the Clevis, which is a right pain in the asre as you can only do it a 1/2 a flat at a time. Earlier on this year, or was it last year, can’t remember, I fitted some new mirrors, these were from either a Rolls-Royce, Bentley or jag. The ones I really wanted for the electric ones but these are quite expensive and hard to find a complete set, two mirrors and the remote control. A couple of months ago manage to find some, I was just waiting for time to fit them. Now as these mirrors are denticle, well supposedly, to the previous ones, just with electric adjusters. it should’ve been a matter of undoing the two bolts, that hold them onto the door, fit some wires, connect it all up and all is good. But it won’t come too much of a surprise to anybody, but this just wasn’t the case. The mirror bolt holes were slightly different, as was the part the mounts onto the door, as was the angle of the mirrors. So I had to makes two new plinths to get them to fit the door, which took a while to get the correct profile. I use the method of roughly cutting it to the correct shape, then getting some sandpaper taped to the door and then this rub the plinth is to get the correct profile. You wouldn’t be the same about struggle, and for some reason the rivet nuts the a previously put on the car for the mirrors weren’t at the correct angle for the mirrors. So that we drilled, ground and crushed out. ![]() 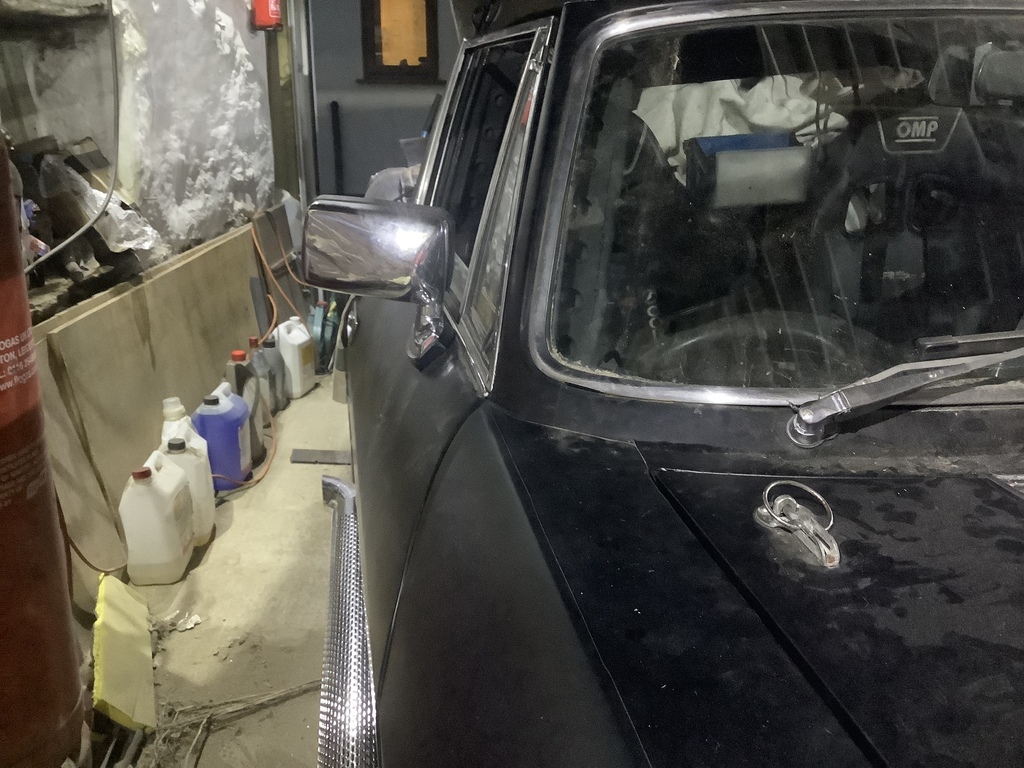 When it was all fitted I found, of course, one the mirrors will go up and down but not left and right. So it was a case of having to strip down the remote control and clean all the connections. Once all back together he seem to work but it was working sort of opposite to how you wanted it to. It needed to be the opposite way round so again swapping some connectors over to make it work how you expect it to. A lot of work for something that’s not a great deal better what are previously fitted, just with the option adjust the passenger side while in the drivers seat. 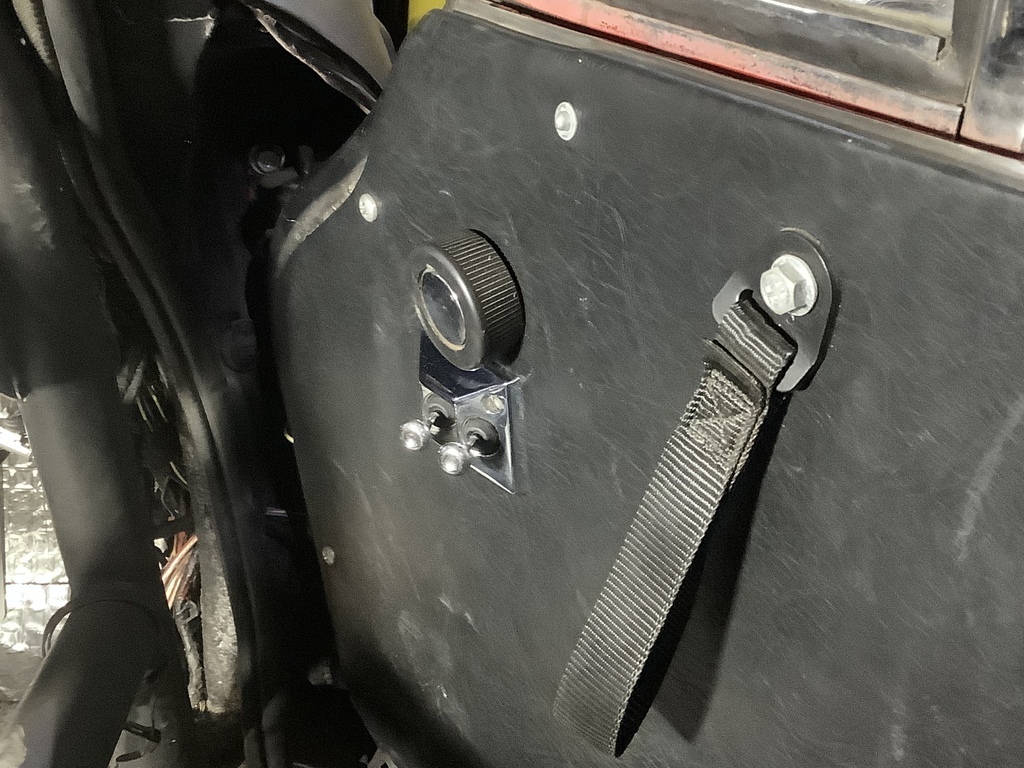 |
| |
Last Edit: Aug 23, 2021 20:24:15 GMT by Bullstarz
“It Doesn’t Feel Pity, Or Remorse, Or Fear, And It Absolutely Will Not Stop, Ever, Until You Are Dead!”
|
|
|
|
|
Aug 17, 2021 17:17:39 GMT
|
Nice work on the brakes! Been a bit of a saga to get here. Getting a proper lathe is well up there on my list of things to buy. There's so many situations where it would make things so much easier. Just need to get the cash together! Ideally I'd like one I can bore out brake discs on, but that's going to be quite a big machine! Crossing out the brakes off of the list was good, just hope they’ll be good when I get to drive it. I never did find what the cause was, I think it was a number of issues which just got too much. The lathe is a big help. Took a while to find one that wasn’t over 200 miles away and useable. Jedimaster, The rear brake conversion was worth it as the front have been upgraded. As for a possible cause for your brother in law issue, there’s so many, but its a case of starting with the cheapest and easiest. |
| |
“It Doesn’t Feel Pity, Or Remorse, Or Fear, And It Absolutely Will Not Stop, Ever, Until You Are Dead!”
|
|
|
|
|
|
|
Little bit of progress. Decided to start from fresh replaced, all the brake lines and all the unions. So I had a baseline to start with. I also did a bit of research on my brake flaring tool and all the correct flares for everything in the system. Now, there is all types, many, many, many different types on my car, American, Imperial (SIA), metric (DIN), JIC and a couple of oddballs.  First thing I thought would be to set my brake flaring tool up correctly, so that the flares would be as they’re supposed to be. I also found that all the Wilwood stuff required a double flare on all the unions. While the rear calipers, which where M10 x 1mm, needed the metric flare. Which is 4.75 mm and is a slightly different shape to the Imperial 3/16. I decide to take a lot of care out of making each flare, sanding it smooth, Flattening it off, D-bearing it and put in a slight chamfer on the inside edge. It took a long time to redo everything, and there was quite a lot of redoing the redoing, as not every flare was good enough. As I didn’t wanna be chasing errors. This compounded the time and frustration as redoing even just one single flare could mean that the pipe was now just that too short, and had to re-done again, what a cnut. With everything done and with fresh fluid through, I did leave it overnight with a pedal depressed, in the morning there was a few little weeps and drips. So a quick nip up, a little bleed to see how things were. But again everything was still the same, a poor pedal. Re-checked all the unions again, a few of them did need this that little quarter of a turn before they felt tight. Once again I left the pedal depressed overnight to force any fluid out of any weak points. Once again, in the morning there’s was few little damp unions. Again is a case of going round every union and checking it, in some cases given it a little bit more of a tighten. Which seemed odd as only a few hours before it was fully tight. A lot of the advice from the main manufacturers of pedal boxes, Tilton/Wilwood, they say the correct way to bleed a twin master cylinder set up, is to bleed both the front and the rear at the same time. This meant having to jack the car up and all four wheels off, so I could get to all to bleed nipples. The fronts calipers have got two each and are impossible to get to with the wheels on. Rather than use a vacuum bleeder I thought it was a good idea to go back to the old trusty way, of getting a pipe from the bleed nipple into a jar of brake fluid. Then just pressing the brake pedal. Not gonna lie, it took quite a while, and a fair amount of brake fluid. But it seems to have worked. The pedal is good, not too sure if it’s all set up correctly, or how good the brake actually are. The car has only moved a matter of feet which is no good for checking the brakes. That will all have to wait until the car is back together, which again is taking a lot longer than I thought it would do. One of the reasons it’s taking longer to put back together is that I finally managed to get a lathe. When you see something not fitting correctly “your like, I can machine something to do that.” I found a couple of things where I’d used a number of washers, or washer and a nut, to act as a spacer. So now I can machine something that’s the correct size. Also noticed that the spigots for the front wheels were slightly the wrong shape. I then realise that these were made for my old wheels, so they needed machining down. Lathes are brilliant, one of the better things I’ve bought, just need a few more parts to be able to cut threads. |
| |
“It Doesn’t Feel Pity, Or Remorse, Or Fear, And It Absolutely Will Not Stop, Ever, Until You Are Dead!”
|
|
|
|
|
|
|
|
|
| |
“It Doesn’t Feel Pity, Or Remorse, Or Fear, And It Absolutely Will Not Stop, Ever, Until You Are Dead!”
|
|
|
|
|
|
|
|
|
|
………..
|
| |
Last Edit: Aug 6, 2021 11:51:34 GMT by Bullstarz
“It Doesn’t Feel Pity, Or Remorse, Or Fear, And It Absolutely Will Not Stop, Ever, Until You Are Dead!”
|
|
|
|
|
|
|
With the battery impact drivers, I bought one a couple of weeks ago, supposed to be rated to 540 new meters. However, it couldn’t undo wheels nuts torqued to 100nm. Apparently a vast majority of them can’t undo things that are torqued up. But they will do something that’s just rusted up tight. Very very good at undoing or tightening things up a lot easier than using a hand ratchet. If you want one to really get seriously seized on bolts off you’ve got to go for a branded make, like Milwaukee, Hilti or snap on. Not at all cheap but at least they’ll do the job. Or just use an pneumatic one. |
| |
Last Edit: Aug 3, 2021 21:08:04 GMT by Bullstarz
“It Doesn’t Feel Pity, Or Remorse, Or Fear, And It Absolutely Will Not Stop, Ever, Until You Are Dead!”
|
|
|
|
|
|
|
Coppershit the fcuk out of it. My car got a dark copper tinge to it under certain light. Good to see you on here Vader. You should put a link on the triumphstag.freeforums.net/ |
| |
“It Doesn’t Feel Pity, Or Remorse, Or Fear, And It Absolutely Will Not Stop, Ever, Until You Are Dead!”
|
|
|
|
|
|
|
Re the long brake pedal…. Have you previously had a good result from the same front calipers or are they new? I ask as we wasted hours or days and many litres of brake fluid trying to get a decent pedal on a Spitfire and in the end it turned out that the new 16PB copy calipers were plop with the seals pulling the pistons back too much. Was possible to fool the seals for a few miles by pumping the pistons out and wedging the pads back in tight, but as the pads wore the calipers would fail to self-adjust and the pedal would get longer and longer. Binned them in the end and rebuilt some OE ones. Also, can be useful to clamp off parts of the system (easy if not using braided hoses) to narrow down where the fluid is going. Good luck…. Nick Thanks The front calipers have been on the car for a number of years and worked. I didn’t realise the reason at the time why the front seemed not to be working. As this was due to the fact the rear master cylinder was not allowing the front master cylinder to gain enough pressure/fluid volume to allow the fronts to work adequately. The rear were stopping the front from working, even though the rears brake got hot while the fronts remained cool. The peddle box has got its own set of rules almost like a Parallel universe, the obvious isn’t the problem it’s in fact the total opposite. The front are working fine now and apparently always have been, the rears calipers were shot and needed to be replaced. If replacing the rear lines from the “T” to the flexi-hose doesn’t solve the problem it must mean the rear Goodrigde hose, or hoses, have gone. Which isn’t that common. |
| |
Last Edit: Aug 3, 2021 18:25:16 GMT by Bullstarz
“It Doesn’t Feel Pity, Or Remorse, Or Fear, And It Absolutely Will Not Stop, Ever, Until You Are Dead!”
|
|
|
|
|
|
|
What a waste of seven years. Seven years I wish. That’s just this rebuild, the first time took 8 years and then the car had only just a couple of years before had an extensive nut and bolt rebuild by the previous owner. All the stuff I’ve done this time has (almost ) rectified the decades of others owners bad repairs. If you own a Stag, which by your name you might, and you have not done a complete rebuild yourself its odd to comment a waste of time. When it’s saved a car that was realistically teetering on the edge of scrap or repair . Yes it has took up a lot of time, money, effort, blood sweat and tears but I have learnt so much off of this car, more than I did/have being a mechanic/engineer. Has it been worth it, no. Does it bother me again no. Some people do golfing or drugs to pass thier time. As I’m no longer advised to play rugby or any contact sports I prefer to spend my time building this. |
| |
Last Edit: Aug 3, 2021 12:22:28 GMT by Bullstarz
“It Doesn’t Feel Pity, Or Remorse, Or Fear, And It Absolutely Will Not Stop, Ever, Until You Are Dead!”
|
|
|
|
|
|
|
|
Well reducing the size of the clutch master cylinder sort of worked but didn’t. I got the car back together and running and tried the clutch. With a pedal full of depressed it just started to disengage, but not fully. So I am going to have to put back in the 0.75 master cylinder. Great
With the rears brakes I’m going to replace the bits that I’ve not replaced, it must be air trapped in the “T” or is not an air tight seal.
The cooling system has been done hopefully this time it will be leak free. It was running at fast tick over for a while and the temp went up nice and slow. The EWP is now set to run at 8v until it reaches 60 degrees then rise to battery voltage at 86 degrees. It runs on for 3 second off for 6 until 50 degrees then on for 6 second and off for 4 until 75 degrees when it just on. I’ll see how that works may need re-jigging later. Might even have to fit the thermostat in the top hose if it take too long to reach temp.
|
| |
Last Edit: Aug 2, 2021 19:00:26 GMT by Bullstarz
“It Doesn’t Feel Pity, Or Remorse, Or Fear, And It Absolutely Will Not Stop, Ever, Until You Are Dead!”
|
|
|
|
|
Jul 29, 2021 17:16:54 GMT
|
It still sounds like air in the rear pipes somewhere. Compressing the pedal overnight makes the fluid absorb air so it points to that scenario. In your rear brake lines do you have a high point anywhere that air could be trapped in? - if so then a T peice with a bleed nipple in the T could sort it. Where the “T” is I suppose is one of the highest points but still a lower than the master cylinder. This was the next thing I was going to do, Move the “T” closer to the handbrake and the have two equal length lines running straight to the Flexi hoses. That will probably be the next thing, I did look at going braided from the “T” all the way to the calipers but it possibly not worth the cost, as just the fittings work out £50. |
| |
“It Doesn’t Feel Pity, Or Remorse, Or Fear, And It Absolutely Will Not Stop, Ever, Until You Are Dead!”
|
|
|
|
|
Jul 28, 2021 16:53:09 GMT
|
|
Looking at the manufacture spec, OBP Pro-Race V2 Top Mounted Cockpit Fit 3 Pedal System, they say the ratio is 5.45:1. But that is the newer version, I’m sure mine was a maximum of 6:1 ratio if you have the foot pad mounted the lowest possible place.
As for the pads need bedding in, the chance would fine thing. I know the fronts will take 100-150 miles, the short distance they have done you can see the bedding in compound is cleaning the surface.
Leaving the brake pedal depressed over night made a slight difference on Sunday-Monday. Noticed one slight weep and that was the union top of the master cylinder so that was nipped up. The pedal did seem firmer and had less travel until it felt firm. Then Monday I decided o the same thing and keep the pedal pressed in overnight. This was done by using a few 1/2 inch drive extensions pushed against the pedal by hand as far/hard as I could and then blocks of wood/metal to packet out against the seat. I found that I couldn’t use everything and the pedal distance had decreased by 10mm.
On Tuesday checked again it seems that firmer once again with less travel. So it seemed like leave it depressed overnight was having some effect, this time for the good. Tuesday I tried the same again but this time I can only use a 10mm spacer against the seat.
Today was better still with less travel and firmer. However it’s still not acting how I thought it would. I Have to use a mirror and lamp in the foot well to see what the bias bar is doing. And looking at it as you press the footpedal, the front moves first closely followed by the rear. When you feel the pedal go firm the bias bar is still cocked, so that will need to be adjusted. When you continue to press the pedal the front only moves slightly more but the rear MC compress a lot more. Not as much as it did but still more than I thought Iit would/should.
|
| |
“It Doesn’t Feel Pity, Or Remorse, Or Fear, And It Absolutely Will Not Stop, Ever, Until You Are Dead!”
|
|
|
|
|
Jul 27, 2021 12:32:42 GMT
|
|
Yes, the original Mondeo MC was a tandem so both front and rear has had the same 1” bore. I would think I’ve got higher pedal ratios than a standard car so that could be a factor yeah true. A servo I suppose that takes up the initial part the pedal where there is no pressure being built up as the depression is there to assist your breaking, so the brakes are different again. Who knows.
Have to see what is like when I finally will it out the garage but I’ve got all the bits I took off which will take a couple of days to get back on. But yeah I think there’s probably some air stuck somewhere and it might mean we’re just making a few more lines and re-believing them again, and again. I may bring the brake line splitter a bit closer and just try to equal longer length lines to the rear brakes.
|
| |
“It Doesn’t Feel Pity, Or Remorse, Or Fear, And It Absolutely Will Not Stop, Ever, Until You Are Dead!”
|
|
|
|
|
Jul 26, 2021 21:52:50 GMT
|
Always used a pressure bleeder, never had a single reservoir go bang. Although unusually i read the instructions first and only use 20psi max. I use a Sealey (pump to pressurise) one these days and its brilliantly usable as i don't have a garage and electric supply. Used it on my Boxster which has inner and outer bleed nipples on all four calipers, complete fluid change and strong pedal in about an hour and a half including jacking and wheel removal-refitting.
I’ve not had one go myself, just seen the after effects. Normally down to user error but there’s one make think it’s VW that can’t take any pressure. The one we had at work did take about 18 Lt of fluid and was connected to the air lines. Which is a formula for things to go wrong, especially when the last person was using a rattle gun. Hopefully it is some random bubble of air trapped away somewhere and I’ve not just been a tawt. |
| |
“It Doesn’t Feel Pity, Or Remorse, Or Fear, And It Absolutely Will Not Stop, Ever, Until You Are Dead!”
|
|
|
|


