triumphandy1
Part of things
 1968 Triumph Herald 13/60, an ongoing project........
Posts: 72 
|
|
Mar 29, 2020 20:30:10 GMT
|
With the running gear done it was time to get started on the engine. So I pulled the old engine and gearbox out and sat it next to the MX5 engine. Initially my plan was to run the engine on twin weber 40 DCOE's and I even bought a rough set to rebuild. But as I started looking into an ignition system I decided to just get a standalone ECU and run EFI. But if your getting a stand alone ECU you may as well have throttle bodies to go with it right?  So I bought a set of jenvey 45s second hand. These bolted straight onto the inlet manifold I had already bought  20190629_161638 20190629_161638 by Andy Roberts, on Flickr  20190629_161647 20190629_161647 by Andy Roberts, on Flickr  20190629_161652 20190629_161652 by Andy Roberts, on Flickr Luckily the MX5 engine lends itself to engine swaps very well I think. Its all set up to work with a rear wheel drive car already, had a rear bowl sump, hydraulic clutch, easily adaptable engine mounts and there are loads of aftermarket parts and upgrades. And the best part is if it goes bang I can go get another one for £100 . So I tried dropping it into the car to see how it fitted.  20190629_174435 20190629_174435 by Andy Roberts, on Flickr I wanted to retain the original heater which made it abit harder! I fitted a Nissan micra heater fan as it near enough drops straight in and is loads better than the factory one. I aslo got rid of the heater valve and replace it with a smaller kit car valve to save some room.  20190706_154820 20190706_154820 by Andy Roberts, on Flickr I used the standard MX5 engine mounts and made my own plates to mount them to the chassis. It was about this time I thought I had better test fit the bonnet before welding the engine mounts on and realised the engine was far too high for it to shut . You can tell this is my first engine swap!  The front of the sump was sat mm above the steering rack as it was so the only way to go was to move the engine back and drop it so the steering rack was in between the sump and the crank pulley. This meant re locating the coil pack (ended up using a ford one anyway), making my own water outlet as the MX5 one was too wide, removing and bunging the camshaft angle sensor and removing the heat exchanger and bunging the fittings. This also meant the throttle bodies hit the bulkhead so I got a local firm to make an offset inlet manifold for me.  20200208_154946 20200208_154946 by Andy Roberts, on Flickr I made the airbox from aluminium it uses a K&N air filter made for a Datsun 240z that just happens to be the perfect size and shape and just fits between the wheel tubs on the bonnet. This is how far back it ended up sitting. The front of the engine is rougly where the front of the original sat but the MX5 engine is a fair bit longer.  20200208_154952 20200208_154952 by Andy Roberts, on Flickr I now needed a way for the ECU to make out the engine position now that I had removed the cam angle sensor. The mk2 mx5 used a front pulley mounted trigger wheel instead and this seamed ideal but unfortunately its mounted behind the crank pully and would have hit the steering rack so another solution was needed. In the end I found a company in America that made a kit to put a trigger wheel on the outside of the crank pulley but unfortunately it was very expensive. I found a company in California that had the only part of the kit I needed to make it work second-hand, the hub that centralises the trigger wheel on the crank pulley so I got it shipped over and got a trigger wheel made.  20191026_180423 20191026_180423 by Andy Roberts, on Flickr I didn't really take enough photos past this point as it moved along fairly quickly but here is is now  20200315_140702 20200315_140702 by Andy Roberts, on Flickr  20200208_154926 20200208_154926 by Andy Roberts, on Flickr  20200208_154932 20200208_154932 by Andy Roberts, on Flickr  20200208_154938 20200208_154938 by Andy Roberts, on Flickr  20200208_154942 20200208_154942 by Andy Roberts, on Flickr The radiator is standard MX5 but with aftermarket twin fans mounted on a tubular frame and a Suzuki jimmy expansion bottle. I made the pipes on top of the heater box to take coolant from the heater outlet on the engine to the heater box inlet on the other side. Its currently all piped up and ran for the first time in my ownership a few months ago. Next is wiring , exhaust and fuel syetm. Cheers Andy |
| |
|
|
|
|
triumphandy1
Part of things
1968 Triumph Herald 13/60, an ongoing project........
Posts: 72
|
|
Mar 29, 2020 19:40:04 GMT
|
Great update. That’s the nicest looking R160 conversion I think I’ve seen. You may find you need to brace the front mount (bolt on section to go over the nose of the diff?). A friend with an ST170 engined Spitfire was getting and effect very much like axle tramping caused by flex in the front mount, though he did start off with the simple nearly flat design you find on the internet so yours is already substantially better! Cheers Nick Thanks a lot for the help with the hub alterations I'm hoping my plate might be abit stronger but I'm just going to have to see how the chassis holds up though it seems pretty bendy anyway Cheers |
| |
|
|
triumphandy1
Part of things
1968 Triumph Herald 13/60, an ongoing project........
Posts: 72
|
|
Mar 29, 2020 13:19:02 GMT
|
I have been back on with this project over the past year and a half so thought I had better update this. The car sat in the garage since 2105 pretty much untouched. With work and spening time working on/driving my Peugeot 205 nothing really happened with it. I decided to do something with it and quickly decided that 60 bhp from the original engine was not really going to be enough for me. So I started collecting parts to build a nice spec 1300 engine. I collected a few decent parts (Yamaha r1 carbs on a custom manifold, tubular exhaust manifold, big valve ported head, spitfire mk3 block etc etc) but as the costs started mounting up I decided that an engine swap was probably a better option for me. Overall it would be cheaper (or so I thought ) perform better and be more reliable. After researching a few options it came down to a ford zetec for a mazda mx5 engine (I have since thought a mazda 2.0 v6 might be a more interesting option but this project is already taking for ever as it is!). The cost of making the zetec work in RWD car made me chose the mazda engine so I bought a 1.8 mk1 engine and gearbox from a scrapyard for £100, sold the 1300 engine parts (which funded most of the new stuff) and made a start. From the start I wanted to make the modifications reversible where possible so I could return the car to standard If I wanted to but also to fit in with the dvla's points system. The body and chassis are unmodified and I could cut the engine mounts off and bolt all the standard running gear back on. The rear suspension on these cars is a well known weak point being a swing axle design has a tendency to go into positive camber when cornering hard. Also the rear diffenetal would have been abit borderline with the new engine. I had seen that some people mostly in New Zealand had fitted a Subaru differential using a kit that bolted into the original chassis. This seemed ideal as the diff could handle way more power than I could ever need, some have an LSD and there are loads of them in breakers yards. I bought a 4.1 ratio LSD diff from a JDM impreza WRX. Here it is next to the standard diff.  20180112_182422 20180112_182422 by Andy Roberts, on Flickr This is the mounting kit complete with a cast aluminium rear mounting plate.  post-1499-0-14927600-1326861732 post-1499-0-14927600-1326861732 by Andy Roberts, on Flickr  6092388024_cf89d5face_b 6092388024_cf89d5face_b by Andy Roberts, on Flickr With the rear suspension I thought the best place to start would be a rotoflex set up from a vitesse. It still uses a transverse leaf spring but has bottom wishbones and was the factory's solution to the problem. So I bought the full rear end from a rusty vitesse. 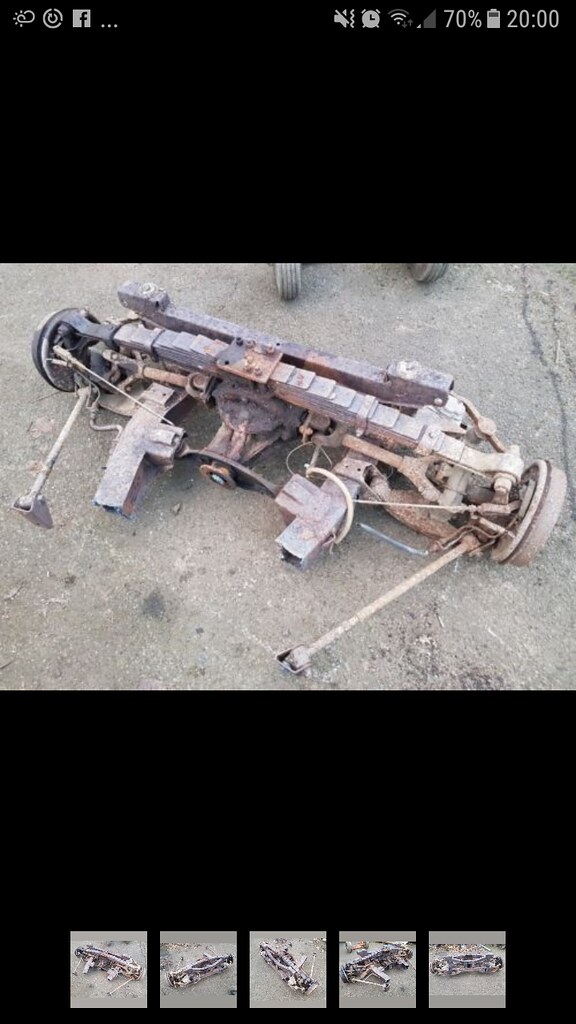 Screenshot_20180107-200019 Screenshot_20180107-200019 by Andy Roberts, on Flickr The diff mounting brackets from what I can work out were made by a company in New Zealand but only a few sets were made and they weren't available to buy when I started. But I managed to find some of the drawings and measurements online so with the help of a fabricator mate set about making some.  20180112_170433 20180112_170433 by Andy Roberts, on Flickr  20190309_075444 20190309_075444 by Andy Roberts, on Flickr  20190405_104146 20190405_104146 by Andy Roberts, on Flickr 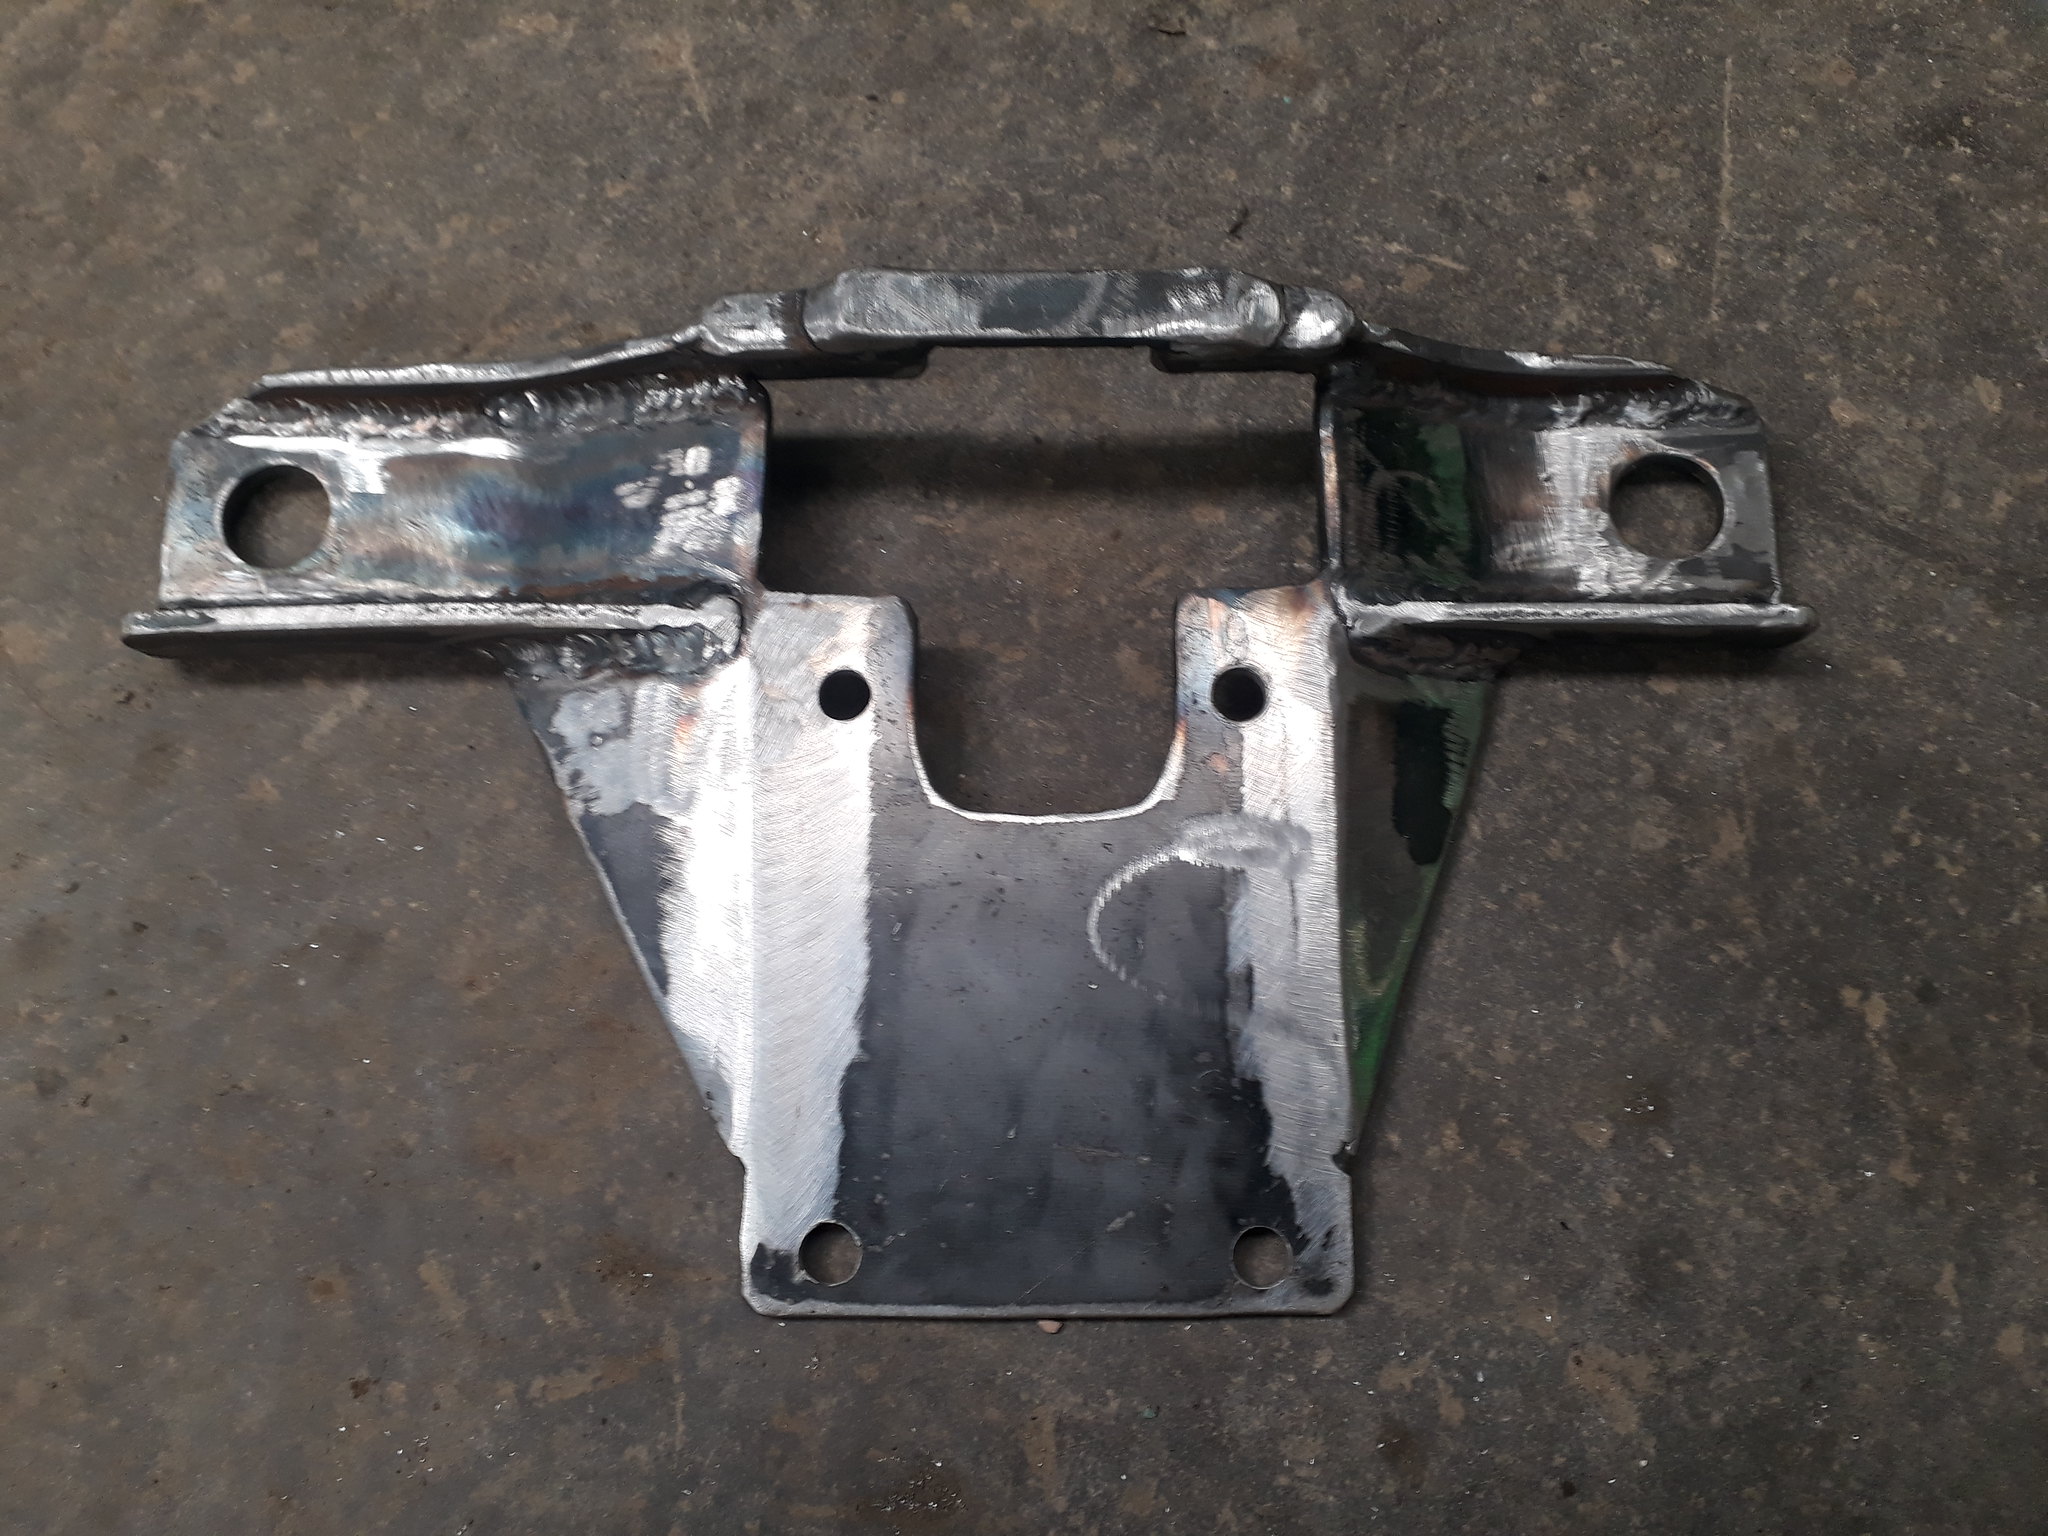 20190405_104151 20190405_104151 by Andy Roberts, on Flickr The section of rusty old chassis came in useful  20190409_191831 20190409_191831 by Andy Roberts, on Flickr Spring mounting plate finished with captive nuts instead of studs. Also made it 3/4" taller than standard to lower the car without needing to use a lowering block.  20190410_191923 20190410_191923 by Andy Roberts, on Flickr With the diff brackets made rear suspension was the next thing. So I stripped the vitesse stuff down, I only ended up using a few bits out of it in the end. I used the vitesse bottom arms and uprights but did the Nick Jones conversion and got them machined to fit MGF wheel bearings and hubs. I used two rover 100 n/s drive shafts and rover 100 cv joints and boots. On the inside the Subaru CV joints fitted straight into the rover 100 driveshafts when shimmed up as the rover inners are thicker than the Subaru ones. After a few hours looking through a CV boot catalogue I found Toyota aygo inner cv boots were the right dimensions but short enough to miss the chassis.  20180210_143908 20180210_143908 by Andy Roberts, on Flickr All the vitesse parts were rebuilt with polybushes used throughout I also had to make new inner radius arm brackets as they were not available new at the time. I used standard vitesse drum brakes as they are slightly bigger than the herald items and I thought they would be fine on a light car. I reused the koni shocks and fitted new inner wishbone brackets to my chassis. And that's it the rear suspension pretty much done. 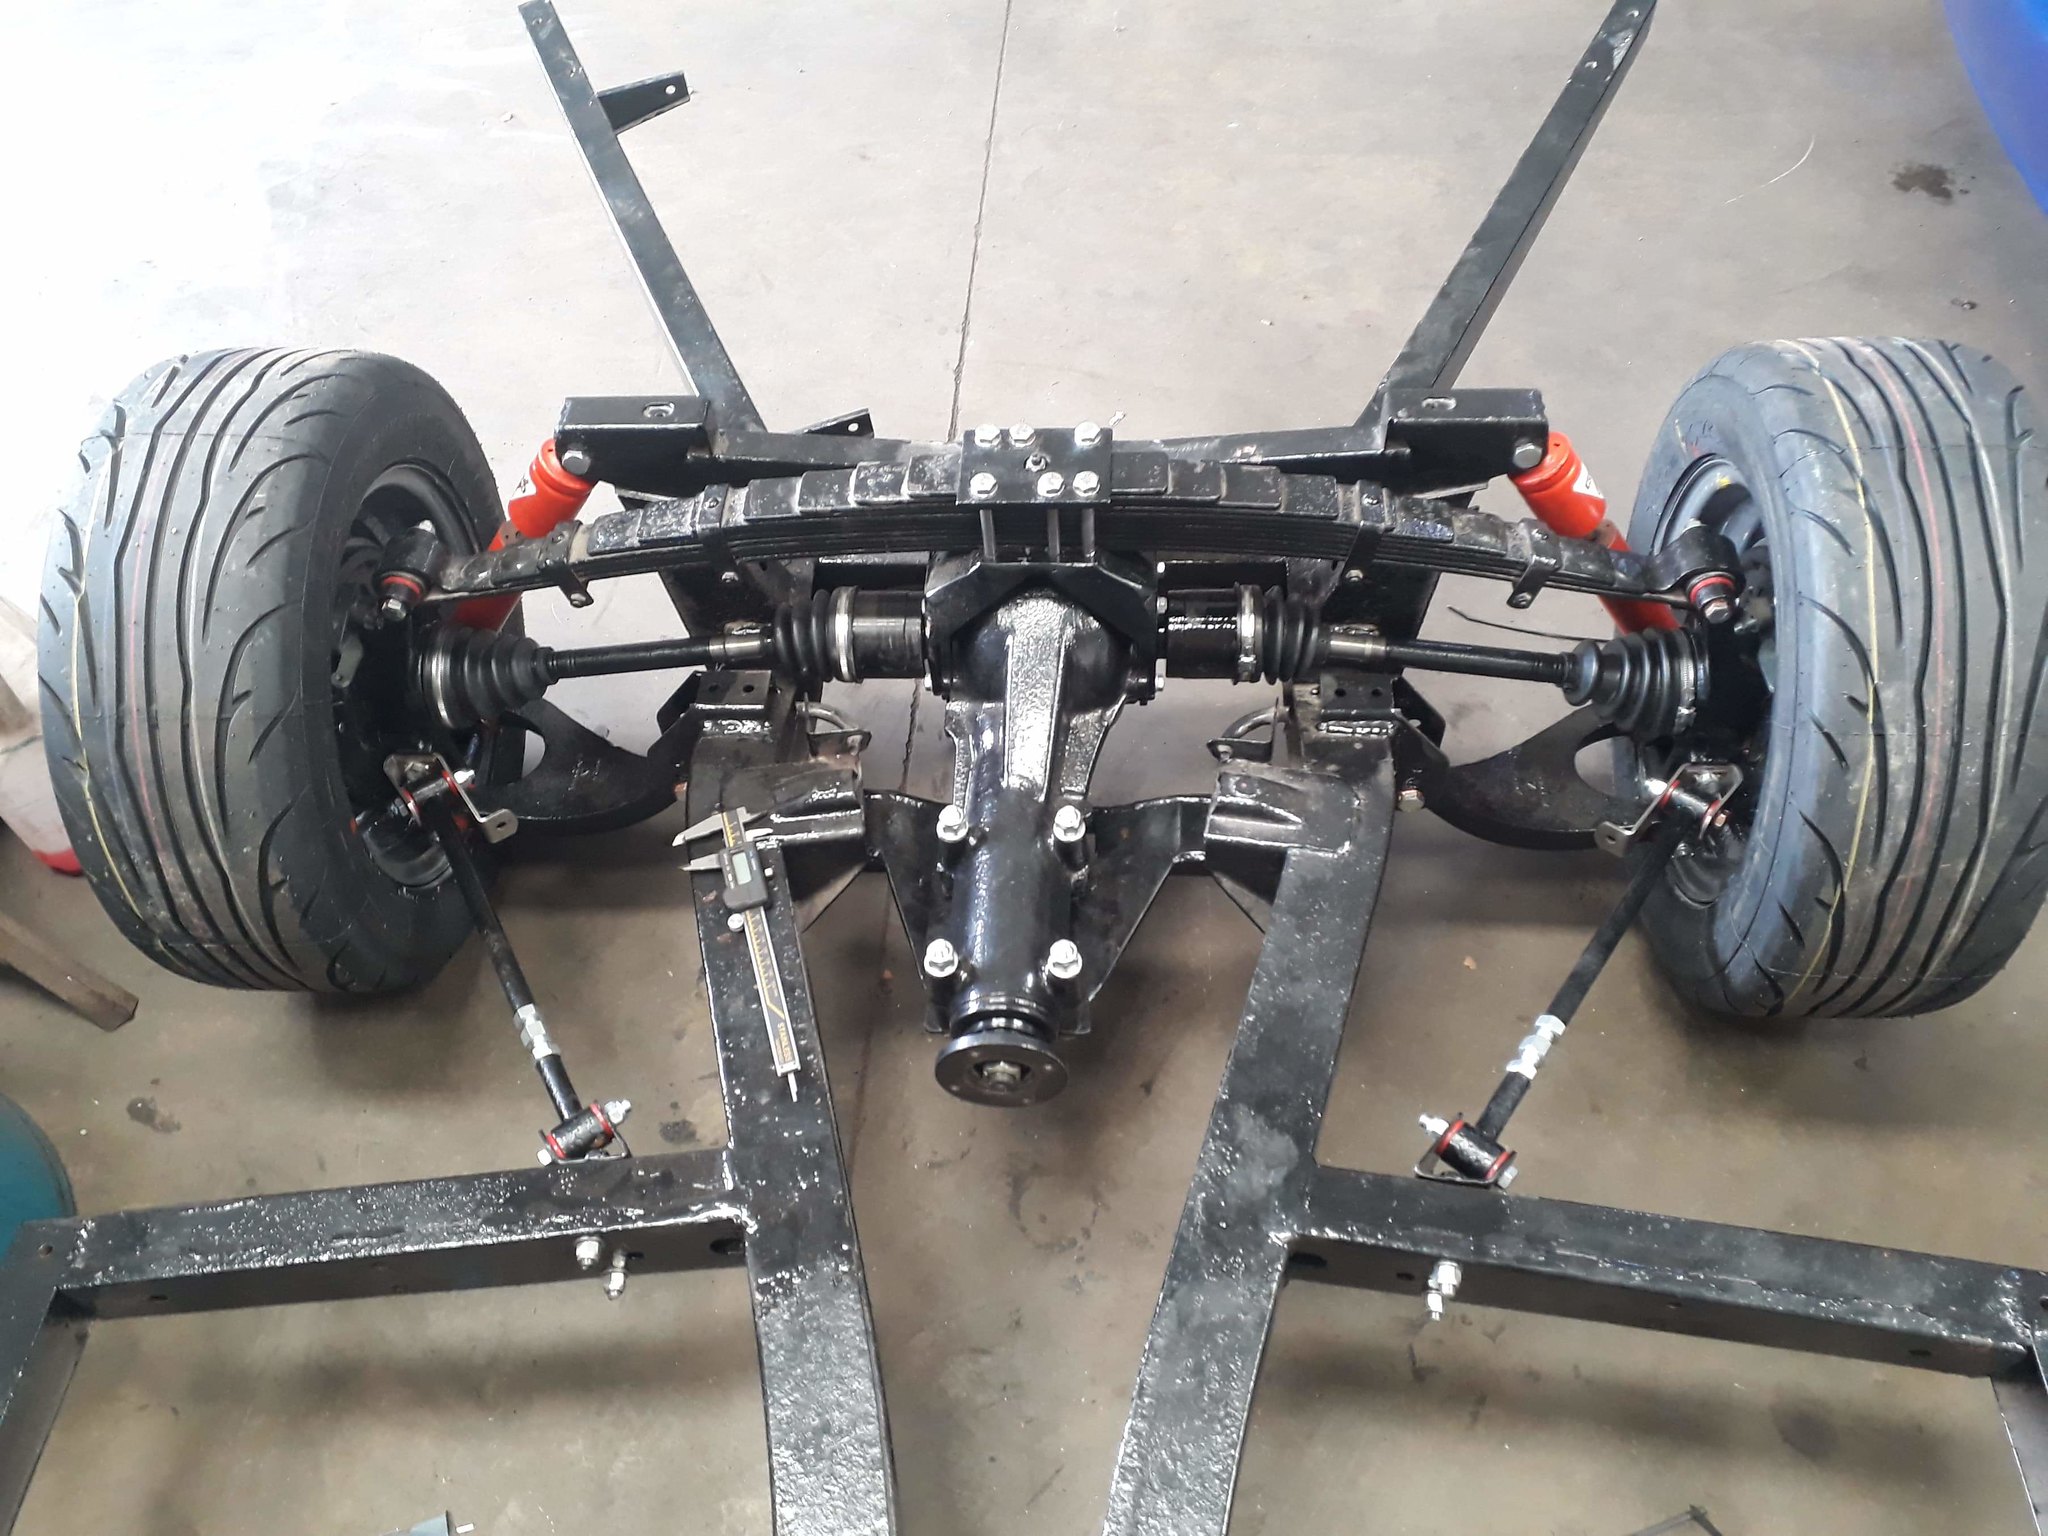 received_808102109590330 received_808102109590330 by Andy Roberts, on Flickr I got the 5.5 wheels powdercoated and bought some sticky looking nankang ns2r's in 185 60 13.  20190531_193911 20190531_193911 by Andy Roberts, on Flickr  20190531_193903 20190531_193903 by Andy Roberts, on Flickr The front suspension/brakes was a lot easier as its mostly off the shelf bolt on stuff. Its got canley classics trunnionless uprights, Canley classics adjustable top wishbones, alloy early vitesse caliper brackets, capri 2.8 discs and spaced princess 4 pot calipers, vitesse stub axles and hubs (vitesses have bigger wheel bearings) machined to centralise and correct the taller offset of the capri disc,koni shocks, late spitfire thicker antoi roll bar, rose jointed anti roll bar links and is polybushed throughout. I also retained the triumphtune springs.  20190131_192130 20190131_192130 by Andy Roberts, on Flickr  20190131_192138 20190131_192138 by Andy Roberts, on Flickr  20190131_192148 20190131_192148 by Andy Roberts, on Flickr  20190131_192155 20190131_192155 by Andy Roberts, on Flickr So now with the chassis done it was time to start on the engine swap. Cheers Andy |
| |
|
|
triumphandy1
Part of things
1968 Triumph Herald 13/60, an ongoing project........
Posts: 72
|
|
|
|
|
Hi sorry now sold thanks
|
| |
|
|
triumphandy1
Part of things
1968 Triumph Herald 13/60, an ongoing project........
Posts: 72
|
|
Mar 21, 2018 10:29:01 GMT
|
|
The sellers just weighed them for me they said the only scales they have only go up to 5kg and these exceed that so its unlikley that they are magnesium surely? Just seen a compomotive 13x6 th alloy weighs 5.5kg
Cheers
|
| |
|
|
triumphandy1
Part of things
1968 Triumph Herald 13/60, an ongoing project........
Posts: 72
|
|
Mar 20, 2018 10:42:47 GMT
|
|
Thanks for the advice ive asked the seller to weight them for me and they are fairly local so I could go do the vinegar test if the seller will let me. If they do turn put to be magnesium are they sutable to be used on a road car?
Cheers
|
| |
|
|
triumphandy1
Part of things
1968 Triumph Herald 13/60, an ongoing project........
Posts: 72
|
|
Mar 18, 2018 21:24:34 GMT
|
Hi I'm looking at a set of these wheels for my 205 and was wondering does anyone know if they will be magnesium or just aluminium they are proper rally wheels as far as I know as used on group n rally cars. Is there an easy way to test what they are? the seller doesn't know and I don't want to be left with a set of very fragile and unusable on the road wheels  cheers Andy |
| |
|
|
triumphandy1
Part of things
1968 Triumph Herald 13/60, an ongoing project........
Posts: 72
|
|
Mar 10, 2018 16:39:30 GMT
|
|
Hi I'm after a interesting set of 4x10⁸ 14" wheels for my peugeot 205 they must be no more than 6" wide and an offset of et 20-30.
Cheers Andy
|
| |
|
|
triumphandy1
Part of things
1968 Triumph Herald 13/60, an ongoing project........
Posts: 72
|
|
Jan 13, 2018 21:36:16 GMT
|
|
Thanks for the replys I am putting a subaru diff in my herald I havent even thought of existing shafts I just assumed that the cv joints would have a different spline fitting as they were from different manufacturers it would certainly save some money if there was something already existing that would do the job! I don't currently know how long the driveshafts need to be as I need to get it all built up to messure it I'm just weighing up my options at the moment. I have found a company in newcastle that will friction weld the shafts for £110 each but I was hoping to find somewhere local so I wouldnt have to post them. I will try some engineering comapnys to see if any of them can help.
Cheers Andy
|
| |
|
|
triumphandy1
Part of things
1968 Triumph Herald 13/60, an ongoing project........
Posts: 72
|
|
Jan 13, 2018 19:19:05 GMT
|
|
Hi I'm trying to find somewhere that can adapt some driveshafts for a project. One side is subaru and the other is mgf and I need them ether cutting down and re joining or cut down and resplining to a specifc length. Does anyone know of anywhere in the yorkshire area that can do this as I'm struggling to find anywhere that will touch driveshats.
Cheers Andy
|
| |
|
|
|
|
triumphandy1
Part of things
1968 Triumph Herald 13/60, an ongoing project........
Posts: 72
|
|
Jul 28, 2016 17:49:11 GMT
|
|
bump before eBay
|
| |
|
|
triumphandy1
Part of things
1968 Triumph Herald 13/60, an ongoing project........
Posts: 72
|
|
Jul 23, 2016 16:17:56 GMT
|
Hi, due to a change of plan I'm selling these. They are all straight and free from major damage and have recently been powder coated white (a decent job but not perfect) and come with three good 185/60/14 Yokohama A539 tyres (although one does not hold air).     Collection from Bradford £60 just after what I paid back Cheers Andy |
| |
|
|
triumphandy1
Part of things
1968 Triumph Herald 13/60, an ongoing project........
Posts: 72
|
|
May 29, 2016 21:46:52 GMT
|
Hi, Bought this a couple of weeks ago to replace an 03 polo as my daily driver. I've been sort of looking for an xs for ages but I wanted a fairly original one with all its xs specific bits present then this one turned up locally for a decent price. Its not perfect but its decent and usable. Its obviously been well cared for at some pint its got mot's and service history back to when it was new. Its a 1987 phase 1 205 xs with the earlier xy8 engine with twin weber carbs. Here's some pics from the advert    i didn't like the reflective rear panel so bought a standard one and some badges on eBay. Luckily the xs badge has been stuck to the tailgate so I peeled it off, painted it and reused it.  so far I've -replaced the driving lams -replaced the grill badge -given it a good cut and polish -painted the wiper arms -black wow'd all the plastic trim bumpers etc. -fitted new number plates (the original dealer plate from the back has been safely stored away!) -replaced a headlight and indicator unit -removed part of the rear spoiler (I'm still unsure on whether to leave it or remove it its a genuine Peugeot accessory but it has left screw holes in the rear 1/4 panels)   The passenger side door is off another 205 (luckily the original came with the car) and the passenger side front wing is dented at the front and the paint is poor   The holes left by the spoiler     The interior is good for its age just the dah is cracked and the drivers door pocket is missing Future plans are to sort an oil leak and give the engine a good service, i'm pretty sure its the rocker cover gasket but I'm going to have it up on the ramp to make sure. Also the rev counter doesn't work, the speedo needle bounces (already got a replacement cable) and replace the gear linkages (the gear change is really bad). I wanted a set of 106 rallye wheels for it but couldn't really afford a set. Then i found these, they are off a Peugeot partner van and are the exact same size as 106 rallye wheels but look like 205 rallye wheels   And the best part is there about a tenth of the price I also found some nearly new bilstein dampers locally for a bargin price. Cheers Andy |
| |
|
|
triumphandy1
Part of things
1968 Triumph Herald 13/60, an ongoing project........
Posts: 72
|
|
Apr 30, 2016 17:51:23 GMT
|
|
Hi I'm after a spitfire mk3 (FD code) engine if anyone's got anything. Condition and missing parts doesn't really matter.
Cheers Andy
|
| |
|
|
triumphandy1
Part of things
1968 Triumph Herald 13/60, an ongoing project........
Posts: 72
|
|
Apr 25, 2016 19:33:38 GMT
|
|
Bump am I asking too much for this?
|
| |
|
|
triumphandy1
Part of things
1968 Triumph Herald 13/60, an ongoing project........
Posts: 72
|
|
Apr 16, 2016 10:19:13 GMT
|
|
|
| |
|
|
triumphandy1
Part of things
1968 Triumph Herald 13/60, an ongoing project........
Posts: 72
|
|
|
|
|
Hi, sorry all the wheels are spoken for now. Thanks for the help.
Andy
|
| |
|
|
triumphandy1
Part of things
1968 Triumph Herald 13/60, an ongoing project........
Posts: 72
|
|
|
|
|
Thanks for the help I'm located near Bradford.
Cheers Andy
|
| |
|
|
triumphandy1
Part of things
1968 Triumph Herald 13/60, an ongoing project........
Posts: 72
|
|
|
|
|
|
| |
|
|
triumphandy1
Part of things
1968 Triumph Herald 13/60, an ongoing project........
Posts: 72
|
|
|
|
Hi, I'm after a lupo or polo 3 door 1.4 as a sensible daily must be in good condition and around the west Yorkshire area. Cheers Andy |
| |
|
|


 So I bought a set of jenvey 45s second hand. These bolted straight onto the inlet manifold I had already bought
 The front of the sump was sat mm above the steering rack as it was so the only way to go was to move the engine back and drop it so the steering rack was in between the sump and the crank pulley. This meant re locating the coil pack (ended up using a ford one anyway), making my own water outlet as the MX5 one was too wide, removing and bunging the camshaft angle sensor and removing the heat exchanger and bunging the fittings. This also meant the throttle bodies hit the bulkhead so I got a local firm to make an offset inlet manifold for me.


