logicaluk
Posted a lot
 Every days a school day round here
Posts: 1,319
|
|
May 11, 2024 11:00:05 GMT
|
|
Thanks. Today is pencilled in messing with lathe, but the job has stopped because I took the valve throat cutter out of the drill and put it somewhere safe, 2hrs search so far, no sodding idea where it is, any guesses? Coz I'm all out of ideas.
D
|
| |
|
|
|
|
logicaluk
Posted a lot
Every days a school day round here
Posts: 1,319
|
|
May 10, 2024 20:22:02 GMT
|
|
thanks, TBH i gave up on the project, the owners weren't interested, so its just sat on my rasberry pi.
|
| |
|
|
logicaluk
Posted a lot
Every days a school day round here
Posts: 1,319
|
|
May 10, 2024 13:03:22 GMT
|
|
This is one of those projects that gets pushed back and forgotten.
Once again I decided I really wanted it running after stripping the headstock and fitting a used acclaim cam belt to drive it off the counter shaft, and a slightly second hand fan belt.
It verks
The next step is to build a mount to fit a Dremel type flex shaft.
|
| |
|
|
logicaluk
Posted a lot
Every days a school day round here
Posts: 1,319
|
|
|
|
|
Thanks for that, lucky for me I have a laptop and wide band O2 that will rejet them for me.
Dan
|
| |
|
|
logicaluk
Posted a lot
Every days a school day round here
Posts: 1,319
|
|
|
|
Last evening, I spent a few hours pretending to be a tool maker. Take one well worn, 1908 drummond B lathe, add a similarly worn Barry, first job was to make the drive shaft round as it was case hardened, we tickled it with a grinder.  Center drilled it for a live centre, and turned it down. 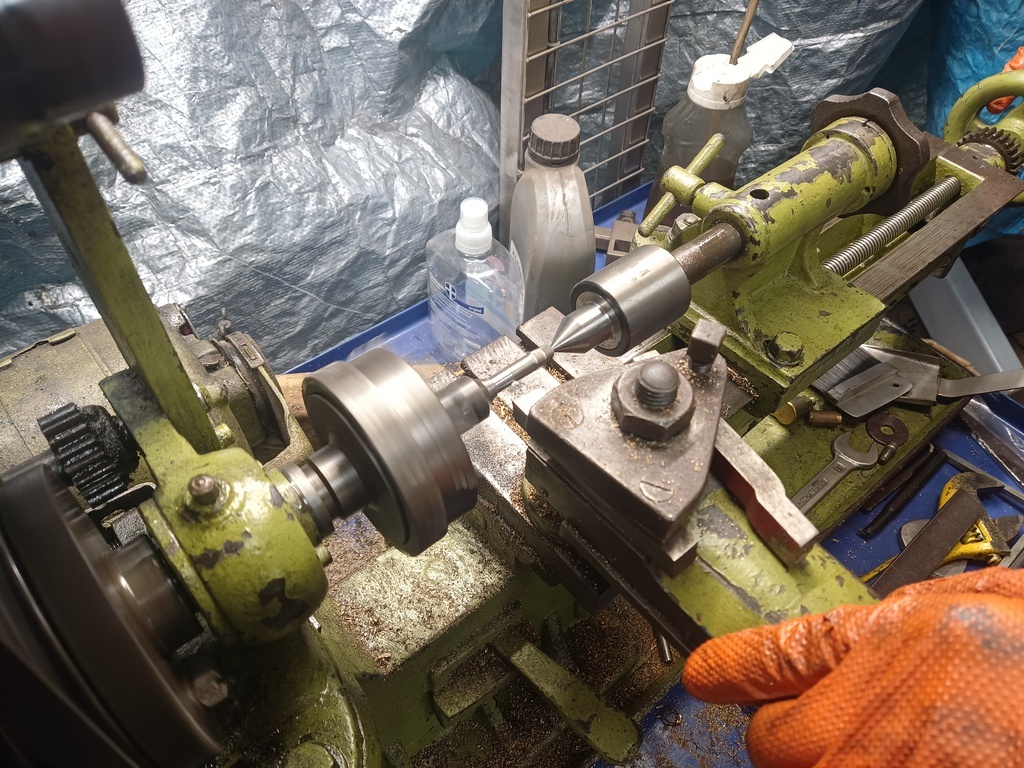 After selecting an appropriate drill bit one that should give a few thou interference fit, opened up the hole the drill bit went in to fit the cut off valve stem, which was pressed in on the big press, on the second attempt we had one with a straight valve stem. That looks like this. 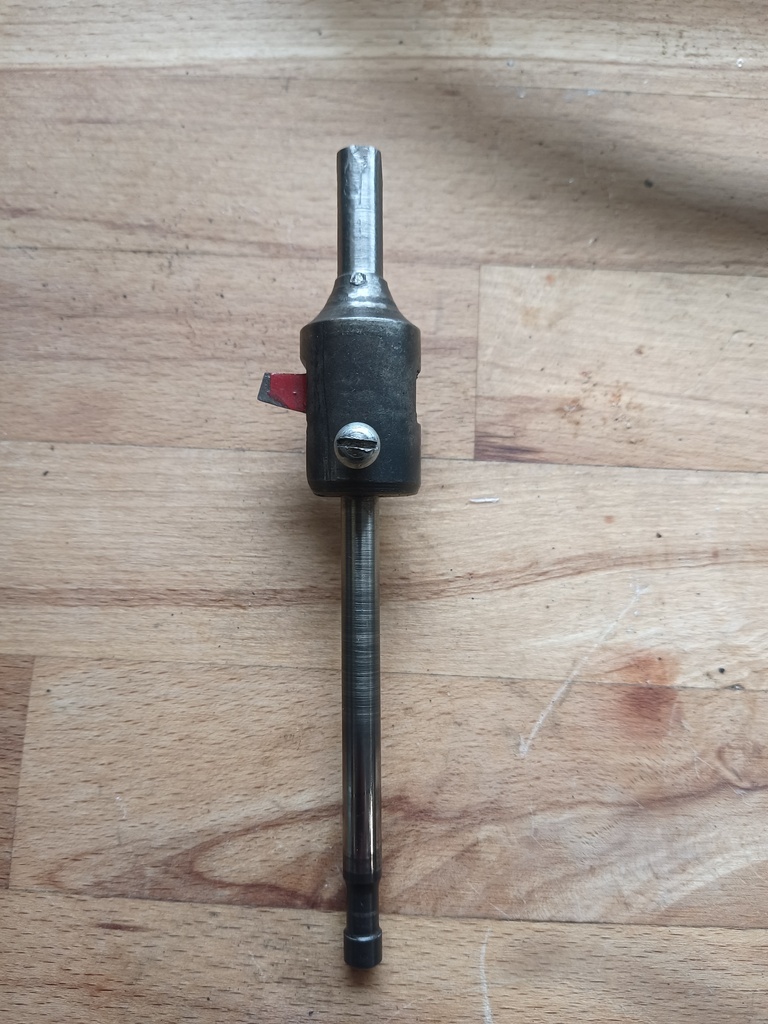 I'm not sure if I've chosen the correct cutting tool but there's another that looks promising in the box. Dan |
| |
|
|
logicaluk
Posted a lot
Every days a school day round here
Posts: 1,319
|
|
Apr 29, 2024 19:58:51 GMT
|
|
Springs are indeed tricksy things, I get the shorter springs are stiffer because there is less to flex, I assume shorter springs reduce preload, but how that effects the shutter movements we shall see.
If you saw the dyno plot on my thread the power came on nicely then the torque curve flattened out and stayed there, the only thing we could think was the CV shutters.
The link doesn't work, BTW.
Caught in the knick of time, if you ask me. I'm in the habit of checking the contents of the oil drain pan too.
Dan
|
| |
|
|
logicaluk
Posted a lot
Every days a school day round here
Posts: 1,319
|
|
Apr 29, 2024 15:12:03 GMT
|
|
Have you got the link to the springs you bought for the carbs, I believe I was having the same issue with my R6 throttle bodies.
Love the Škoda.
Dan
|
| |
|
|
logicaluk
Posted a lot
Every days a school day round here
Posts: 1,319
|
|
|
|
|
Thanks DS, I think I follow you. To my untrained eye, the inlet looks pretty good, the exhaust however looks like it needs all the help it can get. I'll get out there and clean all the carbon off and have a proper look.
Having said that, I feel opening up the seats further with a new piece of home made tooling I haven't used before very risky, I don't want to damage this head in particular as it's had a lot of work done to it already.
Dan
|
| |
Last Edit: Apr 29, 2024 8:45:50 GMT by logicaluk
|
|
logicaluk
Posted a lot
Every days a school day round here
Posts: 1,319
|
|
Apr 28, 2024 14:40:17 GMT
|
Once again, DarkSpeed hits the nail on the head. With fresh eyes and a DS's words ringing in my ears, I ventured out to the garage, lapped a pair of valves in and measured, and then kicked myself for being so daft. Yep there's plenty of room for improvement in the valve seats, inlets at 30.2mm exhausts at 26.5mm lapping the valves in showed about 2mm of unused valve seat. I need a valve seat cutting tool, scratch building one is beyond my skill set at the moment, but i have these 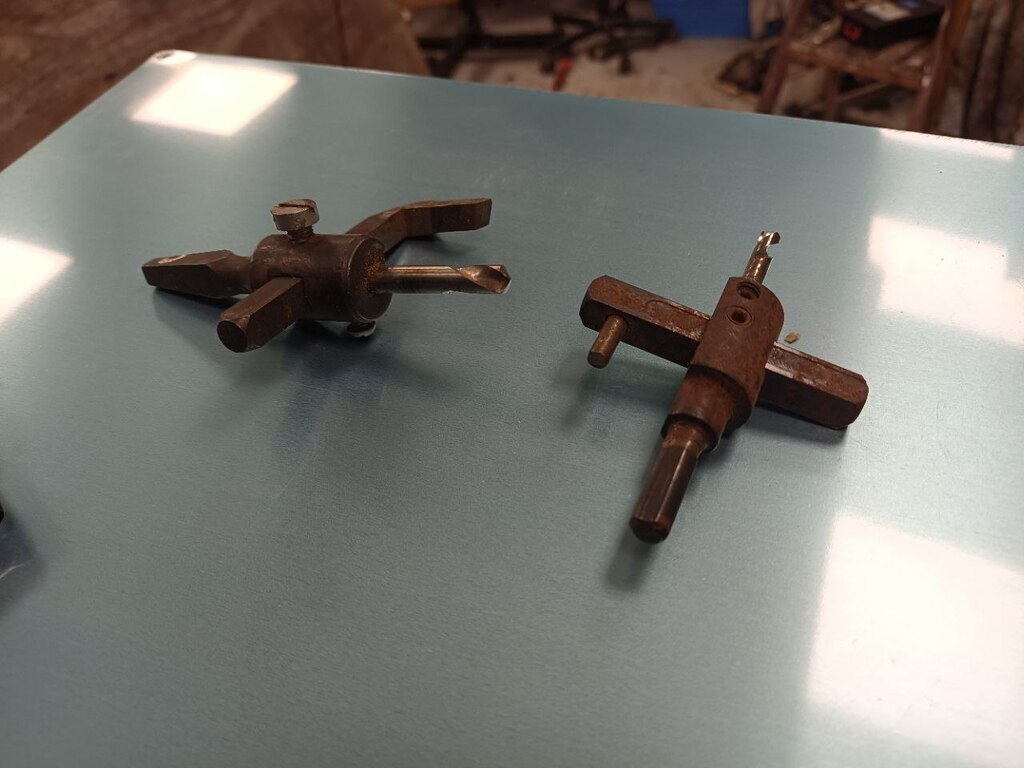 which yields this 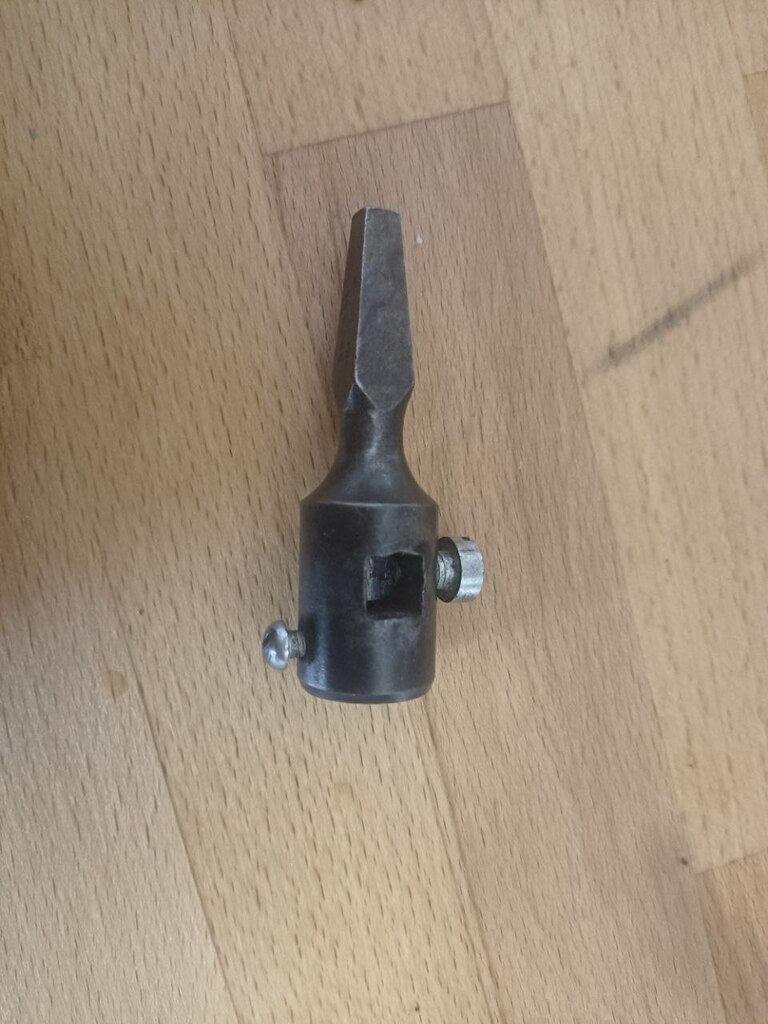 which has a square hole in it that fits this  Which means a trip to my mate's lathe, as mine's not going yet. For the square drive, turning down and the drill hole opening out to 1/4" to fit a cut down valve stem. Any better solutions? Dan |
| |
Last Edit: Apr 28, 2024 14:42:21 GMT by logicaluk
|
|
logicaluk
Posted a lot
Every days a school day round here
Posts: 1,319
|
|
Apr 27, 2024 20:12:59 GMT
|
|
My plan, such that it is, is to cut a slot at 90 degrees to the CROWN of the short side radius with a hacksaw blade that has been marked at 2mm depth of cut so i don't go too deep. Take the top of CROWN off with a burr, then blend that back in.
If the short side radius was a 90 I'd be taking the tip into 2 to 45, then cutting them into 4 22.5s thoughts?
|
| |
Last Edit: Apr 28, 2024 6:55:20 GMT by logicaluk
|
|
|
|
logicaluk
Posted a lot
Every days a school day round here
Posts: 1,319
|
|
Apr 27, 2024 19:59:47 GMT
|
That wasn't as bad as I expected, a couple of hrs to get the head on the bench, the point of failure was fairly obvious. 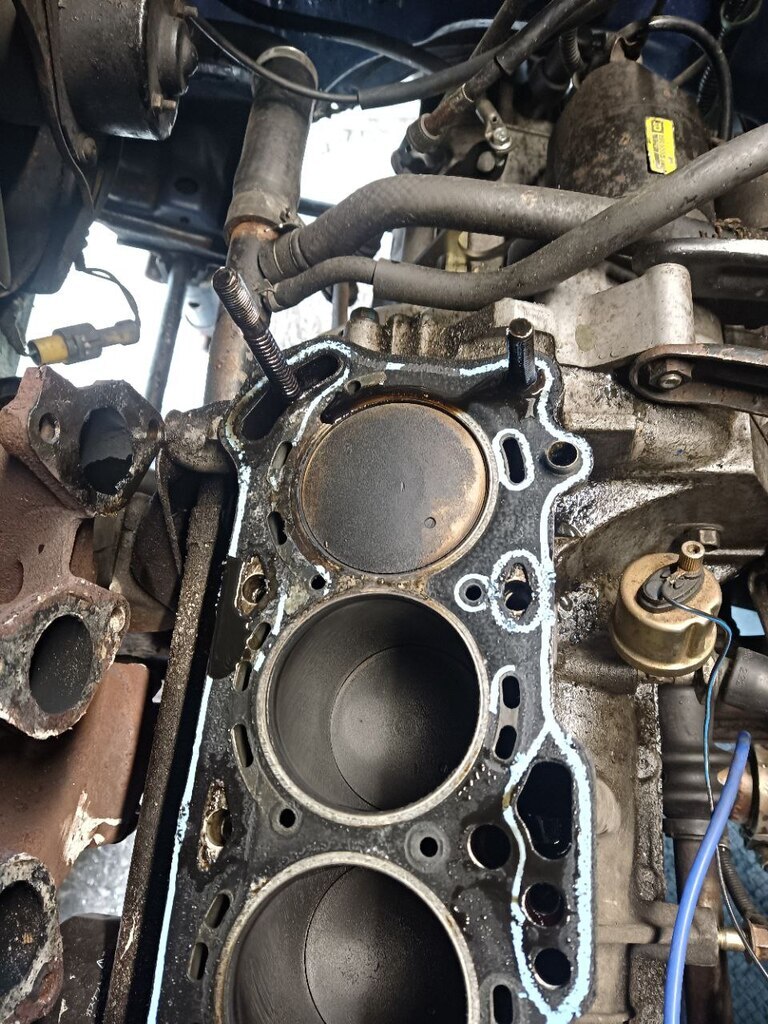 I got the head cleaned up and checked it over with a steel rule, only to find my steel rule, had more in common with a banana that a straight edge. With a straight, straight edge every thing looks great, I sought a second opinion from Barry who called it good too, along with the top of the block. Seeing as the head is off I thought ill see what sort of job I did on the head the first time, from the pics it left a lot to be desired. 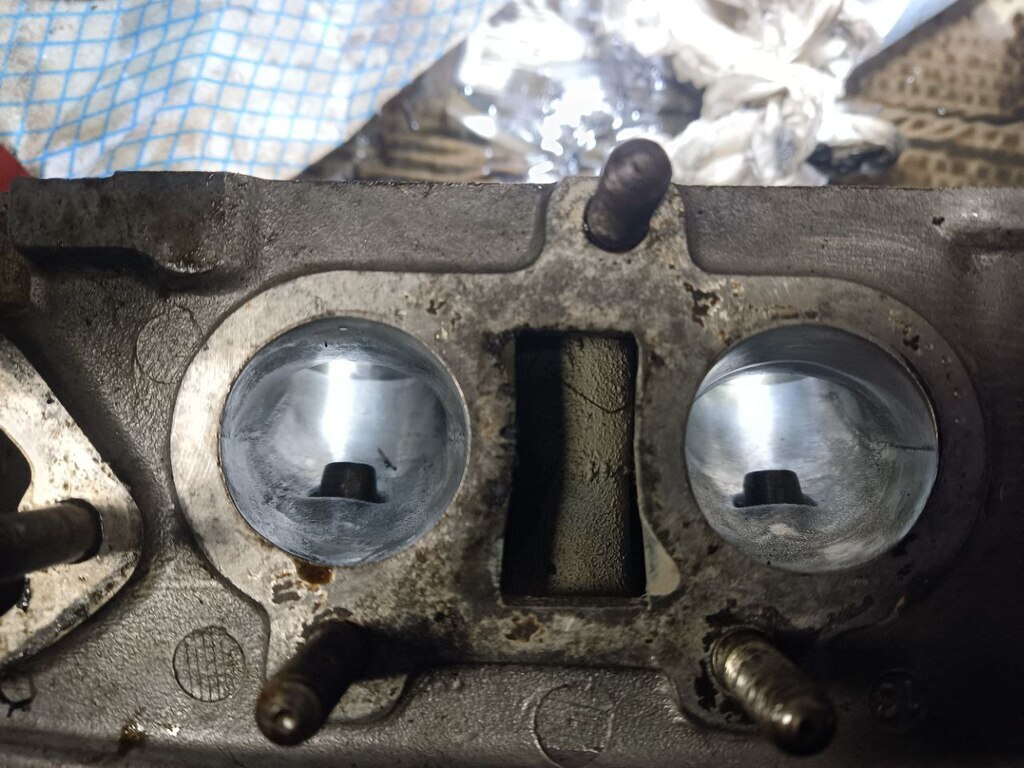 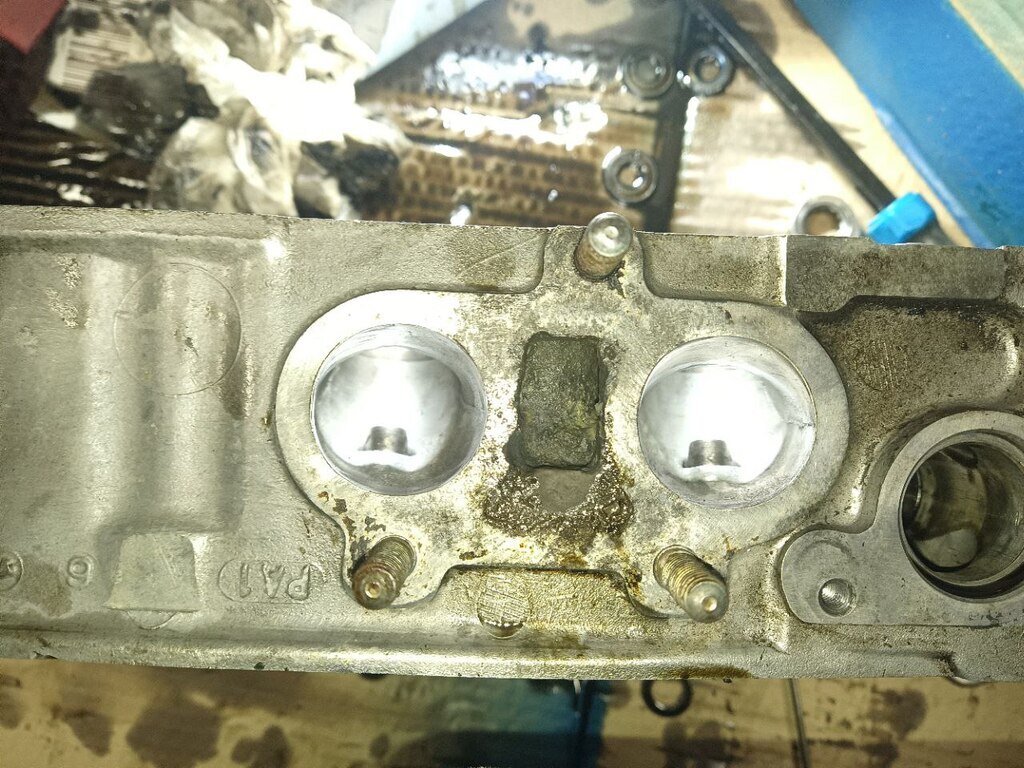 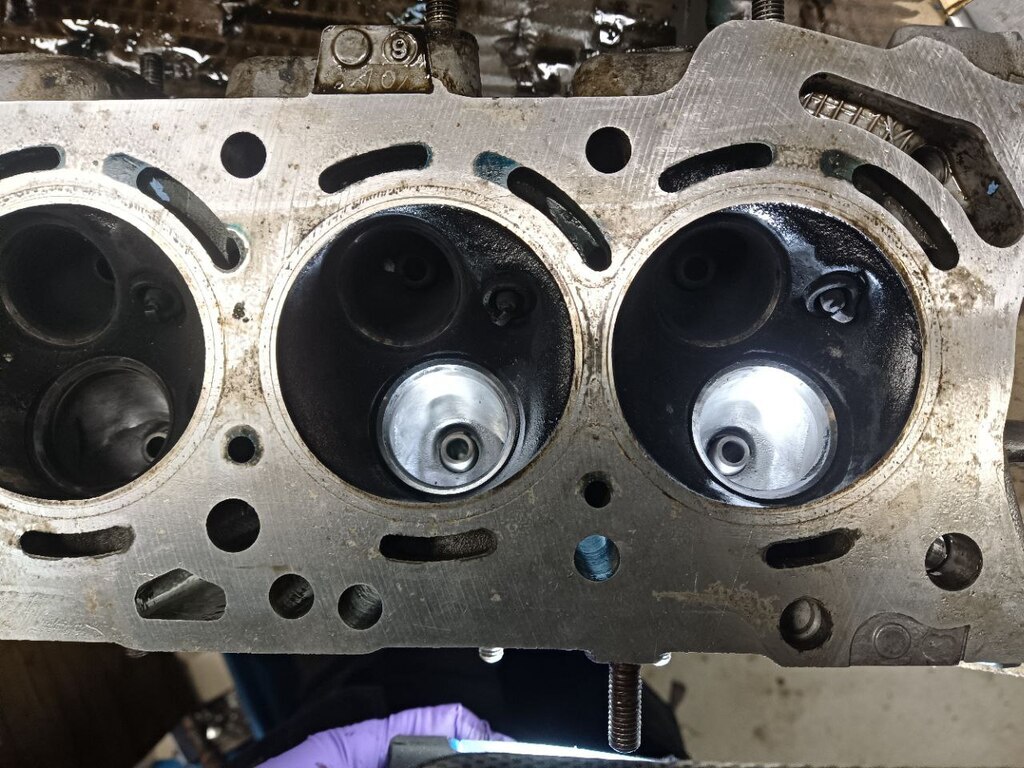 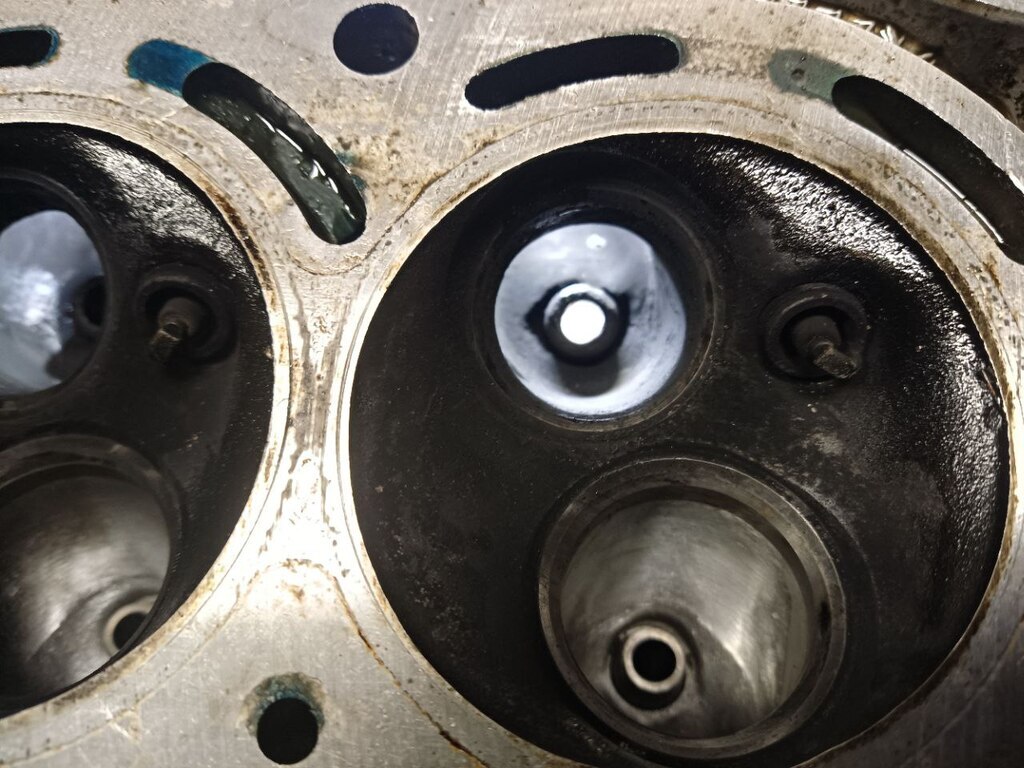 I'm amazed at the inlets, no lip and look pretty good, the short side radius has blended out well, the only thing I think I can improve is the tiny lip on the back of the valve, but I'm not sure if it's even worth it 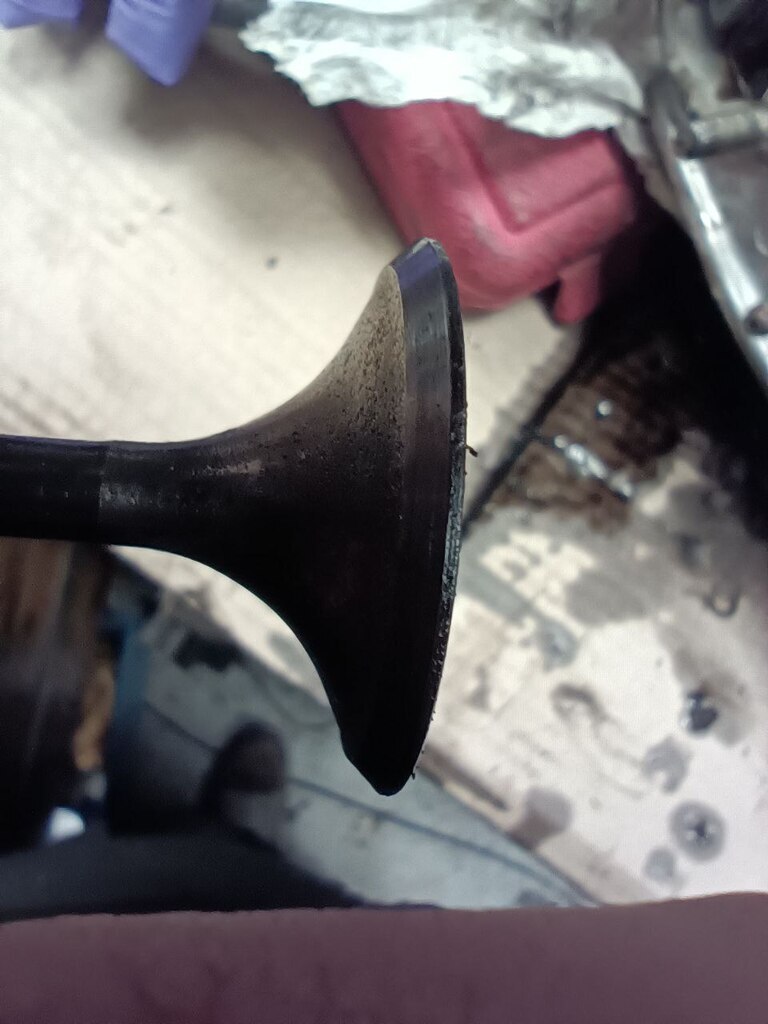 the exhaust was a lot harder to photograph as its been running on choke a lot. 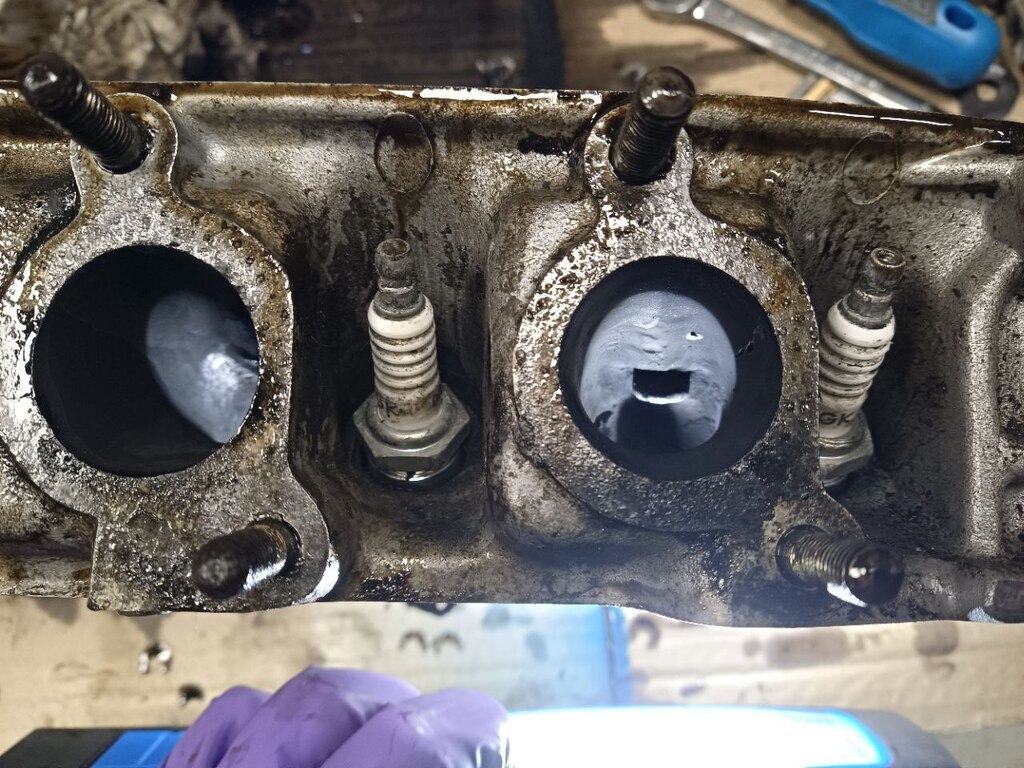 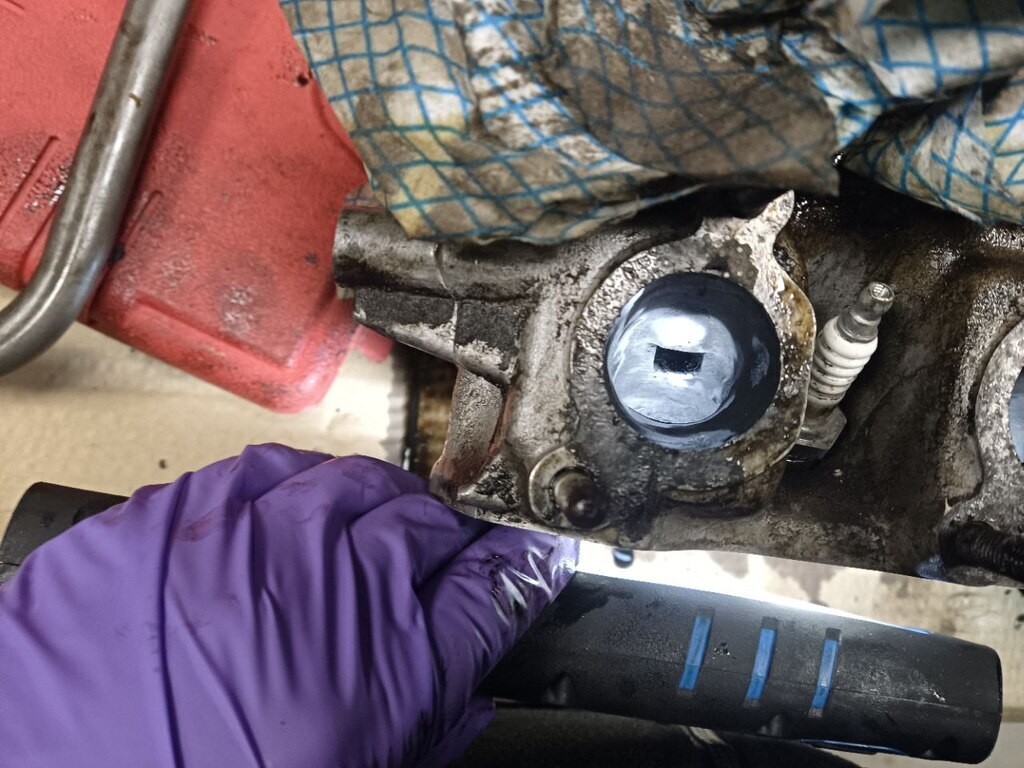  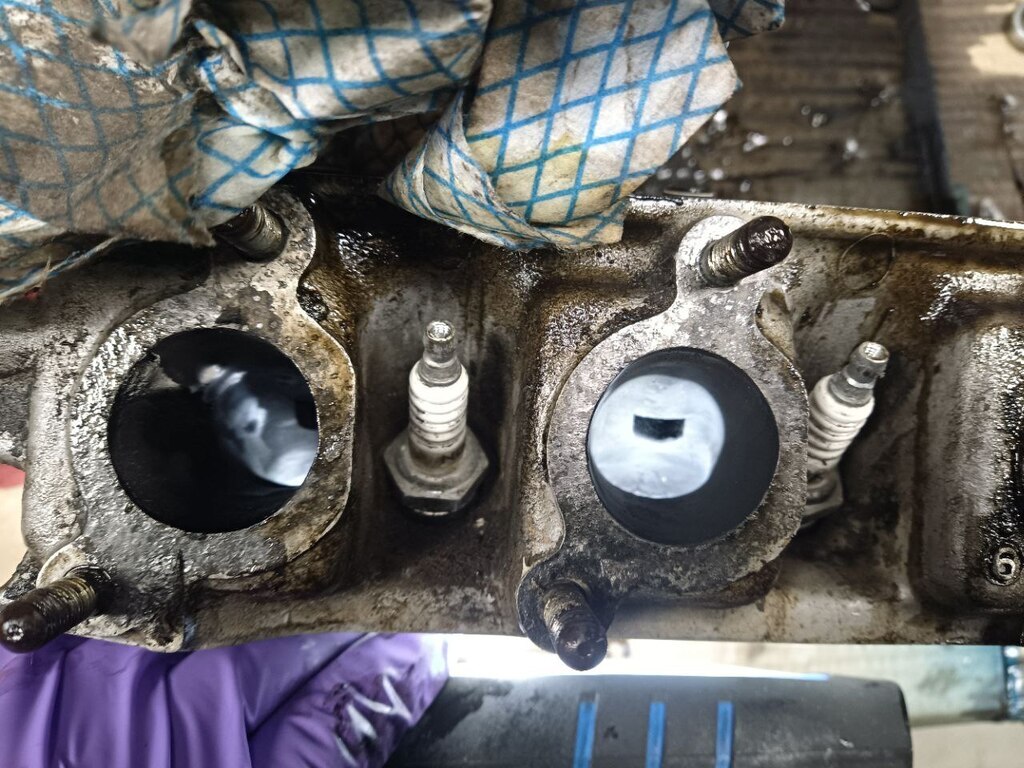 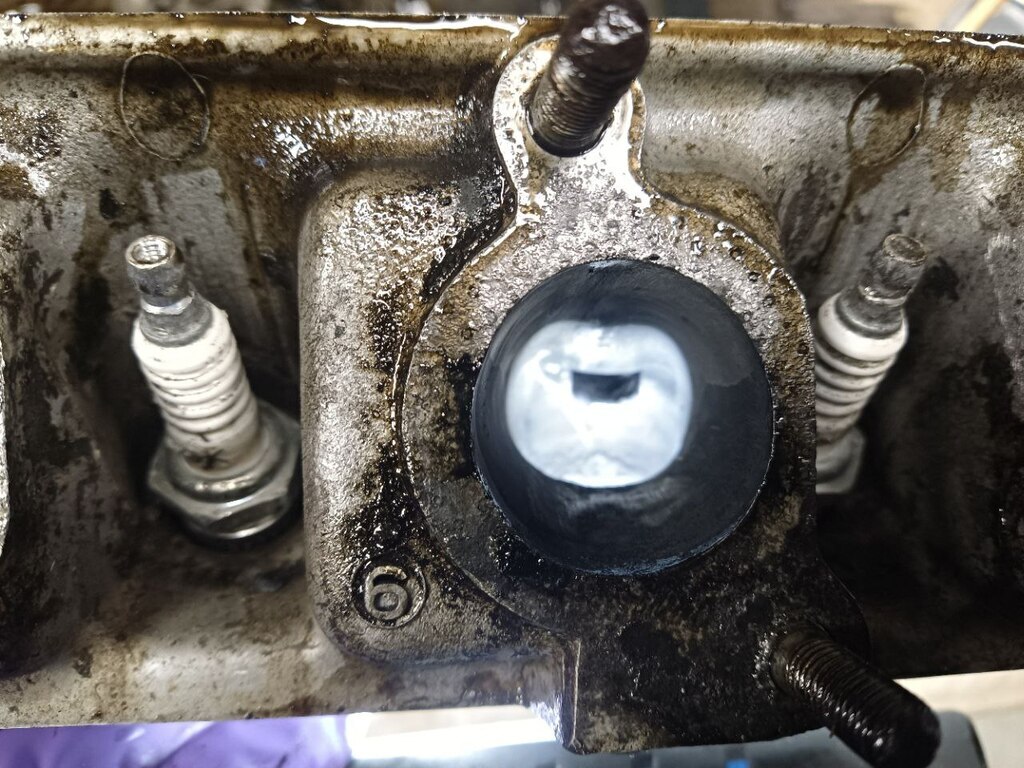 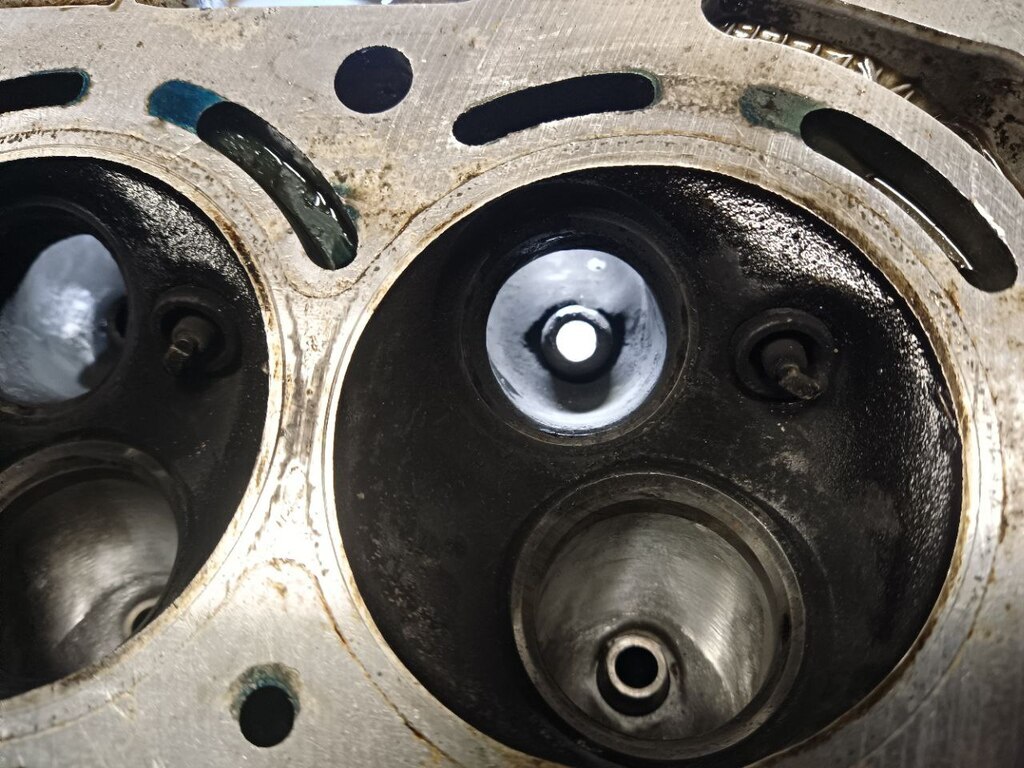 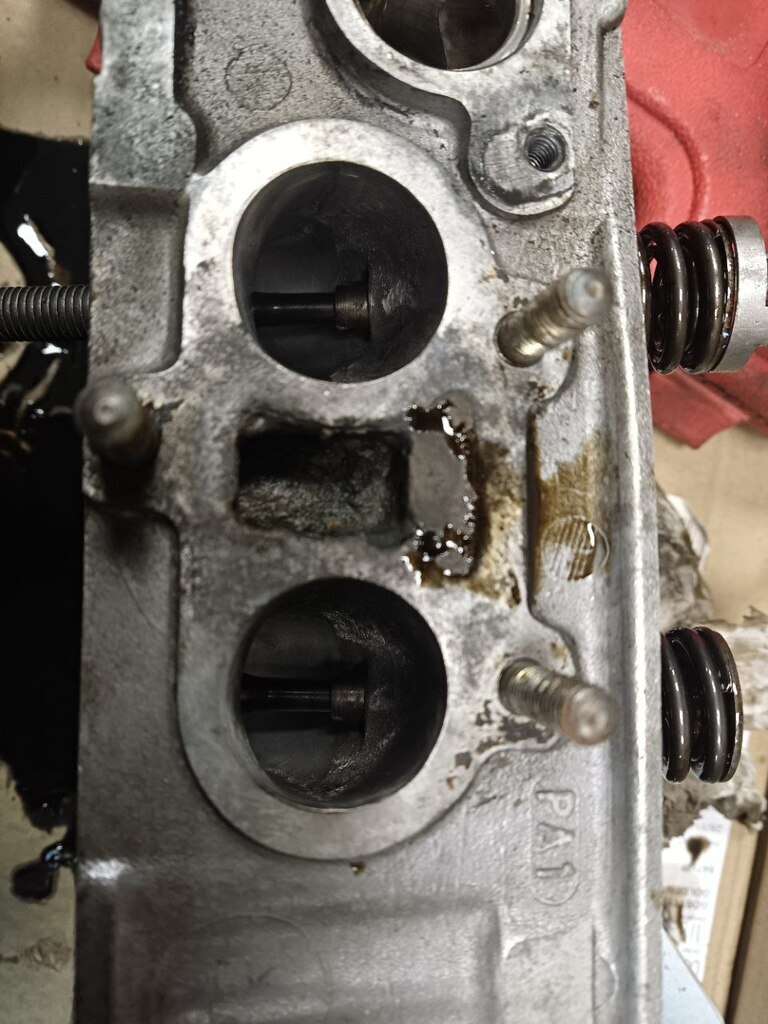 The seat is blended back in to the cylinder wall, but I reckon there is some room for improvement on the short side radius as it feels quite tight, if I opened it up a couple of millimetres, and blended it back in it should smooth the flow out. Opinions please. The head bolts look like they will fit straight in except for the one under the oil pump drive, that one will need a few mm taking off the top of the head as it turns out memories faded since I did this last, but I did buy enough head bolts so game on. Dan |
| |
|
|
logicaluk
Posted a lot
Every days a school day round here
Posts: 1,319
|
|
Apr 27, 2024 14:27:26 GMT
|
|
Small update, all the bolts are here and look promising, I've fitted the new 5V reg and fixed a broken wire on the crank sensor plug, taken some data logs and everything looks good. Next up pulling the head off. But first I've got to get the jazz ready to collect a pile of spitfire engine parts tomorrow.
Dan
|
| |
|
|
logicaluk
Posted a lot
Every days a school day round here
Posts: 1,319
|
|
Apr 26, 2024 11:04:32 GMT
|
Is there nothing compatible from slightly later Hondas’? Or is the later sohc a completely different beast 🤔. I will say that it’s many years since I’ve had one of these in pieces. Top marks for perseverance in the face of adversity 😎 Thanks for that I think I need it at the mo. I'm pretty sure there is no drop in solution as the EN4 engine from the acclaim is the drop in engine of choice for the mk 1 civic. So any of the engines with the gearbox on the drivers side would be the next easiest, an EP2 civic 1.6 at 109bhp in std trim would probably be my engine of choice, which would need engine mounts, drive shafts, ECU and complete rework on the gear shifter as it's cable shift. Right now and I want it on the road so I've got half a chance of getting the herald estate done before the end of the decade. Having said that, I like the fact it's still got it's original type engine, as the head is coming off I'll have another crack at flowing it. Dan |
| |
|
|
|
|
logicaluk
Posted a lot
Every days a school day round here
Posts: 1,319
|
|
Apr 23, 2024 19:59:34 GMT
|
...nor am I going to take the easy path of a modern 16 valved VTEC power, no I'm going to double down, stick to my guns and make this hair brained plan work... That fine line between dogged determination and foolhardiness.  yep, sticking with this engine is the quicker, cheaper option. So ill go with that for now. |
| |
|
|
logicaluk
Posted a lot
Every days a school day round here
Posts: 1,319
|
|
Apr 23, 2024 19:11:56 GMT
|
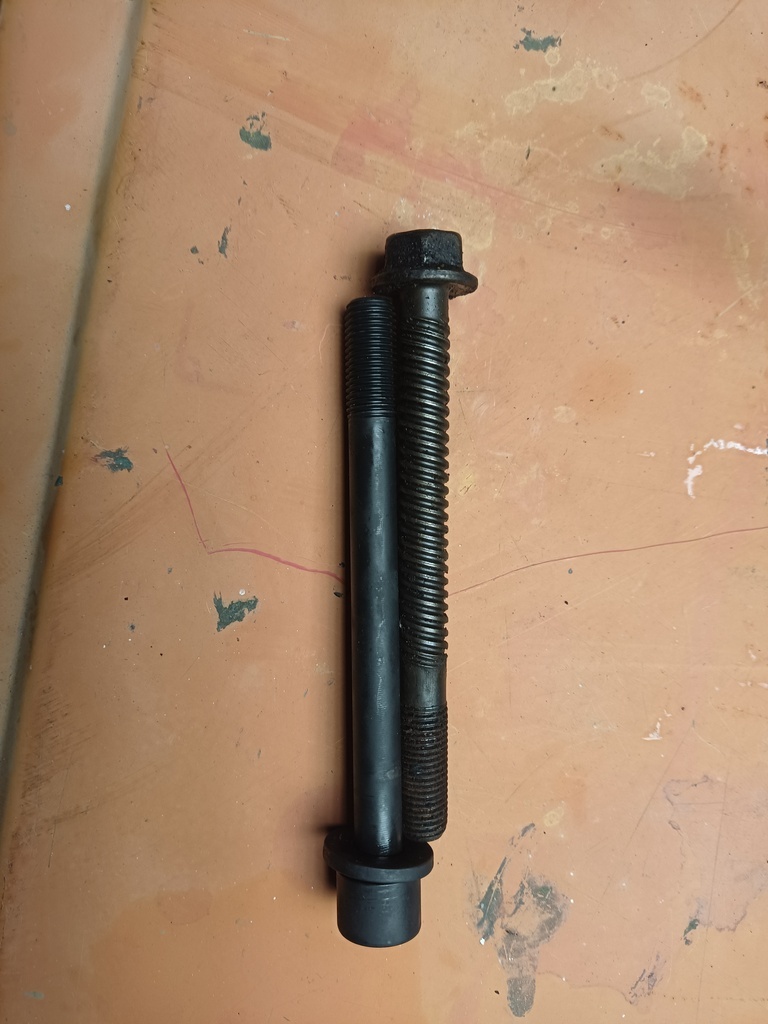
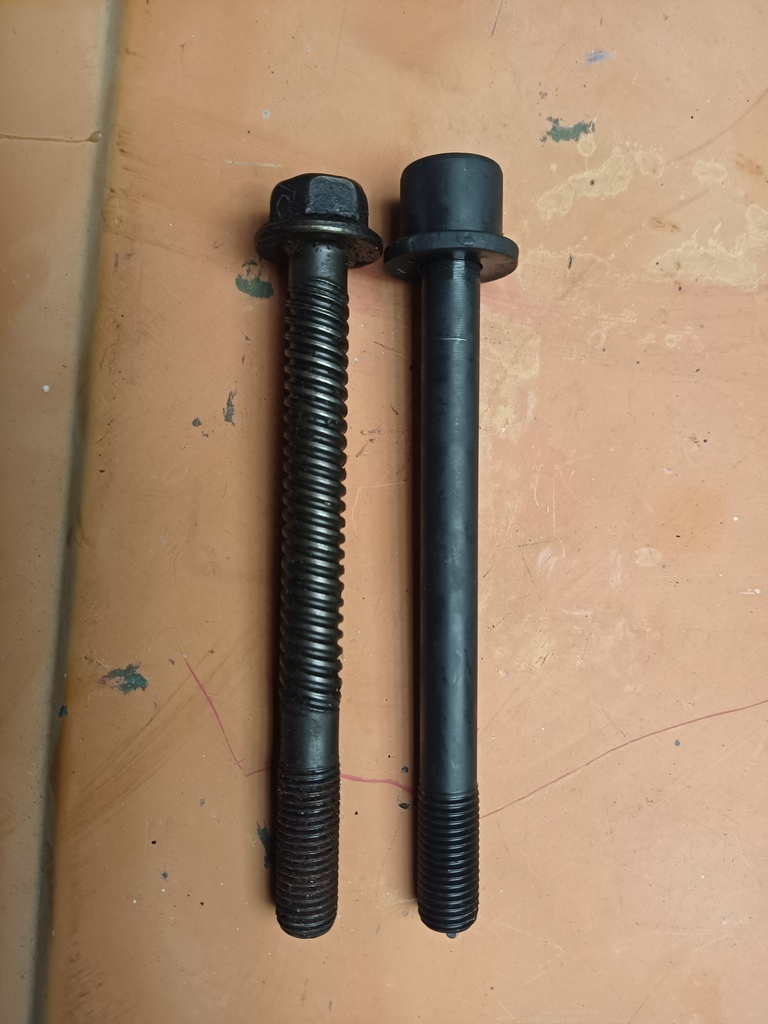
Having meditated and slept on it, I have decided not to take the car up the common, and give it the Viking funeral it so richly deserves, nor am I going to take the easy path of a modern 16 valved VTEC power, no I'm going to double down, stick to my guns and make this hair brained plan work, (unless someone wants to sell me a 125BHPish Honda engine and gearbox, for not a lot of money). I think the HGF was down to 2 things, 1 incorrect ignition timing at start up, causing the engine to kick back, (hopefully ill get the Speeduino working) and 2, most critically reused stretch bolts, here are the little blighters from another engine. 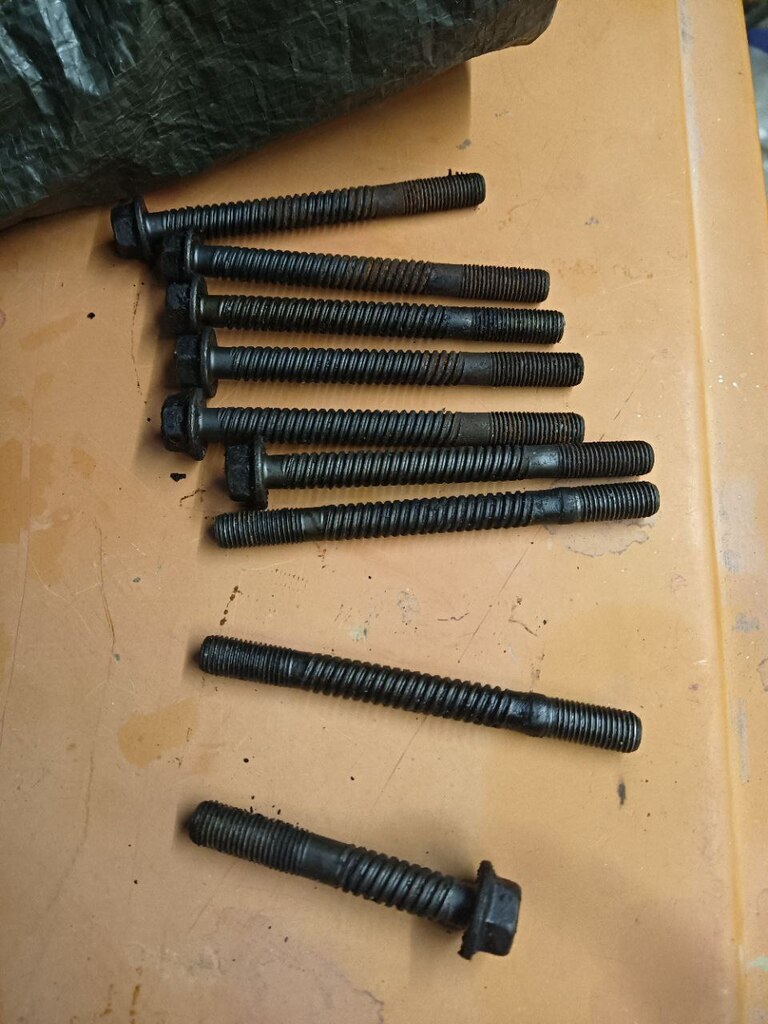 That's 6 x M10x1.25x105mm bolts 2 x M10x1.25x115mm studs 1 x M10x1.25x60mm bolt The 2 studs go in the back corners, under the fuel pump and dizzy drive, but as they are longer than the bolts, I wonder if they are to aid mounting? The 1 short bolt goes under the oil pump drive, Of course acclaim head bolts are made of unobtainium, so I opened a six-pack of GoogleFu on it, and spent the evening on the confuser, getting nowhere really fast. Apparently some people have used shortened BMW MINI N series engine head bolts, but these are torque to yield at 1-22lbf(30Nm) 2-1/4 turn 3-1/4 turn, which seems close considering, the Acclaim head is torqued 1-22lbf (29Nm) 2-40lbf (54Nm) and I didn't really want to use them unless I had to, the search continued. eBay wasn't helping much, Google was a bit pants, until I came across engine parts UK, in amongst their catalogue section is the Payen head-bolt catalogue in PDF format which is searchable, after some time, I came across HBS378 a pack of 10 M10x1.25x106.5mm hex head bolts for a Kia Picanto 1.1 from 04/04 on, that don't appear to be torque to yield. Which gave me a cross-reference to FAI B2193 on eBay for £25. The Picanto head is torqued 1-56Nm (41lbf) 2-69Nm (50lbf), so it's pretty much right where it needs to be, that just leaves me with one problem the short head bolt that goes under the oil pump drive so I've ordered a grade 12.9 M10x1.25x60mm bolt, the torque spec for a grade 12.9 is 73Nm, any thoughts? Dan |
| |
Last Edit: Apr 23, 2024 19:56:49 GMT by logicaluk
|
|
logicaluk
Posted a lot
Every days a school day round here
Posts: 1,319
|
|
Apr 20, 2024 16:29:21 GMT
|
|
Well that's it GAME OVER, do not pass go, do not collect £200.
How did I get there?
Here's how, First I realigned the crank sensor so it was directly over the trigger wheel, I could then get a trigger signal when the engine was running but not when it was cranking, I removed the crank sensor and filled one of the mounting holes 1mm oval and re fitted it, this closed the air gap to around 0.5mm, that got a fairly good signal and the spark channel LEDs lit up, I went through the settings and eventually got it to start, but something was awry with the crank signal I did try switching the sensor pins over, but it didn't work at all then, it would miss-fire stumble and stall, according to the data logs it seems to have been getting a big pulse from somewhere, that happening repeatedly lifted the head and is now pressurizing the cooling system.
I've got a couple of head gaskets in stock but as I've been collecting the bits for a 1440cc engine, so I don't see the point in fixing this one, or maybe I should give up and fit a d16v1 from a 2002 civic.
Mr Piddled Off of Hull
|
| |
|
|
logicaluk
Posted a lot
Every days a school day round here
Posts: 1,319
|
|
|
|
I had a couple of hours free after work on Friday and a fully charged battery, which span the engine over perfectly, but we still had a no start condition. Further investigation revealed, after questioning weather the VR conditioner was working/plugged in properly and whether I had the jumpers set to bypass the VR conditioner and had roasted another Arduino, that the crank sensor was outputting 0v but has 230 ohms resistance which is odd seeing as it was working before I blew up the microsquirt. 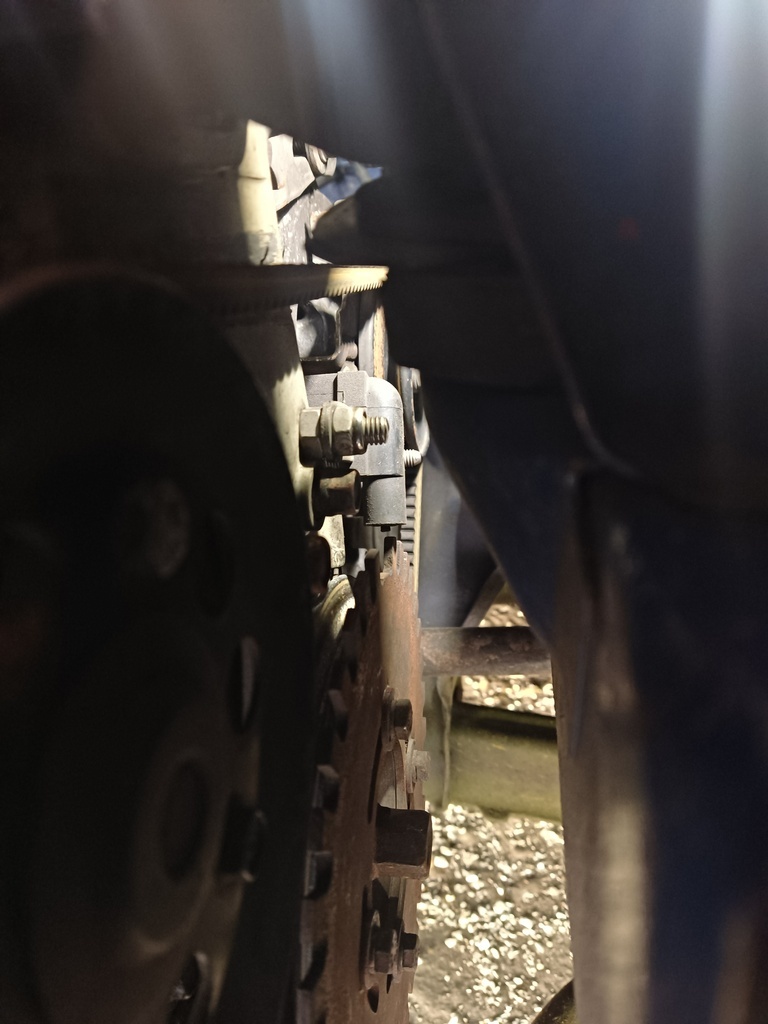 Looks like the first job is to realign the sensor. Dan |
| |
|
|
logicaluk
Posted a lot
Every days a school day round here
Posts: 1,319
|
|
|
|
|
Last night I chucked it in the car only to find, it had developed flatarse batternogoanosity. Left it on trickle charge overnight.
I've cleared Saturday for setting it up ready for drive it day on Sunday.
We're meeting up at Starbuks in Barton, driving to Lincoln to meet another group and driving around Lincolnshire till we find Cleethorpes for fish and chips. Anyone want to join us?
Dan
|
| |
Last Edit: Apr 17, 2024 9:30:41 GMT by logicaluk
|
|
logicaluk
Posted a lot
Every days a school day round here
Posts: 1,319
|
|
|
|
You could try a couple of options, cornflakes packet gasket (thicker than the paper one) and/or a bit of RTV sealant instead of the hylomar. I've had a lot of success with this method. |
| |
|
|