teaboy
Posted a lot
 Make tea, not war.
Posts: 1,959
|
|
May 17, 2024 20:19:00 GMT
|
Very nice looking repairs. You have the patience of a patient thing.... Thanks, Duckie. I've been missing in action for a couple of days; Wednesday was quiz night. We came fifth, we were short handed again so we were on the back foot to start with but it was still a poor showing. Too many sports questions, especially when our sports expert didn't turn up. Yesterday was the Lovely Doctor's birthday so I thought it might be considered to be bad form if I went in the shed... I was hoping to make up for lost time tonight but as (bad) luck would have it, I was late home from work and feeling totally done in. I didn't feel like doing anything when I got in but I managed to make myself go to the shed for an hour. I need to make a new one of these.  It doesn't look too complicated but as usual it is more involved than it looks. The curved edge is not a straight line because it kicks out at one end, right in the middle of the area where the 'flat bit' has an up and down kink. I cut out a piece of steel to start roughing it out. I started with the curved edge then bent the up and down bits. Because of the uppy downy bits I had to stretch and shrink the curved edge. It was a bit oversized there so I cut it down a bit to make it easier.  It was then a case of working on the curvey bit then the bendy bits one after the other several times because working one bit effected the other bit.  It is roughly in the right place now. 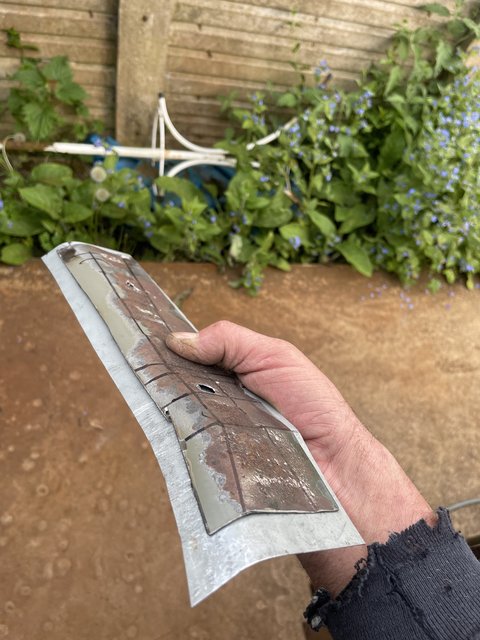 I didn't have the energy to start chasing those lumpy fingery bits in tonight.  I've got some stuff to do tomorrow so I don't know if I will get much, if any time in the shed. Cheers. |
| |
|
|
|
|
teaboy
Posted a lot
Make tea, not war.
Posts: 1,959
|
|
May 14, 2024 19:32:23 GMT
|
the baby ducks aren’t going to die. I don't know what anyone else thinks, Phil, I'm just glad that the ducks are ok.  |
| |
|
|
teaboy
Posted a lot
Make tea, not war.
Posts: 1,959
|
|
May 14, 2024 18:04:02 GMT
|
Right, I'm calling this piece of chassis repaired and ready to go back on.  I can't put it back on until the piece of floor it goes on is fixed.  It doesn't look that bad from the inside, does it? I have already taken most of the tar board off the floor when I replaced this bit.  I have saved the jig that I used to knock in those fingery lumpy bits, I hope it will be some use when I have to make the new piece. Anyway, the tar board, there was one little piece left.  I didn't remove that previously because I didn't think that I would need to and also, it is right next to the plastic heater duct and I didn't want to risk melting it with the heat gun. Now it needs to come off so I had to root through my stash for something to protect the plastic. I found this much used plumber's heat blanket.  Luckily, that did the trick.  Now I have to cut the old bit out.  I marked up where I was going to cut but also where the foldy and fingery lumpy bits go. Partly to see if the new ones und up somewhere near where they are supposed to be but mainly to kill some time because the grinder was in the shed and it was raining. I may have complained about the sun and it being too hot just recently, but I have changed my mind and I want the sun back. When the rain eased I got the grinder and...  The small hole is now a big hole. That is quite a scabby piece. I took it up to the shed and tapped it up a bit to get it back to its proper shape. It had been deformed a little by wire wheeling, drilling and peeling chassis sections from it.  Now I have something to copy. I haven't started copying it yet because I ran out of energy and enthusiasm. The Doc made a cake this morning to take in to work and in a massive stroke of fortune, she managed to save some to bring home for me.  Cheers. |
| |
|
|
teaboy
Posted a lot
Make tea, not war.
Posts: 1,959
|
|
|
|
|
It’s looking good, Gazza.
|
| |
|
|
teaboy
Posted a lot
Make tea, not war.
Posts: 1,959
|
|
May 13, 2024 21:18:23 GMT
|
Yesterday I did the first part of the chassis box section repair.  That was the easy bit. The other part is more involved because it is a bit wiggly. This is 1.2mm steel so it isn't easy to put a joggle in it with a hand operated joggler so I clamped a strip of metal of the required thickness to the back then hammered and chiseled it down. It needed an up and down wiggle at ninety degrees to the joggle so I bent those by hand with it held in the vice.  That was the easy bit. The joggled bit runs for part of the length then it opens out. This was a hammer, chisel, T dolly and whatever else I found job. Every time I moved one bit it would try to straighten out the up and down wiggle so it was a lot of toing and froing before It was something like. 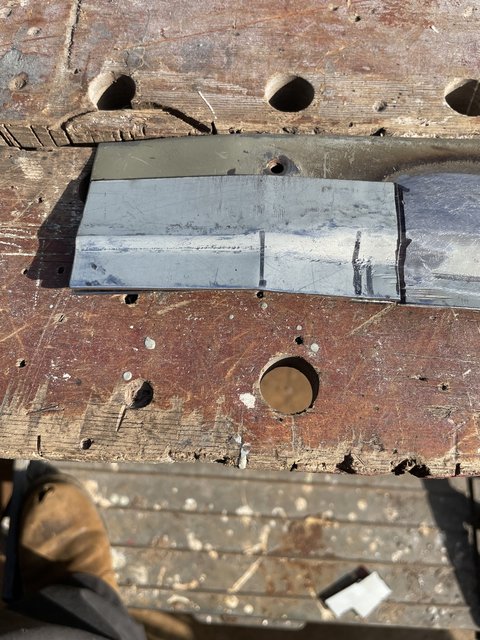 When it was what I wanted, I tacked it up.  When I had fully welded it I picked it up to put it in the vice to grind the weld down but I dropped it pretty sharpish because it turns out that there is a hole in the thumb of my welding glove. That wasn't a very nice experience. Once I had regained my composure I cleaned it off. I think it will work.  Got to make the piece of floor to fit it to next. Cheers. |
| |
Last Edit: May 13, 2024 21:22:40 GMT by teaboy
|
|
teaboy
Posted a lot
Make tea, not war.
Posts: 1,959
|
|
May 12, 2024 20:44:33 GMT
|
Maybe make it standard operating practice to hit the bakery before the breakfast cafe? John That would be the sensible thing to do, John. I really should get myself more organised. It has been another scorcher of a day, by English standards at least. When I opened the tent it was like an oven with the heat rushing out to meet you. I might have complained a little bit when it was cold but you can dress up for that. There is only so much you can take off without making the lovely doctor go weak at the knees, or is it nauseous, I forget which... We did the tip run (recycling centre) this morning, the Doc had got five of those builder's ton bags filled with garden waste. It was mid afternoon-ish before i ventured into the tent. This is what I should be sorting out, daylight coming through the floor.  In my usual style, I ignored it and got on with wire wheeling some more of the under body coating off first. Once my arms were aching and my fingers had gone white, I put the grinder down to have a look at the job at hand.  I marked out my cut line and then measured where it was to check if it would cause problems inside. I was mainly concerned about the heater duct that is currently disguised as a Rice Krispies packet. Luckily, it is well out of the way. Time to make the incision. 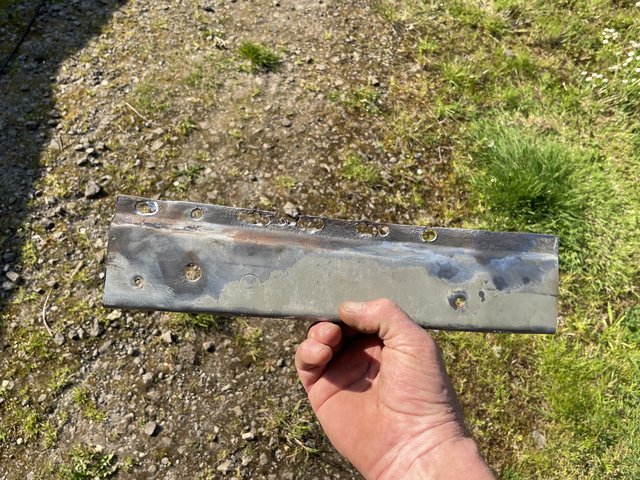 It took a bit of getting out, due to the rust on the flange I couldn't make out where all the spot welds were so it ended up being 'Swiss cheesed' with the spot weld drill until I found them all. The other side looks like this.  And the piece of floor is similar.  I cleaned them both up with the wire wheely thing to see what we were working with.  Then it was up to the shed to start repairing the chassis section. I dug out my home made metal bendy thing.  I did some bishing to get the first fold done, then checked it.   Then it was bashing and boshing to get the other fold. The two fold lines are not parallel, because that would make it too easy.   Once it was something like I cut the old bit off and started tacking the new bit on.  Once it was tacked I could fully weld it.  As this is 1.2mm steel rather than the 0.75mm of the floor, it was much easier to weld. So it has gone from this.  To this. I made sure it was still somewhere near fitting.  You might have noticed that I haven't replaced all of that rusty edge. There are two reasons for that. Firstly, the remaining bit gave me a point of referance to work to. Secondly, the next bit has a few more wiggles in it.  I thought that it would be a lot easier to make that part separately, rather than faffing around for hours trying to make it all in one piece then cocking it up and throwing it away. Cheers. |
| |
|
|
teaboy
Posted a lot
Make tea, not war.
Posts: 1,959
|
|
May 11, 2024 20:37:01 GMT
|
This weekend I had a plan. I don't always have a plan but this weekend I do. Before I can implement any plan on a Saturday I have to go to the cafe for breakfast.  Today the winning ticket was number 93. After that I went to the creamy bun shop. There was one large custard tart left. All the people in the queue in front of me seemed to be buying savories so I was feeling pretty confident. The person in front of me had just been handed her sandwiches and whatever when the lady behind the counter asked if she would like anything else. 'Oh, I think I will have that last custard'... I'm still not sure if I only said my chosen expletive in my head, or out loud. Anyway, my plan. I want to get the driver's side floor completed and, if not in paint, at least ready to be painted by the end of this weekend. The first thing is this time bomb.  That grommet which is part covered in tar board has to go. I used a heat gun to soften the tar board and a stanley knife to cut a semi circle.  Wait, is that brown staining on the top of the grommet? In order to make replacing it easier, I cut a disc of steel then put a joggle round the perimeter so that it wouldn't fall through the hole and also to give me something to weld to rather than trying to fill a gap. This is it in place, looking from below.  The joggle was only just big enough to stop it from falling through. That way, when I welded it from below, the joggle would be fused into the weld and not leave a lapped joint.  I cleaned it off underneath.  And just a quick tidy up on the inside.  There were no pin holes to take care of, which was a result. With that done, I started cleaning all the underbody coating. I did try the heat gun and a scraper but it wasn't that easy so I went back to the wire wheely thing on the grinder. This is the main chassis rail.  The lower of the square holes initially looked like the top one. The area around the lower hole where the E-coat is missing is where rust had started to spread under the sealant. This is why all the sealant has to come off. Most of it is really difficult to remove, this is a good sign. Where it comes off easily is when there is rust beneath it. Like here, along the box section at the edge of the transmission tunnel.  It does look quite pitted here so I went at it again with the wire wheel and...  Oh yes, that is another hole. This is in an awkward position because the section that I am pointing to in the picture below.  Is directly below the front seat, front crossmember. I do not want to remove the seat crossmember because the front seat rear crossmember is already removed and that was a real pain to get out. I think that I will attack this from below. I will cut out the side of the box section, repair that and then repair the floor. I still have to finish removing the rest of the underbody sealant first, I didn't get it all off because my fingers were going funny after operating the grinder for that long.  It doesn't look like I will get the driver's side floor completed this weekend after all. Right, I'm going to have a creamy doughnut.  I'm probably going to have some booze too, to take my mind off the extra holes in the floor. Cheers. |
| |
|
|
teaboy
Posted a lot
Make tea, not war.
Posts: 1,959
|
|
May 11, 2024 16:40:09 GMT
|
He is either a hero or a lunatic, possibly a combination of the two. This thread is inspirational, whenever I start to feel overwhelmed with my own project I just think about this. If he can fix this up then I can do mine. The work going into this is incredible. So on reflection, I’m going to go with hero. |
| |
|
|
teaboy
Posted a lot
Make tea, not war.
Posts: 1,959
|
|
May 11, 2024 15:16:31 GMT
|
|
Happy birthday, Mrs J.
|
| |
|
|
teaboy
Posted a lot
Make tea, not war.
Posts: 1,959
|
|
May 10, 2024 21:45:30 GMT
|
Clearly they designed that polystyrene bit first and then shaped the car floor to fit it. I expect that they designed the car around the packaging from a TV set. But hang on... The under side looks completely flat. So only the top of the floor is wiggly. You could have saved a lot of time doing all that clever metal bending and shaping if you'd just made it from the bottom. Happy to help as ever! James That is all well and good, James, but it would only mean that I would have to find another way of wasting time... I have been driving for a long time and I thought that I had seen just about everything there is to see on the roads but today there was something new. I was held up in traffic today which was caused by someone who was towing a horse. I don't mean in a trailer, the horse was tied to the tow bar and trotting along behind the car. Anyway, once I got home, after Shergar had turned off the road, I finished welding the wiggly plate into the floor. 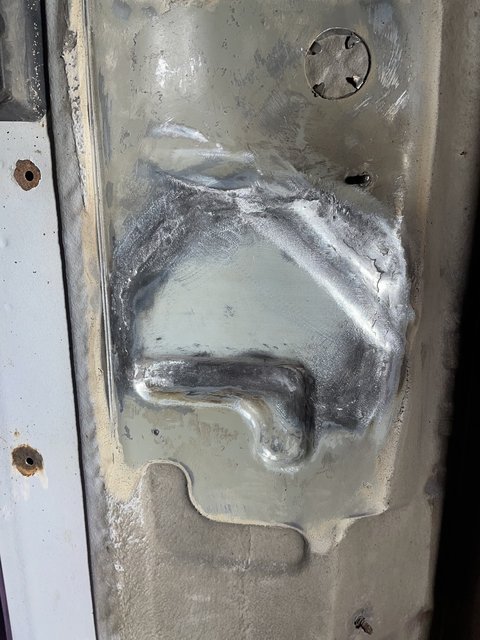 You see that un-rusted grommet near the top of the picture? That is on the short list. I know that it has not gone rusty at the moment but it is a ticking time bomb... I didn't go too mad cleaning the weld back due to the floor being three quarters of a millimetre thick tissue paper. I suppose that the floor being so thin explains all the lumps, bumps and wiggles pressed into it, to give it some rigidity. That is another bit done so, obviously, it got the spooge treatment.   I even managed to get this finished without burning myself again. I hope to get a bit more done this weekend, unlike the last one. Cheers. |
| |
|
|
teaboy
Posted a lot
Make tea, not war.
Posts: 1,959
|
|
|
|
That'll serve you right for putting your finger into a crusty brown hole won't it! Yes, well I hear that some people do that kind of thing for a hobby but I usually try to avoid it. Yesterday I left my roughed out repair panel like this.  When I got home tonight I did a bit more work on it to tidy it up and get it where I wanted it.   Look how wiggly it is, why couldn't they make just one part of the floor flat? I tried it for size. 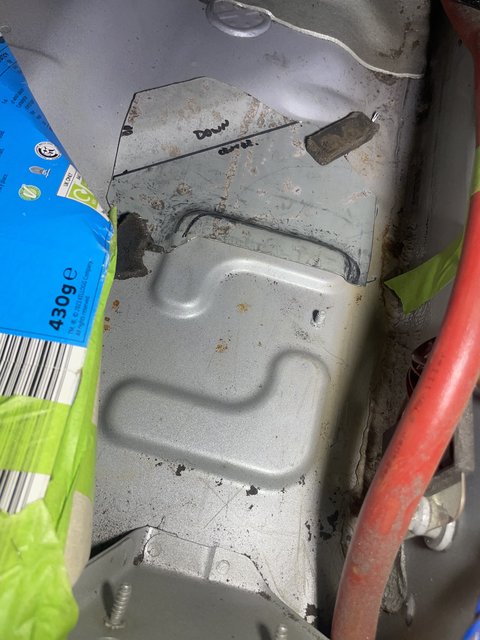 It wasn't too bad. I was hoping to be able to weld it in from inside but with the limited door opening space, this is the room I had.  I couldn't get my head past the steering wheel and the welding torch obscured the view of what I wanted to weld anyway. I was forced to weld it from underneath.  It was very uncomfortable and I ended up with five burns on my neck and shoulder. I didn't get it finished because when it got to 9pm I had had enough and packed up. Luckily it didn't set on fire inside. 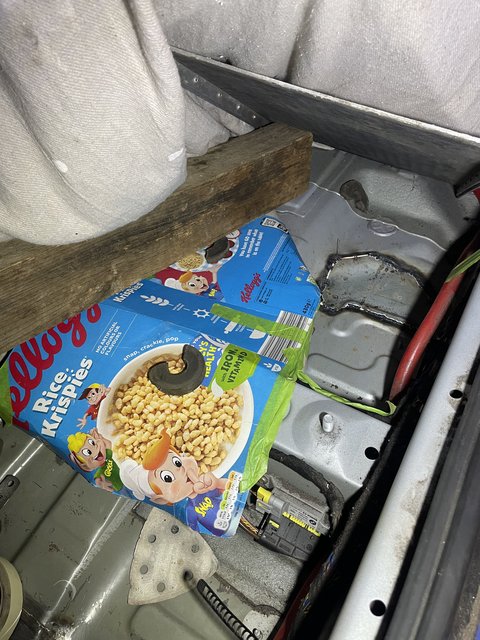 Oh, the Rice Krispies packet is wrapped around a plastic heater duct to protect it from the sparks. I should have wrapped myself in Rice Krispies packets as well... Cheers. |
| |
|
|
teaboy
Posted a lot
Make tea, not war.
Posts: 1,959
|
|
|
|
Yesterday I poked my finger where I shouldn't have. 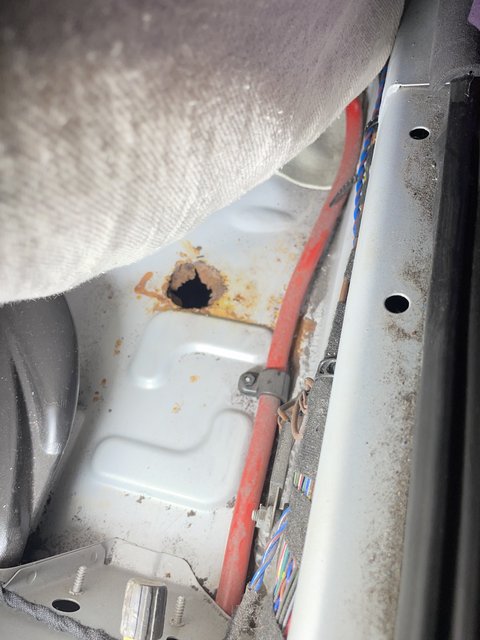 When I started lifting the carpet, in my mind it would be a quick bash the grommet out, weld in a disc of steel and Bob's your uncle. The poking put paid to that. I suppose I had better crawl underneath and have a look. 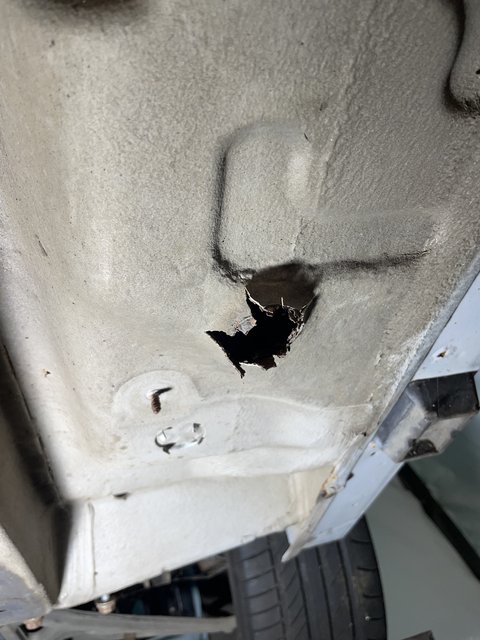 Oh, that looks worse than I expected.  It is worse than I expected...  well, I just laid there, looking at it for quite a while.  I was thinking something like, 'Give over now, I've had enough of this'. I decided to look away. This was also a bad idea because I noticed the paint bubbling around the sill trim holes and I couldn't resist picking at it.  Then I noticed some bubbling next to the front jacking point.  I was going to pull the jacking block off to have a look when I thought, 'No, I must focus'. So I cleaned up around the grommet hole and marked out the minimum area to remove.  Then I removed it. 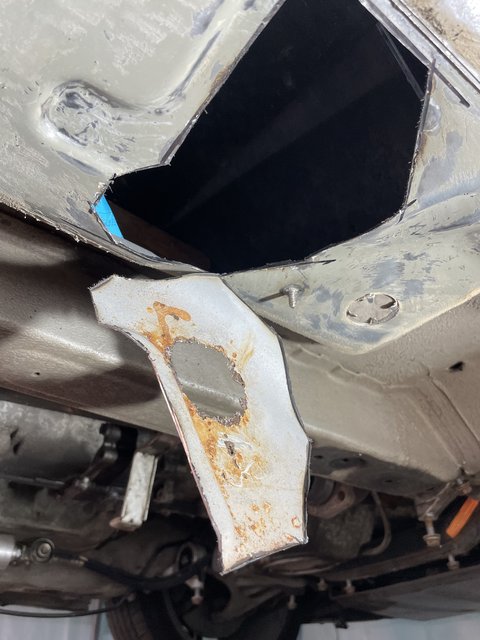 I was half thinking of calling it a day but I decided to at least cut out the steel blank to make the replacement. As I was in the shed with my oversized blank, I started to rough out the new piece. I started chasing out the main groovy bit with a hammer and chisel.  I kept going even after I hit my finger with the hammer. 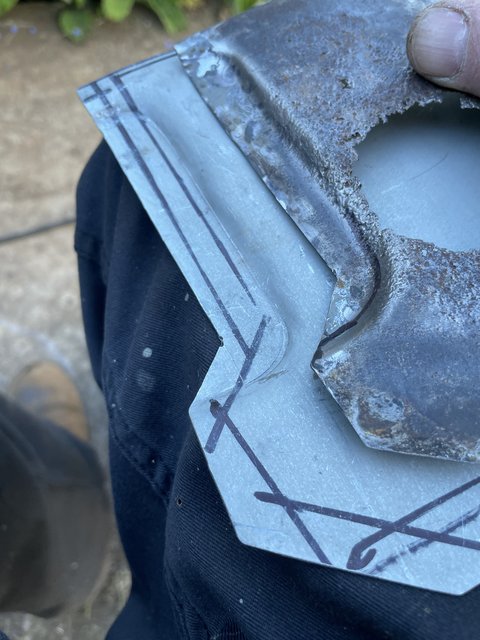 The groovy bit needs a bit more work but it is something like.  I then started putting the uppy-downy wiggly bit at the opposite side to the groovy bit.  It is pretty much roughed out now.  I was going to trim it down to size but decided not to just yet, until I have finished the shaping. I don't want to trim it, adjust the shape and find that it ends up too short on one edge so I left it like this for tonight. In other news, these things turned up today.  They are adjustable rear bumper mount brackets for the leading edge of the bumper, where it meets the wheel arch. It means that I can do away with the rust inducing studs and clips at the back end of the inner arch. Cheers. |
| |
|
|
teaboy
Posted a lot
Make tea, not war.
Posts: 1,959
|
|
|
|
Never ever prod the unknown........ I did have half an idea what was going to happen, Duckie. |
| |
|
|
teaboy
Posted a lot
Make tea, not war.
Posts: 1,959
|
|
|
|
Quite a bit of work ahead. I don't know how you do it all, DS, I struggle doing one thing at a time. |
| |
|
|
teaboy
Posted a lot
Make tea, not war.
Posts: 1,959
|
|
|
|
I wonder if there will be birthday cake? Cheers. If there is I'm sure we will all get to see it  In answer to the 'Will there be cake?' question, he did have a cake.  It is done up like that because my brother-in-law, along with all the rest of that side of the family are Sheffield Wednesday fans. I don't do the football thing but from what I understand, they are not that good... But was the cake any good? I have no idea, it didn't get cut into. We did have some creamy bun cakes though, I had a couple whilst I was there and I took some home too.  These, and the cake were made by one of his friends. I'm not saying that they were rubbish but they never live up to expectations... Anyway, I was hoping to get back into the tent on Saturday afternoon but the Doc wanted me to take her to the rough end of Hull instead.  She had bought a marble table from The British Heart Foundation charity shop and it was my job to get it home. It wasn't the lightest thing in the world but I managed to get it in her dogging car and bring it home.  Don't look at the rusty chairs, they are the Doc's project, not mine. I did loads of gardening and grass cutting on Sunday and I did a few jobs in the garden and on the patio on Monday, amongst which were 'fitting' a fireplace with a mirror above it. 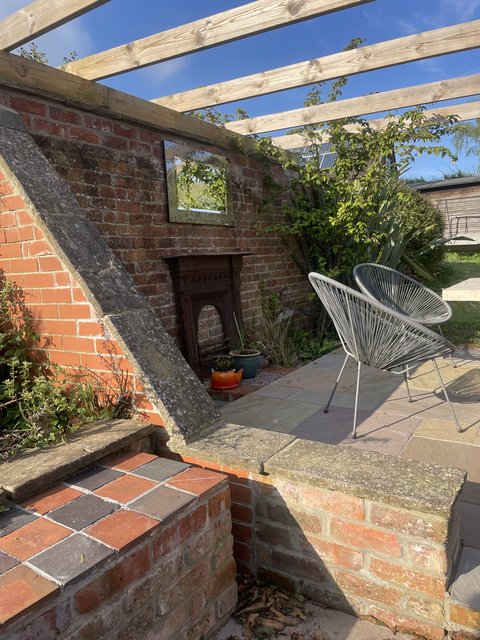 Don't ask me why, I just do as I'm told... Now the long weekend is over, normal service is resumed and I went into the tent after work. As I am still avoiding the rear wheel arch job I decided that I ought to look under the front carpet. The proper way to remove this is to take the dashboard out but there is no way I am doing that because I can't be bothered to but, more pertinently, I don't have anywhere to put it if I did take it out. I just need to get to the footwells anyway, so I thought I might be able to just lift it out of the way. To enable that I first needed to remove the throttle pedal. 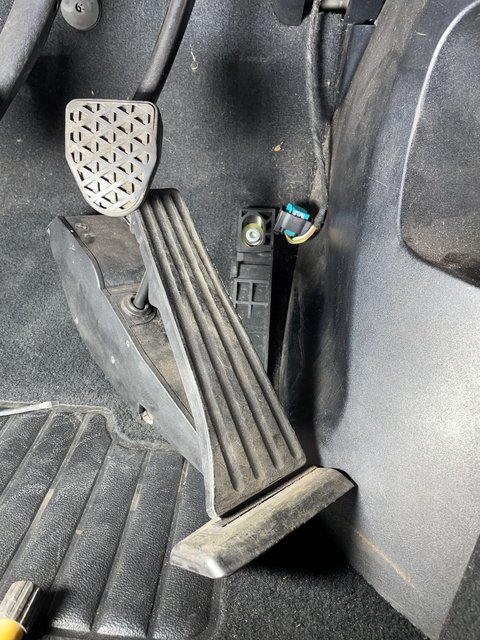 That was a total faff, it was like the Krypton Factor trying to get it out and it isn't helped by not being able to open the door very far. I also took out the panel above the pedals and the kick panel on the side. There were a few plugs to remove from the panels and they were quite uncooperative too.  Once all that glabber was out of the way I wrapped it in bubble wrap and stashed it with all the other stuff in the utility room, making sure that the Doc didn't notice. When I pulled the carpet up there was this large piece of polystyrene under there. I managed to wiggle it out in one piece.  Whilst I was packaging that up for storage I noticed it had a tiny brown stain on the underside.  What could that be from?  Oh look, another grommet. I wonder what would happen if I were to prod it with my finger. Well, isn't that just fabulous! Cheers. |
| |
|
|
teaboy
Posted a lot
Make tea, not war.
Posts: 1,959
|
|
|
|
Good luck with the mower…  |
| |
|
|
teaboy
Posted a lot
Make tea, not war.
Posts: 1,959
|
|
|
|
|
I hate it when paint does that!
|
| |
|
|
teaboy
Posted a lot
Make tea, not war.
Posts: 1,959
|
|
|
|
Took me far too long to get that done today. Story of my life that. I went back to the beginning of the thread to remind myself what it looks like. It's a really pretty little car. Keep it up! James You can’t rush a good job, Sweetie. |
| |
|
|
teaboy
Posted a lot
Make tea, not war.
Posts: 1,959
|
|
|
|
I am sorry to say that we were not good enough in the quiz last night, we came second which, as I'm sure you are aware, is first of the losers. Work today was a real slog and it ended up being a 12 hour shift and, consequently, I was late home. The sun was still out though because, apparently, it has been the hottest day of the year to date. I didn't have much energy left after work but I thought I might be able to finish the platey job off. Last time I completed the passenger side but I only got the driver's side re-welded.  I got the tops filed off the welds both inside and out then covered them with spooge.   This was all that I had planned on doing tonight anyway. By the time I had done that the sun had gone out of view behind the trees and the temperature really dropped. It isn't much progress but, nevertheless, it is progress. We are going to the brother-in-law's birthday thing tomorrow night so it will be Saturday afternoon before I get back at it, all being well. I wonder if there will be birthday cake? Cheers. |
| |
|
|
teaboy
Posted a lot
Make tea, not war.
Posts: 1,959
|
|
|
|
Lovely. And twice as informative as usual.....   There must be an echo in here…. Edit; I don't know why it did that, I certainly didn't type everything out twice. I have now removed the duplication, we don't want information overload... |
| |
Last Edit: May 1, 2024 16:53:42 GMT by teaboy
|
|