|
|
|
|
|
|
Real degreaser, I cleaned/degreased it 3 times, always with new rags. I think the main problem is, that my supposed "filler" is just a primer without any "filling" capabilities (basically paint). Sigh. I'll re-spray the door. I think that's the best approach to fixing this mess... Annoying.
Cheers,
Jan
|
| |
|
|
|
|
|
|
|
Apr 20, 2018 19:37:25 GMT
|
|
|
| |
|
|
|
|
|
Apr 20, 2018 15:25:58 GMT
|
Early this morning I applied some filler. Let it dry, sanded it down. wet, 400, 600, 1200 and 1500 grit (dry). Degreased everything, let it dry for a while. Filled the spray gun and blasted on some paint. Looked nice & even when it was still wet, I hap put on two coats. However, a couple of hours later.... I hate paint.  Looks like no prep work at all... FFS! Don't think I can save this. But I'll try. I've ordered some 3000 grit wet paper (can't seem to get it locally). But I fear I have to paint this again. Don't know what went wrong, maybe think the filler was the wrong type, or wrongly advertised (maybe just a mere primer). If I can't save it, I'll use a different type of (high build) filler. Sigh... At least it looks like the colour match is quite good. And there's only very little orange peel. Which is also bad, since it doesn't match the rest of the car  Argh. I hate painting. Did I mention this before? Cheers, Jan |
| |
|
|
|
|
|
Apr 19, 2018 15:03:49 GMT
|
Those wheel have to go on the car!  But first - other things... Last couple of days I've been rather lazy, only worked a couple of hours. First of; I ditched the "reversed" air filter housing, it's too out of round to re-align the three parts. At least if they should fit together well and be sealed to the outside. Especially the inner part around the carburetor is almost impossible to re-align (there's an o-ring inside a groove in the lid that seals of the center). Though it would fit, there's nothing in it's way. But... I finished the plumbing of the engine.  Then I adjusted the valves and primed the oil pump.  Turned it over until I had oil pressure... Put the leads back on the ignition coil, and after a few adjustments to the distributor it ran Only let it run a couple of seconds, since I had not installed the exhaust yet. But - she's a runner!! Yay! And of course - there's a big leak. I mean - why not? And I knew that's a risk - I just hoped it would not happen. One of the new core plugs sprung a major leak...  Out with the alternator, out with the core plug - let the coolant drain...  Ordered new ones. I had installed them with a bit of sealant, don't know what went wrong. I think the new one I'll try and "spread" a bit and use a different type of sealant, which is more like a glue. In between I slapped some filler to the door an sanded it back down. I was lazy, so I used the orbital sander...  Then I organised the stuff required for painting. I had bought a cheap set of HVLP guns, worst thing is they spray like a rattle can. Best case scenario they work just fine for my requirements.  So I erected a temporary spray booth...  ...put on a painters jumper, 3M mask, spilled a lot of paint (FFS - I HATE paint!) and eventually some found it's way through the little gun.  First time I ever used this gun. Or any spray gun at that Briefly thought about a practice run - but then opted to dive in head first... Not overly happy with the result (which is quite obviously what you get if you don't know sh!t about painting with a gun). But - it'll do.   ^big runner It's a bit dull and has of course lots of dirt in it... To paint the outside, I'll do a bit better prep work on the floor (wet news papers). 'Cause this time - I was too lazy for any. And then came the part with cleaning the spray gun. Sigh. Painting is just not my world. I think I get along with it, but it's nothing I'm overly euphoric about... And that is all. Paint needs to dry, then I'll flip it over and paint the outside. I set up my spray booth in a way I can still park the Mini inside without moving the painted door. Ain't I smart, eh? Cheers, Jan |
| |
|
|
|
|
|
Apr 16, 2018 16:22:14 GMT
|
Around breakfast time, my speedo gear arrived. Nice! Promptly installed, fits very nice into the bearing sleeve, everything rotates smoothly - all good.  Then I pulled the front hub, to replace the CV gaitor. I found an old drive shaft with a sound gaiter, so why not use that. Says "Hardy Spicer" on it - it'll probably outlast any current production Knocked off the inner CV joint, pulled gaitor, put on new one and put everything back in place. I love working on Minis!! It's all so easy 6simple.   Next I painted the exhaust fannymould. With extra special "Porsche Special Exhaust Coating"...  And then... Ther was nothing left but marry the engine to the car. This time I used the balancer and double length of chain, made it a whole lot easier to install the engine & wiggle the drive shafts in.   Engine mounts bolted up straight away, without any fuss. A first! Put the lid on - and called it a day.  Very happy to finally have a 1275 back in there! Next up is all the plumbing and then painting the door. And I discovered a little rust hole on the rear valance, this will need a patch. And... I had to try on one of the Remotecs.  I like that!! Might be a tad illegal, though I'm going to order some suspension parts for negative camber, should be juuust about legal than, if very cheeky  That's all for today. Thanks for reading Cheers, Jan |
| |
|
|
|
|
|
Apr 15, 2018 19:09:09 GMT
|
|
If my Googel-Foo is strong, BMW E36 and E46 with the little four bangers (316, 318, 320) have 80mm PCD drive shafts.
|
| |
|
|
|
|
|
Apr 15, 2018 15:24:46 GMT
|
Next up, wen need to talk about air filtration. And flow. By keeping in mind that "everything helps". Many little improvements together may add enormous amounts of horse power. Not in my case, since the cylinder head is still the biggest cork on the bottle Anyway. Here are 3 stock air filter housings. From top to bottom; Rover Cooper 1.3, standard and early Mini 1000 (metal).  The Rover Cooper housing is nice, since it has a large opening that spreads towards the air filter, giving more direct flow around the filter element. It has one big draw back, though. It points straight towards the radiator... As far as I know, it's the housing from the MG Metro which has a front mounted radiator.  Rover engineers solved this by adding a large snorkel, moving the intake to the other side of the engine bay:  Thus creating a very sharp and narrow bend in the intake. You can actually feel a slight drop in performance when installing this, I didn't use it for long, the intake pointing on the radiator is no big issue actually. But still, I'm not happy with it, especially in city traffic it sucks hot air - when you least need it. So I ground me a narrow cutting tool from a Mercedes cylinder head bolt.  I then bolted the air filter housing onto the bottom piece of a random pillar drill thingy. Which just happened to fit snuggly on the spindle of an old saw blade setting tool...  Though I flipped it around to cut from the back - and I had to extend my cutting tool out a bit. Found a suitable piece of scrap...  ...and started rotating my air filter housing. Until I had successfully trepaned the bottom:  Et voila, an intake that is free to position any way I like it (after removing the locating tab for the lid):  ^I think that off an actual MG Metro I'm not yet going to "weld" the bottom piece back in place, I'll have to determine the final alignment with the engine installed. But from educatedly guessing, it should work. It will look completely OEM, but function a wee little better by always drawing cold air. And before you say it; I don't like exposed air filters bolted on the carburettor. I don't like the noise, I don't like the look - and they are not quite very road legal. Cheers, Jan |
| |
|
|
|
|
|
Apr 14, 2018 15:54:59 GMT
|
Renault would be one of them |
| |
|
|
|
|
|
Apr 14, 2018 15:39:36 GMT
|
Hardened seats are definitely the way to go! I'll try to keep it happy with lead substitute, so far this seems to have worked. I'm actually curious how the engine will perform, since the valve seats have never been as good as they are now Speaking of good - I think my fancy epoxy filler has gone bad... Usually it takes about 20h to dry, but not 72. Still soft and sticky, so off it came with the wire wheel of death & destruction.  Frustrating, because the surface now needs a LOT more prep work  I've ordered a new tin, should be here thursday. Then I decided that I didn't like the top of the head bare metal and painted it. Installed the flywheel, fuel pump and some more random bits. Glued the gasket to the rocker cover and bolted it on to hold the gasket in place until the sealant has cured. And... I like it!  With all this done, it was time to take it off the engine stand. I sat it aside until the speedo gear arrives. And there are some things I want to do prior to installing the engine. But for now - the engine's almost done. Distributor & oil filter I'll install once the engine is in place, this leaves me more room for installation.  And that is, I'm afraid, all for today... Cheers, Jan |
| |
|
|
|
|
|
|
|
Oh, they are not quite as large as I thought they are And this one has bolt-on wheels for road use.... I want one! |
| |
|
|
|
|
|
|
|
Apr 13, 2018 19:54:56 GMT
|
So that's for off-road racing then |
| |
|
|
|
|
|
Apr 13, 2018 19:49:29 GMT
|
This is a picture I took in 2009, before I first fitted this head to an engine... 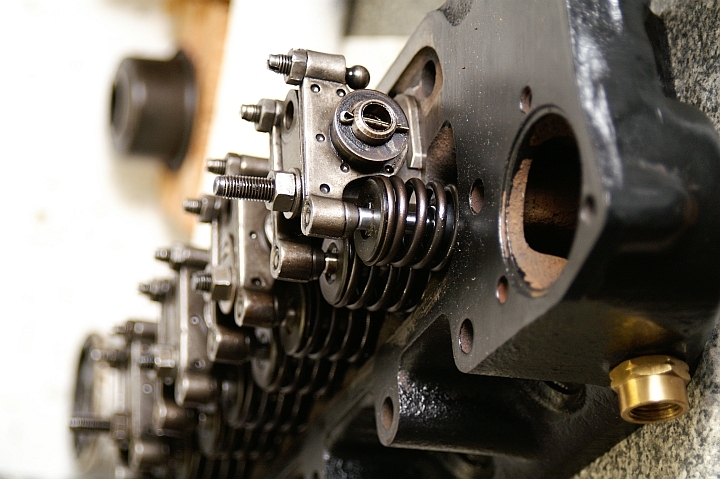 Can you spot it? Bwahahahaha!!! |
| |
|
|
|
|
|
Apr 13, 2018 17:57:40 GMT
|
12G940, yes. In big valve flavour (36mm in, 29mm out), probably off a 1300GT or Innocenti Cooper 1300. And today I got a call it's finished. Had to wait until it stopped to rain, though. And - what times we live in! Rain radar... Perfect for timing when to start your bicycle ride Anyway, pockets lighter, backpack MUCH heavyer... And - shiney:   We agreed on a normal grind, though. There are two veeery little cracks between the valves, so it may require hardened inserts next time anyway. For now it's OK - but next time it goes there, it'll see new valve guides & inserts, which will of course cost a LOT more money to do. Maybe I'll just buy a ready-to-fit ported head instead of fixing this old lump of iron. But for now - all good, if not perfect. Installed stem seals & springs...   ...and cleaned the block. and threads and what not. Degreased everything and fitted a set of new uprated Minispares bolts.  Slapped on the head, torqued it down - starting to look like a proper little engine again  Upon installing the push rods, I noticed that when I had replaced the rocker shaft (many years back), I apparently didn't bend over the split pins securing the outboard rockers... Oooposie.  Much betterer  That's all for today. Not much, but it looks like a lot - like an engine that soon can go back into the car And this makes me very happy! Cheers, Jan |
| |
|
|
|
|
|
Apr 13, 2018 10:40:11 GMT
|
Paint arrived, and I had already pulled the door. I had dug out the original door, but the paint is now badly scratched from storage, so I would have to re-paint it completely anyway. And upon looking closer, it's really rotten from the inside, there's rust between all overlaps. I'll use the "Masters" door.  Which meant destroying a piece of pure 80's-ness... But to be honest; I always thought the tennis themed "Mini Masters" was not the most beautiful limited edition of them all  Sanded it, applied some high build primer where needed and filled some minor dents I couldn't pull out all the way.  Epoxy filler, needs ages to cure... Even more boring than watching paint dry... Cheers, Jan |
| |
|
|
|
|
|
|
|
Apr 11, 2018 19:28:38 GMT
|
Why thank you kind Sir Today - I pulled the plug...  I decided to pull all, bar one who had not moved at all, the others did. And they were pretty easy to pull, without much effort. Almost without resistance. So onto the lathe and make some slightly bigger ones... Parting off always makes me super nervous. This is where I had parts flying through the air. Not this time. Made 4 plugs, two with a hole in the middle.  And knocked them in with a hammer. Didn't go in easy at all, maybe a slightly smaler oversizes would have done the job as well   Though I was a bit cautios, since one fire ring runs across a plug - and the ones with holes are overlapped by a copper ring inside the gasket (holes are off center). And I suspect that this might have been the cause for the water damage to the last engine this head was on. After a winter break I had coolant inside the bores and thus a lot of rust. I had suspected the NOS Leyland gasket I had used - but I'm not so sure now. And then I strapped this big lump of cast iron onto my back and went for a little drive to the engine bzuilder's...  And the rest of the day I spent with some unrelated stuff. So - that's all. Cheers, Jan |
| |
|
|
|
|
|
Apr 10, 2018 19:14:50 GMT
|
It doesnt, it's from the 60s or 70s. I've always ran lead substitute additives, and I've always lapped valves. I'm fine with that and it seems to work. I've had this cylinder head for a while and had it apart a couple of times, the valves didn't get worse. They've always been like this, only I didn't bother. Should I observe rapidly decreasing valve clearance, I can always take it apart yet another time and have inserts fitted. Thus far I never saw/experienced the need for them... You are right, though - it would be better. So far I've gotten away with being cheap and save the cost for machining. Cheers, Jan |
| |
|
|
|
|
|
Apr 10, 2018 17:52:52 GMT
|
Well, let's wait and see... My very first gearbox I pulled apart again after no 3km of driving... ;-) So - all the action had left me with a rather unpleasant mess on the workbench. Somwhere in there is a cylinder head, waiting to be worked on... Sigh.  There it is, found it!  First task of the day was to extract the sunken brass plug. Pictures some pages back, I had already extracted the worst, but I thought better be safe than sorry - so I pulled another one. Drilled, taped and bolted to the 4.5kg sliding hammer:   Two blows and it flew out. Felt rather loose... Next up, the job everyone loves and enjoys the most. Lapping valves. I had lapped them not too many miles ago, but this job is always worth doing, so I didn't skip it.  The exhaust valve seats are a bit of an issue, though.  So I cheated. And attacked them with the drill & coarse lapping paste... I prefer to lap by hand, though. Don't know, it feel better, gives you a feel of what the valve is doing, if you run out of paste etc.  It's a lot better now, acceptable. This shouldn't be a big problem, there is no deep pitting in the seats.  I'm not overly happy, though. Once I have pressed in the new plugs, I'll give the head to the engine shop to have it skimmed (as little as possible). I think I'm going to ask for a quote for 3-angle valve seats & valve grinds. Seems like an good opportunity to have this done and add a little more flow. The head as such is not ported and has stock chambers. But anything helps. And maybe one day I'll port it - doesn't matter if the valves are ground before or after. It wont hurt performance, quite the opposite. That's all for this day, I have no clue where all the hours went today... Cheers, Jan |
| |
|
|
|
|
|
|
|
Took my new ride to town today, manufactured by a local bike builder who's still about. And probably as old as the Mini... Doesn't need expensive repairs, though. Brakes re-adjusted, bit of air, a dab of oil here & there and she's good to go.  Weights just about 10.5kg - not bad for steel frame. Anyway, I gotsome new sealant - and on I went. I filled the gearbox with a bit of brake cleaner and turned it upside down. And whilst it was resting on the bench, I double checked I had torqued the crank & rods...  Always amazing the amount of dirt that comes out, still. Most would be from re-installing some parts to pull/re-install the laygear.  Glued THAT o-ring in place with a bit of sealant.... And then came the big moment. Gearbox & engine got re-united. Lovely! It's only taken me a couple of years...  Installed the drive line... Float of the primary gear was spot on.  So onto the final installation of the transfere case, with a wee dab of sealant on the mating surfaces. Just to make sure it doesn't leak.  And then I remembered that I had last seen my crank seal tool - about - erm - 8 years ago. I think I gave it away and never got it back, don't know. I had made it out of an old drum brake front hub. It said "MOWOG" on it. Sigh. So I turned my attention towards the scrap bin. In which I found a bottle jack, an old W124 drop link and some other random bits.   However I did not dare to drive the tool bit into it, it was vibrating & chattering real bad - my lathe is too tiny for such a big part, not rigid enough. And the chuck was barely holding on to it. Not worth it... I scratched a line and took the angle grinder. Welded in an old bearing race...  ...lengthened the flywheel bolt with a bit of round bar I turned down on the lathe. Drilled it and shoved the drop link through it.  Wrapped some elecchicken tape on the primary gear and oiled it well.  Put crank seal in place, bolt down tool and wind away... Carefull, without the correct sleeve on the primary gear, it's very easy to have the lip of the seal catch on the gear. Do it in smal steps and aid the lip over the edge of the gear with some sort of soft lever (I use a cut down big cable tie, with the edges filed round), use a lot of lubricant.  And all went well. I hope. I'll see. Wouldn't be the first crank seal I have to replace.  And that's it for today. I'm well chuffed that the power unit is finally taking shape! After such a long time. Next up: cylinder head. There's work waiting there... Cheers, Jan |
| |
|
|
|
|
|
|


 I've ordered a new tin, should be here thursday.