keyring
Part of things

Posts: 913
Club RR Member Number: 47
|
|
Apr 27, 2019 21:57:24 GMT
|
Good on you for keeping t on the road. I had a 2000 GU LWB. They are great cars. Luckily they don't rust here Thanks! I’m extremely jealous of the trails you have in Auz for 4x4 driving, do you do much wheeling in it? I know it’s getting more and more advertisement based, but I’m a massive fan of 4wdaction, but I’ve heard the trails are even better when not seeing them through their camera! |
| |
|
|
|
|
keyring
Part of things
Posts: 913
Club RR Member Number: 47
|
|
Apr 27, 2019 21:54:56 GMT
|
There was then a strip along an inch wide running from the panel I welded into the floor, to the rear arch, I cut a strip of sheet steel, and welded this in too, I’m not sure why but I don’t seem to have any photos of that at all, I’ll get some once I’m home again... But anyway, after that, I could then make a start on the rear arch tub, I’m self taught at welding apart from a small bit of mig at college on thicker steel, and I don’t really do any fabrication/panel work in my job, so this was a bit daunting, but I don’t think it’s turned out too bad so far, and hopefully I can get some constructive criticism and find out I’ve not done anything too badly... So I cut out some steel and started to mock up an arch tub 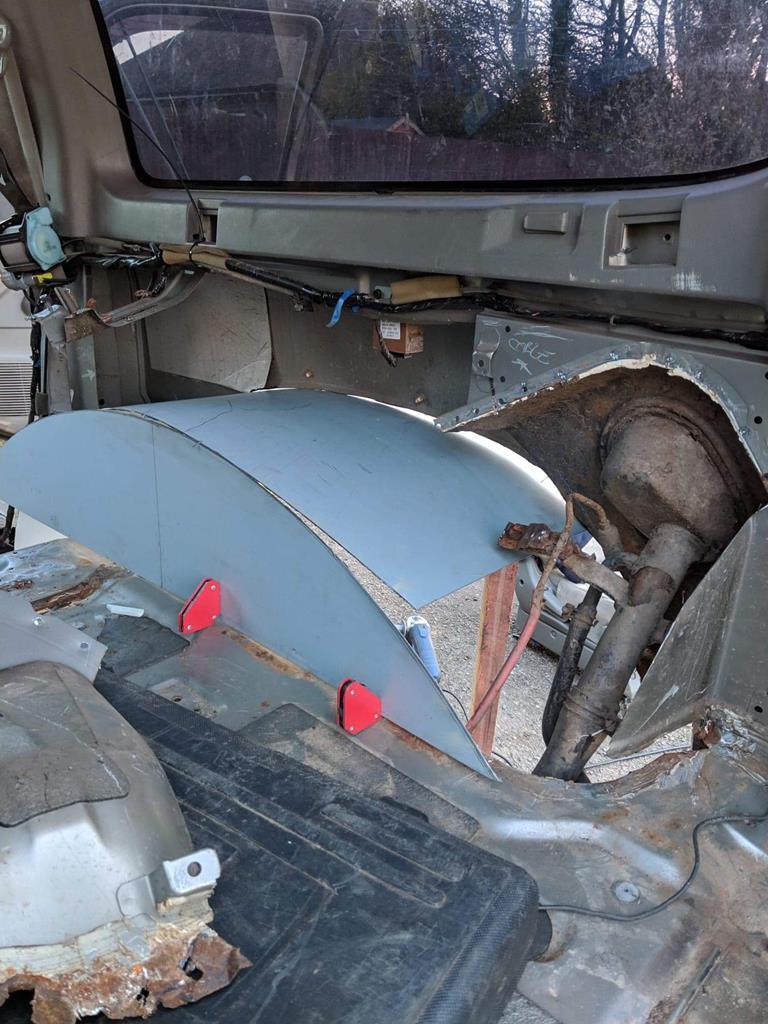 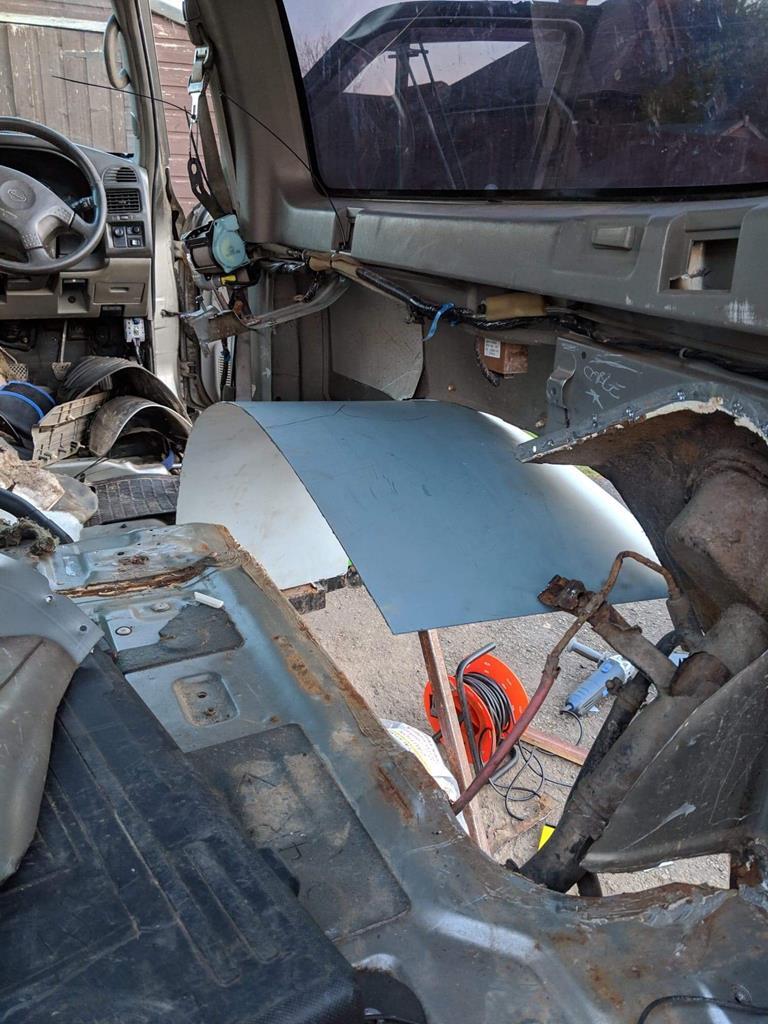 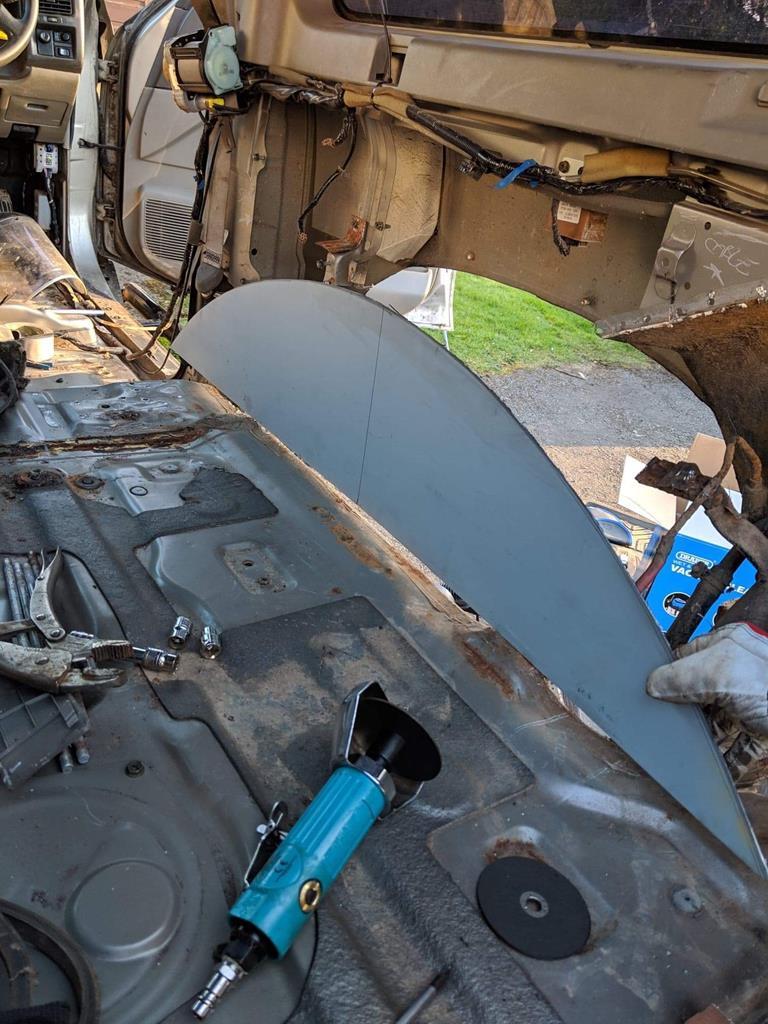 I was happy with that, so got it tacked 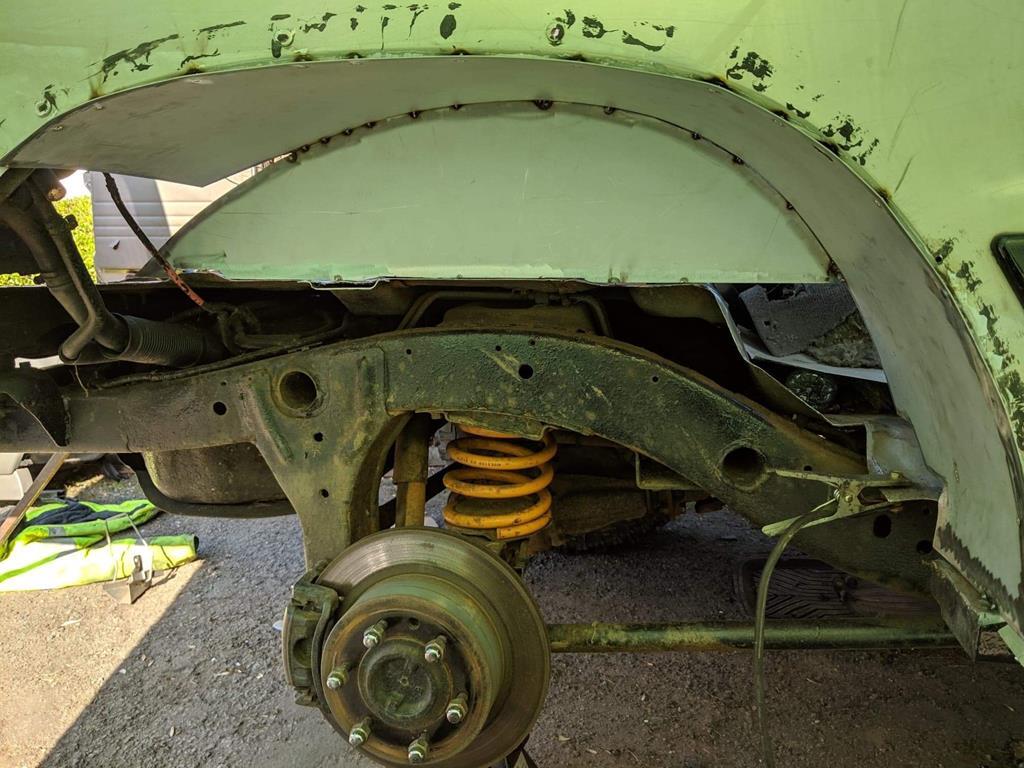 And then got the rest fully welded, again mostly doing spot after spot, on the outer side where the panel met the rear quarter I done random spots, cooling with an air line or leaving to cool in between to try and keep any panel warp to a minimum, I did get a little but nothing I’m massively worried about 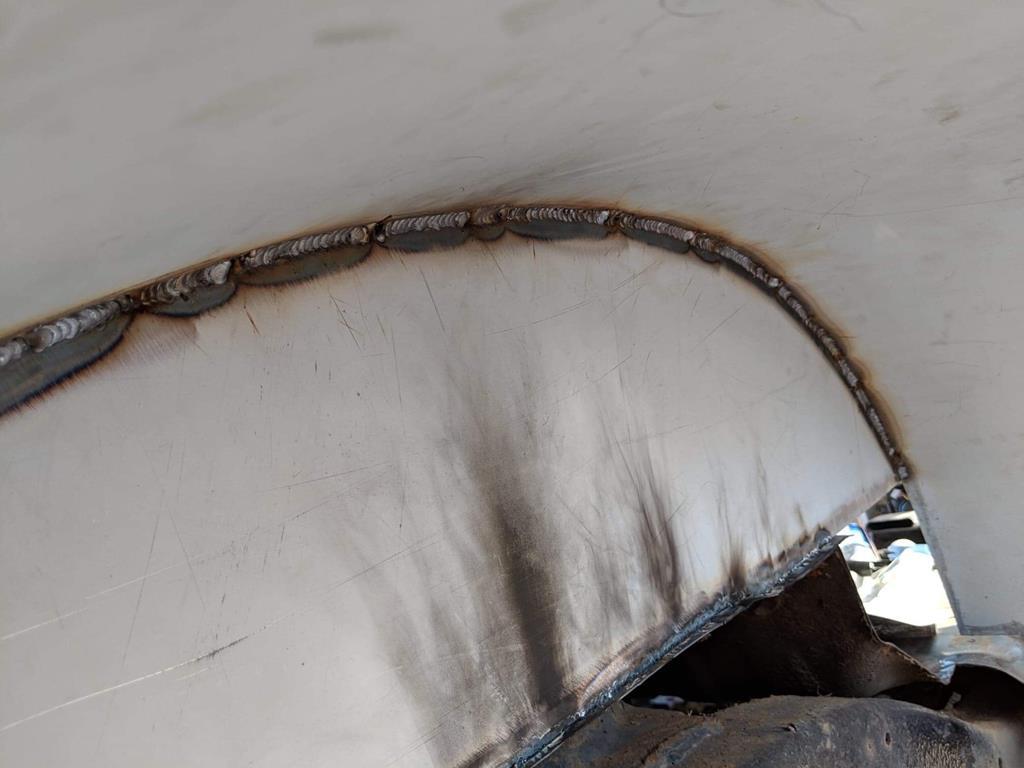 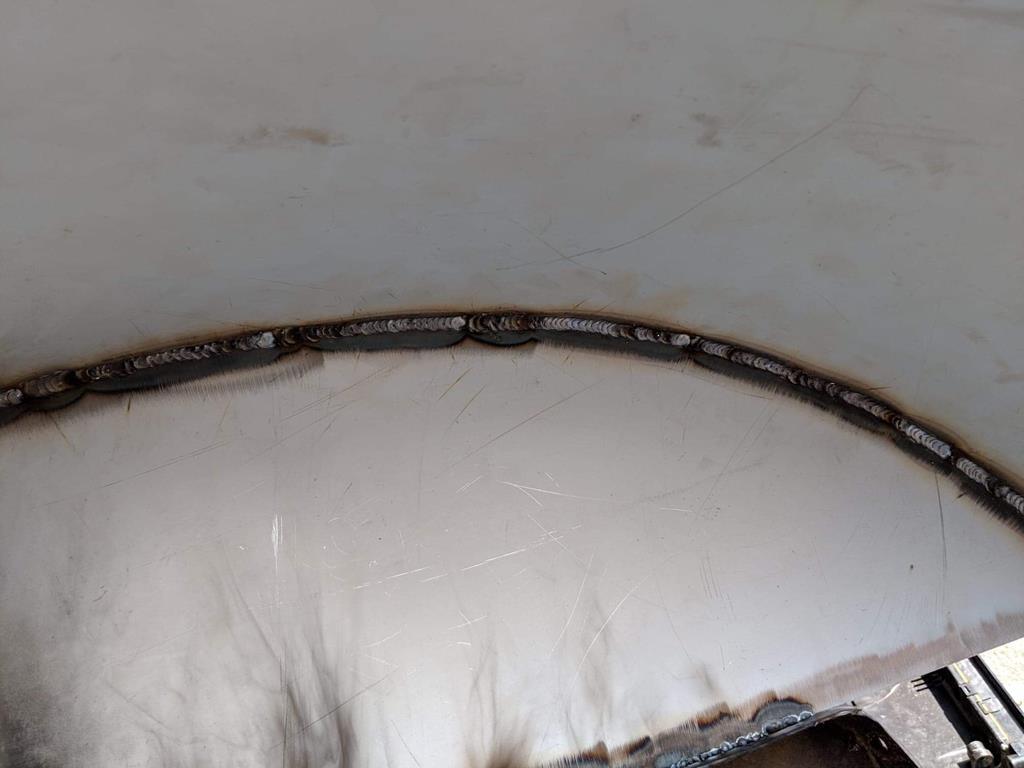 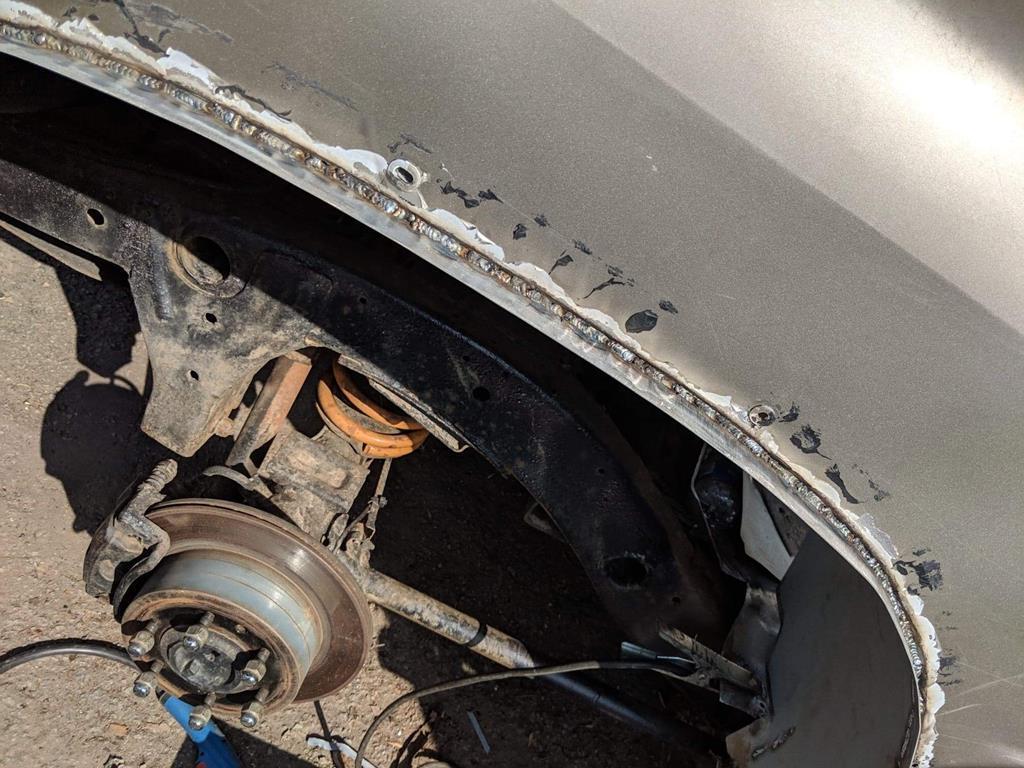 When I cut the arch, I cut it just at the base of the sewage line, so most of the weld shouldn’t actually protude the edge of the panel itself. The reason for leaving the lip is for if I choose to run some strips of conveyor belt in the future (if the wider arches don’t catch all the mud... I then ran out of time before coming back to work, I’ve still got sections to cut and weld in, and then for around the fuel filler neck, I think I’m going to repair the bottom edge of the original piece I cut out, and cut it into the new tub to save me having to make the curved panel. Before I left, I etch primed and seam sealed the parts I had welded(leaving a small undone bit up to where I knew I’d be welding once home again) 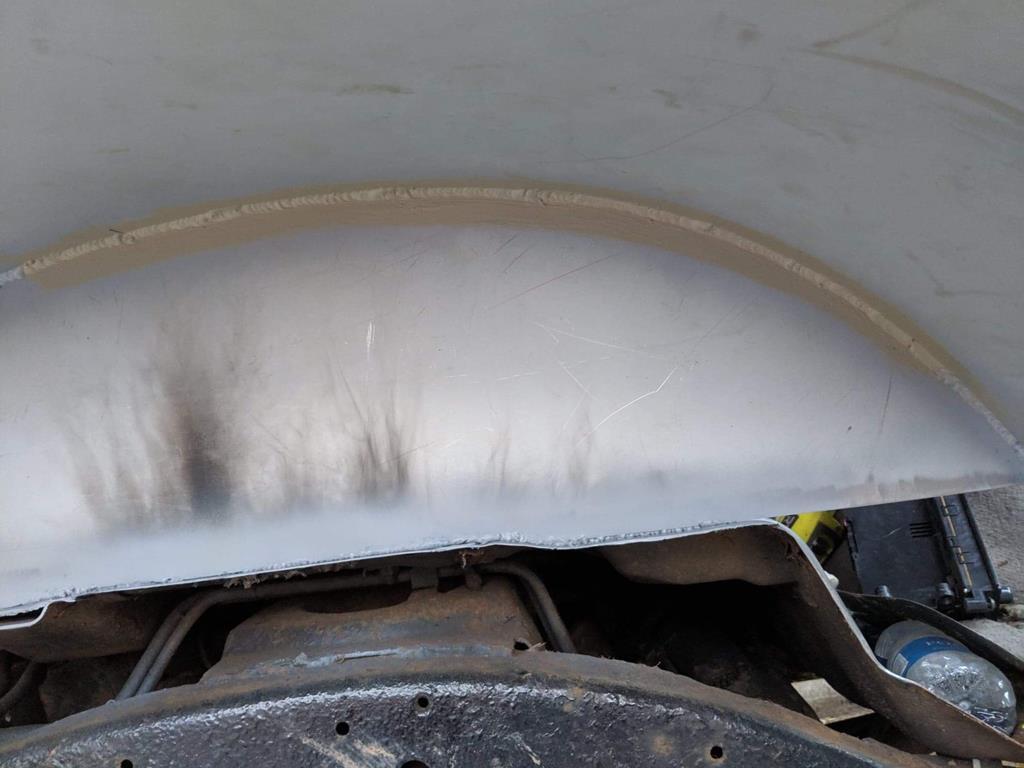 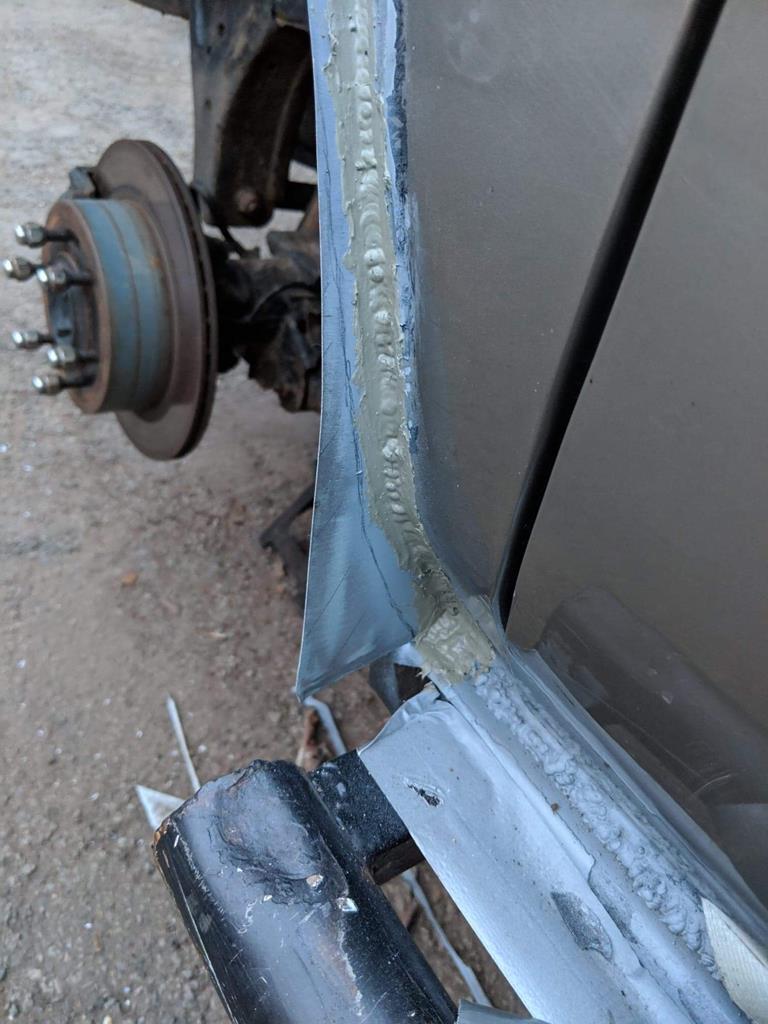 You can see in that photo where I plan to trim the lip back into the body... I’m hoping to be able to lightly sand the seam sealer to smooth it, and then paint in the body colour, as long as it’s solid and no change of water ingress or rust coming back, I’m happy, it doesn’t have to look perfect, as I will be getting a set of these arches (don’t want it to look a mess under the arches either of course)  And finally. I chucked the tyre on just to see the sort of clearance I had 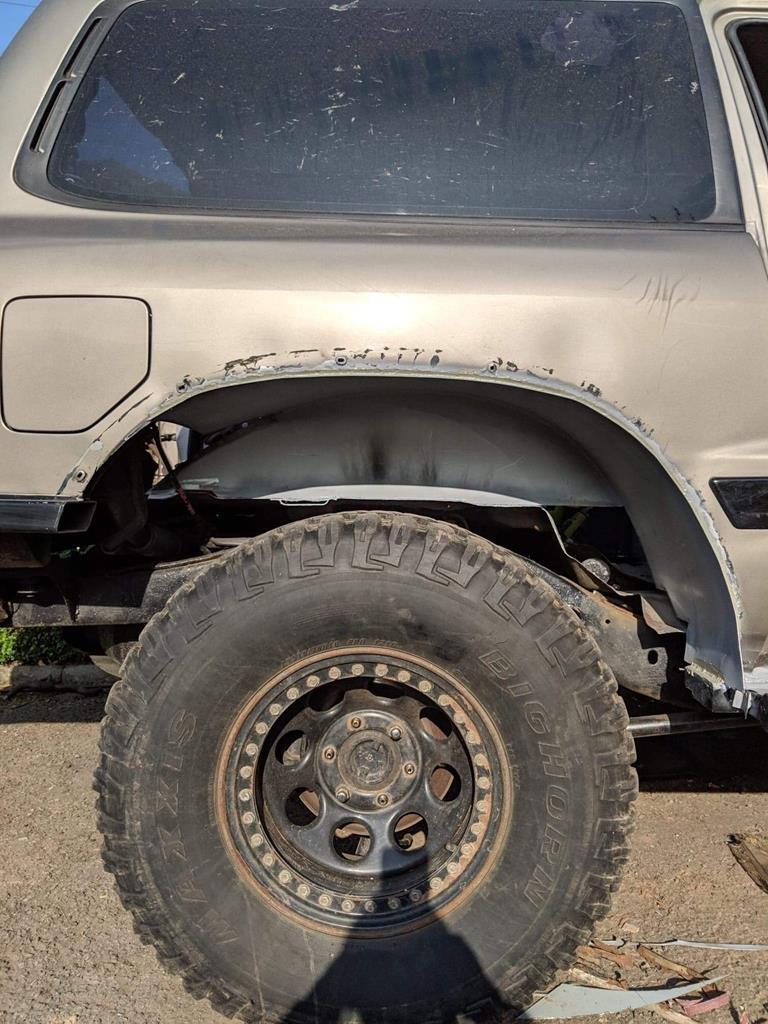 As I say, this isn’t my usual work, and I’ve got a lot to learn, but there’s a lot of knowledge on here, and if I can get feedback on what I’ve done, what I need to change, what I’m doing right etc, that would be amazing.... thanks  |
| |
|
|
keyring
Part of things
Posts: 913
Club RR Member Number: 47
|
|
Apr 27, 2019 21:30:33 GMT
|
Now that the rust was all removed, I could start welding in some fresh metal.... Firstly in the front wheel arch 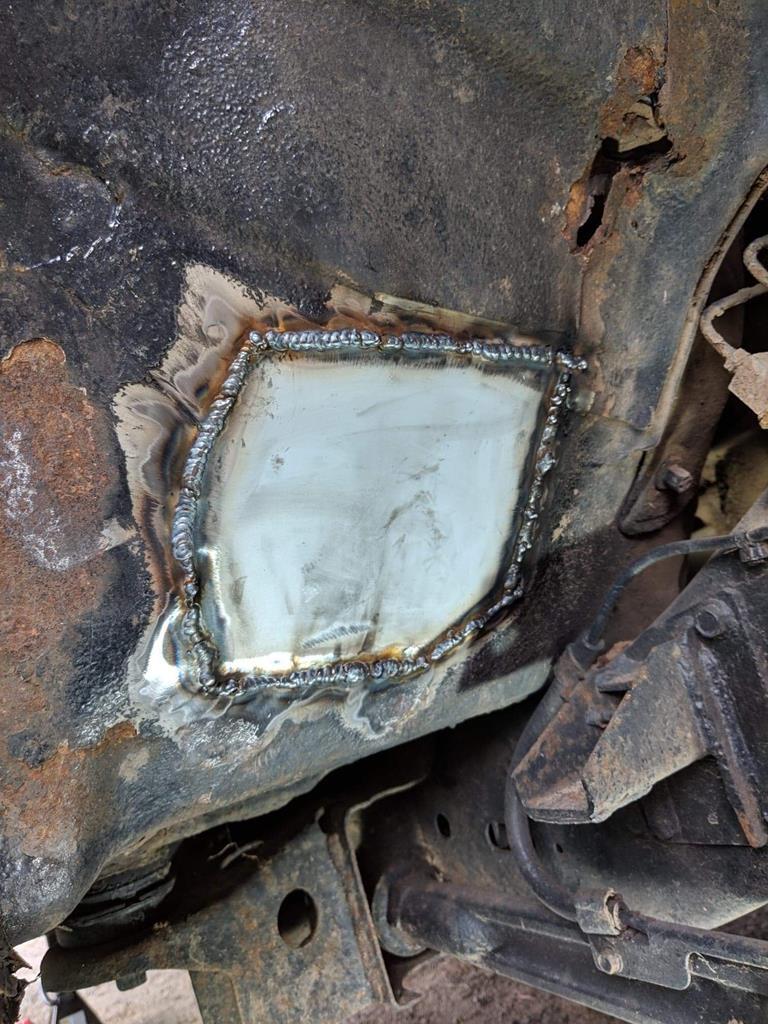 The rusty prt you see above the repair, goes into the engine bay and not the cabin, so I’ll sort this once I move to the front inner arch repairs I then got the box section sill mounted back up, and made an ‘inner sill’ out of 3mm flat bar. I seam welded this along both the box section sill, and the body, perhaps over kill and a pain if it ever needs removed.... 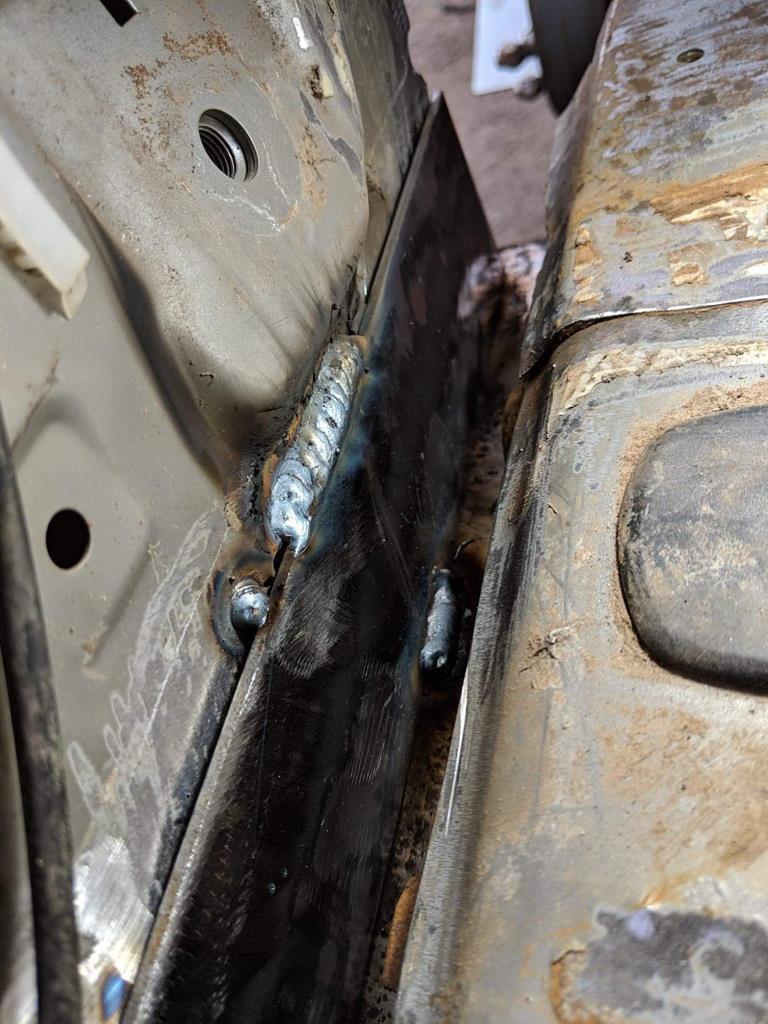 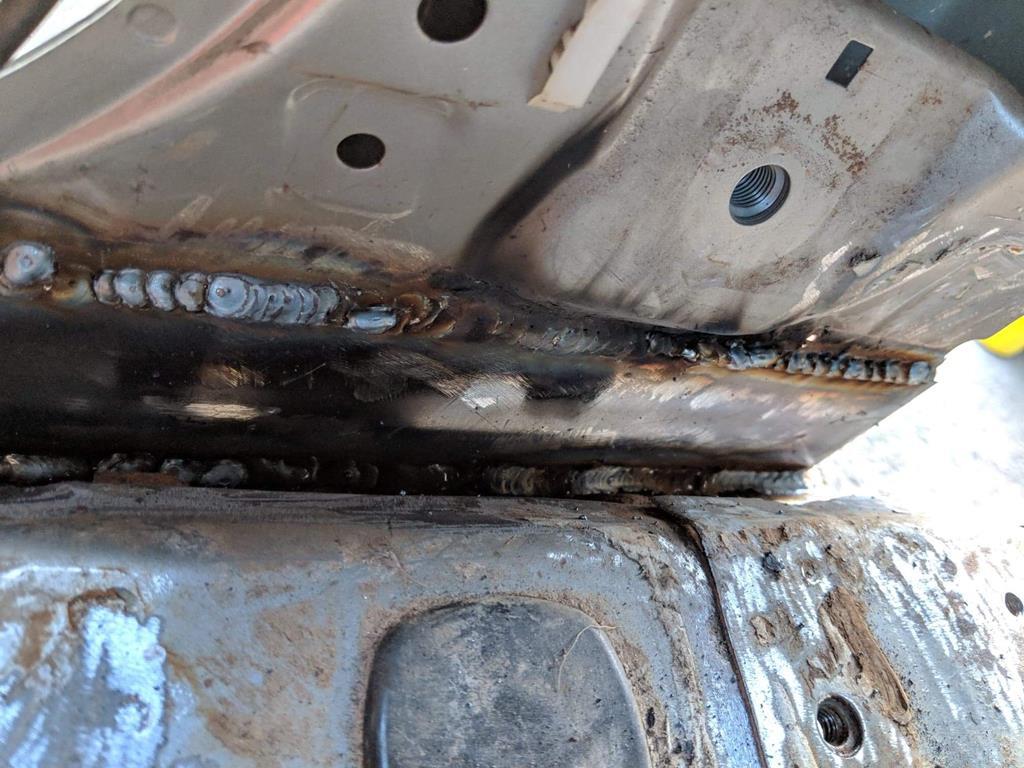 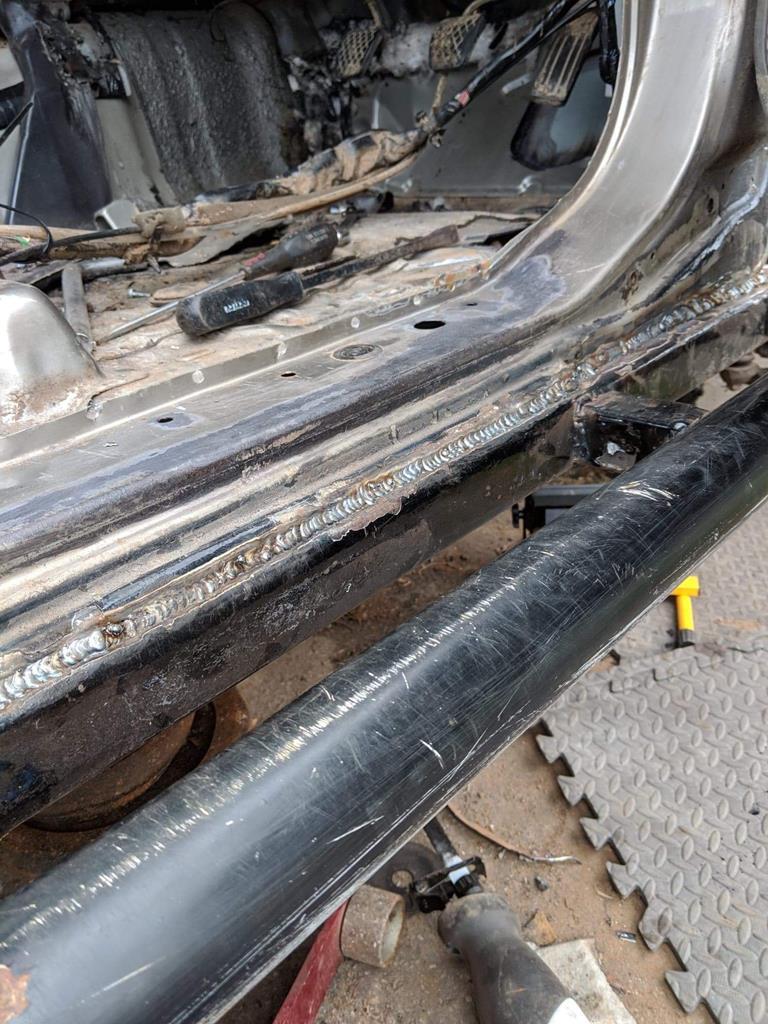 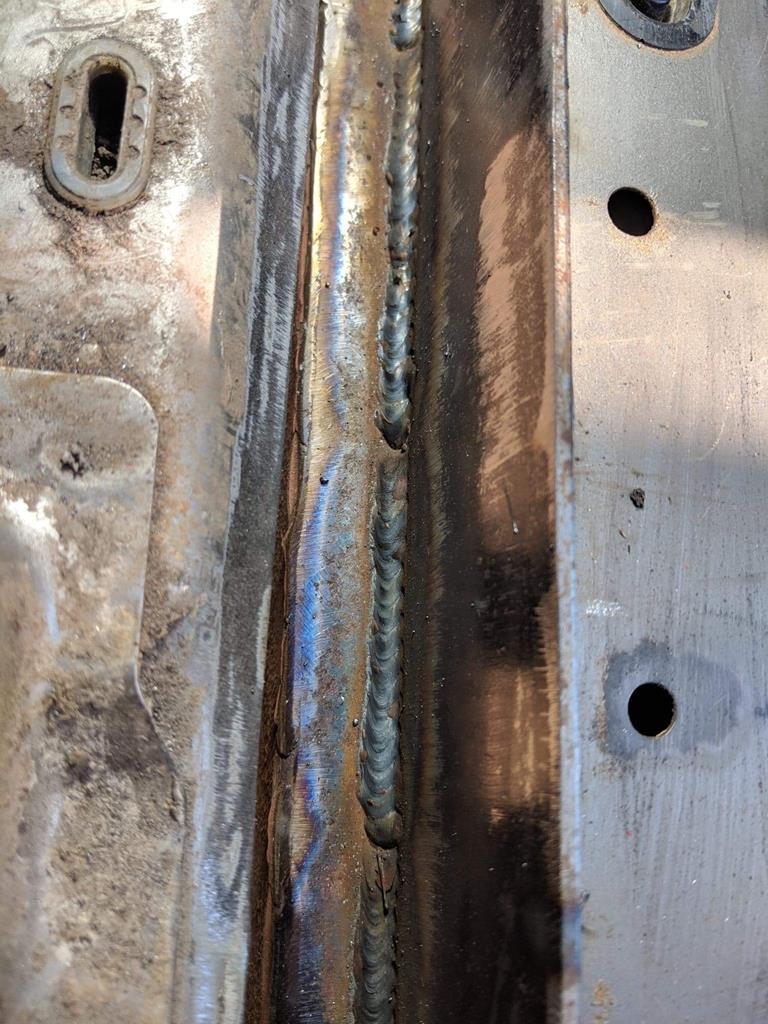 On the outer sill edge, I found I had to do constant spots as otherwise I was getting too much heat in the panel, probably doesn’t look the best, but I guess a dress back and some seam sealer then paint and it shouldn’t be too bad.... I forgot to get photos of the body mounts, but I used the same 3mm flat bar to extend these into the box section and ‘inner sill’ and again seam welded so should be fine for the future... I then got the first patch done on the floor 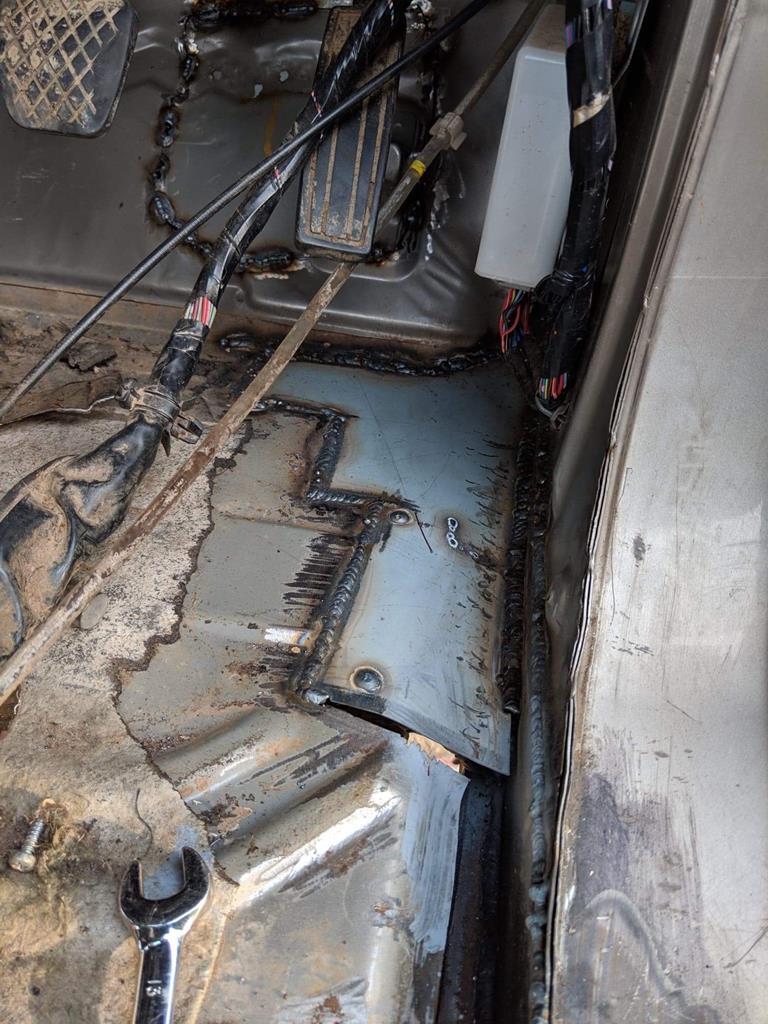 |
| |
|
|
keyring
Part of things
Posts: 913
Club RR Member Number: 47
|
|
Apr 27, 2019 21:18:32 GMT
|
So... I thought best way, get rid of all the rust I could, I probably didn’t have to be so drastic on the arch tub, however, I wanted a bit more clearance for the bigger tyres I plan to order, as once it starts to flex, things soon start rubbing (I’ve got a bigger lift kit to fit aswell) So, all the rust cut out, including cutting off the box section sill (the box section was all fine, it was just the metal it was welded to that wasn’t) 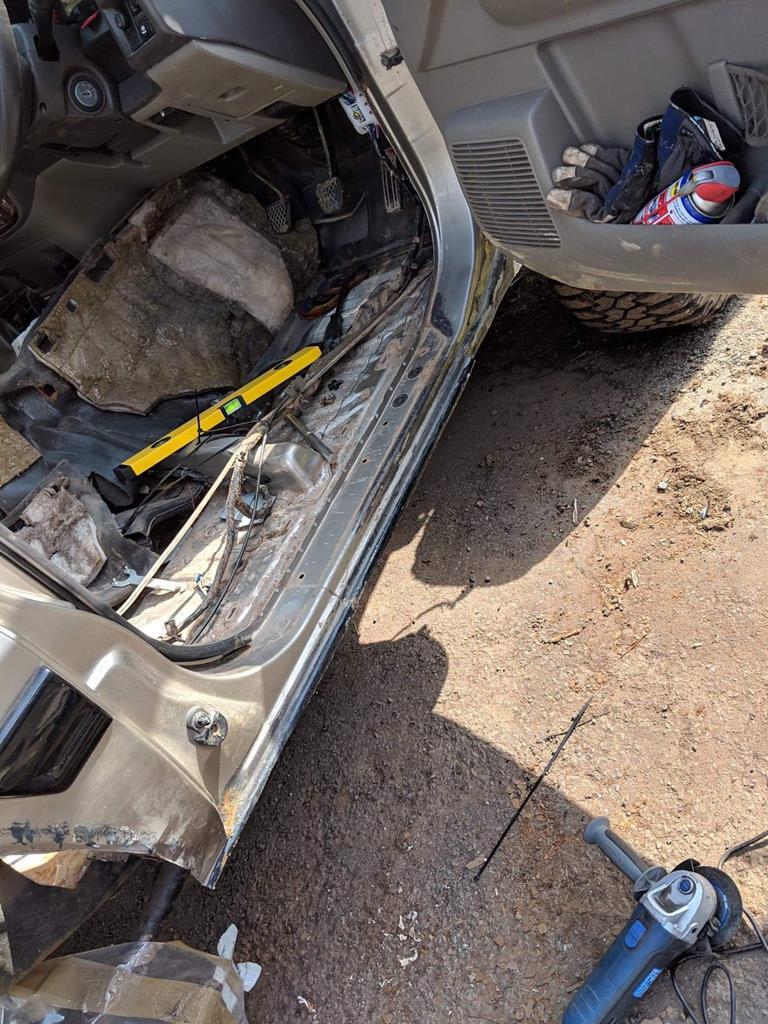 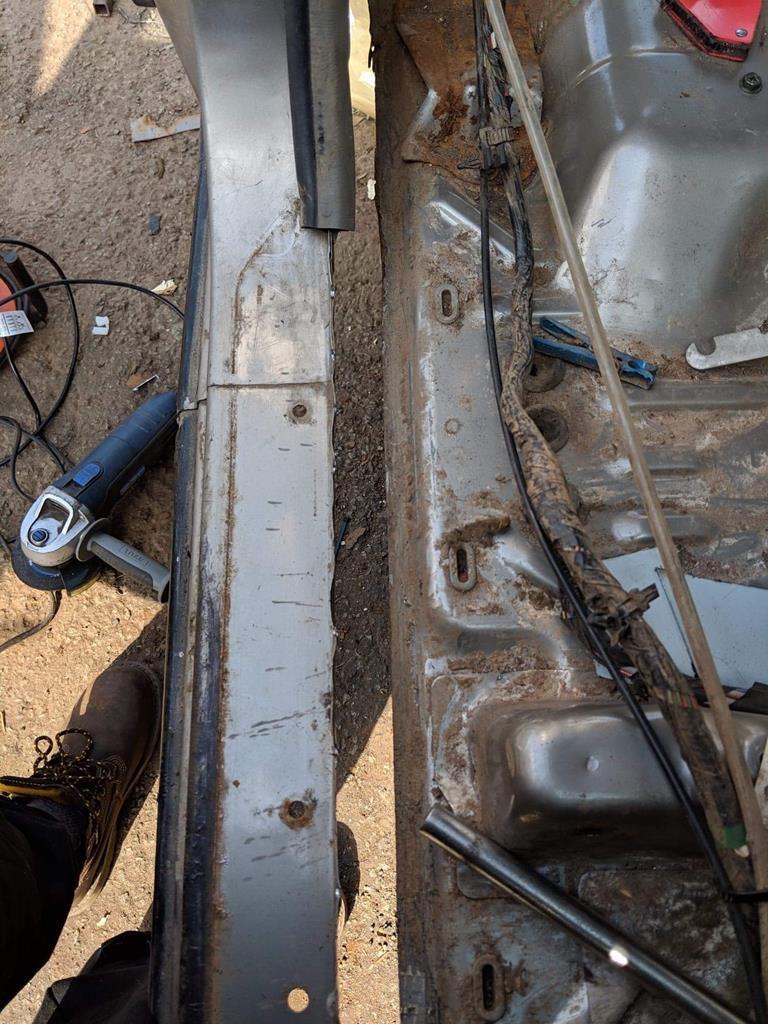 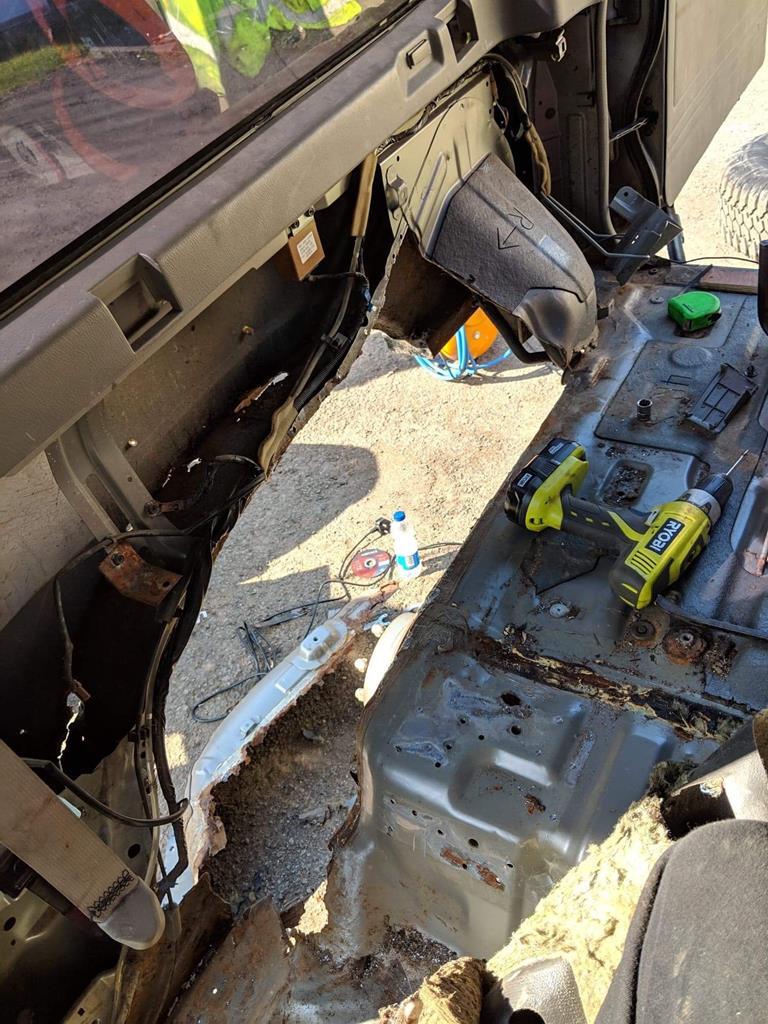 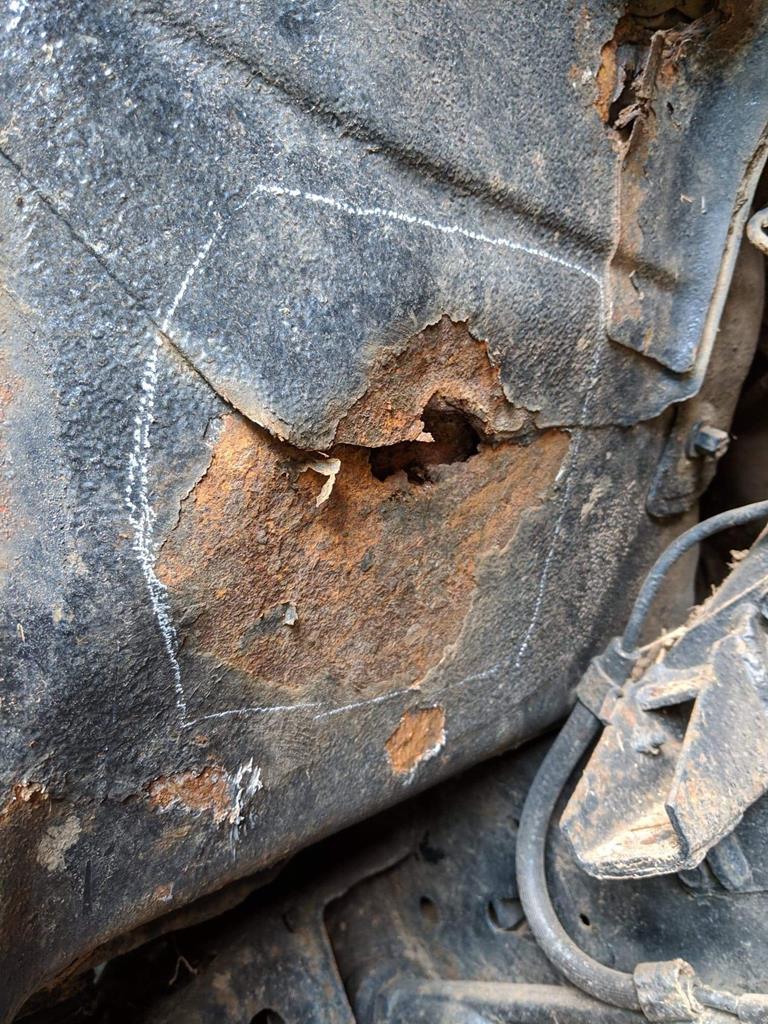 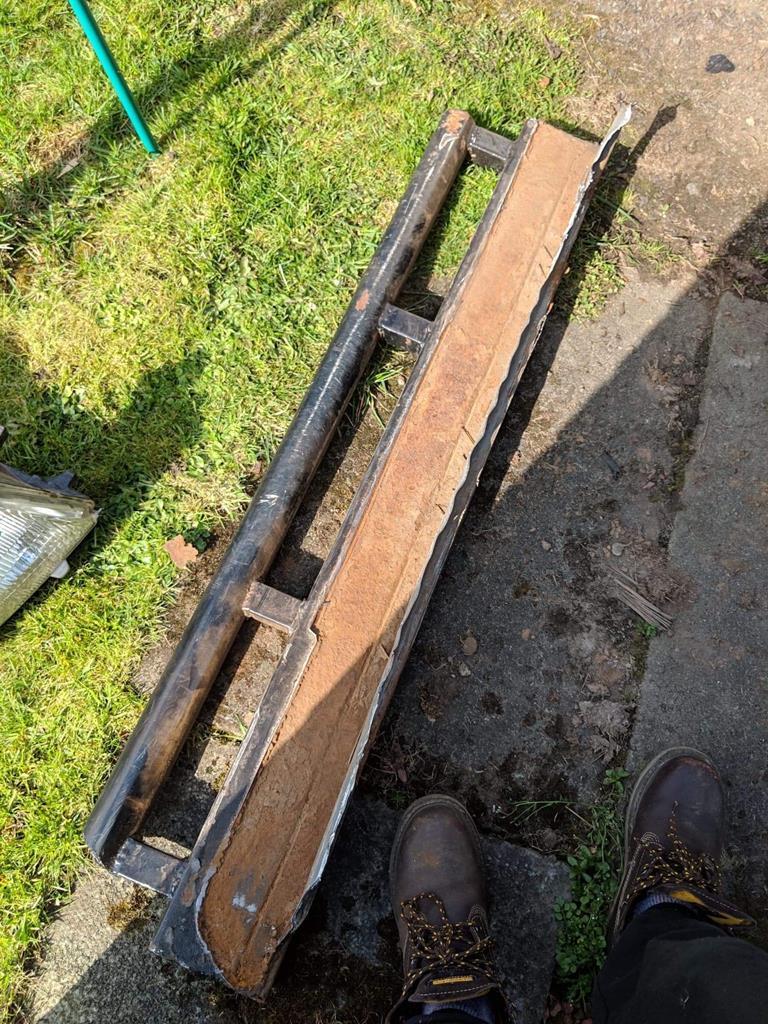 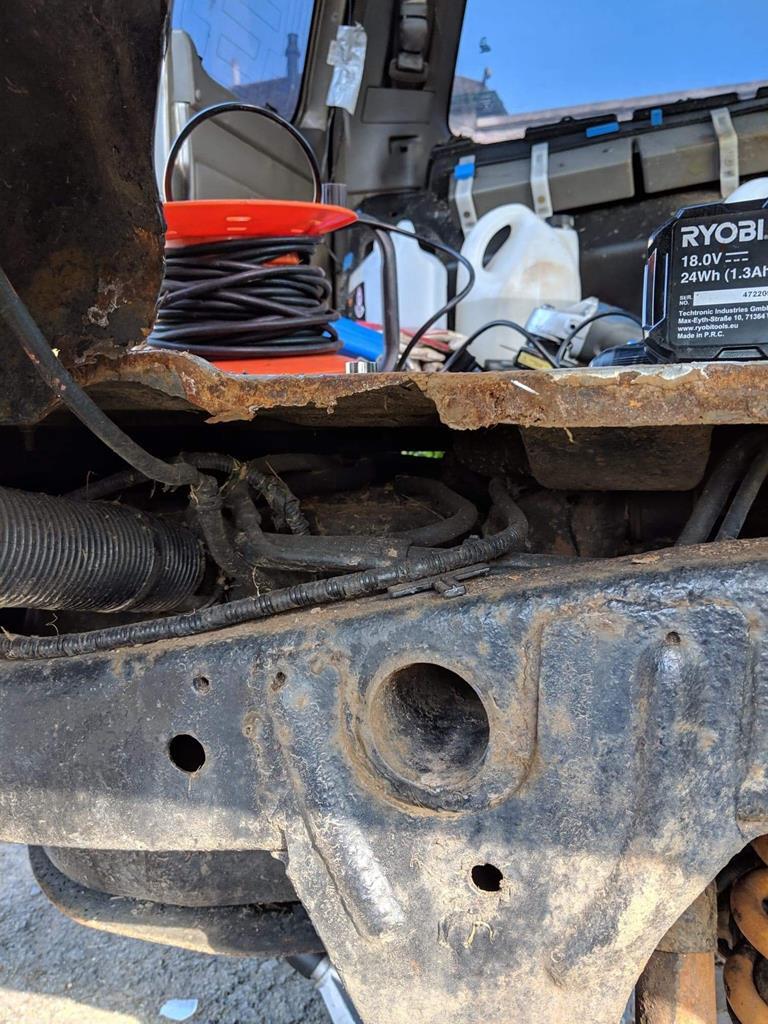 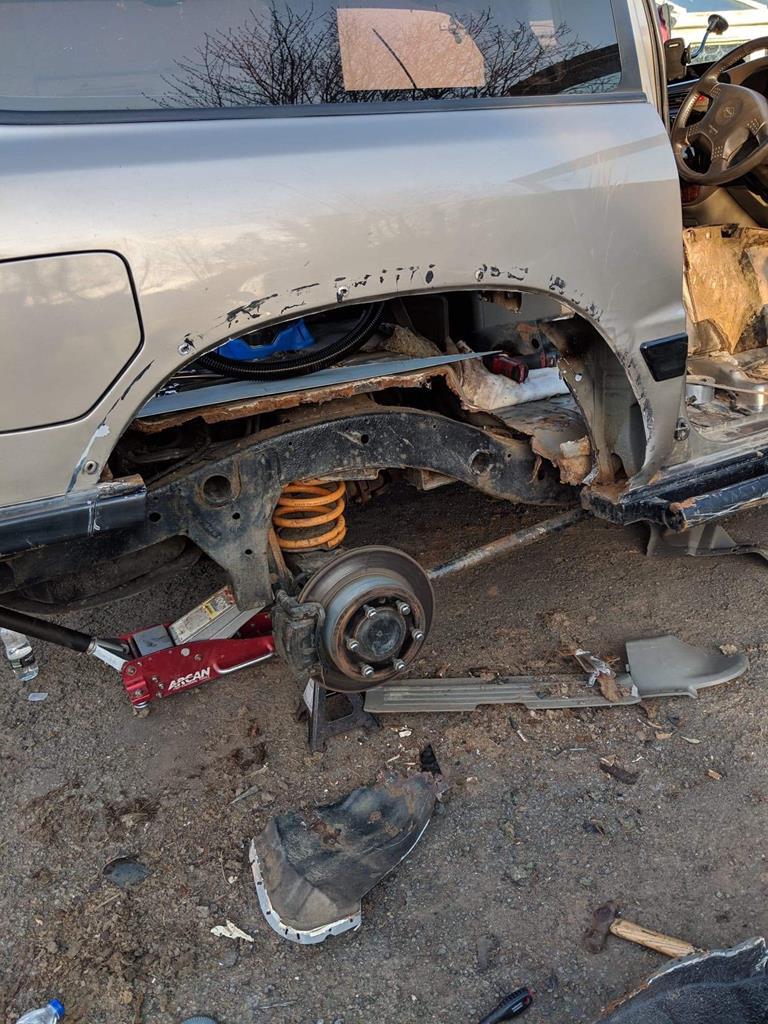 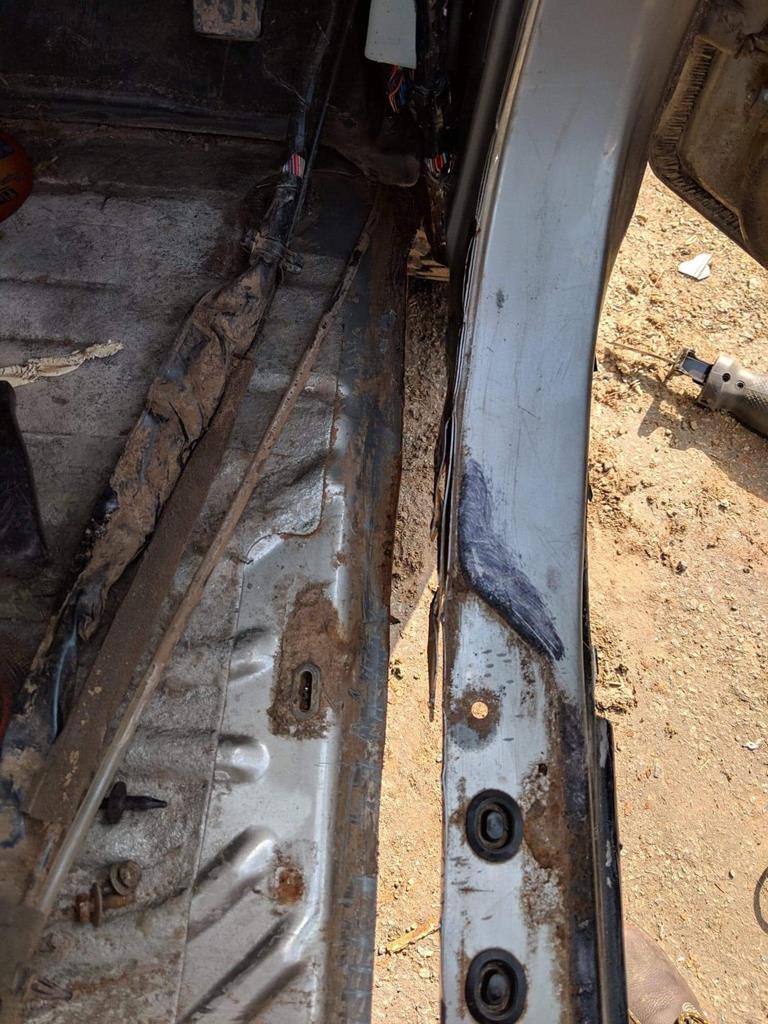 The body mounts on the patrol, originally would also have tied into the sills, these look like they rusted away, and then never got tied into the box section when the previous owner done the work... 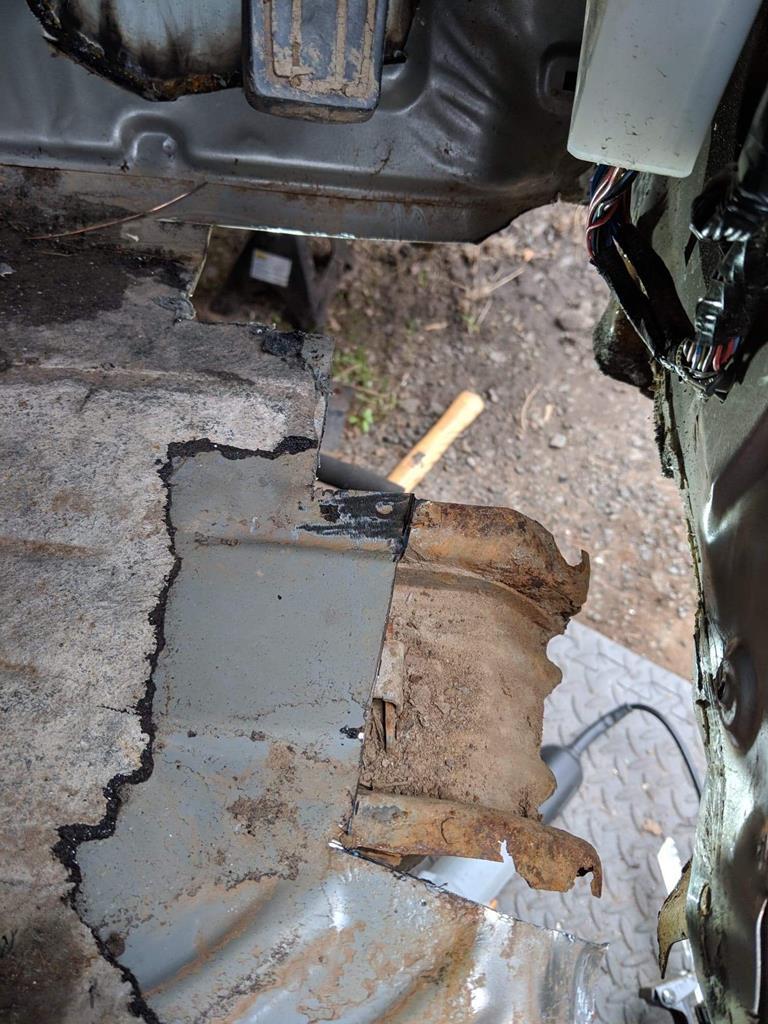 I did make a mistake and not brace the shell before making all these cuts, so I will have some adjustment to do on the door to get it to stop catching so much on the door latch, fortunately it’s more an off-road toy than a show car, but I’d still like to sort it as best I could.... |
| |
|
|
keyring
Part of things
Posts: 913
Club RR Member Number: 47
|
|
Apr 27, 2019 21:04:55 GMT
|
So I’ve not been on the forum in a while, that whole time home actually I think, in between courses for work, getting an offer accepted on my first house (hopefully get the keys on the 17th may all going well) i decided to take the wooden storage box out the back out the patrol, and see if there was any hidden rust, I already knew the box section sill needed removed and sorted, and the outer rear arch had a bit of rust along with a hole from rubbing with bigger tyres... The rust was a little worse than expected... 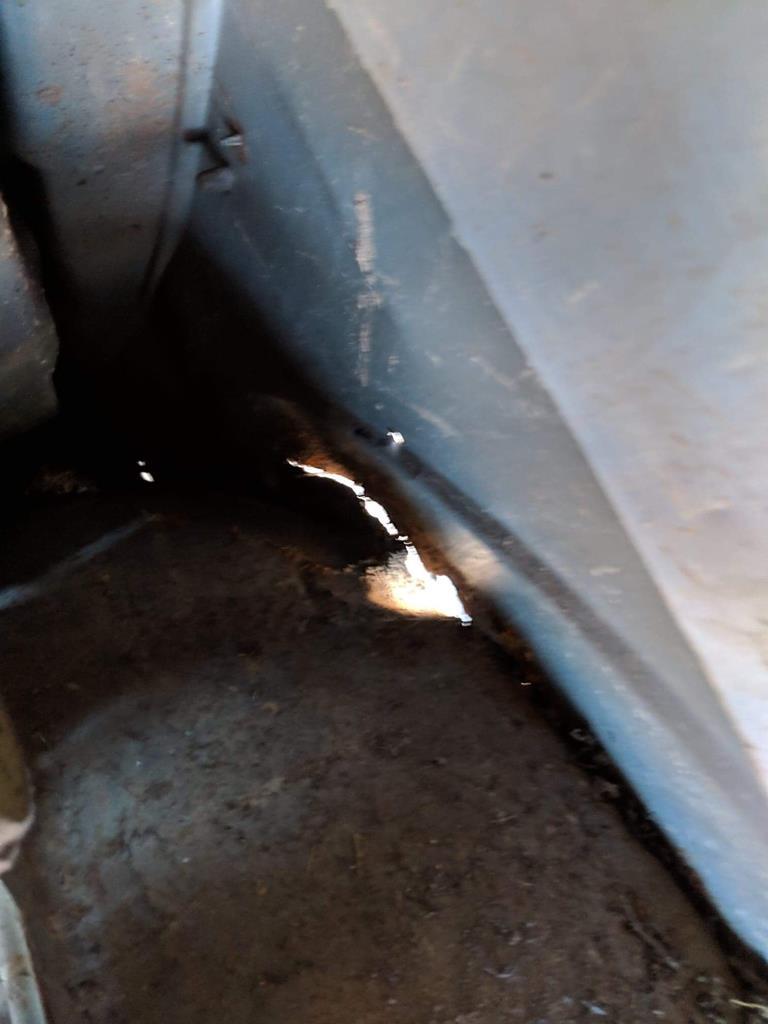 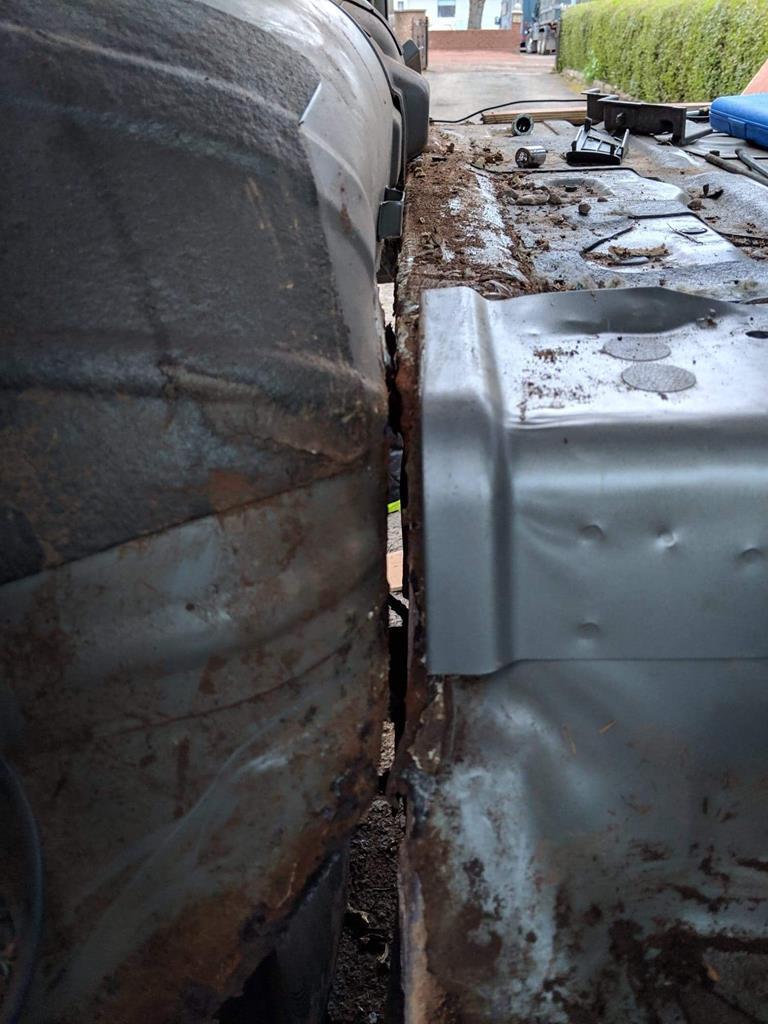 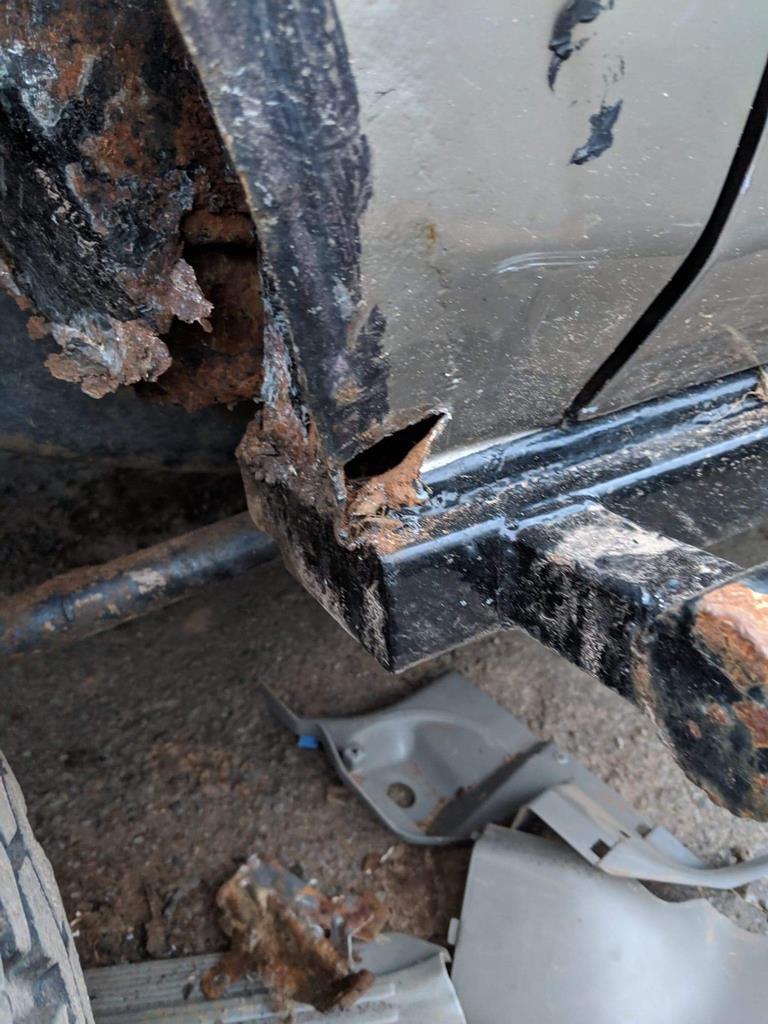 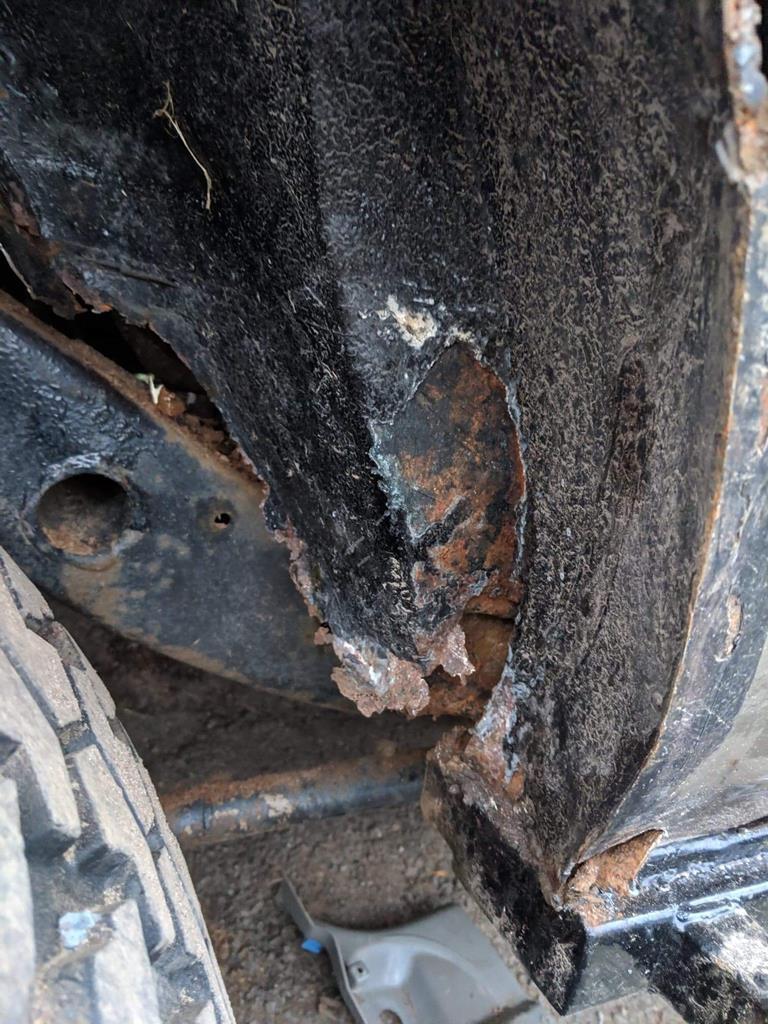   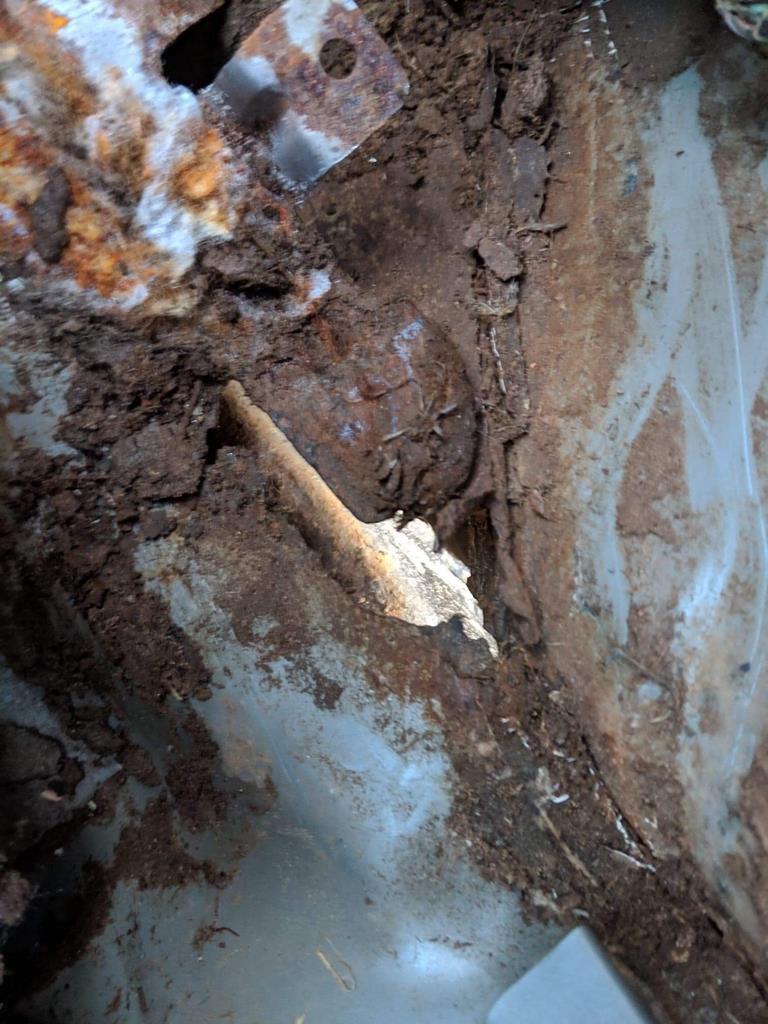 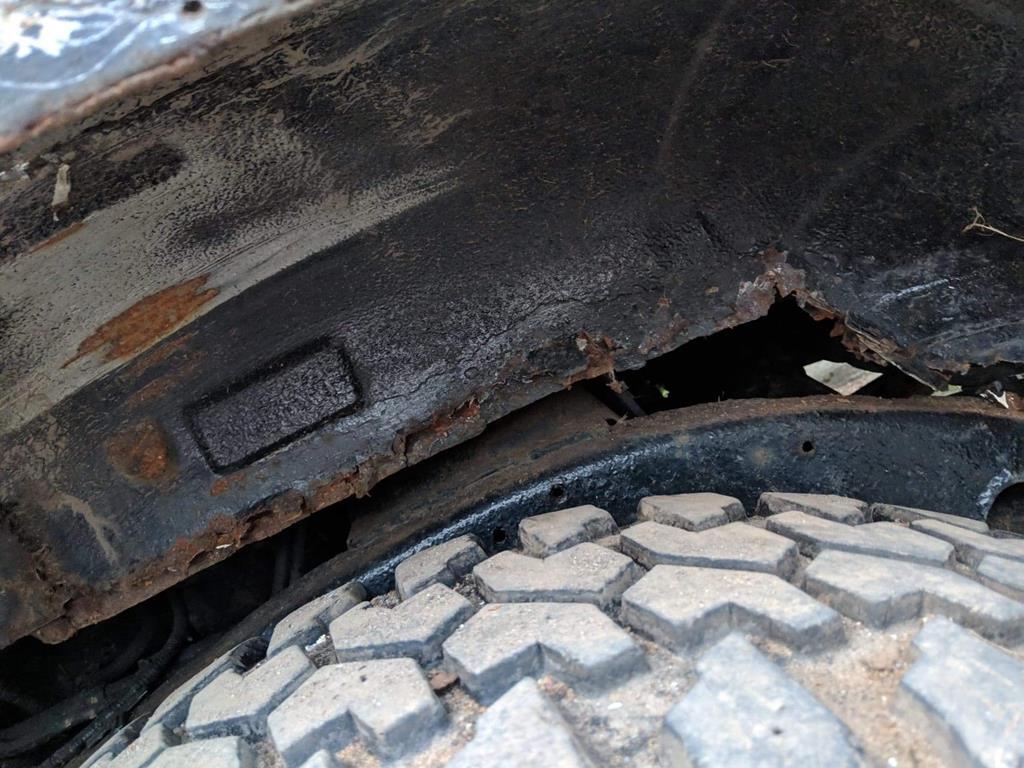 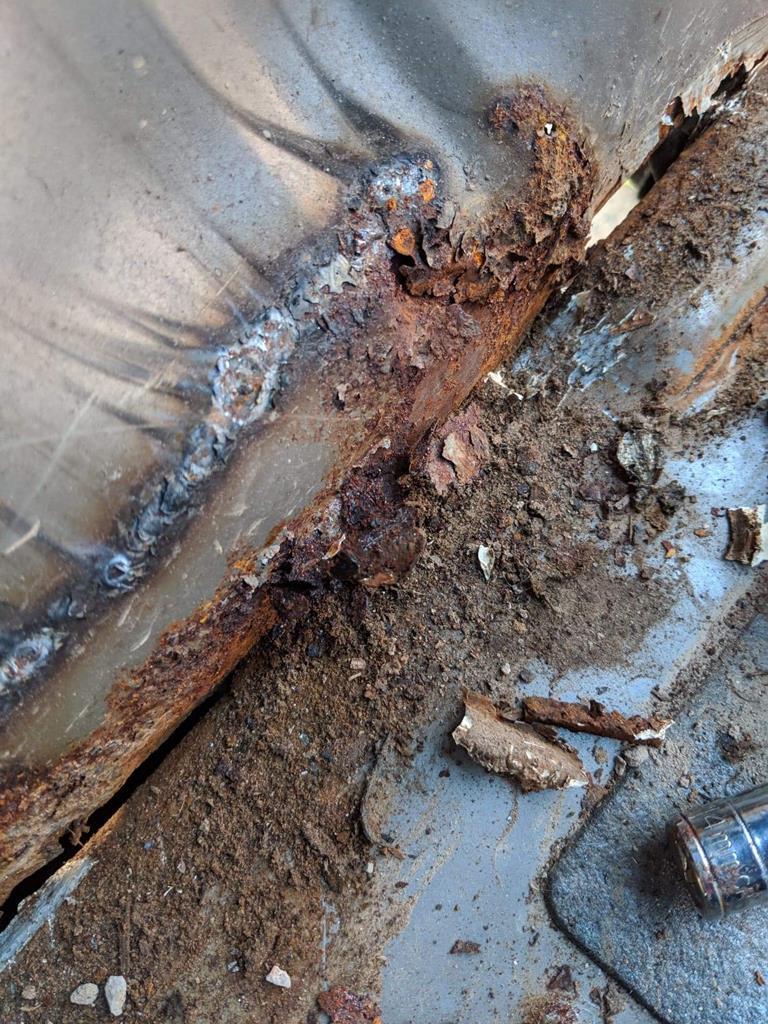 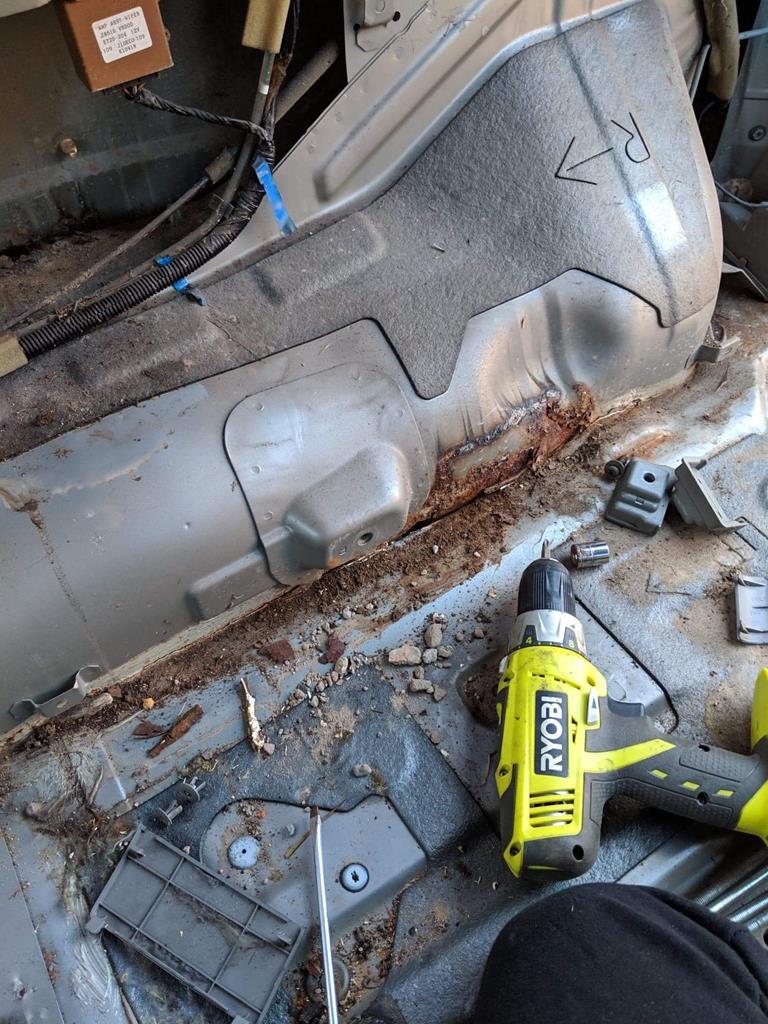 As you can see the inner rear arch was hidden, and worse than expected, there’s also a fair bit of mud trapped in places, which would hold water against the panels (it is used for offroad, and the previous owner used it offroad too) This was along the inner sill to the floor (drivers side) 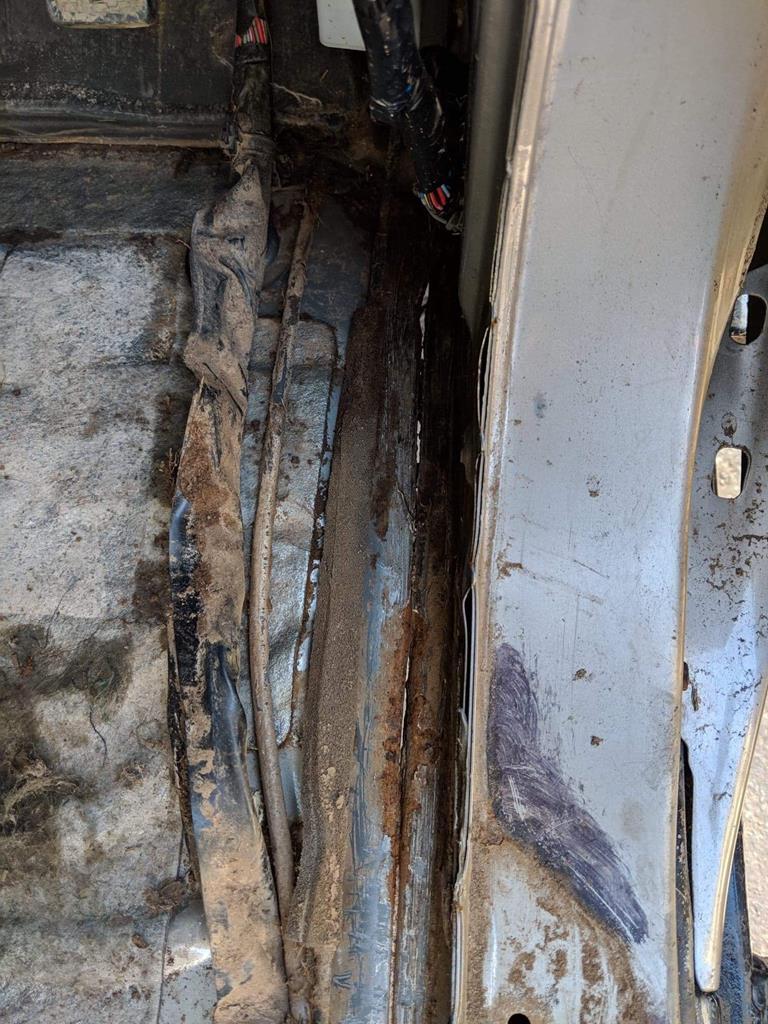 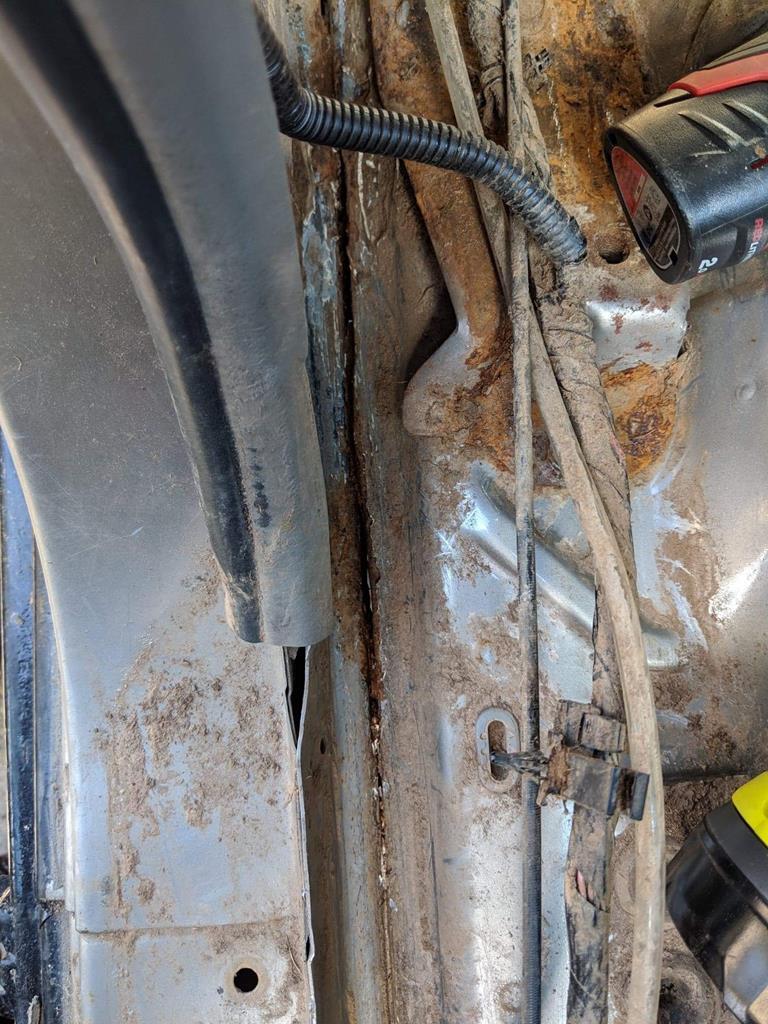 |
| |
|
|
keyring
Part of things
Posts: 913
Club RR Member Number: 47
|
|
Apr 27, 2019 20:41:10 GMT
|
|
Again it’s been a while since I’ve been on the forum, but I done a lot of welding to the patrol last time home, it made me wish even more than ever that I had even a fraction of the skill you have! (Will try update the thread tonight/tomorrow - I’d love constructive criticism if you have the time...
Some seriously impressive work been carried out again on this, and wish carrying out sheet metal repairs on the patrol, it makes it a lot more clear and appreciative of the time you put into the work. Can’t wait to see it hit with paint!
|
| |
|
|
keyring
Part of things
Posts: 913
Club RR Member Number: 47
|
New toy what to buy.....keyring
@keyring
Club Retro Rides Member 47
|
Apr 27, 2019 20:05:14 GMT
|
|
Porsch cayman? I’ve been looking at them recently, they are meant to be a great driving car!
|
| |
|
|
keyring
Part of things
Posts: 913
Club RR Member Number: 47
|
Complete mojo failurekeyring
@keyring
Club Retro Rides Member 47
|
Apr 27, 2019 19:56:56 GMT
|
Really late to this thread, and most has already been said, but I’ve had this happen to me recently, and a couple of times in the past, and I sell stuff, usually at a loss to get rid of it (stupidly) go modern, and then a few months later go back to something retro. This has happened a couple of times now, I’ve got a few projects sitting around I bought a corrado to re-shell my mk2 into, but realised I’d miss the mk2 too much, so I’ve now sold that and bought the panels for the mk2. I think everyone goes through stages of losing interest, and as others have said, you have to just take a step back, have a break and come back to it later. I’ve finally made the jump and had an offer accepted on a house, so I guess for the next few months car stuff may go on the back burner, but it’s got a big workshop, so I’m looking forward to having plenty of space to get stuck into projects now |
| |
Last Edit: May 4, 2019 11:52:15 GMT by keyring
|
|
keyring
Part of things
Posts: 913
Club RR Member Number: 47
|
|
Apr 27, 2019 19:26:07 GMT
|
|
Looks like it’s coming on extremely well!
|
| |
|
|
keyring
Part of things
Posts: 913
Club RR Member Number: 47
|
Bmw z3m roadster? keyring
@keyring
Club Retro Rides Member 47
|
Apr 12, 2019 22:13:14 GMT
|
Trouble is the coupes are more than double the price of the verts. I did notice that, it would make you think that the convertibles should be a great buy at the moment?.... |
| |
|
|
keyring
Part of things
Posts: 913
Club RR Member Number: 47
|
|
Apr 12, 2019 22:11:45 GMT
|
I’ll echo on what ChasR said.... a 306 gti-6 Should still find a decent one for around 3k but they are rising in value... a rare find, but if you can get an Astor grey one, it’ll always hold a value, and it’s a stunning colour! May even find a rallye requiring some bits and bobs within budget which are only rising in value... but it’ll be cloth seats and no mod cons, but an investment if that’s your thing  |
| |
|
|
keyring
Part of things
Posts: 913
Club RR Member Number: 47
|
Bmw z3m roadster? keyring
@keyring
Club Retro Rides Member 47
|
Apr 12, 2019 22:04:49 GMT
|
|
The roadsters are nice, but as has been said, the coupe steals it for me, they’re a car that I never tire of looking at, if the prices hadn’t went so far north, I’d have loved to own one at some point... then again, never say never I guess
|
| |
|
|
keyring
Part of things
Posts: 913
Club RR Member Number: 47
|
|
Apr 12, 2019 22:00:17 GMT
|
|
There’s just something about an extremely tidy interior with a good paintwork finish inside, I love this more and more every time I see more photos!
|
| |
|
|
keyring
Part of things
Posts: 913
Club RR Member Number: 47
|
|
Apr 12, 2019 21:49:29 GMT
|
You’ve not wasted any time with this! Those grinder wire wheels seem to do the trick, I’ve never gave one a try before, but may have to invest in a couple... The work you’ve done looks great! |
| |
|
|
keyring
Part of things
Posts: 913
Club RR Member Number: 47
|
|
Apr 12, 2019 21:38:05 GMT
|
Not been online for a few days, but certainly making headway through all the sanding and filling, paint can’t be far away now |
| |
|
|
keyring
Part of things
Posts: 913
Club RR Member Number: 47
|
Body & Paint Threadkeyring
@keyring
Club Retro Rides Member 47
|
Apr 12, 2019 21:09:17 GMT
|
Aerosol primers vary - you will be better with a good primer / filler rather than just a cheap thin primer that takes many coats to build - U Pol #5 - is a high build primer that is readily available - you could try a local automotive paint factor who will probably stock their own brand trade range + possibly one of the higher range brands - so called motorist discount centres will also stock a range but they tend to price all the products quite heavily - a quick search on Amazon / E Bay should yield some results or try the link below www.jawel.co.uk/index.php?main_page=index&cPath=155_158&zenid=9ommk6rkpv7cu7ps7e9tjm92u2Thanks for this, I ordered up the #5 I’ll hopefully use it this weekend |
| |
|
|
keyring
Part of things
Posts: 913
Club RR Member Number: 47
|
|
Apr 12, 2019 21:06:38 GMT
|
God to hear it all came through what’s it like driving on the road? |
| |
|
|
keyring
Part of things
Posts: 913
Club RR Member Number: 47
|
Body & Paint Threadkeyring
@keyring
Club Retro Rides Member 47
|
|
|
Only thing I would change is that I highly recommend using a primer over the etching primer prior to final paint Perfect, thanks for that Chris Also, do you have a recommendation for primer in a can? I'm sure you gave me one before, but I forgot to write it down, and struggled to find it |
| |
|
|
keyring
Part of things
Posts: 913
Club RR Member Number: 47
|
1995 Eunos Roadsterkeyring
@keyring
Club Retro Rides Member 47
|
|
|
At least it’s a simple fix for the MOT. Still want to own a mk1 mx5 at some point.... maybe one day! Yeah I’ll be getting it sorted tomorrow all being well. This is my 3rd never really gone silly with them but quite fancy a cage and turbo on this one DO IT  |
| |
|
|
keyring
Part of things
Posts: 913
Club RR Member Number: 47
|
Body & Paint Threadkeyring
@keyring
Club Retro Rides Member 47
|
|
|
I’ve tried using the search function in this thread, but I’ve not had much success with it, so hopefully you won’t mind, but I’m going to get the stuff sorted on the patrol before doing the big amounts of work on the golf... So I’ve got the box section sill to remove and reweld in place on one side, the rear arches to trim and plate, and a few patches on the boot floor. To check I’ve got the right products in my lists before ordering them... Zintec sheet Bilt Hamber etchweld - use this both as a weld through primer and as an etch primer? I already have a u-pol seam sealer Top coat on boot floor/outer arch is a rattle can of the colour I got made up at a local spray store, along with a can of clear Dinitrol 4941 for the inner arches, underside and sills Dinitol ml cavity wax for any cavities No reason to use an epoxy primer on top of the etch I assume, just go straight in with paint? And spray all joins with the weld through primer after cleaning it up before welding, and then spray over the weld afterwards, then seam sealer, then top coat/4941 I think that was my only concerns Thanks Only thing I would change is that I highly recommend using a primer over the etching primer prior to final paint Perfect, thanks for that Chris |
| |
|
|
|
|