


Now I'm at my PC I can reply to this in a bit more depth and use MS paint to your advantage!
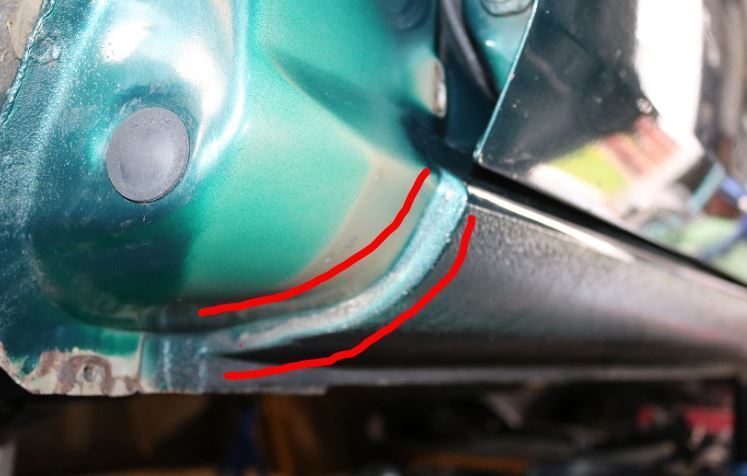
Due to the return (recess bit) for the wing, the section highlighted in red is the strongest part of the panel.
First thing is to weld on a thin bit of plate steel, maybe about an inch wide, at the deepest part of the dent along the outer (visible) radius and tug that down until the fit to the wing is more or less where it needs to be then work the rest of the 'long' part of the dent with the pin-puller. You may need to cut it off and re-position it a couple of times.
Reason for this is that if you pin-pull the shallow part and hope to bring the return with it you're gonna be there ages and pull the dent all over the shop before it looks something like it's meant to. This wastes time and makes your life more difficult (especially if you're new to this kind of repair) and the likely-hood is that you won't get it all out. See point number 2...
The pin-puller is unlikely to have the balls to pull that return edge out and will either keep slipping off or pull a bunch of holes in the sill which will need MIGing up afterwards. The other thing is that the force required to pull the panel back is concentrated on the point of the pin which will put a series of nipples in the panel before it brings the whole lot out (if it ever does).
And as the Rothenberger type dent pullers like you see on eBay don't allow you to pull multiple pins at once, you're effectively using the wrong tool for the job as you need to bring that wing return edge out all together as pulling the metal uniformly leaves a better foundation for the filler work on top.
Once you have the deepest strongest bit dealt with, work your dent puller in a spiral around the dent working inwards. As the metal has stretched, by pulling the outside of the dent you are gently shrinking the shallow edges of the dent bit by bit meaning your metal is as close as possible to it's original shape. By the time you get to the centre of the dent it will have disappeared to a point where you can flash over it with a 120 grid DA pad and apply some filler.
You may notice in the video I posted earlier that the tech is tapping around the dent with tension on the pulling rig? The reason for this is that he is releasing the tension in the panel caused by the damage when it is held in the right shape by the puller.
One last tip is to keep running your hand over the shape of the repair with your fingers together and feeling for the overall shape of the metal (make sure you remove any burrs from the pins first). If you have the flat portion in the right shape and the front of the sill is sitting nicely with the wing profile when fitted then the curved, more visible part of the sill will be fairly easy to get right, even for a beginner.
Hopefully this has given you a bit of confidence with which to attack it. I've tried to give enough detail to not be vague but not too much as to make you over think it. Not easy teaching panel beating by remote!
That is really helpful and makes good sense, I was hoping to do the repair without removing the wing again because lack of space in the garage adds so much more work, but to repair your highlighted section under the wing properly clearly I have to and will do.
I ordered one of the Vevo spot weld kits with nails, washers and wire, should be delivered next week and have a Ford KA repair sill to experiment with getting the welding time for attaching the nails right before I risk burning holes in the Rover sill, I don't want to put a single hole in it if I can help it.
I started what was meant to be a simple repair on the tailgate lacquer where the badges were removed but of course once I removed the trims and rear lights I found some small spots of surface rust around bolt holes and where panels touch that need to be sorted.
I can only work on one area of the car at a time then the car has to be moved over and the garage rearranged so it could be some time before I get started on the sill.
Thanks so much for taking the time to help, I have bookmarked this thread so I can come back to it and will update here with the results, cheers again for the excellent and wise advice.

