deanh
Part of things

Posts: 47 
|
|
Sept 17, 2017 20:51:32 GMT
|
Did you follow any sort of plans when building this? Have considered trying to build one in the past but reluctant to get the kits at £300ish. Your budget of £120 sounds more appealing. You very much get what you pay for, and it very much depends on how long you want to tinker. Mine really was a pile of bit, wires and circuit boards, its knowing what to do with them that saves you the money along with access to the right tools. Can you code? Are you familiar with arduino boards and similar? C++ and G-code? Stepper motor controllers etc? If yes,you can build them for peanuts. If no, you'll need someone who can help you out. My printer is still a prototype, I've made the mistakes and learned the lessons, now I can build a much better one. The hardware is cheap, its the time and effort in getting it to work that you pay for. But, if you are serious about giving one a go, I'm more than happy to help,starting with a parts list. :-) Can't code C++ or G-code but have previously learnt HTML/CSS. An entirely different style of coding i'm sure, but I'd be able to learn. Been having a browse, yours seems to be of a similar style to the Anet A8's which has good reviews. A parts list would be good, the ones I've looked at on the reprap wiki all seem to have outdated links etc. |
| |
|
|
|
|
fad
Posted a lot
Posts: 1,781
|
|
Sept 17, 2017 20:55:19 GMT
|
|
Mine was based on an A8 but with some hardware differences and upgrades. But the A8 is a good design based on the Pusar i8.
|
| |
|
|
deanh
Part of things
Posts: 47
|
|
Sept 17, 2017 20:57:32 GMT
|
|
Gearbest have the A8 kits for sale at £115, do you reckon that'd be a good place to start?
Like you say, it's a starting point and it can be used to print upgrades for itself and make improvements.
|
| |
|
|
fad
Posted a lot
Posts: 1,781
|
|
Sept 17, 2017 21:07:29 GMT
|
|
For sure yeah. Drop me a PM and I will talk you through upgrades etc :-)
|
| |
|
|
fad
Posted a lot
Posts: 1,781
|
|
Sept 17, 2017 21:11:47 GMT
|
Gearbest have the A8 kits for sale at £115, do you reckon that'd be a good place to start? Like you say, it's a starting point and it can be used to print upgrades for itself and make improvements. FWIW the A8 board is basically an arduino RAMPS clone, with some not bad steppers, an alright extruder and a curse word frame that is a good as a base. Its a "ticks all the boxes" reprap printer that, with care and careful assembly, can give fairly good results on its own. |
| |
|
|
|
|
|
Sept 17, 2017 22:29:06 GMT
|
|
When I was looking at getting one, I think the important specs I wanted was at least a 0.05mm layer resolution and a decent print area. Seemed like a waste to spend all the time making a good 3d model, only to have it very roughly printed or not able to be done because of tiny print area.
|
| |
|
|
fad
Posted a lot
Posts: 1,781
|
|
Sept 18, 2017 6:29:12 GMT
|
When I was looking at getting one, I think the important specs I wanted was at least a 0.05mm layer resolution and a decent print area. Seemed like a waste to spend all the time making a good 3d model, only to have it very roughly printed or not able to be done because of tiny print area. Be careful of what you ask for from a 3D print. Layer resolution is important but so are many other factors. Mine will do 0.06,never tried smaller because I've never needed it. You will never, ever get perfect smooth surfaces out if a reprap printer, no matter what it boasts it can do in the marketing. As for tiny print area, mine is pretty good, 220*220*240mm on the current frame. But if you are printing an intricate model that size, at high res 0.06 and a slow print speed cos you want the accuracy, you will have to wait days for it to finish. Printing for that long is not advised really, your datum will shift with the amount of back n forth and you need to tightly control ambient temperature for the duration. I have a design for a 400*400*400mm printer, but the issue there is that anything you print that size will run out of filament before it finishes. You can't change filament mid-print without messing up your centre and knocking something out of line on this design of printer. You could use 2 in, 1 out extruders but you are still limited by the amount of material on a spool. |
| |
|
|
|
|
|
Sept 18, 2017 17:57:49 GMT
|
|
This looks really interesting, though I suspect I might have a similar issue in either thinking of something to make, or being able to translate that into a decent 3D CAD rendering.
It's interesting that you comment on the print quality, as I've been talking to people about recreating some small plastic parts. I'm looking at ways to take a mould and cast in silicon or something like that, where they were looking at a 3D scan and print. I'd commented that all the 3D printing I've seen is a bit "rough", and it seems that may well still be the case.
|
| |
|
|
fad
Posted a lot
Posts: 1,781
|
|
Sept 18, 2017 20:30:20 GMT
|
This looks really interesting, though I suspect I might have a similar issue in either thinking of something to make, or being able to translate that into a decent 3D CAD rendering. It's interesting that you comment on the print quality, as I've been talking to people about recreating some small plastic parts. I'm looking at ways to take a mould and cast in silicon or something like that, where they were looking at a 3D scan and print. I'd commented that all the 3D printing I've seen is a bit "rough", and it seems that may well still be the case. It depends on the print method. Reprap is layer on layer of melted plastic. Without further finishing the surface will be rough much in the same way as sand casting. My printer, by 3D printer standards, gives pretty good results. But it takes care and patience. It also depends on what you are printing. |
| |
|
|
fad
Posted a lot
Posts: 1,781
|
|
Sept 18, 2017 20:33:02 GMT
|
|
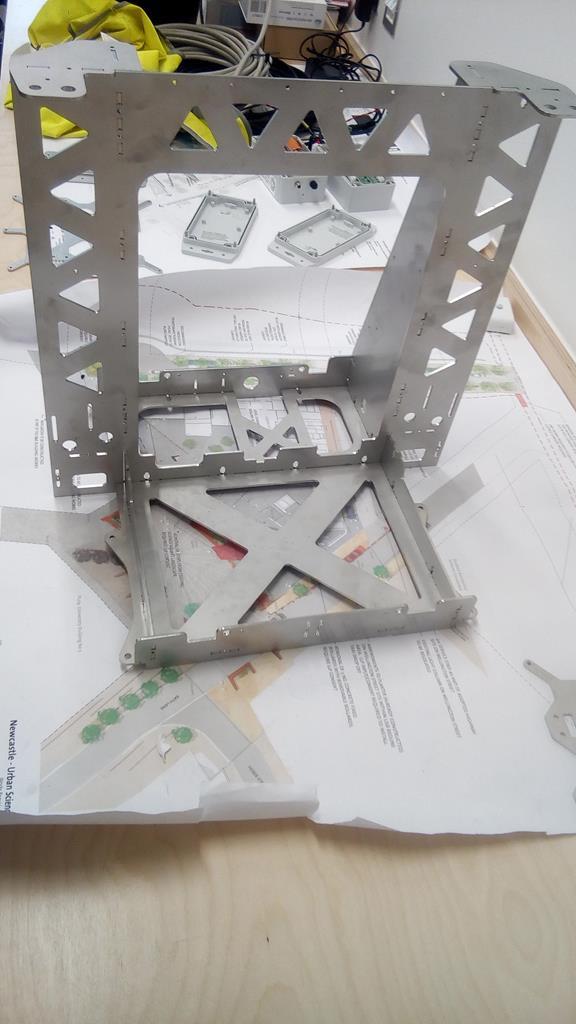
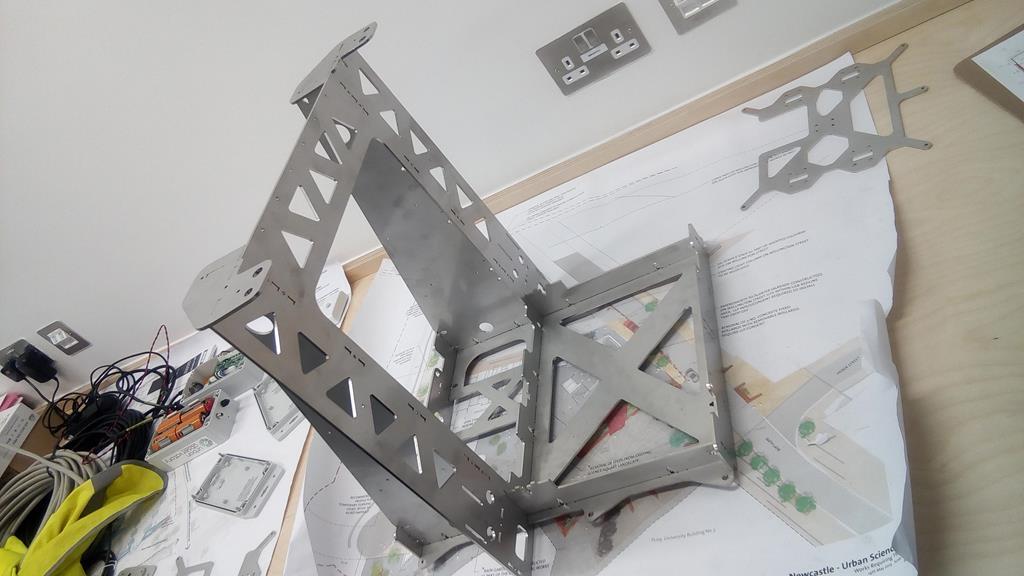
Started assembling the new stainless steel frame. Really pleased with it so far!! Looks ace!
|
| |
|
|
|
|
|
|
|
Sept 18, 2017 22:59:22 GMT
|
When I was looking at getting one, I think the important specs I wanted was at least a 0.05mm layer resolution and a decent print area. Seemed like a waste to spend all the time making a good 3d model, only to have it very roughly printed or not able to be done because of tiny print area. Be careful of what you ask for from a 3D print. Layer resolution is important but so are many other factors. Mine will do 0.06,never tried smaller because I've never needed it. You will never, ever get perfect smooth surfaces out if a reprap printer, no matter what it boasts it can do in the marketing. As for tiny print area, mine is pretty good, 220*220*240mm on the current frame. But if you are printing an intricate model that size, at high res 0.06 and a slow print speed cos you want the accuracy, you will have to wait days for it to finish. Printing for that long is not advised really, your datum will shift with the amount of back n forth and you need to tightly control ambient temperature for the duration. I have a design for a 400*400*400mm printer, but the issue there is that anything you print that size will run out of filament before it finishes. You can't change filament mid-print without messing up your centre and knocking something out of line on this design of printer. You could use 2 in, 1 out extruders but you are still limited by the amount of material on a spool. Good to know, especially from someone who's hands on with it. I didn't mean that all big print sizes had to be done at 0.05, merely, they were the two aspects I was most interested in. What do you use for clean up? I've heard a cloth dampened with Acetone is the go for "deburring" the layers. |
| |
|
|
piguin
Part of things
Posts: 136
|
|
Sept 19, 2017 0:45:10 GMT
|
Started assembling the new stainless steel frame. Really pleased with it so far!! Looks ace! Give us Piktsurssssss |
| |
|
|
|
|
fad
Posted a lot
Posts: 1,781
|
|
Sept 19, 2017 10:34:49 GMT
|
I didn't mean that all big print sizes had to be done at 0.05, merely, they were the two aspects I was most interested in. What do you use for clean up? I've heard a cloth dampened with Acetone is the go for "deburring" the layers. Oh I u8nderstand what you meant, I should have rephrased. Even at 0.2mm and a fast print, you are talking days for large objects especially if you want more than a 5% fill. Clean up depends entirely on your material. So, ABS, acetone wipe will smooth and polish it a bit. PLA doesn't respond well to anything other than sharp knives (you can't even sand it). The wood impregnated PLA behaves much like fragile wood, you can sand it, cut it etc, just be careful. Lost wax casting is my next goal, once I have built my 3D scanner. But I need a forge for that... If anyone on here is set up for casting in bronze, aluminium, brass etc please do drop me a PM. |
| |
Last Edit: Sept 19, 2017 10:35:17 GMT by fad
|
|
alx
Club Retro Rides Member
Posts: 367
Club RR Member Number: 21
|
My 3D Printingalx
@alx
Club Retro Rides Member 21
|
Sept 19, 2017 13:35:24 GMT
|
|
Full of want and awe....sadly lacking in talent and expertise :-)
AL.
|
| |
|
|
|
|
|
Sept 19, 2017 22:44:03 GMT
|
|
That frame looks good. Stainless is quite a tough to work with. I had to cut the top out of a keg and went through probably 3 or 4 times the amount of cutting discs as I would for normal steel.
I've seen others make their own using 80/20 T-Slot aluminium, 1mm pitch threaded rod and stepper motors that can do 100 steps per revolution, but I've got enough unfinished projects in the garage, before starting more!
|
| |
|
|
|
|
|
Sept 23, 2017 20:25:16 GMT
|
|
Like your new frame. Looks great.
I have a very similar 3d printer I got in kit form off ebay for about £150 plus a few notes for delivery. I really happy with it and have also made a few tweeks, modifications and printed some new parts for it.
I also have a laser cutter and use the 3d printer and laser cutter 'dream team' to help with my other hobby of designing and building model boats.
Cheap and acessible 3d printer and a cheap second hand laser cutter has been a total game changer for me. Its amazing what can be done with some computer modelling and a bit of creativity.
I also have a 3d scanner based on Photogrametry (sp?). Works ok, but to be honest, I have not really found anything that I want to scan and re-print. My stuff tends to be bespoke designs for projects I am making.
my next job for the 3d printer is to print a custom, complex, 4 branch intake manifold for the bike carbs on my skoda. I am going to print them in PLA, sand them down smooth and then use them as plugs for casing GRP intakes and then pull out the 3d printed part.
|
| |
|
|
fad
Posted a lot
Posts: 1,781
|
|
Sept 24, 2017 8:08:24 GMT
|
|
Good plan apart from sanding. Never found PLA to tolerate sanding at all. Got pics?
|
| |
|
|
|
|
|
Sept 24, 2017 10:12:45 GMT
|
I have generally found that PLA can be sanded OK, but it works best with very fine grit sand paper so that you don't overheat the surface and soften the material. I also sands MUCH better if you it it with a 'guide coat' of primer. When sanding the primer dust appear to act as a lubricant as well as a fine abrasive and again helps to stop the surface from heating a balling up. Filler primer is also a godsend for the above reason and it also helps to fill in the imperfections in layer lines. Here are a couple of pictures I have to hand - I can find a few more later if you are interested... This is a 100% 3d printed model of a boat called the Calypso. It is more finished than this at the moment if you want a better picture. The hull was printed in seven sections, tacked with CA and then 'back filled' with resin inside the hull to hopefully permanently bond the sections together. The outside was then sprayed with filler primer, sanded, painted and laquered. Not perfect but happy enough with the outcome. My 3d printer has been playing up recently so some of the prints have been less than perfect. 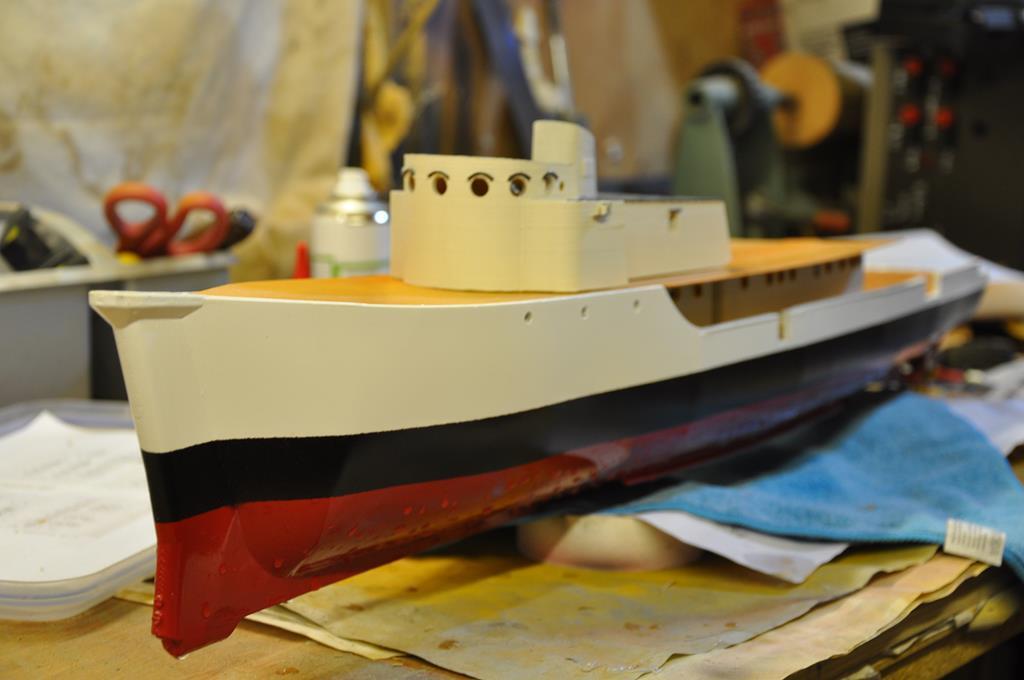 You can see that the hull is nice and smooth with no indiciation that it came from an FDM machine. Still needs finishing obvs! Here are some barrels that I modelled and printed for a 1.18th scale model of the ORCA from the film jaws I am also building. 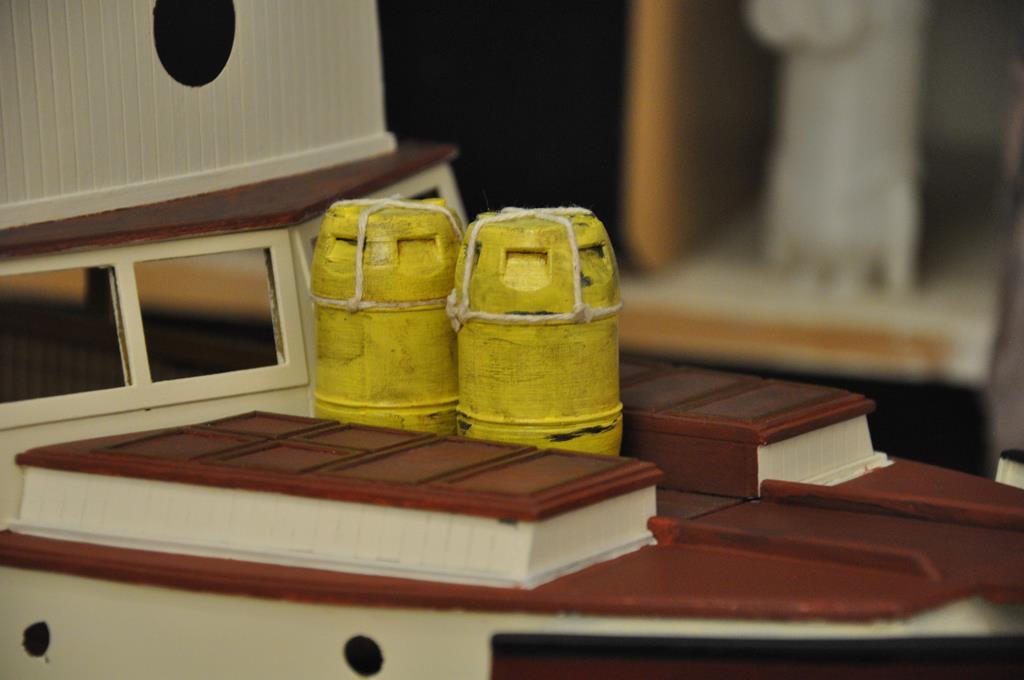 The ORCA is still a work in progress in the above picture - needs painting finishes and weathering etc but you get the idea. I didn't actually sand the barrels as I couldn't be bothered. They have a light coat of filler primer to even out the layer lines and then were hand painted and weathered etc. I used some string for the rope. Not bad for a super cheap FDM printer and no real prep work before finishing. |
| |
Last Edit: Sept 24, 2017 10:18:56 GMT by lewist123
|
|
fad
Posted a lot
Posts: 1,781
|
|
Sept 24, 2017 12:17:18 GMT
|
|
Love this. Some good info!! Will let you know how I get on with lost wax casting. Laser cutter would be a handy tool.
|
| |
|
|
|
|