tristanh
Part of things
 Routinely bewildered
Posts: 990 
|
|
|
|
I also spent a lot of time chopping the loom around before I parked the car in the corner of the shed, I removed literally yards of wiring. And EVERYthing to do with emissions, safety stuff like ABS/Airbags, and Anti theft/immobilisers. Which left the interior in an awful state, the loom like a rats nest. And some of the stuff I'd planned, like doing away with the OEM keyswitch, relocating the battery to the rear, and using a new, Solid State battery kill switch. Quite an expensive bit of gear , but nice. Real nice. And does away with a pull cable going to the outside. www.demon-tweeks.co.uk/performance/battery-isolators-master-switches/eta-911-battery-isolation-switchYou'd be shocked how often the "good old" Big Red Key master switches fail, causing cars not to start, cut out etc. For those of you not into motorsport, and rallying in particular, you have to be able to set off the inboard extinguisher(s), and knock off the engine, from outside. Usually done by 2 pull cables in the wiper scuttle area. Which have a nasty habit of seizing up.. With the ETA 911, the cable is swapped for a simple little push button. The ETA goes on the main cable from the Plus on the battery, in my case, it'll be mounted near the handbrake/gearstick area . Anyhoo, after a long time spent staring blankly at the guts of the loom , and and a Haynes wiring diagram manual for a Ka... I had it turning over on the starter. Which it hadn't done in a few years! So I got cocky , and set myself the challenge of getting it to "speak" ! It did its best to resist me... first the fuel pump was blowing fuses.. turned out it was seized. Employed my Guntering (Irish slang, similar art-form to Bodging, but with much less finesse!) skills, and botched a Mk4 Golf pump onto the Ford Pipes... now I had fuel to the rail, but despite my numerous attempts, no joy. Spinning, but no fire. Hmmm.... Spent a good while rechecking wiring , thinking , stroking my beard of wisdom..... Everything should have been ok! Popped out the injectors, and twigged they weren't spraying fuel. This didn't make sense. You know when a problem is so simple and obvious you can;t figure it? Yep... that was me. I sussed I had no pressure in the fuel rail, even though I had pressure in the pipe up to it. Turns out I had the feed and return mixed up! Swapped them around, prime, turn the key, and then this happened... yes, that is the ecu on a rats nest of wires in the footwell... and a campervan battery on the rear seat area with the battery cables held on with Vise Grips.... |
| |
Whether you believe you can, or you cannot, you're probably right.
|
|
|
|
tristanh
Part of things
Routinely bewildered
Posts: 990
|
|
|
|
So that was on the inner, Ford injectors. And the plan was to be able to use either Ford or Gixxer. The problem there, is that the Gixxer doesn't have a fuel pressure regulator on the rail, and hence no return pipe. Rather it controls the pressure, to 43psi , at the fuel pump. You can't just connect up the supply from the Ka pump, as it would just give out it's best, which could be anything, even 100 psi . So a bit of Guntering (again!) and I hung an adjustable fuel pressure regulator onto it.  Crude, I know, but it worked enough to let me start and run the engine on Gixxer injectors. I hadn't a gauge to check the pressure though. And it's not the nicest way to plumb it. I drilled and tapped into this brass bung in the end of the fuel rail, and screw a barbed fitting into it. This will give me a return line, to go from there to the FPR. 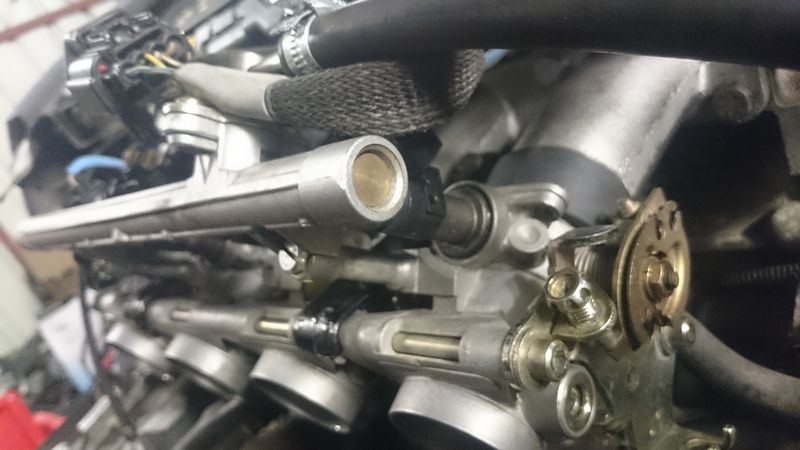 |
| |
Whether you believe you can, or you cannot, you're probably right.
|
|
|
|
|
|
|
|
Great stuff and I love the ''Guntering''!
|
| |
Last Edit: Feb 4, 2017 0:51:37 GMT by Woofwoof
Still learning...still spending...still breaking things!
|
|
tristanh
Part of things
Routinely bewildered
Posts: 990
|
|
|
|
So after that last update, there was a bit of a hiatus with work, life, other projects in the way. I made a promise to myself that this had to be back together before I went back to my mk1 project. Finally got a lot of other, boring, grown-up stuff sorted, so here goes again. Going chopping off some unnecessary metal to add lightness, finish welding the seat mounts and cage. Then paint the interior.  I had a long overdue few days "holidays" to take, so installed the Ka in the workshop, a lot easier do stuff. |
| |
Whether you believe you can, or you cannot, you're probably right.
|
|
tristanh
Part of things
Routinely bewildered
Posts: 990
|
|
|
|
I had reservations about the seat mounts, my stumpy frame left me very far forward and close to the windscreen. A rethink was needed. So I dropped and extended the steering column, and as a result was able to push my seat back and down a fair bit. And the navigators I had reservations about the seat mounts, my stumpy frame left me very far forward and close to the windscreen. A rethink was needed. I wanted to dropand extend the steering column, and as a result push my seat back and down a fair bit. And the navigators seat, even further and lower. This is to help us not elbow each other, and I feel safer. The driver's side, I bought a standard rally seat mount tubular kit from the me go lower. Hypothetically I could have bolted to the floor, but in case I ever land on a rock or similar there's a bit of room for the bang! The rectangular profile would compress if I just bolted right through, so that wasn't good enough. And if I put nuts in under the top wall, they'd be too far in to weld, plus I would only be relying on 2mm steel to support the seat. Bit of a think, down to Mectec.ie in Tynagh and run off a few threaded bushes on the Lathe. 14mm shank with a 16mm "top hat" further and lower. This is to help us not elbow each other, and I feel safer. The driver's side, I bought a standard rally seat mount tubular kit from Grp4 Fabrications in Galway, the navigators side I used 60x25mm rectangular profile as it let me go lower. Hypothetically I could have bolted to the floor, but in case I ever land on a rock or similar there's a bit of room for the bang! The rectangular profile would compress if I just bolted right through, so that wasn't good enough. And if I put nuts in under the top wall, they'd be too far in to weld, plus I would only be relying on 2mm steel to support the seat. Bit of a think, down to Mectec.ie (mate's engineering shop) and run off a few threaded bushes on the Lathe. 14mm shank with a 16mm "top hat"  Drill the seat profiles from the bottom and drop in the bushes, bolt in to keep them square     Flip over and hey presto. Strong, safe, and loading both skins of the metal.  And weld the profile to the inner sill, tunnel and floor.   |
| |
Whether you believe you can, or you cannot, you're probably right.
|
|
tristanh
Part of things
Routinely bewildered
Posts: 990
|
|
|
|
While I was welding, I filled a scatter of holes in the floor, a couple of cracks and areas that were distorted, and added some seam welds to the two original seat rails. They provide a lot of the lateral floor strength.  I also welded in a transverse "dash bar", again for side impact protection, and it gave me something to tie the original floppy steering column to. Before dropping in the dash bar, I tacked on 4 short 6mm studs, they'll be handy to either tie stuff up to and as earth points for the electrics.   Now that took most of the day! Measure once, twice, dry fit, recheck, adjust, remeasure.... Tack, check, measure... And weld. |
| |
Whether you believe you can, or you cannot, you're probably right.
|
|
tristanh
Part of things
Routinely bewildered
Posts: 990
|
|
Feb 11, 2017 11:19:57 GMT
|
I annoy myself sometimes. Regularly. Quite a bit... Actually I just annoy myself. Reason for the above, I wasn't happy (spot the recurring theme here...?) with the seat belt / 6 point harness mounts. Especially since I moved the seats back. and the ones under the seats, known as crotch straps, were only eyes bolted to the floor with a washer under them. Safety is paramount... Quick call to Torsten in Grp4 Fabrications in Galway, and the following day DPD delivered some shiny new mounts. And everyone likes shiny, right?  Refit the seats and mounts, yet again... Mark and drill the floor.  Spreader plates, 2mm steel, and tagged to the floor and a chassis structure.  Another "15 minute job" that took all morning. I fitted new eyelets to reinforced plate in the tunnel area too. The sill ones pick up on the original seat belt mounts  As I keep banging on, I moved the seats back.  Pic above, the drill bit is the oem seat mount bolt. The drift is the rally seat mount hole when I got the car. The pen is where I moved it to, and the funky lightweight door handle where it is now. After that, lots of other boring stuff, including filling more holes, bit of rust repair and running a few welds here and there where I reckon the strength was needed. |
| |
Whether you believe you can, or you cannot, you're probably right.
|
|
tristanh
Part of things
Routinely bewildered
Posts: 990
|
|
Feb 11, 2017 11:28:08 GMT
|
Lots of steel added the last couple of days, so only natural I decided to pick up the angry-grinder and chop some out! Lol  From here  That was steel in the rear "door card" area. Of course, running a grinder through steel always leaves a nasty sharp edge, ripe for taking lumps out of fingers  I could have tried filing it, or glueing some beading on, but I said I'd try another idea, which would also add a bit of strength to the thin metal. Take a bit of scrap square bar lying in the corner, cut a couple of slots in it...  Feed it over the edge, and tease it in a few degrees  And gradually bend over the edge, a few degrees at a time, all along the cut out.  Patience is a virtue, as is thinking of putting more slots, at angles etc to access awkward places. End up with this.  I'll win no prizes, but the sharp edge is tucked out of harms way and the fold adds strength without tacking on more metal. Down to stripping the last of the underseal from the front footwell area, and trying to figure out how to mount the pedal-box. I have a plan... |
| |
Whether you believe you can, or you cannot, you're probably right.
|
|
tristanh
Part of things
Routinely bewildered
Posts: 990
|
|
Feb 12, 2017 18:52:16 GMT
|
|
Found more welding to do, light at the end of the tunnel now I think... Or maybe that's more underseal burning.... Re the pedal-box. It seems I can have pedals, or steering. Not both. I'm thinking if I wedge the throttle open, and use the handbrake, I'll manage clutchless gear changes.
Who needs pedals anyway.
|
| |
Whether you believe you can, or you cannot, you're probably right.
|
|
chubz
Part of things
Posts: 339
|
|
Feb 12, 2017 18:55:59 GMT
|
|
This is an awesome little build, cant believe iv not seen it before now...
|
| |
|
|
|
|
tristanh
Part of things
Routinely bewildered
Posts: 990
|
|
Feb 12, 2017 18:58:31 GMT
|
You may have noticed I call the angle grinder the "angry grinder". There's a reason.  Brilliant at removing seam sealer, but deadlier than rabies. Especially when you're upside in the footwell, cleaning into a corner and it "digs in" and jumps out of your hands...  Got jammed under the front bulkhead as I was lying in there, cleaning seam sealer. Literally jumped out of my hands, knocked off my safety glasses. Effing thing stayed on too, I had to grab it as it was skittering around and turn it off. Not gonna lie, it was pants wettingly frightening. Just a reminder folks, even though we do this for "fun", it can have risks. |
| |
Whether you believe you can, or you cannot, you're probably right.
|
|
tristanh
Part of things
Routinely bewildered
Posts: 990
|
|
Feb 12, 2017 19:02:58 GMT
|
This is an awesome little build, cant believe iv not seen it before now... Kind words indeed, though it's well down on awesome compared to most here! Thanks. |
| |
Whether you believe you can, or you cannot, you're probably right.
|
|
chubz
Part of things
Posts: 339
|
|
Feb 12, 2017 19:17:33 GMT
|
I think it takes my fancy a bit more as i have a mk5 5 door ghia with a puma engine lol... i had it in my mk5 zetec-s for a couple of years but this clean shell came up cheap and local, so, yeah... i have a slight sleeper now  liking the carbs in the Ka idea altogether, it going to be nippy to say the least good to see your doing all the work yourself too, fair play. |
| |
|
|
tristanh
Part of things
Routinely bewildered
Posts: 990
|
|
Feb 12, 2017 19:36:43 GMT
|
|
Well, two reasons, I enjoy it, and I'm poor! 😂
I always find I have my own take on things too, so if someone else did it, I'd only end up redoing it anyway..
|
| |
Whether you believe you can, or you cannot, you're probably right.
|
|
k1664
Part of things
Posts: 37
|
|
Feb 12, 2017 22:29:19 GMT
|
|
I'm not so keen on "angry grinders" either since mine took a liking to my leg, fortunately it cauterised as it cut so there wasn't too much blood.
Actually it didn't hurt too much either... until they poked a needle in it, then I didn't feel so good.
|
| |
|
|
|
|
|
|
|
|
I'm guessing your mate Brian is the same Brian I've chatted to via the ClubGTi forum (can't imagine there's too many other Brian's casting random engine parts for fun) the guy is a legend!
|
| |
|
|
tristanh
Part of things
Routinely bewildered
Posts: 990
|
|
|
|
I'm guessing your mate Brian is the same Brian I've chatted to via the ClubGTi forum (can't imagine there's too many other Brian's casting random engine parts for fun) the guy is a legend! Lol, same man, I recognised your username too! |
| |
Whether you believe you can, or you cannot, you're probably right.
|
|
tristanh
Part of things
Routinely bewildered
Posts: 990
|
|
Mar 12, 2017 18:33:08 GMT
|
 Rust hidden under seamsealer in the corners of the front footwells, dug out and welded up. Not the prettiest job, but effective. Which led to adding a few more stitch welds across the front floor.  The original pedal box, in it's original position. Simple, effective(ish), fits in place, a quick bolt on job. Obviously I couldn't have that.  Pokes out through here into the bay, and is linked to the master cylinder and servo, which resides on the passenger side, via a cross linkage. All very similar to a Mk1 Golf. Junking all this came about from me being a stumpy fc.uker who couldn't comfortably reach the pedals from a rally seat. I thought long and hard, but the standard set-up just couldn't really be made work. Soooooooo.... While the competition pedal box was a whole extra headache I could have done without, it has several advantages. 1. I save an ass-load of weight, by junking the cross linkage and servo. 2. I free up valuable space in the bay, which will make it easier to get hot air out and actually work on the darn thing. 3. The standard master cylinder is mounted terribly, even with extra bracing it flexes around a lot. 4. I will get better feel from the brakes without the servo, admittedly at the expense of greater pedal pressure required. 5. Now I can easily swap different sizes of cylinders to get the front to rear brake performance I want, especially if I swap different calipers, disc sizes, change from rear drums to discs etc. The main disadvantage is.... The steering column and steering shaft doesn't appear to fit now.  |
| |
Whether you believe you can, or you cannot, you're probably right.
|
|
tristanh
Part of things
Routinely bewildered
Posts: 990
|
|
Mar 12, 2017 18:37:58 GMT
|
 Which could be a bit of a problem. Original steering column mounting. Looking scared.  No going back now...  weight reduction getting out of hand....lol  I hope you lot aren't finding this too boring? If so I can skip until something interesting happens, gang? A lot of sitting in the seat, with foam behind the pedals and me raising, lowering, moving back, forward, left, right... And I decided on the final resting place for the bias pedal box. *warning *... The following post contains imagery of extremely "winging it" metal fabrication. Proceed at your own risk. |
| |
Whether you believe you can, or you cannot, you're probably right.
|
|
|
|
|
Mar 12, 2017 18:43:06 GMT
|
|
No, keep going... it's all an interesting read!!!
|
| |
|
|
|
|


